
Users Manual - English
Page 4
... TROUBLESHOOTING 110 FIRST NEEDLE DROP POINT 112 PATTERNS (PROGRAMMED IN MACHINE) 114 PATTERNS (MEMORY CARD) 116 2 EMBROIDERING 87 EMBROIDERY 87 PREPARATION BEFORE SEWING 89 Fitting embroidery unit 89 Inserting memory card 90 Set fabric to embroidery frame 90 Fitting embroidery frame 91 HOW TO SELECT AND SEW PATTERN 92 In case of "Character" card 92 How to...
... TROUBLESHOOTING 110 FIRST NEEDLE DROP POINT 112 PATTERNS (PROGRAMMED IN MACHINE) 114 PATTERNS (MEMORY CARD) 116 2 EMBROIDERING 87 EMBROIDERY 87 PREPARATION BEFORE SEWING 89 Fitting embroidery unit 89 Inserting memory card 90 Set fabric to embroidery frame 90 Fitting embroidery frame 91 HOW TO SELECT AND SEW PATTERN 92 In case of "Character" card 92 How to...
Users Manual - English
Page 26
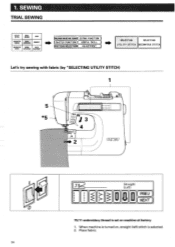
... SEWING STITCH STITCH APPLICATION ADJUSTMENT (PREPARATION BEFORE SEWING)( EXTRA FUNCTION ) ( SWITCH FUNCTION)( USEFUL SKILL ) TTERN SELECTION)( ADJUSTMENT SELECTING SELECTING UTILITY STITCH DECORATIUE STITCH Let's try sewing with fabric (by "SELECTING UTILITY STITCH) 1 kk 0 24 3 IC 2 J i I rima I (Straight (Le ft) PREU ) F( NEXT 75/11 embroidery thread is set on , straight (left) stitch is turned on machine...
... SEWING STITCH STITCH APPLICATION ADJUSTMENT (PREPARATION BEFORE SEWING)( EXTRA FUNCTION ) ( SWITCH FUNCTION)( USEFUL SKILL ) TTERN SELECTION)( ADJUSTMENT SELECTING SELECTING UTILITY STITCH DECORATIUE STITCH Let's try sewing with fabric (by "SELECTING UTILITY STITCH) 1 kk 0 24 3 IC 2 J i I rima I (Straight (Le ft) PREU ) F( NEXT 75/11 embroidery thread is set on , straight (left) stitch is turned on machine...
Users Manual - English
Page 89
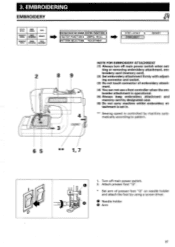
... and attach the foot by using a screw driver. 3. O 2. Turn off main power switch when set in. ** Sewing speed is controlled by designated case. (6) Do not carry machine whilst embroidery attachment is set - Attach presser foot "Q". 6 * Set arm of embroidery attachment. (4) You can not use a foot controller when the embroider attachment is operational. (5) Always keep...
... and attach the foot by using a screw driver. 3. O 2. Turn off main power switch when set in. ** Sewing speed is controlled by designated case. (6) Do not carry machine whilst embroidery attachment is set - Attach presser foot "Q". 6 * Set arm of embroidery attachment. (4) You can not use a foot controller when the embroider attachment is operational. (5) Always keep...
Users Manual - English
Page 91
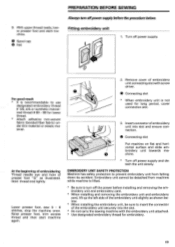
... slightly as illustrated. At the beginning of embroidering Thread needle eye and hole of embroidery unit into the slot. * Do not carry the sewing machine with screw driver. Lower presser foot, sew 5 - 6 stitches, stop the machine once. Remove cover of the embroidery unit securely into slot and ensure connection. Insert connector of presser foot "Q" as shown...
... slightly as illustrated. At the beginning of embroidering Thread needle eye and hole of embroidery unit into the slot. * Do not carry the sewing machine with screw driver. Lower presser foot, sew 5 - 6 stitches, stop the machine once. Remove cover of the embroidery unit securely into slot and ensure connection. Insert connector of presser foot "Q" as shown...
Users Manual - English
Page 101
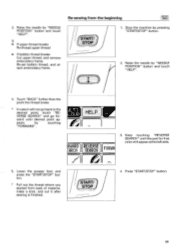
Stop the machine by "NEEDLE PnSMnN" button and much "HELP". 3. • If upper thread breaks Re-thread upper thread • If bobbin thread breaks Cut upper thread, and remove embroidery frame. HELP RWARD I REVERSE =ARCH SEARCH FORWA 3. START/ STOP 4. Keep touching "REVERSE SEARCH" until desired point ap- Raise ... go back to the desired point, touch "RE- Touch "BACK" further than the point the thread broke. * In case it after sewing is finished. Re-sewing from back of material, make a knot, and cut it will not go for first color will appear at the left side. 5.
Stop the machine by "NEEDLE PnSMnN" button and much "HELP". 3. • If upper thread breaks Re-thread upper thread • If bobbin thread breaks Cut upper thread, and remove embroidery frame. HELP RWARD I REVERSE =ARCH SEARCH FORWA 3. START/ STOP 4. Keep touching "REVERSE SEARCH" until desired point ap- Raise ... go back to the desired point, touch "RE- Touch "BACK" further than the point the thread broke. * In case it after sewing is finished. Re-sewing from back of material, make a knot, and cut it will not go for first color will appear at the left side. 5.

Users Manual - English
Page 103
Pattern "Boy" in memory 2 appears on screen. * Pattern in embroidery card can be recalled only when embroidery unit and card are set with machine. 101 N B Qy PREU NEXT MEMORY2) 0ETPIEUE2 4 N Boy CHECk PREU NEXT ra-.)l (c)(d:(_)(T)0?;il LAI ECCIEDE :n. Touch "RETRIEVE 2". 4. El5111:1 3. Recalling pattern UTILITY STITCH BASIC SEWING CARD CHARACTER BASIC SEWING OPERATION MEMORY DECORATIVE SEWING STITCH STITCH APPLICATION ADJUSTMENT 4P N Gi r l PREU NEXT MEMORY1) RERIE0E1 RETRIEVE Let's recall pattern "Boy" from memory 2. 1. Touch "NEXT". Touch "MEMORY". 2.
Pattern "Boy" in memory 2 appears on screen. * Pattern in embroidery card can be recalled only when embroidery unit and card are set with machine. 101 N B Qy PREU NEXT MEMORY2) 0ETPIEUE2 4 N Boy CHECk PREU NEXT ra-.)l (c)(d:(_)(T)0?;il LAI ECCIEDE :n. Touch "RETRIEVE 2". 4. El5111:1 3. Recalling pattern UTILITY STITCH BASIC SEWING CARD CHARACTER BASIC SEWING OPERATION MEMORY DECORATIVE SEWING STITCH STITCH APPLICATION ADJUSTMENT 4P N Gi r l PREU NEXT MEMORY1) RERIE0E1 RETRIEVE Let's recall pattern "Boy" from memory 2. 1. Touch "NEXT". Touch "MEMORY". 2.
Users Manual - English
Page 108
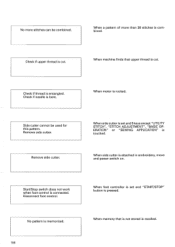
...button is touched. Remove side cutter. When side cutter is connected. Start/Stop switch does not work when foot control is attached in embroidery, move and power switch on. No pattern is memorized. 106 When foot controller is set and 5 keys except "UTILITY STITCH", "STITCH... ADJUSTMENT", "BASIC OPERATION" or "SEWING APPLICATION" is pressed. Check if needle is entangled. Check if thread is bent. When machine finds that is not stored is cut . When memory that upper thread is recalled.
...button is touched. Remove side cutter. When side cutter is connected. Start/Stop switch does not work when foot control is attached in embroidery, move and power switch on. No pattern is memorized. 106 When foot controller is set and 5 keys except "UTILITY STITCH", "STITCH... ADJUSTMENT", "BASIC OPERATION" or "SEWING APPLICATION" is pressed. Check if needle is entangled. Check if thread is bent. When machine finds that is not stored is cut . When memory that upper thread is recalled.
Users Manual - English
Page 109
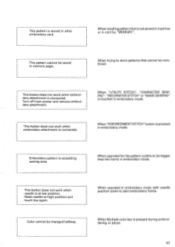
.... When recalling pattern that cannot be changed halfway. When trying to be saved in card by "MEMORY". Embroidery pattern is not stored in machine or in memory page. This pattern is pressed during embroidering or pause. 107 When operated for the pattern ...outline to store patterns that is exceeding sewing area. When Multiple color key is stored in embroidery mode. This pattern cannot be bigger than the frame in other embroidery...
.... When recalling pattern that cannot be changed halfway. When trying to be saved in card by "MEMORY". Embroidery pattern is not stored in machine or in memory page. This pattern is pressed during embroidering or pause. 107 When operated for the pattern ...outline to store patterns that is exceeding sewing area. When Multiple color key is stored in embroidery mode. This pattern cannot be bigger than the frame in other embroidery...
Users Manual - English
Page 113
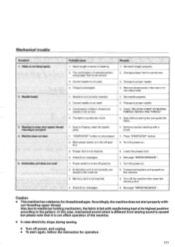
... "ERROR MESSAGE". Embroidery unit does not work Probable cause Remedy 1. Remove thread-ends in the race or inner rotary hook. 1. Correct needle is not affect operation of the machine. • In case electricity stops during sewing. • Turn off the machine then insert the memory...by cleaning with needle being kept at no feeding. 1. See page "ERROR MESSAGE". 1. Embroidery unit is set at its highest position according to the machine. 2. Caution • This machine has a detector for operation. 111 Lower the presser foot. 4. Fabric is pulled too...
... "ERROR MESSAGE". Embroidery unit does not work Probable cause Remedy 1. Remove thread-ends in the race or inner rotary hook. 1. Correct needle is not affect operation of the machine. • In case electricity stops during sewing. • Turn off the machine then insert the memory...by cleaning with needle being kept at no feeding. 1. See page "ERROR MESSAGE". 1. Embroidery unit is set at its highest position according to the machine. 2. Caution • This machine has a detector for operation. 111 Lower the presser foot. 4. Fabric is pulled too...


