

Users Manual - English
Page 2
... in this manual. 3. Use only accessories recommended by the manufacturer as a toy. The wrong plate can cause the needle to break. 14. Never operate the sewing machine with same type rated 15 watts. Never drop or insert any object into water. To disconnect, turn the main switch to be used or where...
... in this manual. 3. Use only accessories recommended by the manufacturer as a toy. The wrong plate can cause the needle to break. 14. Never operate the sewing machine with same type rated 15 watts. Never drop or insert any object into water. To disconnect, turn the main switch to be used or where...
Users Manual - English
Page 3
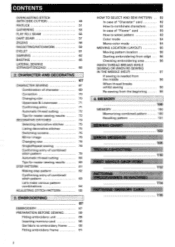
...objects. 2. CHANGING LIGHT BULB 22 3. CLEANING 23 4. Do 24 not store the sewing machine beside a space TRIAL SEWING 24 heater, iron, or other moving parts. Do not drop or hit the machine. Sewing thick material 29 er, needle, or other parts CHANGING PRESSER FOOT 18 •... SIDE APPLICATION) 39 BAR TACK 42 BLIND STITCH 45 APPLIQUE 47 SCALLOP 48 1 CONGRATULATIONS ON CHOOSING OUR COMPUTER SEWING MACHINE CONTENTS CHAPTER 1 Your machine is Sewing curve 30 required, first follow the troubleshooting table in the back of the operation manual to inspect and ad-...
...objects. 2. CHANGING LIGHT BULB 22 3. CLEANING 23 4. Do 24 not store the sewing machine beside a space TRIAL SEWING 24 heater, iron, or other moving parts. Do not drop or hit the machine. Sewing thick material 29 er, needle, or other parts CHANGING PRESSER FOOT 18 •... SIDE APPLICATION) 39 BAR TACK 42 BLIND STITCH 45 APPLIQUE 47 SCALLOP 48 1 CONGRATULATIONS ON CHOOSING OUR COMPUTER SEWING MACHINE CONTENTS CHAPTER 1 Your machine is Sewing curve 30 required, first follow the troubleshooting table in the back of the operation manual to inspect and ad-...
Users Manual - English
Page 4
...91 HOW TO SELECT AND SEW PATTERN 92 In case of...SEWING OR WHEN RE-SEWING IN THE MIDDLE (HELP) 97 If sewing is needed from the middle 98 When thread breaks whilst sewing 98 Re-sewing...65 LATERAL SEWING (STRAIGHT/ZIGZAG) 66 2. CHARACTER AND DECORATIVE 67 CHARACTER SEWING 67 ...sewing results 72 DECORATIVE STITCHES 73 Selecting decorative stitches 75 Listing decorative stitches 75 Switching screens 75 Mirror image 76 Changing size 76 Single/Repeat sewing... 78 Confirming entry of combined stitch pattern 79 Automatic thread cutting 80 Tips for neater sewing...
...91 HOW TO SELECT AND SEW PATTERN 92 In case of...SEWING OR WHEN RE-SEWING IN THE MIDDLE (HELP) 97 If sewing is needed from the middle 98 When thread breaks whilst sewing 98 Re-sewing...65 LATERAL SEWING (STRAIGHT/ZIGZAG) 66 2. CHARACTER AND DECORATIVE 67 CHARACTER SEWING 67 ...sewing results 72 DECORATIVE STITCHES 73 Selecting decorative stitches 75 Listing decorative stitches 75 Switching screens 75 Mirror image 76 Changing size 76 Single/Repeat sewing... 78 Confirming entry of combined stitch pattern 79 Automatic thread cutting 80 Tips for neater sewing...
Users Manual - English
Page 5
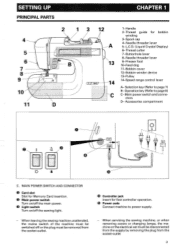
Selection key (Refer to page 8) C- Accessories compartment O 4 C. When servicing the sewing machine, or when removing covers or changing lamps, the machine or the electrical set must be disconnected from the supply by removing the plug from the socket-outlet. SETTING ...must be removed from the socket-outlet 3 Operation key (Refer to page 7) B- When leaving the sewing machine unattended, the mains switch of the machine must be switched off the sewing light. O Controller jack Insert for bobbin winding 3-Spool cap 4-Needle threader lever 5-L.C.D. (Liquid Crystal Display...
Selection key (Refer to page 8) C- Accessories compartment O 4 C. When servicing the sewing machine, or when removing covers or changing lamps, the machine or the electrical set must be disconnected from the supply by removing the plug from the socket-outlet. SETTING ...must be removed from the socket-outlet 3 Operation key (Refer to page 7) B- When leaving the sewing machine unattended, the mains switch of the machine must be switched off the sewing light. O Controller jack Insert for bobbin winding 3-Spool cap 4-Needle threader lever 5-L.C.D. (Liquid Crystal Display...
Users Manual - English
Page 8
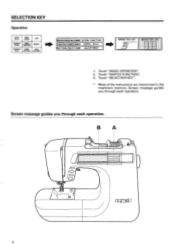
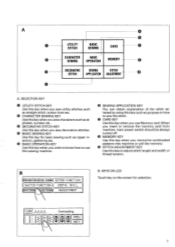
t 6 Touch "BASIC OPERATION". 2. Touch "SWITCH FUNCTION". 3. Touch "SELECTION KEY". * Most of the instructions are memorized in the machine's memory. SELECTION KEY Operation UTILITY STITCH BASIC SEWING CARD CHARACTER BASIC SEWING OPERATION MEMORY DECORATIVE SEWING STITCH STITCH APPLICATION ADJUSTMENT (PREPARATION BEFORE SEWING) EXTRA FUNCTION ( SWITCH FUNCTION ( USEFUL SKILL PATTERN SELECTION)( ADJUSTMENT OPERATION KEY SELECTION KEY O 1. Screen message guides you through each operation. Screen message guides you through each operation.
t 6 Touch "BASIC OPERATION". 2. Touch "SWITCH FUNCTION". 3. Touch "SELECTION KEY". * Most of the instructions are memorized in the machine's memory. SELECTION KEY Operation UTILITY STITCH BASIC SEWING CARD CHARACTER BASIC SEWING OPERATION MEMORY DECORATIVE SEWING STITCH STITCH APPLICATION ADJUSTMENT (PREPARATION BEFORE SEWING) EXTRA FUNCTION ( SWITCH FUNCTION ( USEFUL SKILL PATTERN SELECTION)( ADJUSTMENT OPERATION KEY SELECTION KEY O 1. Screen message guides you through each operation. Screen message guides you through each operation.
Users Manual - English
Page 9
... key for selection. A O 0 0 UTILITY STITCH BASIC SEWING CARD O CHARACTER BASIC SEWING OPERATION MEMORY 0 0 DECORATIVE SEWING STITCH _ STITCH APPLICATION ADJUSTMENT - 0 A. O BASIC SEWING KEY Use this key to sew the stitch. O SEWING APPLICATION KEY You can obtain explanation of the stitch selected by using this sewing machine. When you memorize combinated patterns into machine or call the memory. O MEMORY KEY Use...
... key for selection. A O 0 0 UTILITY STITCH BASIC SEWING CARD O CHARACTER BASIC SEWING OPERATION MEMORY 0 0 DECORATIVE SEWING STITCH _ STITCH APPLICATION ADJUSTMENT - 0 A. O BASIC SEWING KEY Use this key to sew the stitch. O SEWING APPLICATION KEY You can obtain explanation of the stitch selected by using this sewing machine. When you memorize combinated patterns into machine or call the memory. O MEMORY KEY Use...

Users Manual - English
Page 10
... press this operation does not affect operation of machine. 1040. With some sewing patterns, needle keeps it's highest position while fabric is placed at its highest position. 8 OPERATION KEY UTILITY STITCH BASIC SEWING CARD CHARACTER BASIC SEWING OPERATION MEMORY DECORATIVE SEWING STITCH STITCH APPLICATION ADJUSTMENT (PREPARATION BEFORE SEWING)( EXTRA FUNCTION SWITCH FUNCTION ( USEFUL SKILL PATTERN SELECTION...
... press this operation does not affect operation of machine. 1040. With some sewing patterns, needle keeps it's highest position while fabric is placed at its highest position. 8 OPERATION KEY UTILITY STITCH BASIC SEWING CARD CHARACTER BASIC SEWING OPERATION MEMORY DECORATIVE SEWING STITCH STITCH APPLICATION ADJUSTMENT (PREPARATION BEFORE SEWING)( EXTRA FUNCTION SWITCH FUNCTION ( USEFUL SKILL PATTERN SELECTION...
Users Manual - English
Page 11
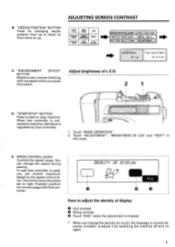
... • Touch "END" when the adjustment is regulated by the speed control lever. You can control maximum speed by foot controller. 1. BUTTON Machine sew reverse stitching with foot controller. Touch "BASIC OPERATION". 2. SPEED CONTROL LEVER Controls the speed range. ADJUSTING SCREEN CONTRAST B. UTILITY STITCH BASIC... The control lever should be set at right (Fastest) position for changing needle position from up to down or from down to machine, start or stop is finished When you change the speed during sewing. DENSITY OF DI SPLAY 7E" How to start /stop...
... • Touch "END" when the adjustment is regulated by the speed control lever. You can control maximum speed by foot controller. 1. BUTTON Machine sew reverse stitching with foot controller. Touch "BASIC OPERATION". 2. SPEED CONTROL LEVER Controls the speed range. ADJUSTING SCREEN CONTRAST B. UTILITY STITCH BASIC... The control lever should be set at right (Fastest) position for changing needle position from up to down or from down to machine, start or stop is finished When you change the speed during sewing. DENSITY OF DI SPLAY 7E" How to start /stop...
Users Manual - English
Page 12
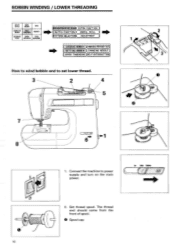
... UTILITY STITCH BASIC SEWING CHARACTER BASIC SEWING OPERATION CARD MEMORY [PREPARATION BEFORE SEWING)( EXTRA FUNCTION SWITCH FUNCTION)( USEFUL SKILL DECORATIVE SEWING STITCH STITCH APPLICATION ...ADJUSTMENT (PATTERN SELECTION) ADJUSTMENT 1 WINDING BOBBIN (CHANGING PRESSER FOOT SETTING BOBBIN CHANGING NEEDLE ( UPPER THREADING)(SELF-INTRODUCTION How to wind bobbin and to power supply and turn on the main power. Connect the machine...
... UTILITY STITCH BASIC SEWING CHARACTER BASIC SEWING OPERATION CARD MEMORY [PREPARATION BEFORE SEWING)( EXTRA FUNCTION SWITCH FUNCTION)( USEFUL SKILL DECORATIVE SEWING STITCH STITCH APPLICATION ...ADJUSTMENT (PATTERN SELECTION) ADJUSTMENT 1 WINDING BOBBIN (CHANGING PRESSER FOOT SETTING BOBBIN CHANGING NEEDLE ( UPPER THREADING)(SELF-INTRODUCTION How to wind bobbin and to power supply and turn on the main power. Connect the machine...
Users Manual - English
Page 14
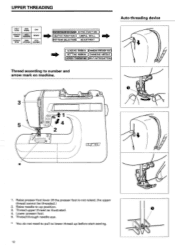
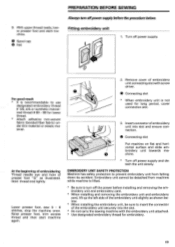
... STITCH APPLICATION ADJUSTMENT PREPARATION BEFORE SEWING) EXTRA FUNCTION SWITCH FUNCTION) USEFUL SKILL PATTERN SELECTIOJ( ADJUSTMENT 4 ( WINDING BOBBIN CHANGING PRESSER FOOT) ( SETTING BOBBIN CHANGING NEEDLE) UPPER THREADING (SELF-INTRODUCTION) Thread according to lower thread up position. 3. O 2 /// 1. Thread through needle eye. * You do not need to pull to number and arrow mark on machine.
... STITCH APPLICATION ADJUSTMENT PREPARATION BEFORE SEWING) EXTRA FUNCTION SWITCH FUNCTION) USEFUL SKILL PATTERN SELECTIOJ( ADJUSTMENT 4 ( WINDING BOBBIN CHANGING PRESSER FOOT) ( SETTING BOBBIN CHANGING NEEDLE) UPPER THREADING (SELF-INTRODUCTION) Thread according to lower thread up position. 3. O 2 /// 1. Thread through needle eye. * You do not need to pull to number and arrow mark on machine.
Users Manual - English
Page 26
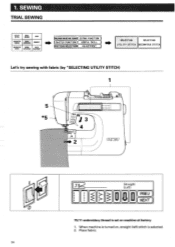
... SEWING OPERATION MEMORY DECORATIVE SEWING STITCH STITCH APPLICATION ADJUSTMENT (PREPARATION BEFORE SEWING)( EXTRA FUNCTION ) ( SWITCH FUNCTION)( USEFUL SKILL ) TTERN SELECTION)( ADJUSTMENT SELECTING SELECTING UTILITY STITCH DECORATIUE STITCH Let's try sewing with fabric (by "SELECTING UTILITY STITCH) 1 kk 0 24 3 IC 2 J i I rima I (Straight (Le ft) PREU ) F( NEXT 75/11 embroidery thread is selected. 2. Place fabric. When machine...
... SEWING OPERATION MEMORY DECORATIVE SEWING STITCH STITCH APPLICATION ADJUSTMENT (PREPARATION BEFORE SEWING)( EXTRA FUNCTION ) ( SWITCH FUNCTION)( USEFUL SKILL ) TTERN SELECTION)( ADJUSTMENT SELECTING SELECTING UTILITY STITCH DECORATIUE STITCH Let's try sewing with fabric (by "SELECTING UTILITY STITCH) 1 kk 0 24 3 IC 2 J i I rima I (Straight (Le ft) PREU ) F( NEXT 75/11 embroidery thread is selected. 2. Place fabric. When machine...
Users Manual - English
Page 27
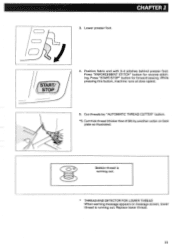
While pressing this button, machine runs at slow speed. 5. Cut threads by another cutter on message screen, lower thread is running out. Lower presser foot. Replace lower thread. 25 cD, &#.... Position fabric end with 3-4 stitches behind presser foot. Cut thick thread (thicker than # 30) by "AUTOMATIC THREAD CUTTER" button. *5. Press "ENFORCEMENT STITCH" button for forward sewing. - - • I`I I I- 3.
While pressing this button, machine runs at slow speed. 5. Cut threads by another cutter on message screen, lower thread is running out. Lower presser foot. Replace lower thread. 25 cD, &#.... Position fabric end with 3-4 stitches behind presser foot. Cut thick thread (thicker than # 30) by "AUTOMATIC THREAD CUTTER" button. *5. Press "ENFORCEMENT STITCH" button for forward sewing. - - • I`I I I- 3.
Users Manual - English
Page 34
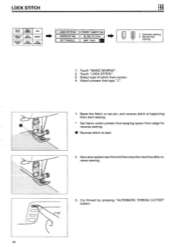
... presser foot type "J". 1. Cut thread by pressing "AUTOMATIC THREAD CUTTER" button. Sew slow speed near the end then stop the machine after reverse sewing. Touch "BASIC SEWING". 2. C ) r 32 3. Touch "LOCK STITCH". 3. LOCK STITCH UTILITY STITCH BASIC SEWING CARD CHARACTER BASIC SEWING OPERATION MEMORY OECORATME SEWING STITCH STITCH APPLICATION ADJUSTMENT LOCK STITCH 1 ZIPPER INSERTION) OVERCASTING BLIND STITCH ( BUTTONHOLE...
... presser foot type "J". 1. Cut thread by pressing "AUTOMATIC THREAD CUTTER" button. Sew slow speed near the end then stop the machine after reverse sewing. Touch "BASIC SEWING". 2. C ) r 32 3. Touch "LOCK STITCH". 3. LOCK STITCH UTILITY STITCH BASIC SEWING CARD CHARACTER BASIC SEWING OPERATION MEMORY OECORATME SEWING STITCH STITCH APPLICATION ADJUSTMENT LOCK STITCH 1 ZIPPER INSERTION) OVERCASTING BLIND STITCH ( BUTTONHOLE...
Users Manual - English
Page 38
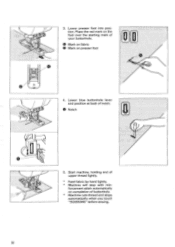
Lower blue buttonhole lever and position at back of upper thread lightly. * Feed fabric by hand lightly. * Machine will stop with rein- O Mark on fabric • Mark on completion of your buttonhole. Start machine, holding end of notch. Lower presser foot into position. O Notch • Le 5. forcement stitch automatically on presser foot Jul 0 A 4. 3. Place the red mark on the foot over the starting mark of buttonhole. * Machine cuts thread and stops automatically when you touch "SCISSORS" before sewing. 36
Lower blue buttonhole lever and position at back of upper thread lightly. * Feed fabric by hand lightly. * Machine will stop with rein- O Mark on fabric • Mark on completion of your buttonhole. Start machine, holding end of notch. Lower presser foot into position. O Notch • Le 5. forcement stitch automatically on presser foot Jul 0 A 4. 3. Place the red mark on the foot over the starting mark of buttonhole. * Machine cuts thread and stops automatically when you touch "SCISSORS" before sewing. 36
Users Manual - English
Page 49
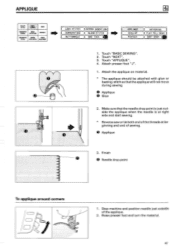
... 1. O Applique 3. Touch "APPLIQUE". 4. Make sure that the applique will not move during sewing. APPLIQUE UTILITY STITCH BASIC SEWING CARD CHARACTER BASIC SEWING OPERATION MEMORY DECORATIVE SEWING STITCH STITCH APPLICATION ADJUSTMENT ( LOCK STITCH OVERCASTING ( BUTTONHOLE ZIPPER INSERTION) ( BLIND STITCH as BAR... SCALLOP PINTUCK II GATHERING ( FLAT FELL SEAM ( DART SEAM 0 O 1. Stop machine and position needle just outside the applique when the needle is just outside of sewing. Finish O Needle drop point To applique around corners 1. Raise presser foot and turn...
... 1. O Applique 3. Touch "APPLIQUE". 4. Make sure that the applique will not move during sewing. APPLIQUE UTILITY STITCH BASIC SEWING CARD CHARACTER BASIC SEWING OPERATION MEMORY DECORATIVE SEWING STITCH STITCH APPLICATION ADJUSTMENT ( LOCK STITCH OVERCASTING ( BUTTONHOLE ZIPPER INSERTION) ( BLIND STITCH as BAR... SCALLOP PINTUCK II GATHERING ( FLAT FELL SEAM ( DART SEAM 0 O 1. Stop machine and position needle just outside the applique when the needle is just outside of sewing. Finish O Needle drop point To applique around corners 1. Raise presser foot and turn...

Users Manual - English
Page 50
... 3. Attache presser foot "N". ,00."'"ivow"4.4.401 4'104kk 1. Touch "SCALLOP". 4. Select type of stitch, the machine sews fastening stitch automatically. 0 Surface 2. Mark the line then stitch along the stitches carefully so as not to cut the...48 Touch "NEXT". 5. Trim along marked line. * At beginning of scallop stitch. 6. SCALLOP UTILITY STITCH BASIC SEWING CARD CHARACTER BASIC SEWING OPERATION MEMORY DECORATIVE SEWING STITCH STITCH APPLICATION ADJUSTMENT LOCK STITCH ( OVERCASTING ( BUTTONHOLE (ZIPPER INSERTION BLIND STITCH BAR TACK APPLIQUE SCALLOP PI NTUCK ...
... 3. Attache presser foot "N". ,00."'"ivow"4.4.401 4'104kk 1. Touch "SCALLOP". 4. Select type of stitch, the machine sews fastening stitch automatically. 0 Surface 2. Mark the line then stitch along the stitches carefully so as not to cut the...48 Touch "NEXT". 5. Trim along marked line. * At beginning of scallop stitch. 6. SCALLOP UTILITY STITCH BASIC SEWING CARD CHARACTER BASIC SEWING OPERATION MEMORY DECORATIVE SEWING STITCH STITCH APPLICATION ADJUSTMENT LOCK STITCH ( OVERCASTING ( BUTTONHOLE (ZIPPER INSERTION BLIND STITCH BAR TACK APPLIQUE SCALLOP PI NTUCK ...
Users Manual - English
Page 53
... accepts maximum of 3 ply of material by lancet. O Back side 2. Margin is attached to machine, stitch number automatically changes to clean side-cutter after every time it is used . 1. Touch "BASIC SEWING". 2. Touch "NEXT". 3. Attach presser foot "I " then 0 sew a line parallel with side-cutter. GATHERING FLAT FELL SEAM DART SEAM AID * When side...
... accepts maximum of 3 ply of material by lancet. O Back side 2. Margin is attached to machine, stitch number automatically changes to clean side-cutter after every time it is used . 1. Touch "BASIC SEWING". 2. Touch "NEXT". 3. Attach presser foot "I " then 0 sew a line parallel with side-cutter. GATHERING FLAT FELL SEAM DART SEAM AID * When side...
Users Manual - English
Page 63
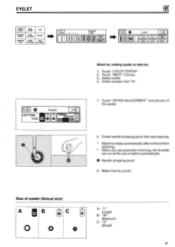
... making eyelet on belt etc. 1. "M" (Medium) C- Make hole by punch. Check needle dropping point then start sewing. * Machine stops automatically after enforcement stitching. PRE) ) I 1. "S" (Small) 61 EYELET UTILITY STITCH BASIC SEWING CARD CHARACTER BASIC SEWING OPERATION MEMORY DECORATIVE SEWING STITCH STITCH APPLICATION ADJUSTMENT St eight (Left) 8 PREU 0 NEXT [N(/ 0 Eyelet j -1 "1111"1111'11 imi 7 -,==- Touch "NEXT...
... making eyelet on belt etc. 1. "M" (Medium) C- Make hole by punch. Check needle dropping point then start sewing. * Machine stops automatically after enforcement stitching. PRE) ) I 1. "S" (Small) 61 EYELET UTILITY STITCH BASIC SEWING CARD CHARACTER BASIC SEWING OPERATION MEMORY DECORATIVE SEWING STITCH STITCH APPLICATION ADJUSTMENT St eight (Left) 8 PREU 0 NEXT [N(/ 0 Eyelet j -1 "1111"1111'11 imi 7 -,==- Touch "NEXT...
Users Manual - English
Page 65
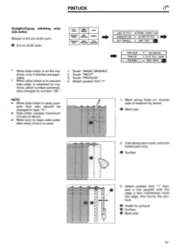
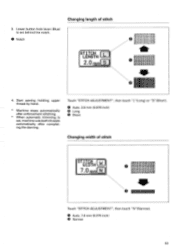
...touch "L"(Long) or "S"(Short). O Auto. 2.0 mm (0.079 inch) e Long Q Short Changing width of stitch 3. Lower button hole lever (Blue) to set , machine cuts both threads automatically after enforcement stitching. • When automatic trimming is set behind the notch. 0 Notch STITCH LENGTH 2.0 mm ..MaisfltalrlrTaYolall 0 fir IIII • ! ... "N"(Narrow). Changing length of stitch El STITCH WIDTH 7.0 min I •', • 4. O Auto. 7.0 mm (0.276 inch) • Narrow 63 Start sewing holding upper thread by hand. * Machine stops automatically after completing the darning.
...touch "L"(Long) or "S"(Short). O Auto. 2.0 mm (0.079 inch) e Long Q Short Changing width of stitch 3. Lower button hole lever (Blue) to set , machine cuts both threads automatically after enforcement stitching. • When automatic trimming is set behind the notch. 0 Notch STITCH LENGTH 2.0 mm ..MaisfltalrlrTaYolall 0 fir IIII • ! ... "N"(Narrow). Changing length of stitch El STITCH WIDTH 7.0 min I •', • 4. O Auto. 7.0 mm (0.276 inch) • Narrow 63 Start sewing holding upper thread by hand. * Machine stops automatically after completing the darning.
Users Manual - English
Page 91
... embroidery unit 1. For good result * It is not used for long period, cover connection slot. 3. Lower presser foot, sew 5 - 6 stitches, stop the machine once. Raise presser foot, trim excess thread and then start machine. Embroidery unit cannot be detached from falling down by accident. Turn off power supply and detach the unit slowly...
... embroidery unit 1. For good result * It is not used for long period, cover connection slot. 3. Lower presser foot, sew 5 - 6 stitches, stop the machine once. Raise presser foot, trim excess thread and then start machine. Embroidery unit cannot be detached from falling down by accident. Turn off power supply and detach the unit slowly...


