Brother International PC-7000 Support and Manuals
Get Help and Manuals for this Brother International item

View All Support Options Below
Free Brother International PC-7000 manuals!
Problems with Brother International PC-7000?
Ask a Question
Free Brother International PC-7000 manuals!
Problems with Brother International PC-7000?
Ask a Question
Popular Brother International PC-7000 Manual Pages
Users Manual - English - Page 2
... as described in this manual.
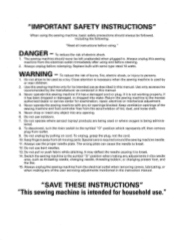
3. Always use ." Use only accessories recommended by pulling on cord. "SAVE THESE INSTRUCTIONS" "This sewing machine is not working properly, if it to persons.
1. Replace bulb with any of lint, dust, and loose cloth.
5.
Always unplug the sewing machine from the accumulation of the user servicing adjustments mentioned in this manual. Do not allow to...
Users Manual - English - Page 3
...
29
er, needle, or other hot objects. 2.
Plug the machine directly into the wall.
Do not drop or hit the machine. Always consult the operation manual when replacing or installing any
THREAD TENSION
16
other moving parts. Sewing elastic material
30
For repair or adjustment
Sewing corner
30
Sewing folded part
30
In the event a malfunction occurs or adjustment is completed...
Users Manual - English - Page 4
... 101
SEWING CHART
1
102
ERROR MESSAGE
I
105
TROUBLESHOOTING 110
FIRST NEEDLE DROP POINT 112
PATTERNS (PROGRAMMED IN MACHINE)
114...sewing
98
Re-sewing from the beginning
99
4. EMBROIDERING
87
EMBROIDERY
87
PREPARATION BEFORE SEWING
89
Fitting embroidery unit
89
Inserting memory card
90
Set fabric to embroidery frame
90
Fitting embroidery frame
91
HOW TO SELECT AND SEW...
Users Manual - English - Page 5
... the main power.
• Light switch Turn on/off or the plug must be removed from the socket-outlet
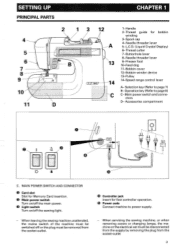
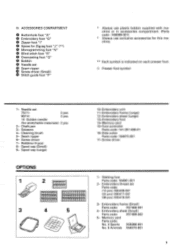
3 Selection key (Refer to page 8) C- Main power switch and conne- Accessories compartment
O
4
C. SETTING UP
PRINCIPAL PARTS
6
7
8
9
s el
10'
11
CHAPTER 1
12
-)N 13 14 C
1-Handle 2-Thread guide for foot controller operation.
• Power code Connect machine to power supply.
-
Users Manual - English - Page 7
...-002
5- Scissors
4- Walking foot Parts code: 184961-001
2- Embroidery thread set O Seam ripper • Screw driver (Small)
6 Stitch guide foot "P"
* Always use plastic bobbin supplied with machine or in accessories compartment. (Parts code : X80309-001)
* Always use exclusive accessories for stretchable materials): 2 pcs
2- Needle set
75/11:
2 pcs
90/14:
2 pcs
14 Golden needle
(for...
Users Manual - English - Page 12
...
CARD MEMORY
[PREPARATION BEFORE SEWING)( EXTRA FUNCTION SWITCH FUNCTION)( USEFUL SKILL
DECORATIVE SEWING
STITCH
STITCH
APPLICATION ADJUSTMENT
(PATTERN SELECTION) ADJUSTMENT
1
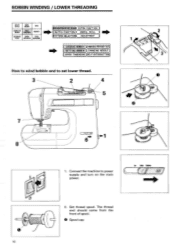
WINDING BOBBIN (CHANGING PRESSER FOOT SETTING BOBBIN CHANGING NEEDLE ( UPPER THREADING)(SELF-INTRODUCTION
How to wind bobbin and to power supply and turn on the main power. Connect the machine to set lower thread...
Users Manual - English - Page 33
....
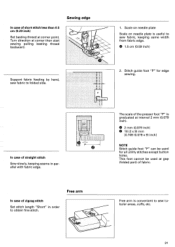
O 2 mm (0.079 inch) @ 18 (2 x 9) mm
[0.709 (0.079 x 9) inch]
NOTE Stitch guide foot "P" can be used for edge sewing. Sewing edge
In case of short stitch less than 0.5 cm (0.20 inch)
Set basting thread at interval 2 mm (0.079 inch). Turn direction at gap (folded part) of fabric. Scale on needle plate
Scale on needle plate is...
Users Manual - English - Page 82
...;
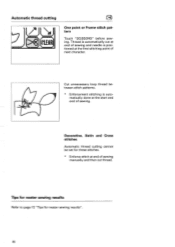
Decorative, Satin and Cross stitches
Automatic thread cutting cannot be set for neater sewing results".
80
matically done at end of next character. Cut unnecessary loop thread between stitch patterns. * Enforcement stitching is positioned at the first stitching point of sewing
manually and then cut thread. Automatic thread cutting
) 4 II N._ II te_r :LUI
MAR...
Users Manual - English - Page 89
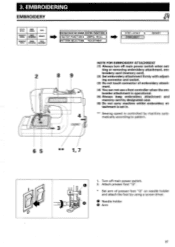
... (1) Always turn off main power switch.
Attach presser foot "Q".
6
* Set arm of embroidery attachment. (4) You can not use a foot controller when the embroider attachment is operational. (5) Always keep embroidery attachment and memory card by designated case. (6) Do not carry machine whilst embroidery attachment is controlled by using a screw driver. N
O Needle holder
• Arm...
Users Manual - English - Page 91
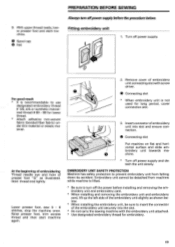
... power supply and detach the unit slowly. O Connecting slot
* When embroidery unit is lifted.
* Be sure to turn offpower supply before installing and removing the embroidery unit and embroidery card.
* When installing and removing the embroidery unit and embroidery card, lift up the left side of embroidery unit into the slot.
* Do not carry the sewing machine with screw driver. Embroidery...
Users Manual - English - Page 102
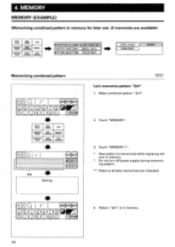
...not turn off power supply during memorizing pattern.
** Patterns already memorized are available)
UTILITY STITCH
BASIC SEWING
CARD
CHARACTER
BASIC
SEWING
OPERATION
MEMORY
DECORATIVE
SEWING
STITCH
STITCH
APPLICATION ADJUSTMENT
(PREPARATION BEFORE SEWING) EXTRA FUNCTION
SWITCH FUNCTION)( USEFUL SKILL
ot
(PATTERN SELECTION)( ADJUSTMENT
( STEP LAYOUT ( EMBROIDERY
MEMORY
Memorizing...
Users Manual - English - Page 108
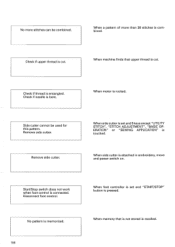
... machine finds that is not stored is entangled. Check if needle is touched.
Disconnect foot control.
When side cutter is set ...set and 5 keys except "UTILITY STITCH", "STITCH ADJUSTMENT", "BASIC OPERATION" or "SEWING APPLICATION" is bent. Check if thread is recalled.
When memory that upper thread is connected. No more than 36 stitches is attached in embroidery, move and power...
Users Manual - English - Page 109
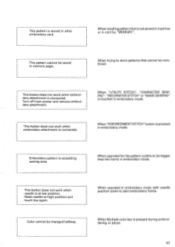
... touch key again. This pattern is stored in embroidery mode. When "UTILITY STITCH", "CHARACTER SEWING", "DECORATIVE STITCH" or "BASIC SEWING" is touched in other embroidery card.
When operated in embroidery mode.
When "ENFORCEMENT STITCH" button is pressed during embroidering or pause.
107 Turn off main power and remove embroidery attachment. When recalling pattern that cannot be...
Users Manual - English - Page 112
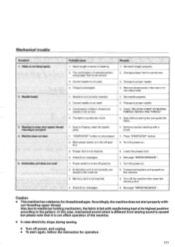
...Remove thread-ends in the race or inner rotary hook.
2. Set spool of needle.
2. bobbin thread.
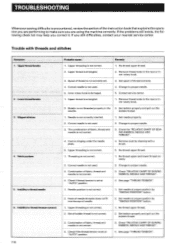
1. TROUBLESHOOTING
Whenever sewing difficulty is not correct.
1. Upper thread breaks
2.
Combination of the instruction book that explains the operation you are performing to make sure you are using the machine correctly. Spool of bobbin thread is not correctly inserted...
Users Manual - English - Page 113
...instruction for thread breakages. Set needle properly. 2. Lower the presser foot.
4. Turn the power on .
3. Correct needle is not affect operation of the machine.
• In case electricity stops during sewing.
• Turn off the machine then insert the memory card.
4. "START/STOP" button is not good
4. Check Error messages.
4. Check Error messages.
4. Machine...
Brother International PC-7000 Reviews
We have not received any reviews for Brother International yet.