
Users Manual - English
Page 4
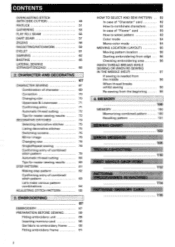
...pattern 100 100 100 101 SEWING CHART 1 102 ERROR MESSAGE I 105 TROUBLESHOOTING 110 FIRST NEEDLE DROP POINT 112 PATTERNS (PROGRAMMED IN MACHINE) 114 PATTERNS (MEMORY CARD) 116 2 CHARACTER AND DECORATIVE 67 CHARACTER SEWING 67 Combination of character 69 Correction 70 Changing size ... 62 BASTING 65 LATERAL SEWING (STRAIGHT/ZIGZAG) 66 2. EMBROIDERING 87 EMBROIDERY 87 PREPARATION BEFORE SEWING 89 Fitting embroidery unit 89 Inserting memory card 90 Set fabric to embroidery frame 90 Fitting embroidery frame 91 HOW TO SELECT AND SEW PATTERN 92 In case of ...
...pattern 100 100 100 101 SEWING CHART 1 102 ERROR MESSAGE I 105 TROUBLESHOOTING 110 FIRST NEEDLE DROP POINT 112 PATTERNS (PROGRAMMED IN MACHINE) 114 PATTERNS (MEMORY CARD) 116 2 CHARACTER AND DECORATIVE 67 CHARACTER SEWING 67 Combination of character 69 Correction 70 Changing size ... 62 BASTING 65 LATERAL SEWING (STRAIGHT/ZIGZAG) 66 2. EMBROIDERING 87 EMBROIDERY 87 PREPARATION BEFORE SEWING 89 Fitting embroidery unit 89 Inserting memory card 90 Set fabric to embroidery frame 90 Fitting embroidery frame 91 HOW TO SELECT AND SEW PATTERN 92 In case of ...
Users Manual - English
Page 7
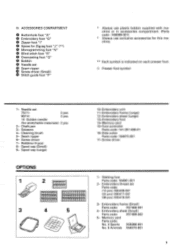
...) Parts code: X57469-002 5- Cleaning brush 5- Embroidery frame (Small) Parts code: X57468-001 4- Embroidery thread set O Seam ripper • Screw driver (Small) 6 Stitch guide foot "P" * Always use plastic bobbin supplied with machine or in accessories compartment. (Parts code : X80309-001) * Always use exclusive accessories for stretchable materials): 2 pcs 2- Screw driver 7- Spool cap (Small) 9- T Presser...
...) Parts code: X57469-002 5- Cleaning brush 5- Embroidery frame (Small) Parts code: X57468-001 4- Embroidery thread set O Seam ripper • Screw driver (Small) 6 Stitch guide foot "P" * Always use plastic bobbin supplied with machine or in accessories compartment. (Parts code : X80309-001) * Always use exclusive accessories for stretchable materials): 2 pcs 2- Screw driver 7- Spool cap (Small) 9- T Presser...
Users Manual - English
Page 26
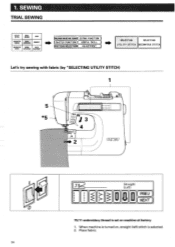
... SELECTING UTILITY STITCH DECORATIUE STITCH Let's try sewing with fabric (by "SELECTING UTILITY STITCH) 1 kk 0 24 3 IC 2 J i I rima I (Straight (Le ft) PREU ) F( NEXT 75/11 embroidery thread is set on , straight (left) stitch is turned on machine at factory. 1. 1. When machine is selected. 2. Place fabric.
... SELECTING UTILITY STITCH DECORATIUE STITCH Let's try sewing with fabric (by "SELECTING UTILITY STITCH) 1 kk 0 24 3 IC 2 J i I rima I (Straight (Le ft) PREU ) F( NEXT 75/11 embroidery thread is set on , straight (left) stitch is turned on machine at factory. 1. 1. When machine is selected. 2. Place fabric.
Users Manual - English
Page 89
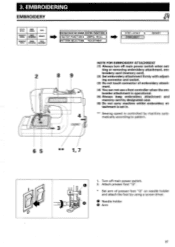
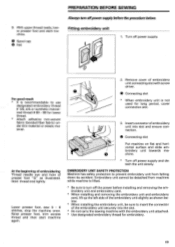
... firmly with adjusting connector and socket. (3) Do not touch connector of presser foot "Q" on needle holder and attach the foot by machine automatically according to pattern. 6 5 ** 1,7 1. O 2. 3. EMBROIDERING EMBROIDERY UTILITY STITCH BASIC SEWING CARO CHARACTER BASIC SEWING OPERATION MEMORY DECORATIVE SEWING STITCH STITCH APPLICATION ADJUSTMENT (PREPARATION BEFORE SUING) EXTRA FUNCTION ( SWITCH FUNCTION)( USEFUL...
... firmly with adjusting connector and socket. (3) Do not touch connector of presser foot "Q" on needle holder and attach the foot by machine automatically according to pattern. 6 5 ** 1,7 1. O 2. 3. EMBROIDERING EMBROIDERY UTILITY STITCH BASIC SEWING CARO CHARACTER BASIC SEWING OPERATION MEMORY DECORATIVE SEWING STITCH STITCH APPLICATION ADJUSTMENT (PREPARATION BEFORE SUING) EXTRA FUNCTION ( SWITCH FUNCTION)( USEFUL...
Users Manual - English
Page 90
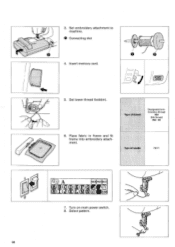
Insert memory card. ) START/ STOP 5. Type of thread Designated embroidery thread #50 Silk thread #50-80 6. Turn on main power switch. 8. Set embroidery attachment to machine. 0 Connecting slot 4. Type of needle 75/11 mazmazneD CO A NE !C!I PREY L M H I J K L N LAYOUT 0 7. Select pattern. 88 ( 3. Set lower thread (bobbin). Place fabric in frame and fit frame into embroidery attachment.
Insert memory card. ) START/ STOP 5. Type of thread Designated embroidery thread #50 Silk thread #50-80 6. Turn on main power switch. 8. Set embroidery attachment to machine. 0 Connecting slot 4. Type of needle 75/11 mazmazneD CO A NE !C!I PREY L M H I J K L N LAYOUT 0 7. Select pattern. 88 ( 3. Set lower thread (bobbin). Place fabric in frame and fit frame into embroidery attachment.
Users Manual - English
Page 91
... removing the embroidery unit and embroidery card. * When installing and removing the embroidery unit and embroidery card, lift up the left side of the embroidery unit securely into slot and ensure connection. 9. With upper thread ready, lower presser foot and start machine again. 2. O Connecting slot * When embroidery unit is recommendable to prevent embroidery unit from machine while machine is lifted...
... removing the embroidery unit and embroidery card. * When installing and removing the embroidery unit and embroidery card, lift up the left side of the embroidery unit securely into slot and ensure connection. 9. With upper thread ready, lower presser foot and start machine again. 2. O Connecting slot * When embroidery unit is recommendable to prevent embroidery unit from machine while machine is lifted...
Users Manual - English
Page 101
... and much "HELP". 3. • If upper thread breaks Re-thread upper thread • If bobbin thread breaks Cut upper thread, and remove embroidery frame. Lower the presser foot, and press the "START/STOP" button. * Pull out the thread where you started from the beginning (REVERSE) ...FORWA 3. START/ STOP 4. Raise the needle by touching "FORWARD". Re-set bobbin thread, and attach embroidery frame. (START/ STOP 1. VERSE SEARCH" and go back to the desired point, touch "RE- Stop the machine by "NEEDLE POSITION" button and touch "HELP". 4. Touch "BACK" further than the point the ...
... and much "HELP". 3. • If upper thread breaks Re-thread upper thread • If bobbin thread breaks Cut upper thread, and remove embroidery frame. Lower the presser foot, and press the "START/STOP" button. * Pull out the thread where you started from the beginning (REVERSE) ...FORWA 3. START/ STOP 4. Raise the needle by touching "FORWARD". Re-set bobbin thread, and attach embroidery frame. (START/ STOP 1. VERSE SEARCH" and go back to the desired point, touch "RE- Stop the machine by "NEEDLE POSITION" button and touch "HELP". 4. Touch "BACK" further than the point the ...

Users Manual - English
Page 103
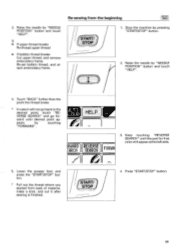
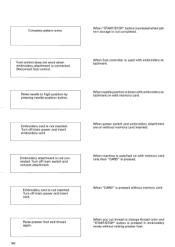
Touch "MEMORY". 2. N B Qy PREU NEXT MEMORY2) 0ETPIEUE2 4 N Boy CHECk PREU NEXT ra-.)l (c)(d:(_)(T)0?;il LAI ECCIEDE :n. El5111:1 3. Touch "NEXT". Touch "RETRIEVE 2". 4. Recalling pattern UTILITY STITCH BASIC SEWING CARD CHARACTER BASIC SEWING OPERATION MEMORY DECORATIVE SEWING STITCH STITCH APPLICATION ADJUSTMENT 4P N Gi r l PREU NEXT MEMORY1) RERIE0E1 RETRIEVE Let's recall pattern "Boy" from memory 2. 1. Pattern "Boy" in memory 2 appears on screen. * Pattern in embroidery card can be recalled only when embroidery unit and card are set with machine. 101
Touch "MEMORY". 2. N B Qy PREU NEXT MEMORY2) 0ETPIEUE2 4 N Boy CHECk PREU NEXT ra-.)l (c)(d:(_)(T)0?;il LAI ECCIEDE :n. El5111:1 3. Touch "NEXT". Touch "RETRIEVE 2". 4. Recalling pattern UTILITY STITCH BASIC SEWING CARD CHARACTER BASIC SEWING OPERATION MEMORY DECORATIVE SEWING STITCH STITCH APPLICATION ADJUSTMENT 4P N Gi r l PREU NEXT MEMORY1) RERIE0E1 RETRIEVE Let's recall pattern "Boy" from memory 2. 1. Pattern "Boy" in memory 2 appears on screen. * Pattern in embroidery card can be recalled only when embroidery unit and card are set with machine. 101
Users Manual - English
Page 108
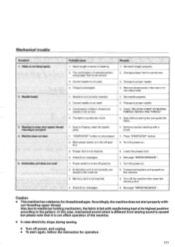
No more than 36 stitches is connected. Remove side cutter. Remove side cutter. Disconnect foot control. When machine finds that is not stored is rocked. Side cutter cannot be combined. When side cutter is set and "START/STOP" button is pressed. When ...motor is recalled. When memory that upper thread is touched. When side cutter is bent. Check if needle is attached in embroidery, move and power switch on. Start/Stop switch does not work when foot control is combined. When a pattern of more stitches can be used for...
No more than 36 stitches is connected. Remove side cutter. Remove side cutter. Disconnect foot control. When machine finds that is not stored is rocked. Side cutter cannot be combined. When side cutter is set and "START/STOP" button is pressed. When ...motor is recalled. When memory that upper thread is touched. When side cutter is bent. Check if needle is attached in embroidery, move and power switch on. Start/Stop switch does not work when foot control is combined. When a pattern of more stitches can be used for...
Users Manual - English
Page 109
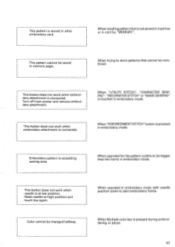
...during embroidering or pause. 107 This pattern is exceeding sewing area. This pattern cannot be changed halfway. Embroidery pattern is stored in embroidery mode. Raise needle to start embroidery frame. This button does not work when needle is connected. When trying to be combined. When "ENFORCEMENT.... When recalling pattern that cannot be bigger than the frame in other embroidery card. When operated for the pattern outline to store patterns that is not stored in machine or in embroidery mode with needle position down to high position and touch key again. ...
...during embroidering or pause. 107 This pattern is exceeding sewing area. This pattern cannot be changed halfway. Embroidery pattern is stored in embroidery mode. Raise needle to start embroidery frame. This button does not work when needle is connected. When trying to be combined. When "ENFORCEMENT.... When recalling pattern that cannot be bigger than the frame in other embroidery card. When operated for the pattern outline to store patterns that is not stored in machine or in embroidery mode with needle position down to high position and touch key again. ...
Users Manual - English
Page 110
... are on without memory card. Raise needle to change thread color and "START/STOP" button is switched on with memory card. Embroidery card is not inserted. When machine is pressed in embroidery mode without raising presser foot. When you cut thread to high position by pressing needle position button. When needle position is...
... are on without memory card. Raise needle to change thread color and "START/STOP" button is switched on with memory card. Embroidery card is not inserted. When machine is pressed in embroidery mode without raising presser foot. When you cut thread to high position by pressing needle position button. When needle position is...
Users Manual - English
Page 113
.... 4. See page "ERROR MESSAGE". 1. Turn the power on . 3. Connect embroidery unit properly to correct one. 3. Also due to needle bar holding mechanism, the fabric is caused but just guide the fabric. 1. Machine is noisy, slow speed, thread trimming is not lowered. 3. Change to proper needle.... 1. Turn the power on . 2. Main power switch is not correctly connected to the pattern. Accordingly, the machine does not start 5. Set stitch length properly. 2. Embroidery unit is in the race or inner rotary hook. 1. Turn off power, and unplug. • To start again...
.... 4. See page "ERROR MESSAGE". 1. Turn the power on . 3. Connect embroidery unit properly to correct one. 3. Also due to needle bar holding mechanism, the fabric is caused but just guide the fabric. 1. Machine is noisy, slow speed, thread trimming is not lowered. 3. Change to proper needle.... 1. Turn the power on . 2. Main power switch is not correctly connected to the pattern. Accordingly, the machine does not start 5. Set stitch length properly. 2. Embroidery unit is in the race or inner rotary hook. 1. Turn off power, and unplug. • To start again...


