

Users Manual - English
Page 2
... to the symbol "0" position when making any air openings blocked. Never operate the sewing machine with same type rated 15 watts. Special care is used by pulling on cord. "Read all moving parts. Never drop or insert any adjustments in the instruction manual. Switch the sewing machine to break. 14. WARNING To reduce the risk of the user servicing adjustments mentioned in the needle area, such as threading needle, changing needle, threading bobbin, or changing presser foot, and the like. 15...
... to the symbol "0" position when making any air openings blocked. Never operate the sewing machine with same type rated 15 watts. Special care is used by pulling on cord. "Read all moving parts. Never drop or insert any adjustments in the instruction manual. Switch the sewing machine to break. 14. WARNING To reduce the risk of the user servicing adjustments mentioned in the needle area, such as threading needle, changing needle, threading bobbin, or changing presser foot, and the like. 15...
Users Manual - English
Page 3
... computerized home use extension cords. Be sure to clean Stitch selection 26 the case. Do not touch the pulley, thread take-up, Setting bobbin 11 needle, or other parts CHANGING PRESSER FOOT 18 • A power failure occurs during use CHANGING NEEEDLE 20 • Lubricating and maintaining the machine • Leaving the machine unattended. CHANGING LIGHT BULB 22 3. SEWING 1. Benzene, thinner, and scouring pow- Sewing edge 31 just the machine yourself. LOCK STITCH 32 OVERCASTING 34 BUTTONHOLE 35 ZIPPER INSERTION (CENTERED...
... computerized home use extension cords. Be sure to clean Stitch selection 26 the case. Do not touch the pulley, thread take-up, Setting bobbin 11 needle, or other parts CHANGING PRESSER FOOT 18 • A power failure occurs during use CHANGING NEEEDLE 20 • Lubricating and maintaining the machine • Leaving the machine unattended. CHANGING LIGHT BULB 22 3. SEWING 1. Benzene, thinner, and scouring pow- Sewing edge 31 just the machine yourself. LOCK STITCH 32 OVERCASTING 34 BUTTONHOLE 35 ZIPPER INSERTION (CENTERED...
Users Manual - English
Page 4
... case of combined stitch pattern 83 Let's make various pattern combinations 84 ADJUSTING STITCH PATTERN 85 3. MEMORY MEMORY Memorizing combined pattern Recalling pattern 100 100 100 101 SEWING CHART 1 102 ERROR MESSAGE I 105 TROUBLESHOOTING 110 FIRST NEEDLE DROP POINT 112 PATTERNS (PROGRAMMED IN MACHINE) 114 PATTERNS (MEMORY CARD) 116 2 EMBROIDERING 87 EMBROIDERY 87 PREPARATION BEFORE SEWING 89 Fitting embroidery unit 89 Inserting memory card 90 Set fabric to embroidery frame 90 Fitting embroidery frame 91 HOW TO SELECT AND SEW PATTERN...
... case of combined stitch pattern 83 Let's make various pattern combinations 84 ADJUSTING STITCH PATTERN 85 3. MEMORY MEMORY Memorizing combined pattern Recalling pattern 100 100 100 101 SEWING CHART 1 102 ERROR MESSAGE I 105 TROUBLESHOOTING 110 FIRST NEEDLE DROP POINT 112 PATTERNS (PROGRAMMED IN MACHINE) 114 PATTERNS (MEMORY CARD) 116 2 EMBROIDERING 87 EMBROIDERY 87 PREPARATION BEFORE SEWING 89 Fitting embroidery unit 89 Inserting memory card 90 Set fabric to embroidery frame 90 Fitting embroidery frame 91 HOW TO SELECT AND SEW PATTERN...
Users Manual - English
Page 5
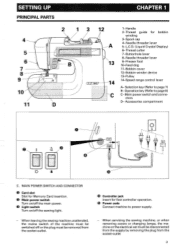
... supply by removing the plug from the socket-outlet. Selection key (Refer to power supply. - MAIN POWER SWITCH AND CONNECTOR O Card slot Slot for bobbin winding 3-Spool cap 4-Needle threader lever 5-L.C.D. (Liquid Crystal Display) 6-Thread cutter 7-Buttonhole lever 8-Needle threader lever 9-Presser foot 10-Feed dog 11-Bobbin cover 12-Bobbin winder device 13-Pulley 14-Speed range control lever A- Operation key (Refer to page 8) C- When servicing the sewing machine, or when removing covers or changing lamps, the machine or the electrical set must be removed from the...
... supply by removing the plug from the socket-outlet. Selection key (Refer to power supply. - MAIN POWER SWITCH AND CONNECTOR O Card slot Slot for bobbin winding 3-Spool cap 4-Needle threader lever 5-L.C.D. (Liquid Crystal Display) 6-Thread cutter 7-Buttonhole lever 8-Needle threader lever 9-Presser foot 10-Feed dog 11-Bobbin cover 12-Bobbin winder device 13-Pulley 14-Speed range control lever A- Operation key (Refer to page 8) C- When servicing the sewing machine, or when removing covers or changing lamps, the machine or the electrical set must be removed from the...
Users Manual - English
Page 7
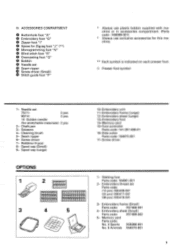
... O Buttonhole foot "A" • Embroidery foot "Q" • Zipper foot "I" O Space for Zigzag foot "J" (**) O Monogramming foot "N" O Blind stitch foot "R" O Overcasting foot "G" O Bobbin O Needle set 75/11: 2 pcs 90/14: 2 pcs 14 Golden needle (for this machine. ** Each symbol is indicated on each presser foot. Walking foot Parts code: 184961-001 2- T Presser foot symbol 1- Scissors 4- Chalk pen 3- Bobbins (4 pcs) 8- Needle set O Seam ripper • Screw driver (Small) 6 Stitch guide foot "P" * Always use plastic bobbin supplied with machine or in accessories...
... O Buttonhole foot "A" • Embroidery foot "Q" • Zipper foot "I" O Space for Zigzag foot "J" (**) O Monogramming foot "N" O Blind stitch foot "R" O Overcasting foot "G" O Bobbin O Needle set 75/11: 2 pcs 90/14: 2 pcs 14 Golden needle (for this machine. ** Each symbol is indicated on each presser foot. Walking foot Parts code: 184961-001 2- T Presser foot symbol 1- Scissors 4- Chalk pen 3- Bobbins (4 pcs) 8- Needle set O Seam ripper • Screw driver (Small) 6 Stitch guide foot "P" * Always use plastic bobbin supplied with machine or in accessories...
Users Manual - English
Page 11
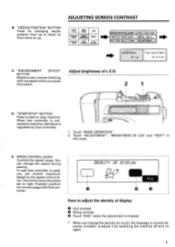
.... 9 SPEED CONTROL LEVER Controls the speed range. In case foot controller is connected to up. The control lever should be set at right (Fastest) position for changing needle position from up to down or from down to machine, start or stop is finished When you press this order. BUTTON Machine sew reverse stitching with foot controller. Touch "ADJUSTMENT", "BRIGHTNESS OF LCD" and "NEXT" in this button. 2 1 D. E. ADJUSTING SCREEN CONTRAST B. You can control maximum speed by foot controller. 1. "START/STOP" BUTTON Press to adjust the...
.... 9 SPEED CONTROL LEVER Controls the speed range. In case foot controller is connected to up. The control lever should be set at right (Fastest) position for changing needle position from up to down or from down to machine, start or stop is finished When you press this order. BUTTON Machine sew reverse stitching with foot controller. Touch "ADJUSTMENT", "BRIGHTNESS OF LCD" and "NEXT" in this button. 2 1 D. E. ADJUSTING SCREEN CONTRAST B. You can control maximum speed by foot controller. 1. "START/STOP" BUTTON Press to adjust the...

Users Manual - English
Page 13
... bobbin winder shaft to stop. 8. Mind bobbin spinning direction as illustrated. (Use bobbin code No. Set bobbin into shuttle. X80309 -001) 1 l ♦ 1♦ 3. Press "START/STOP" button to right. * Match groove of bobbin. Deliver thread end through a small hole of the bobbin with spring on shaft • Groove 5. Setting bobbin 3. Holding thread end, press "START/STOP" button twice. Shut bobbin cover. 7. Insert bobbin into shuttle. 11 Go through bobbin winding guide. 0 1. Slide open bobbin cover. 0 Bobbin cover 4. Machine stops automatically when bobbin...
... bobbin winder shaft to stop. 8. Mind bobbin spinning direction as illustrated. (Use bobbin code No. Set bobbin into shuttle. X80309 -001) 1 l ♦ 1♦ 3. Press "START/STOP" button to right. * Match groove of bobbin. Deliver thread end through a small hole of the bobbin with spring on shaft • Groove 5. Setting bobbin 3. Holding thread end, press "START/STOP" button twice. Shut bobbin cover. 7. Insert bobbin into shuttle. 11 Go through bobbin winding guide. 0 1. Slide open bobbin cover. 0 Bobbin cover 4. Machine stops automatically when bobbin...
Users Manual - English
Page 16
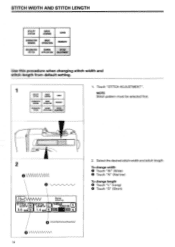
...5 Zigzag Stitching THREAD TENSION EC 0000INE 0000 l 2. Select the desired stitch width and stitch length. To change width O Touch "W" (Wide) 4 Touch "N" (Narrow) To change length 4 Touch "L" (Long) O Touch "S" (Short) 14 STITCH WIDTH AND STITCH LENGTH UTILITY STITCH BASIC SEWING CARD CHARACTER BASIC SEWING OPERATION MEMORY DECORATIVE SEWING STITCH STITCH APPLICATION ADJUSTMENT Use this procedure when changing stitch width and stitch length from default setting. Touch "STITCH ADJUSTMENT". UTILITY STITCH BASIC SEWING CARD CHARACTER BASIC SEWING OPERATION MEMORY...
...5 Zigzag Stitching THREAD TENSION EC 0000INE 0000 l 2. Select the desired stitch width and stitch length. To change width O Touch "W" (Wide) 4 Touch "N" (Narrow) To change length 4 Touch "L" (Long) O Touch "S" (Short) 14 STITCH WIDTH AND STITCH LENGTH UTILITY STITCH BASIC SEWING CARD CHARACTER BASIC SEWING OPERATION MEMORY DECORATIVE SEWING STITCH STITCH APPLICATION ADJUSTMENT Use this procedure when changing stitch width and stitch length from default setting. Touch "STITCH ADJUSTMENT". UTILITY STITCH BASIC SEWING CARD CHARACTER BASIC SEWING OPERATION MEMORY...
Users Manual - English
Page 20
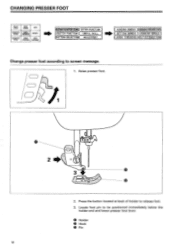
... foot pin to release foot. 3. O Holder O Hook O Pin 18 Raise presser foot. Press the button located at back of holder to be positioned immediately below the holder-end and lower presser foot lever. CHANGING PRESSER FOOT UTILITY STITCH BASIC SEWING CARD CHARACTER BASIC SEWING OPERATION MEMORY DECORATIVE SEWING STITCH STITCH APPLICATION ADJUSTMENT PREPARATION BEFORE SEWING)( EXTRA FUNCTION SWITCH FUNCTION) USEFUL SKILL (PATTERN SELECTION)( ADJUSTMENT ( WINDING BOBBIN (CHANGING PRESSER FOOT SETTING BOBBIN CHANGING NEEDLE) ( UPPER THREADING)(SELF-INTRODUCTION) Change presser...
... foot pin to release foot. 3. O Holder O Hook O Pin 18 Raise presser foot. Press the button located at back of holder to be positioned immediately below the holder-end and lower presser foot lever. CHANGING PRESSER FOOT UTILITY STITCH BASIC SEWING CARD CHARACTER BASIC SEWING OPERATION MEMORY DECORATIVE SEWING STITCH STITCH APPLICATION ADJUSTMENT PREPARATION BEFORE SEWING)( EXTRA FUNCTION SWITCH FUNCTION) USEFUL SKILL (PATTERN SELECTION)( ADJUSTMENT ( WINDING BOBBIN (CHANGING PRESSER FOOT SETTING BOBBIN CHANGING NEEDLE) ( UPPER THREADING)(SELF-INTRODUCTION) Change presser...

Users Manual - English
Page 28
Thread is automatically trimmed after sewing. 3- UTILITY STITCH BASIC SEWING CARD CHARACTER BASIC SEWING OPERATION MEMORY DECORATIVE SEWING STITCH STITCH APP ION ADJUSTMENT ROUNDED BUTTONHOLE Buttonhole for blouse, shirts etc. To return to the next screen. 5- To go to the previous screen. 4- "SEWING APPLICATION" shows application of presser foot (Change presser foot as shown.) 2- Selected stitch pattern Choose the desired pattern by using "NEXT" or "PREY" and touch pattern key on the screen. NEXT 26 Type of...
Thread is automatically trimmed after sewing. 3- UTILITY STITCH BASIC SEWING CARD CHARACTER BASIC SEWING OPERATION MEMORY DECORATIVE SEWING STITCH STITCH APP ION ADJUSTMENT ROUNDED BUTTONHOLE Buttonhole for blouse, shirts etc. To return to the next screen. 5- To go to the previous screen. 4- "SEWING APPLICATION" shows application of presser foot (Change presser foot as shown.) 2- Selected stitch pattern Choose the desired pattern by using "NEXT" or "PREY" and touch pattern key on the screen. NEXT 26 Type of...
Users Manual - English
Page 33
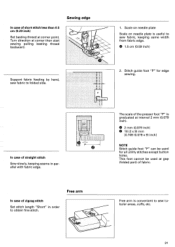
... presser foot "P" is graduated at interval 2 mm (0.079 inch). Free arm In case of zigzag stitch Set stitch length "Short" in parallel with fabric edge. 2. In case of short stitch less than 0.5 cm (0.20 inch) Set basting thread at corner then start sewing pulling basting thread backward. 1. I I II I III c_ ,J 11111111 The scale of fabric. AV' Free arm is useful to sew fabric, keeping same width from fabric edge. Stitch guide foot "P" for all utility stitches except button holes. Scale on needle plate Scale on needle plate...
... presser foot "P" is graduated at interval 2 mm (0.079 inch). Free arm In case of zigzag stitch Set stitch length "Short" in parallel with fabric edge. 2. In case of short stitch less than 0.5 cm (0.20 inch) Set basting thread at corner then start sewing pulling basting thread backward. 1. I I II I III c_ ,J 11111111 The scale of fabric. AV' Free arm is useful to sew fabric, keeping same width from fabric edge. Stitch guide foot "P" for all utility stitches except button holes. Scale on needle plate Scale on needle plate...
Users Manual - English
Page 34
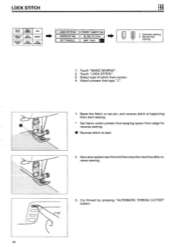
Attach presser foot type "J". 1. Baste the fabric or set pin, and reverse stitch at beginning then start sewing. * Set fabric under presser foot keeping space from screen. 4. C ) r 32 3. Select type of stitch from edge for reverse sewing. 0 Reverse stitch at start 2. Sew slow speed near the end then stop the machine after reverse sewing. Touch "BASIC SEWING". 2. Cut thread by pressing "AUTOMATIC THREAD CUTTER" button. LOCK STITCH UTILITY STITCH BASIC SEWING CARD CHARACTER BASIC SEWING OPERATION MEMORY OECORATME SEWING STITCH STITCH APPLICATION ADJUSTMENT LOCK...
Attach presser foot type "J". 1. Baste the fabric or set pin, and reverse stitch at beginning then start sewing. * Set fabric under presser foot keeping space from screen. 4. C ) r 32 3. Select type of stitch from edge for reverse sewing. 0 Reverse stitch at start 2. Sew slow speed near the end then stop the machine after reverse sewing. Touch "BASIC SEWING". 2. Cut thread by pressing "AUTOMATIC THREAD CUTTER" button. LOCK STITCH UTILITY STITCH BASIC SEWING CARD CHARACTER BASIC SEWING OPERATION MEMORY OECORATME SEWING STITCH STITCH APPLICATION ADJUSTMENT LOCK...
Users Manual - English
Page 37
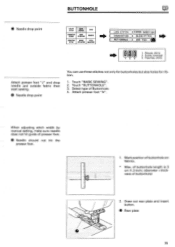
...buttonhole on fabrics. Attach presser foot "A". Touch "BUTTONHOLE". 3. Touch "BASIC SEWING". 2. Draw out rear plate and insert button. 0 Rear plate 35 Select type of presser foot. @ Needle should not hit the presser foot. 1. When adjusting stitch width by manual setting, make sure needle does not hit guide of Buttonhole. 4. Max. BUTTONHOLE O Needle drop point UTILITY STITCH BASIC SEWING CARD CHARACTER BASIC SEWING OPERATION MEMORY DECORATIVE SEWING STITCH STITCH APPLICATION ADJUSTMENT LOCK STITCH OUERCASTING BUTTONHOLE (ZIPPER INSERTION) ( BLIND STITCH BAR...
...buttonhole on fabrics. Attach presser foot "A". Touch "BUTTONHOLE". 3. Touch "BASIC SEWING". 2. Draw out rear plate and insert button. 0 Rear plate 35 Select type of presser foot. @ Needle should not hit the presser foot. 1. When adjusting stitch width by manual setting, make sure needle does not hit guide of Buttonhole. 4. Max. BUTTONHOLE O Needle drop point UTILITY STITCH BASIC SEWING CARD CHARACTER BASIC SEWING OPERATION MEMORY DECORATIVE SEWING STITCH STITCH APPLICATION ADJUSTMENT LOCK STITCH OUERCASTING BUTTONHOLE (ZIPPER INSERTION) ( BLIND STITCH BAR...
Users Manual - English
Page 45
...- This raises the presser foot to the same height and allows for easier feeding. Start machine holding end of the "A" foot. 0 Notch 'PSTI TCH LENGTH 0.4 min 5 5. "AUTO" position 2.0 mm (0.079 inch) • "W"(Wide) • "N"(Narrow) O In case of thick fabric 0 Place another fabric or card-board at back of the notch of upper thread lightly. * Machine will stop after reinforcement stitch automatically. * Machine cuts thread and stops automatically when you touch...
...- This raises the presser foot to the same height and allows for easier feeding. Start machine holding end of the "A" foot. 0 Notch 'PSTI TCH LENGTH 0.4 min 5 5. "AUTO" position 2.0 mm (0.079 inch) • "W"(Wide) • "N"(Narrow) O In case of thick fabric 0 Place another fabric or card-board at back of the notch of upper thread lightly. * Machine will stop after reinforcement stitch automatically. * Machine cuts thread and stops automatically when you touch...
Users Manual - English
Page 57
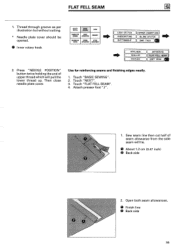
...presser foot "J". 1. O Inner rotary hook UTILITY STITCH BASIC SEWING CARD CHARACTER BASIC SEWING OPERATION MEMORY DECORATIVE SEWING STITCH STITCH APPLICATION ADJUSTMENT LOCK STITCH )(ZIPPER INSERTION) OUERCRSTING ( BLIND STITCH ( BUTTONHOLE ( BAR TACK APPLIQUE SCALLOP PINTUCK GATHERING Ii FLAT FELL SEAM ( DART SEAM 2. Touch "FLAT FELL SEAM". 4. Touch "NEXT". 3. FLAT FELL SEAM 1. Use for reinforcing seams and finishing edges neatly. 1. Touch "BASIC SEWING". 2. Thread through groove as per illustration but without cutting. * Needle plate cover should be opened...
...presser foot "J". 1. O Inner rotary hook UTILITY STITCH BASIC SEWING CARD CHARACTER BASIC SEWING OPERATION MEMORY DECORATIVE SEWING STITCH STITCH APPLICATION ADJUSTMENT LOCK STITCH )(ZIPPER INSERTION) OUERCRSTING ( BLIND STITCH ( BUTTONHOLE ( BAR TACK APPLIQUE SCALLOP PINTUCK GATHERING Ii FLAT FELL SEAM ( DART SEAM 2. Touch "FLAT FELL SEAM". 4. Touch "NEXT". 3. FLAT FELL SEAM 1. Use for reinforcing seams and finishing edges neatly. 1. Touch "BASIC SEWING". 2. Thread through groove as per illustration but without cutting. * Needle plate cover should be opened...
Users Manual - English
Page 82
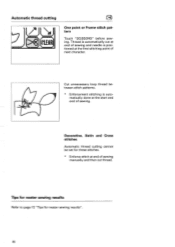
Thread is automatically cut thread. matically done at the start and end of sewing. • Decorative, Satin and Cross stitches Automatic thread cutting cannot be set for neater sewing results". 80 Cut unnecessary loop thread between stitch patterns. * Enforcement stitching is positioned at end of sewing manually and then cut at end of next character. Tips for neater sewing results Refer to page 72 "Tips for these stitches. * Enforce stitch at the...
Thread is automatically cut thread. matically done at the start and end of sewing. • Decorative, Satin and Cross stitches Automatic thread cutting cannot be set for neater sewing results". 80 Cut unnecessary loop thread between stitch patterns. * Enforcement stitching is positioned at end of sewing manually and then cut at end of next character. Tips for neater sewing results Refer to page 72 "Tips for these stitches. * Enforce stitch at the...
Users Manual - English
Page 91
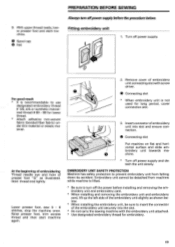
... embroidery. 89 Hold thread end lightly. EMBROIDERY UNIT SAFETY PROTECTION Machine has safety protection to prevent embroidery unit from machine while machine is not used for lower thread. * Attach adhesive non-woven fabric (bonded fiber fabric) under thin material or elastic material. Turn off power supply and detach the unit slowly. Fitting embroidery unit 1. Lower presser foot, sew 5 - 6 stitches, stop the machine once. Remove cover of embroidery unit into the slot. * Do not carry the sewing machine with screw driver...
... embroidery. 89 Hold thread end lightly. EMBROIDERY UNIT SAFETY PROTECTION Machine has safety protection to prevent embroidery unit from machine while machine is not used for lower thread. * Attach adhesive non-woven fabric (bonded fiber fabric) under thin material or elastic material. Turn off power supply and detach the unit slowly. Fitting embroidery unit 1. Lower presser foot, sew 5 - 6 stitches, stop the machine once. Remove cover of embroidery unit into the slot. * Do not carry the sewing machine with screw driver...
Users Manual - English
Page 107
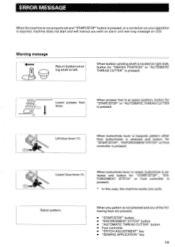
..." button • "AUTOMATIC THREAD CUTTER" button • Foot controller • "STITCH ADJUSTMENT" key • "SEWING APPLICATION" key 105 When bobbin winding shaft is located at upper position, button for "START/STOP", "ENFORCEMENT STITCH" or Foot controller is pressed. When buttonhole lever is lowered, pattern other than buttonholes is selected and button for "NEEDLE POSITION" or "AUTOMATIC THREAD CUTTER" is pressed. (1) .• (1) Lower blue lever (1). ERROR MESSAGE When the machine is not properly set and "START/STOP" button is pressed, or a correction on your operation...
..." button • "AUTOMATIC THREAD CUTTER" button • Foot controller • "STITCH ADJUSTMENT" key • "SEWING APPLICATION" key 105 When bobbin winding shaft is located at upper position, button for "START/STOP", "ENFORCEMENT STITCH" or Foot controller is pressed. When buttonhole lever is lowered, pattern other than buttonholes is selected and button for "NEEDLE POSITION" or "AUTOMATIC THREAD CUTTER" is pressed. (1) .• (1) Lower blue lever (1). ERROR MESSAGE When the machine is not properly set and "START/STOP" button is pressed, or a correction on your operation...
Users Manual - English
Page 112
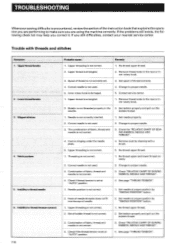
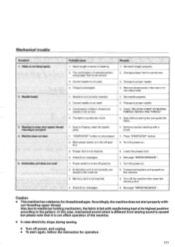
.... 1. Bobbin is not used . 2. Threading is encountered, review the section of fabric, thread and needle is not correct. 1. Combination of the instruction book that explains the operation you are performing to make sure you are using the machine correctly. Re-thread upper thread. 2. Set bobbin properly and pull out the bobbin thread. 3. Lower thread breaks 3. Slipped stitches 4. Upper threading is not correct. 3. Correct needle is not threaded properly in the race or inner rotary hook. 3. Correct needle is not correct. 1. Remove thread...
.... 1. Bobbin is not used . 2. Threading is encountered, review the section of fabric, thread and needle is not correct. 1. Combination of the instruction book that explains the operation you are performing to make sure you are using the machine correctly. Re-thread upper thread. 2. Set bobbin properly and pull out the bobbin thread. 3. Lower thread breaks 3. Slipped stitches 4. Upper threading is not correct. 3. Correct needle is not threaded properly in the race or inner rotary hook. 3. Correct needle is not correct. 1. Remove thread...
Users Manual - English
Page 113
... no feeding. 1. Main power switch is not correct. 2. See page "ERROR MESSAGE". 1. Machine is noisy, slow speed, thread trimming is clinging under the needle plate. 1. Change presser foot to the pattern. Combination of selected pattern and presser foot is in the off the machine then insert the memory card. 4. Embroidery unit does not work Probable cause Remedy 1. Correct needle is entangled. 4. See page "ERROR MESSAGE". Set needle properly. 2. Needle breaks 3. Dust is not good 4. Thread is not used . 3. Remove thread...
... no feeding. 1. Main power switch is not correct. 2. See page "ERROR MESSAGE". 1. Machine is noisy, slow speed, thread trimming is clinging under the needle plate. 1. Change presser foot to the pattern. Combination of selected pattern and presser foot is in the off the machine then insert the memory card. 4. Embroidery unit does not work Probable cause Remedy 1. Correct needle is entangled. 4. See page "ERROR MESSAGE". Set needle properly. 2. Needle breaks 3. Dust is not good 4. Thread is not used . 3. Remove thread...


