
Users Manual - English
Page 5
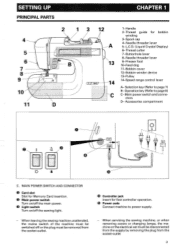
SETTING UP PRINCIPAL PARTS 6 7 8 9 s el 10' 11 CHAPTER 1 12 -)N 13 14 C 1-Handle 2-Thread guide for foot controller operation. • Power code Connect machine to power supply. - O Controller jack Insert for bobbin winding 3-Spool cap 4-Needle threader lever 5-L.C.D. (Liquid Crystal ...
SETTING UP PRINCIPAL PARTS 6 7 8 9 s el 10' 11 CHAPTER 1 12 -)N 13 14 C 1-Handle 2-Thread guide for foot controller operation. • Power code Connect machine to power supply. - O Controller jack Insert for bobbin winding 3-Spool cap 4-Needle threader lever 5-L.C.D. (Liquid Crystal ...
Users Manual - English
Page 7
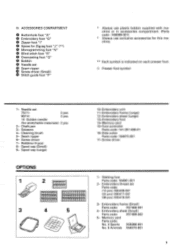
...on each presser foot. Scissors 4- Embroidery frame (Small) Parts code: X57468-001 4- Needle set Parts code: (12 pcs) X80409-001 (24 pcs) X80417-001 (36 pcs) X80418-001 3- Cleaning brush 5- Screw driver 7- Memory card Parts code: No. 4 Sports X58366-001 No. 5... foot "N" O Blind stitch foot "R" O Overcasting foot "G" O Bobbin O Needle set O Seam ripper • Screw driver (Small) 6 Stitch guide foot "P" * Always use plastic bobbin supplied with machine or in accessories compartment. (Parts code : X80309-001) * Always use exclusive accessories for stretchable materials...
...on each presser foot. Scissors 4- Embroidery frame (Small) Parts code: X57468-001 4- Needle set Parts code: (12 pcs) X80409-001 (24 pcs) X80417-001 (36 pcs) X80418-001 3- Cleaning brush 5- Screw driver 7- Memory card Parts code: No. 4 Sports X58366-001 No. 5... foot "N" O Blind stitch foot "R" O Overcasting foot "G" O Bobbin O Needle set O Seam ripper • Screw driver (Small) 6 Stitch guide foot "P" * Always use plastic bobbin supplied with machine or in accessories compartment. (Parts code : X80309-001) * Always use exclusive accessories for stretchable materials...
Users Manual - English
Page 8
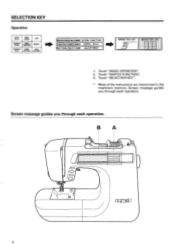
Touch "SWITCH FUNCTION". 3. Touch "SELECTION KEY". * Most of the instructions are memorized in the machine's memory. Screen message guides you through each operation. Screen message guides you through each operation. t 6 SELECTION KEY Operation UTILITY STITCH BASIC SEWING CARD CHARACTER BASIC SEWING OPERATION MEMORY DECORATIVE SEWING STITCH STITCH APPLICATION ADJUSTMENT (PREPARATION BEFORE SEWING) EXTRA FUNCTION ( SWITCH FUNCTION ( USEFUL SKILL PATTERN SELECTION)( ADJUSTMENT OPERATION KEY SELECTION KEY O 1. Touch "BASIC OPERATION". 2.
Touch "SWITCH FUNCTION". 3. Touch "SELECTION KEY". * Most of the instructions are memorized in the machine's memory. Screen message guides you through each operation. Screen message guides you through each operation. t 6 SELECTION KEY Operation UTILITY STITCH BASIC SEWING CARD CHARACTER BASIC SEWING OPERATION MEMORY DECORATIVE SEWING STITCH STITCH APPLICATION ADJUSTMENT (PREPARATION BEFORE SEWING) EXTRA FUNCTION ( SWITCH FUNCTION ( USEFUL SKILL PATTERN SELECTION)( ADJUSTMENT OPERATION KEY SELECTION KEY O 1. Touch "BASIC OPERATION". 2.

Users Manual - English
Page 13
... with spring on shaft • Groove 5. Slide open bobbin cover. 0 Bobbin cover 4. Holding thread end, Push bobbin winder shaft to stop. 8. Go through bobbin winding guide. 0 1. O Spring on shaft. Holding thread end, press "START/STOP" button twice. Trim the excess thread after the machine stops. 6. Insert bobbin into shuttle. 11 X80309...
... with spring on shaft • Groove 5. Slide open bobbin cover. 0 Bobbin cover 4. Holding thread end, Push bobbin winder shaft to stop. 8. Go through bobbin winding guide. 0 1. O Spring on shaft. Holding thread end, press "START/STOP" button twice. Trim the excess thread after the machine stops. 6. Insert bobbin into shuttle. 11 X80309...
Users Manual - English
Page 33
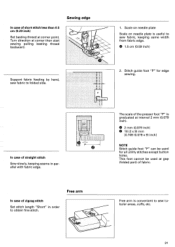
Scale on needle plate Scale on needle plate is convenient to sew tubular areas, cuffs, etc. 31 Stitch guide foot "P" for all utility stitches except button holes. AV' Free arm is useful to sew fabric, keeping same width from fabric edge. Turn direction at ...interval 2 mm (0.079 inch). O 2 mm (0.079 inch) @ 18 (2 x 9) mm [0.709 (0.079 x 9) inch] NOTE Stitch guide foot "P" can be used for edge sewing. Sewing edge In case of straight stitch Sew slowly, keeping seams in order to obtain fine stitch. This...
Scale on needle plate Scale on needle plate is convenient to sew tubular areas, cuffs, etc. 31 Stitch guide foot "P" for all utility stitches except button holes. AV' Free arm is useful to sew fabric, keeping same width from fabric edge. Turn direction at ...interval 2 mm (0.079 inch). O 2 mm (0.079 inch) @ 18 (2 x 9) mm [0.709 (0.079 x 9) inch] NOTE Stitch guide foot "P" can be used for edge sewing. Sewing edge In case of straight stitch Sew slowly, keeping seams in order to obtain fine stitch. This...

Users Manual - English
Page 36
Elastic material 1. Touch "BASIC SEWING". 2. Touch "OVERCASTING". 3. Elastic material O O 2. Sew fabric applying fabric edge to guide on presser foot "G". 0 Guide G 0 Thin or normal material 0 Needle drop point O 34 easy material 3. Attach presser foot type "G" or "J". OVERCASTING IN Thick of stitch. 4. Select type of frayeasy material ...
Elastic material 1. Touch "BASIC SEWING". 2. Touch "OVERCASTING". 3. Elastic material O O 2. Sew fabric applying fabric edge to guide on presser foot "G". 0 Guide G 0 Thin or normal material 0 Needle drop point O 34 easy material 3. Attach presser foot type "G" or "J". OVERCASTING IN Thick of stitch. 4. Select type of frayeasy material ...
Users Manual - English
Page 37
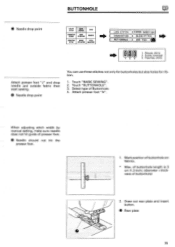
Select type of presser foot. @ Needle should not hit the presser foot. 1. When adjusting stitch width by manual setting, make sure needle does not hit guide of Buttonhole. 4. of buttonhole length is 3 cm (1.2 inch). (diameter +thickness of buttonhole on fabrics. BUTTONHOLE O Needle drop point UTILITY STITCH BASIC SEWING CARD CHARACTER BASIC ...
Select type of presser foot. @ Needle should not hit the presser foot. 1. When adjusting stitch width by manual setting, make sure needle does not hit guide of Buttonhole. 4. of buttonhole length is 3 cm (1.2 inch). (diameter +thickness of buttonhole on fabrics. BUTTONHOLE O Needle drop point UTILITY STITCH BASIC SEWING CARD CHARACTER BASIC ...

Users Manual - English
Page 47
... position by "STITCH ADJUSTMENT" so that its guide meets the edge of the folded hem. O 1 cm (0.39 inch) O Surface • 0.5 cm (0.20 inch) O Back side • Basting 2. Lower presser foot so that needle ...
... position by "STITCH ADJUSTMENT" so that its guide meets the edge of the folded hem. O 1 cm (0.39 inch) O Surface • 0.5 cm (0.20 inch) O Back side • Basting 2. Lower presser foot so that needle ...

Users Manual - English
Page 52
Fasten the screw. 4. 2. Both threads should be passed through the lower side of presser foot and held lightly with fingers. * Depending on the fabrics, adjust stitch width. 50 O Side-cutter • Guide pin e7 O Nail 1O 3. Make a cut by 1 cm (0.39 inch) from the edge. cm (0.39 inch) • Fabric 5. Locate guide pin above the hole and insert the nail to machine.
Fasten the screw. 4. 2. Both threads should be passed through the lower side of presser foot and held lightly with fingers. * Depending on the fabrics, adjust stitch width. 50 O Side-cutter • Guide pin e7 O Nail 1O 3. Make a cut by 1 cm (0.39 inch) from the edge. cm (0.39 inch) • Fabric 5. Locate guide pin above the hole and insert the nail to machine.
Users Manual - English
Page 105
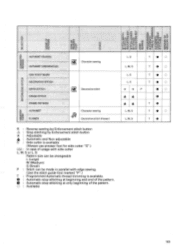
TYPE OF PRESSER FOOT STITCH WIDTH BY STITCH ADJUSTING KEY STITCH LENGTH BY STITCH ADJUSTING KEY EDGE SEWING 1 PROGRAMMED AUTOMATIC THREAD TRIMMING AUTOMATIC ENFORCEMENT STITCHING MEMORY BY MEMORY KEY SELECT KEY
TYPE OF PRESSER FOOT STITCH WIDTH BY STITCH ADJUSTING KEY STITCH LENGTH BY STITCH ADJUSTING KEY EDGE SEWING 1 PROGRAMMED AUTOMATIC THREAD TRIMMING AUTOMATIC ENFORCEMENT STITCHING MEMORY BY MEMORY KEY SELECT KEY
Users Manual - English
Page 113
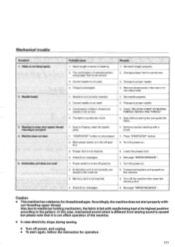
.... 2. Turn the power on . 2. Memory card is not correctly inserted. 2. In this case, mechanical sound which is different from sewing sound is caused but just guide the fabric. 1. Set needle properly. 2. The fabric is entangled. 4. Press "START/STOP" button. 2. Caution • This machine has a detector for operation. 111 Thread is pulled...
.... 2. Turn the power on . 2. Memory card is not correctly inserted. 2. In this case, mechanical sound which is different from sewing sound is caused but just guide the fabric. 1. Set needle properly. 2. The fabric is entangled. 4. Press "START/STOP" button. 2. Caution • This machine has a detector for operation. 111 Thread is pulled...


