

Users Manual - English
Page 2
.... To unplug, grasp the plug, not the cord. 10. Always unplug this manual. 3. tered. 8. Switch the sewing machine to break. 12. Do not operate where aerosol (spray) products are being adminis- Always use ." "Read all moving parts. Use only accessories recommended by the manufacturer as threading needle, changing needle, threading bobbin, or changing...
.... To unplug, grasp the plug, not the cord. 10. Always unplug this manual. 3. tered. 8. Switch the sewing machine to break. 12. Do not operate where aerosol (spray) products are being adminis- Always use ." "Read all moving parts. Use only accessories recommended by the manufacturer as threading needle, changing needle, threading bobbin, or changing...
Users Manual - English
Page 3
... KEY 8 ADJUSTING SCREEN CONTRAST 9 For safe operation BOBBIN WINDING/LOWER 1. CHANGING LIGHT BULB 22 3. Do not use sewing machine. SEWING 1. Do 24 not store the sewing machine beside a space TRIAL SEWING 24 heater, iron, or other moving parts. Do not touch the pulley, thread take-up, Setting bobbin 11 needle, or other hot objects. 2. CLEANING 23 4. USEFUL...
... KEY 8 ADJUSTING SCREEN CONTRAST 9 For safe operation BOBBIN WINDING/LOWER 1. CHANGING LIGHT BULB 22 3. Do not use sewing machine. SEWING 1. Do 24 not store the sewing machine beside a space TRIAL SEWING 24 heater, iron, or other moving parts. Do not touch the pulley, thread take-up, Setting bobbin 11 needle, or other hot objects. 2. CLEANING 23 4. USEFUL...
Users Manual - English
Page 5
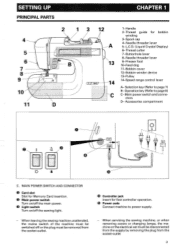
...range control lever A- Selection key (Refer to page 8) C- Accessories compartment O 4 C. When leaving the sewing machine unattended, the mains switch of the machine must be switched off the sewing light. MAIN POWER SWITCH AND CONNECTOR O Card slot Slot for Memory Card insertion. • Main power switch... when removing covers or changing lamps, the machine or the electrical set must be disconnected from the supply by removing the plug from the socket-outlet. Main power switch and conne- SETTING UP PRINCIPAL PARTS 6 7 8 9 s el 10' 11 CHAPTER 1 12 -)N 13 14 C 1-Handle 2-...
...range control lever A- Selection key (Refer to page 8) C- Accessories compartment O 4 C. When leaving the sewing machine unattended, the mains switch of the machine must be switched off the sewing light. MAIN POWER SWITCH AND CONNECTOR O Card slot Slot for Memory Card insertion. • Main power switch... when removing covers or changing lamps, the machine or the electrical set must be disconnected from the supply by removing the plug from the socket-outlet. Main power switch and conne- SETTING UP PRINCIPAL PARTS 6 7 8 9 s el 10' 11 CHAPTER 1 12 -)N 13 14 C 1-Handle 2-...
Users Manual - English
Page 53
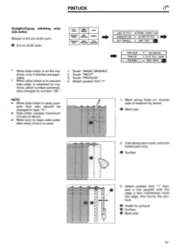
...time it is attached to machine, stitch number automatically changes to type "S". &#...machine, only 4 stitches are applicable. * When other stitch is in-use and side-cutter is used , pres- tuck. Touch "NEXT". 3. Attach presser foot "I " then 0 sew... a line parallel with side-cutter. Attach presser foot "I ". 1. Touch "BASIC SEWING". 2. Margin is used . 1. Touch ... inch) UTILITY STITCH BASIC SAWINC CARO CHARACTER BASIC SEWING OPERATION MEMORY DECORATIVE SEWING STITCH STITCH APPLICATION ADJUSTMENT ( LOCK STITCH ( OVERCASTING...
...time it is attached to machine, stitch number automatically changes to type "S". &#...machine, only 4 stitches are applicable. * When other stitch is in-use and side-cutter is used , pres- tuck. Touch "NEXT". 3. Attach presser foot "I " then 0 sew... a line parallel with side-cutter. Attach presser foot "I ". 1. Touch "BASIC SEWING". 2. Margin is used . 1. Touch ... inch) UTILITY STITCH BASIC SAWINC CARO CHARACTER BASIC SEWING OPERATION MEMORY DECORATIVE SEWING STITCH STITCH APPLICATION ADJUSTMENT ( LOCK STITCH ( OVERCASTING...
Users Manual - English
Page 68
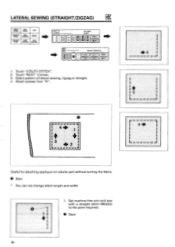
... =NM 13 0 r 4 3 Useful for attaching applique on tubular part without turning the fabric. 0 Start * You can not change stitch length and width. 1. Touch "UTILITY STITCH". 2. re ti Strani't `i,t (Left) U U NEXT i+ VV I ,.__. Select pattern of lateral sewing, zigzag or straight. 4. Set machine free arm and sew with a straight stitch (Middle) to the point required...
... =NM 13 0 r 4 3 Useful for attaching applique on tubular part without turning the fabric. 0 Start * You can not change stitch length and width. 1. Touch "UTILITY STITCH". 2. re ti Strani't `i,t (Left) U U NEXT i+ VV I ,.__. Select pattern of lateral sewing, zigzag or straight. 4. Set machine free arm and sew with a straight stitch (Middle) to the point required...
Users Manual - English
Page 95
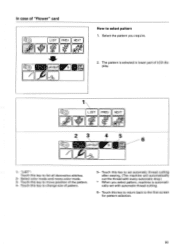
...CoLOUP 71-;17131 LAIlla PAT R . ...' Select color mode and mono-color mode. 3- Select the pattern you select pattern, machine is selected in lower part of "Flower" card O LIST PREU NEXT 00 f _-0 AP- //. Touch this key to change size of the pattern.... 4- "LIST": Touch this key to select pattern 1. Touch this key to the first screen for pattern selection. 93 A ,--c, CD crFiiiLLnTi I1F LAYOU LAMM How to set automatic thread cutting after sewing. (The machine...
...CoLOUP 71-;17131 LAIlla PAT R . ...' Select color mode and mono-color mode. 3- Select the pattern you select pattern, machine is selected in lower part of "Flower" card O LIST PREU NEXT 00 f _-0 AP- //. Touch this key to change size of the pattern.... 4- "LIST": Touch this key to select pattern 1. Touch this key to the first screen for pattern selection. 93 A ,--c, CD crFiiiLLnTi I1F LAYOU LAMM How to set automatic thread cutting after sewing. (The machine...
Users Manual - English
Page 96
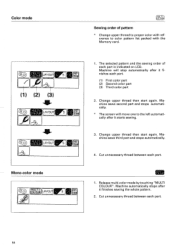
... rS ,2P1FyIT,5 Lu _FP 1. Release multi-color mode by touching "MULTI COLOUR". Machine sews second part and stops automatically. * The screen will stop automatically after it finishes each part. LAYOUT gr PRI)IIIJERN, ---9F J 1. Machine automatically stops after it finishes sewing the whole pattern. 2. Machine will move one to color pattern list packed with the Memory card...
... rS ,2P1FyIT,5 Lu _FP 1. Release multi-color mode by touching "MULTI COLOUR". Machine sews second part and stops automatically. * The screen will stop automatically after it finishes each part. LAYOUT gr PRI)IIIJERN, ---9F J 1. Machine automatically stops after it finishes sewing the whole pattern. 2. Machine will move one to color pattern list packed with the Memory card...
Users Manual - English
Page 101
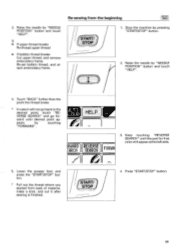
... Touch "BACK" further than the point the thread broke. * In case it after sewing is finished. Press "START/STOP" button. 99 Raise the needle by touching "FORWARD". START/ STOP 4. ward until the part for - Keep touching "REVERSE SEARCH" until desired point ap- pears by "NEEDLE POSITION"...where you started from the beginning (REVERSE) SEARCH 2. Re-sewing from back of material, make a knot, and cut it will appear at the left side. 5. Re-set bobbin thread, and attach embroidery frame. (START/ STOP 1. Stop the machine by "NEEDLE PnSMnN" button and much "HELP". 3. ...
... Touch "BACK" further than the point the thread broke. * In case it after sewing is finished. Press "START/STOP" button. 99 Raise the needle by touching "FORWARD". START/ STOP 4. ward until the part for - Keep touching "REVERSE SEARCH" until desired point ap- pears by "NEEDLE POSITION"...where you started from the beginning (REVERSE) SEARCH 2. Re-sewing from back of material, make a knot, and cut it will appear at the left side. 5. Re-set bobbin thread, and attach embroidery frame. (START/ STOP 1. Stop the machine by "NEEDLE PnSMnN" button and much "HELP". 3. ...


