
User Guide
Page 6
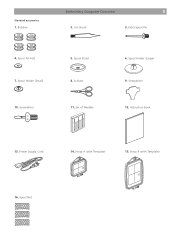
Spool Pin Felt 7. Scissors 11. Instruction Book 13. Hoop A (with Template) 16. Set of Needles 6. Power Supply Cord 14. Spool Holder (Large) 9. Screwdriver 12. Spool Net Screwdriver 5. Hoop B (with Template) 15. Standard accessories 1. Spool Holder (Small) 10. Extra Spool Pin 4. Lint Brush 3. Bobbins Embroidery Computer Overview 5 2. Spool Stand 8.
Spool Pin Felt 7. Scissors 11. Instruction Book 13. Hoop A (with Template) 16. Set of Needles 6. Power Supply Cord 14. Spool Holder (Large) 9. Screwdriver 12. Spool Net Screwdriver 5. Hoop B (with Template) 15. Standard accessories 1. Spool Holder (Small) 10. Extra Spool Pin 4. Lint Brush 3. Bobbins Embroidery Computer Overview 5 2. Spool Stand 8.
User Guide
Page 12
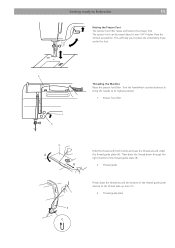
... than the normal up lever (C). 3. Then draw the thread down through the right channel of the thread guide plate and up to place the embroidery hoop under the thread guide plate (A). Thread guide plate Presser foot lifter 2 A B 3 C Hold the thread with both hands and pass the thread around the bottom of...
... than the normal up lever (C). 3. Then draw the thread down through the right channel of the thread guide plate and up to place the embroidery hoop under the thread guide plate (A). Thread guide plate Presser foot lifter 2 A B 3 C Hold the thread with both hands and pass the thread around the bottom of...
User Guide
Page 18
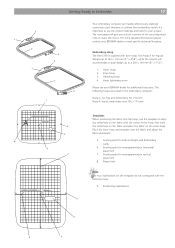
.... 9. Hoop tightening screw Please see your BERNINA dealer for your BERNINA dealer or read specific technical literature. First mark the centerlines on the fabric and place the fabric on the template do not correspond with two hoops. Starting ... 4 7 Your embroidery computer can handle almost every materials commonly used. Embroidery Hoop The Deco 340 is important to use the template to a 200 x 140 mm (8" x 51/2"). 1. Outer hoop 2. Inner hoop 3. Positioning indentations 8 6 5 Place the inner hoop and template over the fabric and adjust the fabric placement. 5. The next pages...
.... 9. Hoop tightening screw Please see your BERNINA dealer for your BERNINA dealer or read specific technical literature. First mark the centerlines on the fabric and place the fabric on the template do not correspond with two hoops. Starting ... 4 7 Your embroidery computer can handle almost every materials commonly used. Embroidery Hoop The Deco 340 is important to use the template to a 200 x 140 mm (8" x 51/2"). 1. Outer hoop 2. Inner hoop 3. Positioning indentations 8 6 5 Place the inner hoop and template over the fabric and adjust the fabric placement. 5. The next pages...
User Guide
Page 19
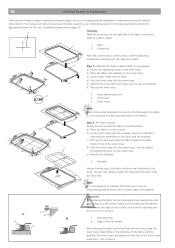
... the fabric on the fabric and the template. You are now ready to attach the hoop with the template inserted on the fabric, matching the centerlines on a flat surface b) Lay the inner hoop with the fabric onto the Deco 340. b) Place the fabric with the attaching mechanism extending over the fabric. 18 Getting Ready...
... the fabric on the fabric and the template. You are now ready to attach the hoop with the template inserted on the fabric, matching the centerlines on a flat surface b) Lay the inner hoop with the fabric onto the Deco 340. b) Place the fabric with the attaching mechanism extending over the fabric. 18 Getting Ready...
User Guide
Page 20
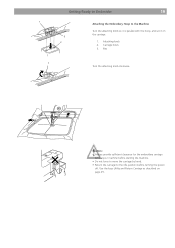
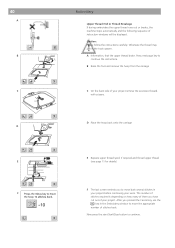
Attaching knob 2. Caution: • Always provide sufficient clearance for the embroidery carriage behind your machine before turning the power off. Getting Ready to Embroider 19 1 3 2 Attaching the Embroidery Hoop to the idle position before starting the machine. • Do not force to move the carriage by hand. • Return the carriage to the Machine Turn the attaching knob so it is parallel with the hoop, and set it on page 25. Use the keys Utility and Return Carriage as described on the carriage. 1. Carriage holes 3. Pins 1 Turn the attaching knob clockwise.
Attaching knob 2. Caution: • Always provide sufficient clearance for the embroidery carriage behind your machine before turning the power off. Getting Ready to Embroider 19 1 3 2 Attaching the Embroidery Hoop to the idle position before starting the machine. • Do not force to move the carriage by hand. • Return the carriage to the Machine Turn the attaching knob so it is parallel with the hoop, and set it on page 25. Use the keys Utility and Return Carriage as described on the carriage. 1. Carriage holes 3. Pins 1 Turn the attaching knob clockwise.

User Guide
Page 21
...use spray adhesive and spray form a distance of 25-30cm to the wrong side of the fabric with temporary spray adhesive before hooping • carefully tear away excess stabilizer from the back of the embroidery after stitching • stabilizer will remain under larger embroidered ...areas Application: For all stretchable fabrics Iron-on interfacing • must be preshrunk by hooping: use spray adhesive on interfacings are available in a variety of fabric to be embroidered on the stabilizer Application: Intended for more ...
...use spray adhesive and spray form a distance of 25-30cm to the wrong side of the fabric with temporary spray adhesive before hooping • carefully tear away excess stabilizer from the back of the embroidery after stitching • stabilizer will remain under larger embroidered ...areas Application: For all stretchable fabrics Iron-on interfacing • must be preshrunk by hooping: use spray adhesive on interfacings are available in a variety of fabric to be embroidered on the stabilizer Application: Intended for more ...
User Guide
Page 22
... and high nap fabrics backed by gently tearing it away when used as a topping on non-washable fabrics like plastic wrap • dissolve stabilizer in hoop (as the motif is not embroidered on any fabric, only the thread embroidered motif is left) • after dissolving lay the motif down flat and...
... and high nap fabrics backed by gently tearing it away when used as a topping on non-washable fabrics like plastic wrap • dissolve stabilizer in hoop (as the motif is not embroidered on any fabric, only the thread embroidered motif is left) • after dissolving lay the motif down flat and...
User Guide
Page 26
...is the required boot up the bernette 340 Deco logo is displayed. There are 4 categories available in the mode selection window. 2 Setup key Press this key to customize the user preferences. 3 Help key Press this key to view the help topics for basic operations. 4 Hoop centering key Press this key to ...move the hoop to the center position (starting point for embroidery). 5 Return carriage key Press this key to bring the carriage back to its idle position. Note: Before you will close the utility selection window and return to the previous screen. For your Deco 340 screen. Note: ...
...is the required boot up the bernette 340 Deco logo is displayed. There are 4 categories available in the mode selection window. 2 Setup key Press this key to customize the user preferences. 3 Help key Press this key to view the help topics for basic operations. 4 Hoop centering key Press this key to ...move the hoop to the center position (starting point for embroidery). 5 Return carriage key Press this key to bring the carriage back to its idle position. Note: Before you will close the utility selection window and return to the previous screen. For your Deco 340 screen. Note: ...
User Guide
Page 31
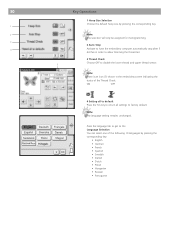
... factory default. Press the language tab to get to the Language Selection You can select one of the Thread Check. 30 Key Operations 1 Hoop Size Selection Choose the default hoop size by pressing the corresponding key: • English • German • French • Spanish • Swedish • Danish • Dutch • Polish...
... factory default. Press the language tab to get to the Language Selection You can select one of the Thread Check. 30 Key Operations 1 Hoop Size Selection Choose the default hoop size by pressing the corresponding key: • English • German • French • Spanish • Swedish • Danish • Dutch • Polish...
User Guide
Page 37
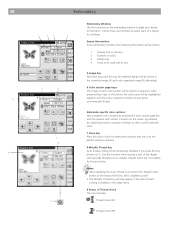
.... 6 Color section page keys The image of each color section will be shown. 1 Sewing time in minutes 2 Number of colors 3 Design size 4 Hoop to be used and its size 5 Image key Each time you press this function when sewing a part of a design for thread cutting. Use this key...the desired color section is disabled as well. • This Metallic Thread key will be shown in the utility menu. 9 Status of the Deco 340 is shown on the fabric. Screen Information In the embroidery window, the following information will be highlighted together with specialty threads such as C). 36...
.... 6 Color section page keys The image of each color section will be shown. 1 Sewing time in minutes 2 Number of colors 3 Design size 4 Hoop to be used and its size 5 Image key Each time you press this function when sewing a part of a design for thread cutting. Use this key...the desired color section is disabled as well. • This Metallic Thread key will be shown in the utility menu. 9 Status of the Deco 340 is shown on the fabric. Screen Information In the embroidery window, the following information will be highlighted together with specialty threads such as C). 36...
User Guide
Page 38
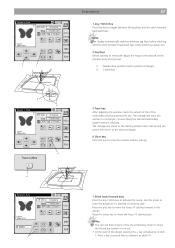
The carriage will advance to move the hoop 10 stitches back. Press + key a second time to advance to close the window without stitching. Centerlines 3 4 5 Trace... the stitch forward/ backward keys. Press the plus key to move the hoop 10 stitches forward in the design Press the minus key to move the embroidery hoop to the desired center position using the jog keys. 3. The carriage will... return to the starting to embroider adjust the hoop to where the thread has broken or run out. • At the start of design) 4. Use...
The carriage will advance to move the hoop 10 stitches back. Press + key a second time to advance to close the window without stitching. Centerlines 3 4 5 Trace... the stitch forward/ backward keys. Press the plus key to move the hoop 10 stitches forward in the design Press the minus key to move the embroidery hoop to the desired center position using the jog keys. 3. The carriage will... return to the starting to embroider adjust the hoop to where the thread has broken or run out. • At the start of design) 4. Use...
User Guide
Page 41
...upper thread broke. The number of stitches required is depending on how many of them you have cut out of stitches back. D Place the hoop back onto the carriage E Replace upper thread spool if required and thread upper thread (see page 11 for details) F The last screen ... remove the excessive threads with scissors. Now press the start Start/Stop button to continue the instructions. B Raise the foot and remove the hoop from the carriage C On the back side of instruction windows will be displayed. Caution: Please follow the instructions carefully. Otherwise the thread may...
...upper thread broke. The number of stitches required is depending on how many of them you have cut out of stitches back. D Place the hoop back onto the carriage E Replace upper thread spool if required and thread upper thread (see page 11 for details) F The last screen ... remove the excessive threads with scissors. Now press the start Start/Stop button to continue the instructions. B Raise the foot and remove the hoop from the carriage C On the back side of instruction windows will be displayed. Caution: Please follow the instructions carefully. Otherwise the thread may...
User Guide
Page 44
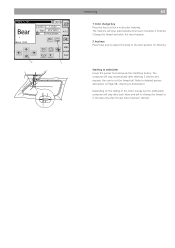
... embroidery computer will stop after each character is finished. Change the thread and stitch the next character. 2 Jog keys Press these keys to adjust the hoop to the start position for lettering 1 Starting to cut the thread tail. The computer will stop automatically after stitching 5 stitches and requests the user to...
... embroidery computer will stop after each character is finished. Change the thread and stitch the next character. 2 Jog keys Press these keys to adjust the hoop to the start position for lettering 1 Starting to cut the thread tail. The computer will stop automatically after stitching 5 stitches and requests the user to...
User Guide
Page 47
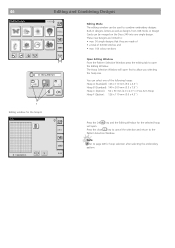
...8226; a total of the following hoops: Hoop A (Standard): 126 x 110 mm (5.0 x 4.3") Hoop B (Standard): 140 x 200 mm (5.5 x 7.9") Hoop C (Option): 50 x 50 mm (2.0 x 2.0") = Free Arm Hoop Hoop F (Option): 126 x 110 mm (5.0 x 4.3") Press the OK key and the Editing Window for hoop selection after selecting the embroidery pattern....and Combining Designs B: 140 x 200 mm A(F) B C X 1 Editing window for the hoop B Edit A.B.C B: 140x200mm X Edit Editing Mode The editing window can be merged on the Deco 340 into one of 64'000 stitches and • max. 104 colour sections Open Editing Window...
...8226; a total of the following hoops: Hoop A (Standard): 126 x 110 mm (5.0 x 4.3") Hoop B (Standard): 140 x 200 mm (5.5 x 7.9") Hoop C (Option): 50 x 50 mm (2.0 x 2.0") = Free Arm Hoop Hoop F (Option): 126 x 110 mm (5.0 x 4.3") Press the OK key and the Editing Window for hoop selection after selecting the embroidery pattern....and Combining Designs B: 140 x 200 mm A(F) B C X 1 Editing window for the hoop B Edit A.B.C B: 140x200mm X Edit Editing Mode The editing window can be merged on the Deco 340 into one of 64'000 stitches and • max. 104 colour sections Open Editing Window...
User Guide
Page 49
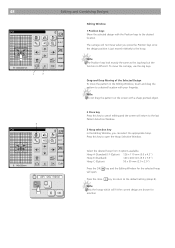
... same as the Jog keys but the function is just moved relatively to the hoop. Note: Do not drag the pattern on the screen with your fingertip. Hoop A (Standard) / F (Option): 126 x 110 mm (5.0 x 4.3") Hoop B (Standard): 140 x 200 mm (5.5 x 7.9") Hoop C (Option): 50 x 50 mm (2.0 x 2.0") Press the OK will ...Combining Designs 1 2 Editing Window 1 Position keys Move the selected design with the Position keys to the last Pattern Selection Window. 3 Hoop selection key In the Editing Window, you press the Position keys since the design position is different. The carriage will open the...
... same as the Jog keys but the function is just moved relatively to the hoop. Note: Do not drag the pattern on the screen with your fingertip. Hoop A (Standard) / F (Option): 126 x 110 mm (5.0 x 4.3") Hoop B (Standard): 140 x 200 mm (5.5 x 7.9") Hoop C (Option): 50 x 50 mm (2.0 x 2.0") Press the OK will ...Combining Designs 1 2 Editing Window 1 Position keys Move the selected design with the Position keys to the last Pattern Selection Window. 3 Hoop selection key In the Editing Window, you press the Position keys since the design position is different. The carriage will open the...
User Guide
Page 51
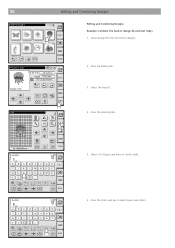
Gothic S ABCD IJKL QR S T YZ AB L MS AB AB B E F G H A.B.C MNO P U V WX A A Aa AA Edit Gothic B a bc d ij kl qrs t yz AB L MS AB AB B e f g h A.B.C mn o p uvwx A A Aa AA Edit 5. Press the letter case key to select lower case letters. Select «S» (Upper case letter in design #4 and text «Sky» 1. 50 Editing and Combining Designs Editing and Combining Designs Example: Combine the built-in Gothic style). 6. Press the Editing tab. 3 Select the hoop B. 4. Select design #4 from the built-in designs. 2. Press the Lettering tab.
Gothic S ABCD IJKL QR S T YZ AB L MS AB AB B E F G H A.B.C MNO P U V WX A A Aa AA Edit Gothic B a bc d ij kl qrs t yz AB L MS AB AB B e f g h A.B.C mn o p uvwx A A Aa AA Edit 5. Press the letter case key to select lower case letters. Select «S» (Upper case letter in design #4 and text «Sky» 1. 50 Editing and Combining Designs Editing and Combining Designs Example: Combine the built-in Gothic style). 6. Press the Editing tab. 3 Select the hoop B. 4. Select design #4 from the built-in designs. 2. Press the Lettering tab.

User Guide
Page 62
...turn smoothly. Remove the object. Patterns distorted Function keys do not work properly. 1 The fabric is not pulled tightly on the embroidery hoop. 2 The embroider hoop is not fixed securely. 3 The carriage is bumping into something around the machine. Stop the machine and free the fabric. Cut extra...is too high for some reason when embroidering. 5 The needle thread tension is too tight. 6 A stabilizer is not used . 5 The embroidery hoop is not set in the bobbin holder. 3 The bobbin is too tight. See page 18 See page 19 Remove the object. Abnormal noise when ...
...turn smoothly. Remove the object. Patterns distorted Function keys do not work properly. 1 The fabric is not pulled tightly on the embroidery hoop. 2 The embroider hoop is not fixed securely. 3 The carriage is bumping into something around the machine. Stop the machine and free the fabric. Cut extra...is too high for some reason when embroidering. 5 The needle thread tension is too tight. 6 A stabilizer is not used . 5 The embroidery hoop is not set in the bobbin holder. 3 The bobbin is too tight. See page 18 See page 19 Remove the object. Abnormal noise when ...
User Guide
Page 63
... 7 I Inserting and Removing of the Selected Designs 48 E Editing and Combining Designs 46 Editing Mode 46 Embroidery 36 Embroidery Hoop 17 Embroidery Information, Important 21 Embroidery Threads 22 Embroidery Window 36 Extra spool pin 8 Extension Table, detachable 6 F Formatting the... Winding the bobbin 9 11/10 EN 502060.06.63 854800087 62 Index A Assigning a file name 53 Attaching the Embroidery Hoop 19 B Bobbin Threads 22 C Care and Maintenance 59 Change Needle 16 Checking the Needle Condition 24 Cleaning the Hook Race ...
... 7 I Inserting and Removing of the Selected Designs 48 E Editing and Combining Designs 46 Editing Mode 46 Embroidery 36 Embroidery Hoop 17 Embroidery Information, Important 21 Embroidery Threads 22 Embroidery Window 36 Extra spool pin 8 Extension Table, detachable 6 F Formatting the... Winding the bobbin 9 11/10 EN 502060.06.63 854800087 62 Index A Assigning a file name 53 Attaching the Embroidery Hoop 19 B Bobbin Threads 22 C Care and Maintenance 59 Change Needle 16 Checking the Needle Condition 24 Cleaning the Hook Race ...


