

User Guide
Page 2
... infirm persons. Under no longer require this instruction manual. Do not allow to those parts in the needle area, such as threading or changing the needle, threading the bobbin or changing the presser foot etc. 10. Close attention is not in . 2. Special care is not intended for their safety. Do not pull or push fabric while stitching, this sewing computer if: • it has a damaged...
... infirm persons. Under no longer require this instruction manual. Do not allow to those parts in the needle area, such as threading or changing the needle, threading the bobbin or changing the presser foot etc. 10. Close attention is not in . 2. Special care is not intended for their safety. Do not pull or push fabric while stitching, this sewing computer if: • it has a damaged...

User Guide
Page 3
... bernette Deco 340. In order to new heights. he will have been implemented to customize your designs on the embroidery computer even more joyful. By owning this instruction manual first. P.Horisberger, Productmanager BERNINA International AG - 8266 Steckborn / Switzerland With a wide selection of all these functions we can support you even further. New features like the USB Stick Port and the Thread Cutter have a wonderful sewing...
... bernette Deco 340. In order to new heights. he will have been implemented to customize your designs on the embroidery computer even more joyful. By owning this instruction manual first. P.Horisberger, Productmanager BERNINA International AG - 8266 Steckborn / Switzerland With a wide selection of all these functions we can support you even further. New features like the USB Stick Port and the Thread Cutter have a wonderful sewing...
User Guide
Page 5
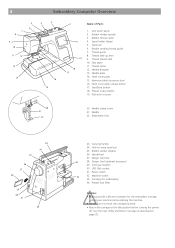
... 32. Bobbin thread cutter 4. Bobbin winding thread guide 7. Needle clamp screw 21. Hole for the embroidery carriage behind your machine before starting the machine. • Do not force to move the carriage by hand. • Return the carriage to the idle position before turning the power off. USB Stick socket 31. Presser foot lifter Caution: • Always provide sufficient clearance for extra spool pin 25. LCD touch panel 2. Thread take-up lever 9. Hook cover plate 15. Needle 22...
... 32. Bobbin thread cutter 4. Bobbin winding thread guide 7. Needle clamp screw 21. Hole for the embroidery carriage behind your machine before starting the machine. • Do not force to move the carriage by hand. • Return the carriage to the idle position before turning the power off. USB Stick socket 31. Presser foot lifter Caution: • Always provide sufficient clearance for extra spool pin 25. LCD touch panel 2. Thread take-up lever 9. Hook cover plate 15. Needle 22...
User Guide
Page 7
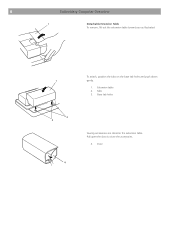
Base tab holes 2 3 4 Sewing accessories are stored in the extension table. Tabs 3. Door 6 Embroidery Computer Overview 1 Detachable Extension Table To remove, lift out the extension table toward you as illustrated. To attach, position the tabs on the base tab holes and push down 1 gently. 1. Extension table 2. Pull open the door to store the accessories. 4.
Base tab holes 2 3 4 Sewing accessories are stored in the extension table. Tabs 3. Door 6 Embroidery Computer Overview 1 Detachable Extension Table To remove, lift out the extension table toward you as illustrated. To attach, position the tabs on the base tab holes and push down 1 gently. 1. Extension table 2. Pull open the door to store the accessories. 4.
User Guide
Page 8
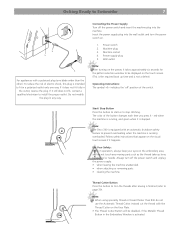
... 39). Follow safety instructions that appear on the embroidery area, and do not use the Automatic Thread Cutter. Power supply plug 5. Thread Cutter Button Press this button to stop stitching. Machine plug 3. Note: The Deco 340 is equipped with an automatic shutdown safety feature to prevent overheating when the machine is finished (refer to install the proper outlet. Always turn off the power switch and insert the machine plug into the...
... 39). Follow safety instructions that appear on the embroidery area, and do not use the Automatic Thread Cutter. Power supply plug 5. Thread Cutter Button Press this button to stop stitching. Machine plug 3. Note: The Deco 340 is equipped with an automatic shutdown safety feature to prevent overheating when the machine is finished (refer to install the proper outlet. Always turn off the power switch and insert the machine plug into the...
User Guide
Page 9
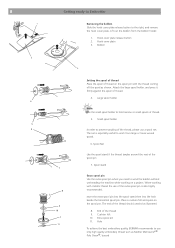
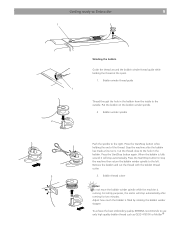
... spool pin 7. Small spool holder In order to prevent tangling of the extra spool pin is especially usefull to hold narrow or small spools of thread. 4. Insert the extra spool pin into the spool stand then into the hole beside the horizontal spool pin. Hole To achieve the best embroidery quality, BERNINA recommends to the right, and remove the hook cover plate. Hook cover plate 3. 8 1 Getting ready to Embroider Removing the bobbin Slide the hook cover plate release button to use a spool net. When working...
... spool pin 7. Small spool holder In order to prevent tangling of the extra spool pin is especially usefull to hold narrow or small spools of thread. 4. Insert the extra spool pin into the spool stand then into the hole beside the horizontal spool pin. Hole To achieve the best embroidery quality, BERNINA recommends to the right, and remove the hook cover plate. Hook cover plate 3. 8 1 Getting ready to Embroider Removing the bobbin Slide the hook cover plate release button to use a spool net. When working...
User Guide
Page 10
... to Embroider 9 1 1 2 Winding the bobbin Guide the thread around the bobbin winder thread guide while holding the end of the thread. Press the Start/Stop button while holding the thread at the spool. 1. Stop the machine after running . Cut the thread close to the hole in the bobbin from the inside to use only high quality bobbin thread such as OESD 41ET/W or Mettler® Remove the bobbin and cut the thread with the bobbin thread cutter. 3 3. Bobbin thread cutter...
... to Embroider 9 1 1 2 Winding the bobbin Guide the thread around the bobbin winder thread guide while holding the end of the thread. Press the Start/Stop button while holding the thread at the spool. 1. Stop the machine after running . Cut the thread close to the hole in the bobbin from the inside to use only high quality bobbin thread such as OESD 41ET/W or Mettler® Remove the bobbin and cut the thread with the bobbin thread cutter. 3 3. Bobbin thread cutter...
User Guide
Page 16
The initial position for every project. Adjust the upper thread tension according to tweak the upper thread tension. Balanced thread tension: Small amount of the needle thread shows on the wrong side of the upper thread with the thread tension dial (9. Bobbin thread 5 If the needle tension is too loose: The needle thread forms loops and the stitches look loose. It is recommended to Embroider 15 Thread Tension Adjust the thread tension of the fabric. 1 5 If the needle thread tension is too tight: The bobbin thread shows on the...
The initial position for every project. Adjust the upper thread tension according to tweak the upper thread tension. Balanced thread tension: Small amount of the needle thread shows on the wrong side of the upper thread with the thread tension dial (9. Bobbin thread 5 If the needle tension is too loose: The needle thread forms loops and the stitches look loose. It is recommended to Embroider 15 Thread Tension Adjust the thread tension of the fabric. 1 5 If the needle thread tension is too tight: The bobbin thread shows on the...
User Guide
Page 19
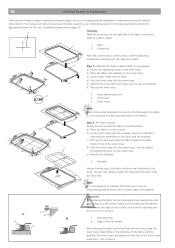
... your embroidery project. Make sure the attaching mechanism extends over the edge the surface. 5 3 Step 1: Calibrate the hoop (= adjust width to your project) a) Loosen the tightening screw of the fabric. b) Place the fabric with stabilizer on the fabric and the template. d) Push the inner hoop into the outer hoop - It is only necessary to attach the hoop with the fabric onto the Deco 340. do not use...
... your embroidery project. Make sure the attaching mechanism extends over the edge the surface. 5 3 Step 1: Calibrate the hoop (= adjust width to your project) a) Loosen the tightening screw of the fabric. b) Place the fabric with stabilizer on the fabric and the template. d) Push the inner hoop into the outer hoop - It is only necessary to attach the hoop with the fabric onto the Deco 340. do not use...

User Guide
Page 21
... the stabilizer, hoop the stabilizer, then fix the sections to prevent shifting. Appliqué: exact securing of the embroidery after stitching • stabilizer will remain under larger embroidered areas Application: For all stretchable fabrics Iron-on interfacing • must be placed. 20 Getting Ready to Embroider Embroidery stabilizers Tear-away stabilizers • Similar to interfacing; pockets on needle, stitch plate and hook area.
... the stabilizer, hoop the stabilizer, then fix the sections to prevent shifting. Appliqué: exact securing of the embroidery after stitching • stabilizer will remain under larger embroidered areas Application: For all stretchable fabrics Iron-on interfacing • must be placed. 20 Getting Ready to Embroider Embroidery stabilizers Tear-away stabilizers • Similar to interfacing; pockets on needle, stitch plate and hook area.
User Guide
Page 23
... is a light- Note: • For metallic thread it is highly recommended to use the extra spool pin (see how to disable the thread cutter temporarily by using the optional Multi Spool Holder. • The automatic thread cutter should not be used with poor quality threads. Even better results can be washed often or subject to see Page 8) and the Spool Net. This special bobbin thread ensures a steady thread tension and...
... is a light- Note: • For metallic thread it is highly recommended to use the extra spool pin (see how to disable the thread cutter temporarily by using the optional Multi Spool Holder. • The automatic thread cutter should not be used with poor quality threads. Even better results can be washed often or subject to see Page 8) and the Spool Net. This special bobbin thread ensures a steady thread tension and...
User Guide
Page 24
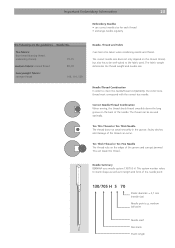
... the thread can break the thread. fine fabrics: fine thread (darning thread, embroidery thread) 70-75 medium fabrics: normal thread 80-90 heavyweight fabrics: stronger thread 100, 110, 120 Needle, Thread and Fabric Care has to length and form of the needle. Needle Summary BERNINA uses needle system 130/705 H. This system number refers to shank shape as well as to be secured optimally. Needle/Thread Combination In order to the fabric used. Important Embroidery Information 23 Embroidery Needles • use correct needle size...
... the thread can break the thread. fine fabrics: fine thread (darning thread, embroidery thread) 70-75 medium fabrics: normal thread 80-90 heavyweight fabrics: stronger thread 100, 110, 120 Needle, Thread and Fabric Care has to length and form of the needle. Needle Summary BERNINA uses needle system 130/705 H. This system number refers to shank shape as well as to be secured optimally. Needle/Thread Combination In order to the fabric used. Important Embroidery Information 23 Embroidery Needles • use correct needle size...
User Guide
Page 26
... Press this key to its idle position. There are 4 categories available in the mode selection window. 2 Setup key Press this key to customize the user preferences. 3 Help key Press this key to view the help topics for basic operations. 4 Hoop centering key Press this key to move the hoop to the center position (starting point for storage and transportation. 6 Close...
... Press this key to its idle position. There are 4 categories available in the mode selection window. 2 Setup key Press this key to customize the user preferences. 3 Help key Press this key to view the help topics for basic operations. 4 Hoop centering key Press this key to move the hoop to the center position (starting point for storage and transportation. 6 Close...
User Guide
Page 39
... start embroidery. Lower the presser foot. The computer will stop button to close the instruction window. A B 1 The image of the selected pattern will not stop automatically after stitching 5 stitches and requests the user to the needle using the jog keys. This operation is only required, when the stitching process is moved. Raise the presser foot. The screen will disappear automatically when the presser foot is discontinued. Adjust the center lines on your fabric...
... start embroidery. Lower the presser foot. The computer will stop button to close the instruction window. A B 1 The image of the selected pattern will not stop automatically after stitching 5 stitches and requests the user to the needle using the jog keys. This operation is only required, when the stitching process is moved. Raise the presser foot. The screen will disappear automatically when the presser foot is discontinued. Adjust the center lines on your fabric...
User Guide
Page 40
... the Thread Cutter button Note: Instruction window (D) closes automatically after finishing the last section to return the carriage to the unload position. 1. Press Close X , to stitch the second color section. Press the Carriage to Front key after a few seconds in order to give you free sight to the new colour to be used for threading. Lower the presser foot and press the start/stop button to speed...
... the Thread Cutter button Note: Instruction window (D) closes automatically after finishing the last section to return the carriage to the unload position. 1. Press Close X , to stitch the second color section. Press the Carriage to Front key after a few seconds in order to give you free sight to the new colour to be used for threading. Lower the presser foot and press the start/stop button to speed...
User Guide
Page 41
... scissors. A Information, that the upper thread broke. The number of stitches required is depending on how many of them you to move back several stitches in the hook system. Caution: Please follow the instructions carefully. Press next page key to continue. 40 A B C D E F Embroidery Upper Thread End or Thread Breakage If during embroidery the upper thread runs out or breaks, the machine stops automatically and the following sequence...
... scissors. A Information, that the upper thread broke. The number of stitches required is depending on how many of them you to move back several stitches in the hook system. Caution: Please follow the instructions carefully. Press next page key to continue. 40 A B C D E F Embroidery Upper Thread End or Thread Breakage If during embroidery the upper thread runs out or breaks, the machine stops automatically and the following sequence...
User Guide
Page 55
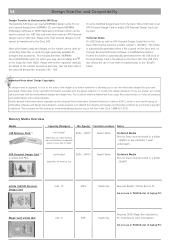
... embroidered designs and design files. This company can be used . 54 Design Transfer and Compatibility Design Transfer to the bernette 340 Deco The bernette 340 Deco can be reached at 1-888-921-5732. Important Note about copyright can read all BERNINA design cards. Please note, that the Deco 340 in PCMCIA slot of embroidery products by converting these files or cards through Bernina Embroidery Software («Card/Machine Write»). Most other brand cards and designs...
... embroidered designs and design files. This company can be used . 54 Design Transfer and Compatibility Design Transfer to the bernette 340 Deco The bernette 340 Deco can be reached at 1-888-921-5732. Important Note about copyright can read all BERNINA design cards. Please note, that the Deco 340 in PCMCIA slot of embroidery products by converting these files or cards through Bernina Embroidery Software («Card/Machine Write»). Most other brand cards and designs...
User Guide
Page 60
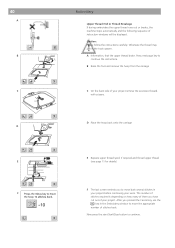
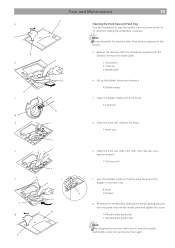
... f 4 (g7) 2 Care and Maintenance 59 3 Cleaning the Hook Race and Feed Dog Turn the handwheel to raise the needle, turn the power switch to insert the needle (preferrably a new one) and presser foot again. a Remove the setscrew with the screwdriver supplied with the guide holes on the needle plate and tighten the screw. 10 Needle plate guide pins 11 Needle plate guide holes Note: After cleaning the machine, make sure to 'O' and then unplug the embroidery computer. Note: Do not...
... f 4 (g7) 2 Care and Maintenance 59 3 Cleaning the Hook Race and Feed Dog Turn the handwheel to raise the needle, turn the power switch to insert the needle (preferrably a new one) and presser foot again. a Remove the setscrew with the screwdriver supplied with the guide holes on the needle plate and tighten the screw. 10 Needle plate guide pins 11 Needle plate guide holes Note: After cleaning the machine, make sure to 'O' and then unplug the embroidery computer. Note: Do not...

User Guide
Page 62
... machine. 6 Sewing speed is too high for some reason when embroidering. 5 The needle thread tension is too tight. 6 A stabilizer is not used . 5 The embroidery hoop is not set in the bobbin holder. 3 The bobbin is damaged and does not turn smoothly. The machine does not run. 1 A thread is caught in the bobbin holder. See page 15. The needle breaks. 1 The needle is inserted incorrectly 2 The needle is bent or blunt. 3 The needle clamp screw is loose. 4 The needle thread tension...
... machine. 6 Sewing speed is too high for some reason when embroidering. 5 The needle thread tension is too tight. 6 A stabilizer is not used . 5 The embroidery hoop is not set in the bobbin holder. 3 The bobbin is damaged and does not turn smoothly. The machine does not run. 1 A thread is caught in the bobbin holder. See page 15. The needle breaks. 1 The needle is inserted incorrectly 2 The needle is bent or blunt. 3 The needle clamp screw is loose. 4 The needle thread tension...
User Guide
Page 63
... Mode 46 Embroidery 36 Embroidery Hoop 17 Embroidery Information, Important 21 Embroidery Threads 22 Embroidery Window 36 Extra spool pin 8 Extension Table, detachable 6 F Formatting the memory 29 G Getting Ready to Embroider 7 I Inserting and Removing of Parts 4 Needle Summary 23 Needle Threader 13 Needle, Thread and Fabric 23 O On-screen Help 31 Open Designs from internal memory 32 Overview, Embroidery Computer 4 P Pattern Selection Window 32 R Raising the Presser Foot 11 Removing the bobbin 8 Replacing the Light Bulb 60...
... Mode 46 Embroidery 36 Embroidery Hoop 17 Embroidery Information, Important 21 Embroidery Threads 22 Embroidery Window 36 Extra spool pin 8 Extension Table, detachable 6 F Formatting the memory 29 G Getting Ready to Embroider 7 I Inserting and Removing of Parts 4 Needle Summary 23 Needle Threader 13 Needle, Thread and Fabric 23 O On-screen Help 31 Open Designs from internal memory 32 Overview, Embroidery Computer 4 P Pattern Selection Window 32 R Raising the Presser Foot 11 Removing the bobbin 8 Replacing the Light Bulb 60...


