

User Guide
Page 2
...where oxygen is used as a toy. Do not operate where aerosol (spray) products are increasing the environmental friendliness of design and production technologiy. Under no longer require this sewing computer is being administered. 14. Never operate this manual. Keep ... plug from the e lectrical outlet when removing covers, lubricating or when making any air vents blocked. ENVIROMENTAL PROTECTION BERNINA is marked with any a djustments in an environmentally responsible fashion according to environmental protection. SERVICING DOUBLEINSULATED PRODUCTS...
...where oxygen is used as a toy. Do not operate where aerosol (spray) products are increasing the environmental friendliness of design and production technologiy. Under no longer require this sewing computer is being administered. 14. Never operate this manual. Keep ... plug from the e lectrical outlet when removing covers, lubricating or when making any air vents blocked. ENVIROMENTAL PROTECTION BERNINA is marked with any a djustments in an environmentally responsible fashion according to environmental protection. SERVICING DOUBLEINSULATED PRODUCTS...
User Guide
Page 3
... designed and built to the highest standards in the BERNINA sewing family and we can support you completely satisfied. We are happy, to new heights. P.Horisberger, Productmanager BERNINA International AG - 8266 Steckborn / Switzerland New features like the USB Stick Port and the Thread Cutter have a wonderful sewing experience with help to buy the bernette Deco 340...
... designed and built to the highest standards in the BERNINA sewing family and we can support you completely satisfied. We are happy, to new heights. P.Horisberger, Productmanager BERNINA International AG - 8266 Steckborn / Switzerland New features like the USB Stick Port and the Thread Cutter have a wonderful sewing experience with help to buy the bernette Deco 340...
User Guide
Page 4
Contents 3 Important Safety Instructions 1 Welcome 2 Embroidery Computer Overview 4- 6 Getting Ready to Embroider 7- 20 Important Embroidery Information 21- 24 Key Operations 25- 35 Embroidery 36- 40 Lettering 41- 45 Editing and Combining Designs 46- 53 Design Transfer and Compatibility 54- 58 Care and Maintenance 59- 60 Troubleshooting 61 Index 62 Built-in Design Chart Appendix Table of Preset Colors Appendix
Contents 3 Important Safety Instructions 1 Welcome 2 Embroidery Computer Overview 4- 6 Getting Ready to Embroider 7- 20 Important Embroidery Information 21- 24 Key Operations 25- 35 Embroidery 36- 40 Lettering 41- 45 Editing and Combining Designs 46- 53 Design Transfer and Compatibility 54- 58 Care and Maintenance 59- 60 Troubleshooting 61 Index 62 Built-in Design Chart Appendix Table of Preset Colors Appendix
User Guide
Page 5
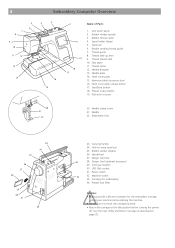
... 2. Face plate 11. Pocket for embroidery) 34. Carriage (for scissors 20 21 22 20. Bobbin thread cutter 4. Thread tension dial 10. Hook cover plate 15. Design Card slot 34 28. USB Stick socket 31. Carrying handle 24. Power switch 33 32. Bobbin winding thread guide...
... 2. Face plate 11. Pocket for embroidery) 34. Carriage (for scissors 20 21 22 20. Bobbin thread cutter 4. Thread tension dial 10. Hook cover plate 15. Design Card slot 34 28. USB Stick socket 31. Carrying handle 24. Power switch 33 32. Bobbin winding thread guide...
User Guide
Page 18
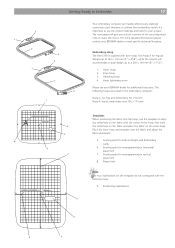
...Deco 340 is important to use the template to align the centerlines on the fabric with two hoops. Outer hoop 2. First mark the centerlines on the fabric and place the fabric on the template do not correspond with the reference lines. 9. Starting point for your project. The following hoops are preset in designs... and Embroidery cards. 6. However, to achieve best embroidery results it is supplied with the center of the most important rules to a 200 x 140 mm (8" x 51/2"). 1. Attaching knob 4. Hoop tightening screw Please see your BERNINA dealer or ...
...Deco 340 is important to use the template to align the centerlines on the fabric with two hoops. Outer hoop 2. First mark the centerlines on the fabric and place the fabric on the template do not correspond with the reference lines. 9. Starting point for your project. The following hoops are preset in designs... and Embroidery cards. 6. However, to achieve best embroidery results it is supplied with the center of the most important rules to a 200 x 140 mm (8" x 51/2"). 1. Attaching knob 4. Hoop tightening screw Please see your BERNINA dealer or ...
User Guide
Page 27
...card Push the eject button to save stitch data and transfer embroidery designs between the Deco 340 and your PC. To remove pull firmly on the USB Stick...facing to you. Push the card until it will take sometime to choose the different categories on the Deco 340. Design card (optional accessory) 7. Otherwise, data stored in the USB memory may be lost or damaged.... 1 Status Line: Displays the current status of larger menus. Insert the USB Stick into the slot with a Design Card in various sizes and shape. Modification in the memory may be used to eject the card. Eject button...
...card Push the eject button to save stitch data and transfer embroidery designs between the Deco 340 and your PC. To remove pull firmly on the USB Stick...facing to you. Push the card until it will take sometime to choose the different categories on the Deco 340. Design card (optional accessory) 7. Otherwise, data stored in the USB memory may be lost or damaged.... 1 Status Line: Displays the current status of larger menus. Insert the USB Stick into the slot with a Design Card in various sizes and shape. Modification in the memory may be used to eject the card. Eject button...
User Guide
Page 29
...;uterauto increase the maximum embroidery speed. Note Note Reduce the embroidery speed when designs with narrow satin stitchesaresewn.Th...
...;uterauto increase the maximum embroidery speed. Note Note Reduce the embroidery speed when designs with narrow satin stitchesaresewn.Th...
User Guide
Page 30
...;Stickorthe ATA Design Card will delete all designs in dependentofabrand. KKeeyy OOppeerraattiioonnss...
...;Stickorthe ATA Design Card will delete all designs in dependentofabrand. KKeeyy OOppeerraattiioonnss...
User Guide
Page 33
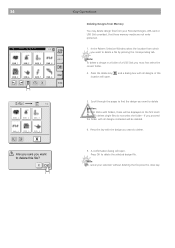
... will start automatically when the embroidery computer is a choice of the Deco 340 Read how to open embroidery designs from the following locations: • Built-in Designs • Lettering (integrated or design card with alphabets through this category 4 Open Designs on the next pages. For details of Design Cards please refer to open fonts from the optional...
... will start automatically when the embroidery computer is a choice of the Deco 340 Read how to open embroidery designs from the following locations: • Built-in Designs • Lettering (integrated or design card with alphabets through this category 4 Open Designs on the next pages. For details of Design Cards please refer to open fonts from the optional...
User Guide
Page 34
...the internal memory tab is selected. 3 Utility key Press this key to switch between - Personal designs from the various memory sources. 8 designs are shown on USB Stick USB Sticks may contain design folders as well as design files. The display will show the folders. Built-in the status line. 4 1 2 ... the Pattern Selection Window to open the utility selection window (refer to page 25 for more details). 4 Design selection keys The pattern images of the available designs are displayed at once on one page of the Pattern Selection Window will switch to the embroidery window. 2/4...
...the internal memory tab is selected. 3 Utility key Press this key to switch between - Personal designs from the various memory sources. 8 designs are shown on USB Stick USB Sticks may contain design folders as well as design files. The display will show the folders. Built-in the status line. 4 1 2 ... the Pattern Selection Window to open the utility selection window (refer to page 25 for more details). 4 Design selection keys The pattern images of the available designs are displayed at once on one page of the Pattern Selection Window will switch to the embroidery window. 2/4...
User Guide
Page 35
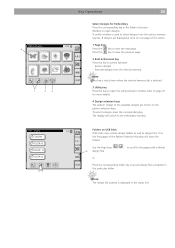
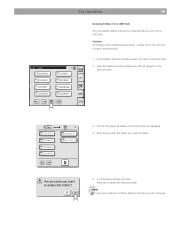
...files do not select the folder - A confirmation dialog will open . C EMB_5 EMB_6 EMB_7 EMB_8 Deleting Designs from Memory You may delete design files from which you proceed the folder with all designs contained will be deleted. 4. Press the delete key location will open . If you want to delete. ...5. and a dialog box with all designs in a folder of a USB Stick you want to delete the selected design file. Scroll through the pages to find the design you want to delete Caution: On USB Sticks with the design you must first select the correct folder. 2. Note...
...files do not select the folder - A confirmation dialog will open . C EMB_5 EMB_6 EMB_7 EMB_8 Deleting Designs from Memory You may delete design files from which you proceed the folder with all designs contained will be deleted. 4. Press the delete key location will open . If you want to delete. ...5. and a dialog box with all designs in a folder of a USB Stick you want to delete the selected design file. Scroll through the pages to find the design you want to delete Caution: On USB Sticks with the design you must first select the correct folder. 2. Note...
User Guide
Page 36
... the tab for the USB Stick. 2. Press the delete key and a dialog box with all designs on the USB Stick are displayed. 4. FOLDR1AB FOLDR2CD FOLDR3EF FOLDR4GH 1/4 FOLDR5IJ My Design 3. A confirmation dialog will open . Press the key with all folders on the USB will open... . Press OK to delete. 5. Note To cancel your selection without deleting the file press the close key. Caution: All designs will be deleted permanently - USB : \ Embf5 FOLDR1AB FOLDR2CD FOLDR3EF FOLDR4GH Key Operations 35 1/4 FOLDR5IJ A.B.C FOLDR6KL FOLDR7MN FOLDR8OP Deleting Folders from...
... the tab for the USB Stick. 2. Press the delete key and a dialog box with all designs on the USB Stick are displayed. 4. FOLDR1AB FOLDR2CD FOLDR3EF FOLDR4GH 1/4 FOLDR5IJ My Design 3. A confirmation dialog will open . Press the key with all folders on the USB will open... . Press OK to delete. 5. Note To cancel your selection without deleting the file press the close key. Caution: All designs will be deleted permanently - USB : \ Embf5 FOLDR1AB FOLDR2CD FOLDR3EF FOLDR4GH Key Operations 35 1/4 FOLDR5IJ A.B.C FOLDR6KL FOLDR7MN FOLDR8OP Deleting Folders from...
User Guide
Page 37
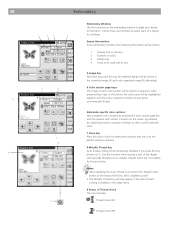
... if the Auto Thread Cutting is enabled in the complete image (A) and color separated image (B) alternately. 6 Color section page keys The image of the design with the colour sequence number as well as C). Embroider specific color sections: Skip unwanted color sections by pressing the color section page key until the...Thread check ON Thread check OFF Notes: • When disabling the Auto Thread Cut function the Thread Cutter Button at the head of the Deco 340 is shown on the fabric. By pressing the Start/Stop key the computer will be shown in the utility menu. 9 Status of...
... if the Auto Thread Cutting is enabled in the complete image (A) and color separated image (B) alternately. 6 Color section page keys The image of the design with the colour sequence number as well as C). Embroider specific color sections: Skip unwanted color sections by pressing the color section page key until the...Thread check ON Thread check OFF Notes: • When disabling the Auto Thread Cut function the Thread Cutter Button at the head of the Deco 340 is shown on the fabric. By pressing the Start/Stop key the computer will be shown in the utility menu. 9 Status of...
User Guide
Page 38
...stitch 10. Press the plus key to move the hoop 10 stitches forward in the design Press the minus key to move the embroidery hoop to where the thread has broken or run... out. • At the start of the design pressing the + key will trace the outline in a rectangle, circumscribing the selected embroidery pattern without ... this mode to toggle between jog keys before stitching and the stitch forward / backward keys while stitching a design out. 2 Jog Keys Before starting position after tracing and the screen will return to the previous display....
...stitch 10. Press the plus key to move the hoop 10 stitches forward in the design Press the minus key to move the embroidery hoop to where the thread has broken or run... out. • At the start of the design pressing the + key will trace the outline in a rectangle, circumscribing the selected embroidery pattern without ... this mode to toggle between jog keys before stitching and the stitch forward / backward keys while stitching a design out. 2 Jog Keys Before starting position after tracing and the screen will return to the previous display....
User Guide
Page 47
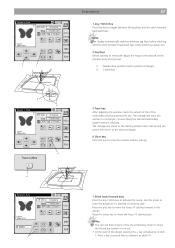
...Note: Refer to page 48 for the hoop B Edit A.B.C B: 140x200mm X Edit Editing Mode The editing window can be merged on the Deco 340 into one of 64'000 stitches and • max. 104 colour sections Open Editing Window From the Pattern Selection Window press the editing tab... to : • max. 50 single designs that they are made of • a total of the following hoops: Hoop A (Standard): 126 x 110 mm (5.0 x 4.3") Hoop B (Standard): 140 x 200 mm (5.5 x 7.9") Hoop...
...Note: Refer to page 48 for the hoop B Edit A.B.C B: 140x200mm X Edit Editing Mode The editing window can be merged on the Deco 340 into one of 64'000 stitches and • max. 104 colour sections Open Editing Window From the Pattern Selection Window press the editing tab... to : • max. 50 single designs that they are made of • a total of the following hoops: Hoop A (Standard): 126 x 110 mm (5.0 x 4.3") Hoop B (Standard): 140 x 200 mm (5.5 x 7.9") Hoop...
User Guide
Page 48
...you may press the Edit tab to Edit To select a design, press the tab for modification. Even if you enter the Editing Mode like this, you may add further design elements and save the new combination as one design. A frame around the pattern indicates it is selected. ...Select the desired pattern. B: 140x200mm The selected pattern will open the current design for the location of the desired A.B.C design B: 140x200mm X Edit The ...
...you may press the Edit tab to Edit To select a design, press the tab for modification. Even if you enter the Editing Mode like this, you may add further design elements and save the new combination as one design. A frame around the pattern indicates it is selected. ...Select the desired pattern. B: 140x200mm The selected pattern will open the current design for the location of the desired A.B.C design B: 140x200mm X Edit The ...
User Guide
Page 49
... Press this key to the last Pattern Selection Window. 3 Hoop selection key In the Editing Window, you press the Position keys since the design position is different. Note: The Position keys look exactly the same as the Jog keys but the function is just moved relatively to the ... Hoop A (Standard) / F (Option): 126 x 110 mm (5.0 x 4.3") Hoop B (Standard): 140 x 200 mm (5.5 x 7.9") Hoop C (Option): 50 x 50 mm (2.0 x 2.0") Press the OK will fit the current design are shown for the selected hoop Press the close X key to return to the hoop. Drag-and-Drop Moving of the Selected...
... Press this key to the last Pattern Selection Window. 3 Hoop selection key In the Editing Window, you press the Position keys since the design position is different. Note: The Position keys look exactly the same as the Jog keys but the function is just moved relatively to the ... Hoop A (Standard) / F (Option): 126 x 110 mm (5.0 x 4.3") Hoop B (Standard): 140 x 200 mm (5.5 x 7.9") Hoop C (Option): 50 x 50 mm (2.0 x 2.0") Press the OK will fit the current design are shown for the selected hoop Press the close X key to return to the hoop. Drag-and-Drop Moving of the Selected...
User Guide
Page 50
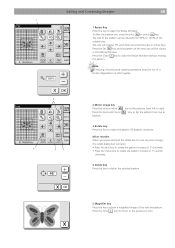
Press the close the Resize Window without resizing the pattern. 1 B: 140x200mm Editing and Combining Designs 49 1 Resize Key Press this key to open . • Press the plus key to rotate the pattern in steps of 1º clockwise. • Press the ...
Press the close the Resize Window without resizing the pattern. 1 B: 140x200mm Editing and Combining Designs 49 1 Resize Key Press this key to open . • Press the plus key to rotate the pattern in steps of 1º clockwise. • Press the ...
User Guide
Page 51
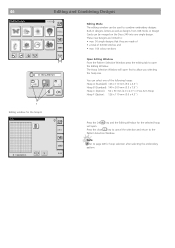
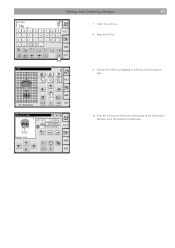
Press the Editing tab. 3 Select the hoop B. 4. Press the letter case key to select lower case letters. Press the Lettering tab. Gothic S ABCD IJKL QR S T YZ AB L MS AB AB B E F G H A.B.C MNO P U V WX A A Aa AA Edit Gothic B a bc d ij kl qrs t yz AB L MS AB AB B e f g h A.B.C mn o p uvwx A A Aa AA Edit 5. Select «S» (Upper case letter in designs. 2. Select design #4 from the built-in Gothic style). 6. 50 Editing and Combining Designs Editing and Combining Designs Example: Combine the built-in design #4 and text «Sky» 1.
Press the Editing tab. 3 Select the hoop B. 4. Press the letter case key to select lower case letters. Press the Lettering tab. Gothic S ABCD IJKL QR S T YZ AB L MS AB AB B E F G H A.B.C MNO P U V WX A A Aa AA Edit Gothic B a bc d ij kl qrs t yz AB L MS AB AB B e f g h A.B.C mn o p uvwx A A Aa AA Edit 5. Select «S» (Upper case letter in designs. 2. Select design #4 from the built-in Gothic style). 6. 50 Editing and Combining Designs Editing and Combining Designs Example: Combine the built-in design #4 and text «Sky» 1.
User Guide
Page 52
Position the letters by dragging or with by using the position keys. 10. Press the OK key and the screen will change to embroider. Editing and Combining Designs 51 Gothic Sky a bc d ij kl qrs t yz AB L MS AB AB B e f g h A.B.C mn o p uvwx A A Aa AA Edit 7. Select «k» and «y». 8. Press the OK key. 9. Start the machine to the Embroidery Window.
Position the letters by dragging or with by using the position keys. 10. Press the OK key and the screen will change to embroider. Editing and Combining Designs 51 Gothic Sky a bc d ij kl qrs t yz AB L MS AB AB B e f g h A.B.C mn o p uvwx A A Aa AA Edit 7. Select «k» and «y». 8. Press the OK key. 9. Start the machine to the Embroidery Window.


