

User Guide
Page 2
...not use as a toy. Do not pull or push fabric while stitching, this instruction manual. Turn power switch to the nearest authorized BERNINA dealer or service center for their safety. Always unplug the sewing computer from the e lectrical outlet when removing covers, lubricating or ...needle, causing it has fallen into any air vents blocked. This sewing and embroidery computer is committed to persons: 11. ENVIROMENTAL PROTECTION BERNINA is intended for its intend ed use bent needles. 8. We are increasing the environmental friendliness of the system and should be...
...not use as a toy. Do not pull or push fabric while stitching, this instruction manual. Turn power switch to the nearest authorized BERNINA dealer or service center for their safety. Always unplug the sewing computer from the e lectrical outlet when removing covers, lubricating or ...needle, causing it has fallen into any air vents blocked. This sewing and embroidery computer is committed to persons: 11. ENVIROMENTAL PROTECTION BERNINA is intended for its intend ed use bent needles. 8. We are increasing the environmental friendliness of the system and should be...

User Guide
Page 3
...have a wonderful sewing experience with your bernette Deco 340. With a wide selection of all these functions we hope you will have been implemented to welcome you study this instruction manual first. We are happy, to make your sewing experience on your BERNINA dealer; 2 Welcome Congratulations on the...the concise, easy-to-learn user interface and the many features and high stitch quality that you in order to buy the bernette Deco 340. Please visit your decision to keep you even further. These features combined with help to enhance your creativity to make your...
...have a wonderful sewing experience with your bernette Deco 340. With a wide selection of all these functions we hope you will have been implemented to welcome you study this instruction manual first. We are happy, to make your sewing experience on your BERNINA dealer; 2 Welcome Congratulations on the...the concise, easy-to-learn user interface and the many features and high stitch quality that you in order to buy the bernette Deco 340. Please visit your decision to keep you even further. These features combined with help to enhance your creativity to make your...

User Guide
Page 4
Contents 3 Important Safety Instructions 1 Welcome 2 Embroidery Computer Overview 4- 6 Getting Ready to Embroider 7- 20 Important Embroidery Information 21- 24 Key Operations 25- 35 Embroidery 36- 40 Lettering 41- 45 Editing and Combining Designs 46- 53 Design Transfer and Compatibility 54- 58 Care and Maintenance 59- 60 Troubleshooting 61 Index 62 Built-in Design Chart Appendix Table of Preset Colors Appendix
Contents 3 Important Safety Instructions 1 Welcome 2 Embroidery Computer Overview 4- 6 Getting Ready to Embroider 7- 20 Important Embroidery Information 21- 24 Key Operations 25- 35 Embroidery 36- 40 Lettering 41- 45 Editing and Combining Designs 46- 53 Design Transfer and Compatibility 54- 58 Care and Maintenance 59- 60 Troubleshooting 61 Index 62 Built-in Design Chart Appendix Table of Preset Colors Appendix
User Guide
Page 5
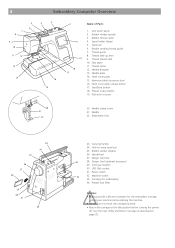
Spool holder (large) 5. Needle plate 14. Hook cover plate 15. Extension table (accessory box) 16. Pocket for the embroidery carriage behind your machine before starting the machine. • Do not force to move the carriage by hand. • Return the carriage to the idle position before turning the power off. Embroidery foot 25 26 27 28 23 24 29 30 31 32 23. Card eject button 30. Face plate 11. Thread Cutter button 19. Carrying handle 24. Machine socket 33. Presser foot lifter Caution: • Always provide sufficient clearance for scissors 20 ...
Spool holder (large) 5. Needle plate 14. Hook cover plate 15. Extension table (accessory box) 16. Pocket for the embroidery carriage behind your machine before starting the machine. • Do not force to move the carriage by hand. • Return the carriage to the idle position before turning the power off. Embroidery foot 25 26 27 28 23 24 29 30 31 32 23. Card eject button 30. Face plate 11. Thread Cutter button 19. Carrying handle 24. Machine socket 33. Presser foot lifter Caution: • Always provide sufficient clearance for scissors 20 ...
User Guide
Page 6
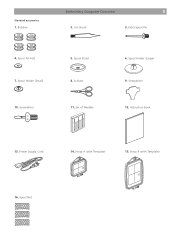
Standard accessories 1. Extra Spool Pin 4. Spool Holder (Large) 9. Screwdriver 12. Hoop A (with Template) 16. Spool Pin Felt 7. Screwdriver 5. Bobbins Embroidery Computer Overview 5 2. Scissors 11. Hoop B (with Template) 15. Spool Holder (Small) 10. Power Supply Cord 14. Instruction Book 13. Spool Stand 8. Spool Net Set of Needles 6. Lint Brush 3.
Standard accessories 1. Extra Spool Pin 4. Spool Holder (Large) 9. Screwdriver 12. Hoop A (with Template) 16. Spool Pin Felt 7. Screwdriver 5. Bobbins Embroidery Computer Overview 5 2. Scissors 11. Hoop B (with Template) 15. Spool Holder (Small) 10. Power Supply Cord 14. Instruction Book 13. Spool Stand 8. Spool Net Set of Needles 6. Lint Brush 3.
User Guide
Page 7
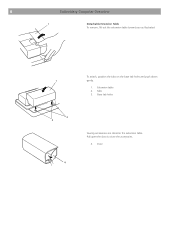
Tabs 3. Door Base tab holes 2 3 4 Sewing accessories are stored in the extension table. 6 Embroidery Computer Overview 1 Detachable Extension Table To remove, lift out the extension table toward you as illustrated. To attach, position the tabs on the base tab holes and push down 1 gently. 1. Extension table 2. Pull open the door to store the accessories. 4.
Tabs 3. Door Base tab holes 2 3 4 Sewing accessories are stored in the extension table. 6 Embroidery Computer Overview 1 Detachable Extension Table To remove, lift out the extension table toward you as illustrated. To attach, position the tabs on the base tab holes and push down 1 gently. 1. Extension table 2. Pull open the door to store the accessories. 4.
User Guide
Page 8
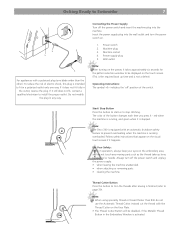
... Power Supply Turn off the power switch and insert the machine plug into the wall outlet and turn off ' position of the switch. Note: The Deco 340 is equipped with the Thread Cutter on the Face Plate. • The Thread Cutter Button will be displayed on . 1. For Your Safety: While in the...
... Power Supply Turn off the power switch and insert the machine plug into the wall outlet and turn off ' position of the switch. Note: The Deco 340 is equipped with the Thread Cutter on the Face Plate. • The Thread Cutter Button will be displayed on . 1. For Your Safety: While in the...
User Guide
Page 9
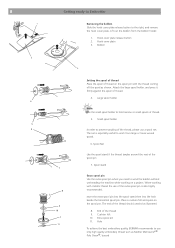
.... 6. Attach the large spool holder, and press it firmly against the spool of the thread 9. End of thread. 4. Hole To achieve the best embroidery quality, BERNINA recommends to hold narrow or small spools of thread on the spool pin with metallic thread the use only high quality embroidery thread such as...
.... 6. Attach the large spool holder, and press it firmly against the spool of the thread 9. End of thread. 4. Hole To achieve the best embroidery quality, BERNINA recommends to hold narrow or small spools of thread on the spool pin with metallic thread the use only high quality embroidery thread such as...
User Guide
Page 10
... while holding the thread at the spool. 1. Remove the bobbin and cut the thread with the bobbin thread cutter. 3 3. To achieve the best embroidery quality, BERNINA recommends to the right. Bobbin winder thread guide Thread through the hole in the bobbin. Put the bobbin on the bobbin winder spindle. 2 Bobbin winder...
... while holding the thread at the spool. 1. Remove the bobbin and cut the thread with the bobbin thread cutter. 3 3. To achieve the best embroidery quality, BERNINA recommends to the right. Bobbin winder thread guide Thread through the hole in the bobbin. Put the bobbin on the bobbin winder spindle. 2 Bobbin winder...
User Guide
Page 11
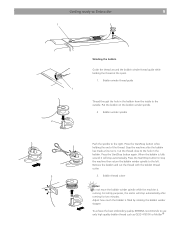
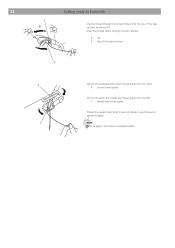
Draw the thread to check the threading Re-attach the hook cover plate. 5. Side notch 7 Pull out about 10 cm (4") of the bobbin holder. Bobbin thread 5 6. Refer to the threading chart shown on the front of thread to Embroider Inserting the bobbin Place the bobbin in the bobbin holder with the thread unwinding counter-clockwise. 1. 10 1 4 Getting ready to the rear. Threading chart 6 Thread 2. Bobbin holder 2 Guide the thread into side notch. 4. Front notch 3 Continue to draw the thread lightly until the thread slips into front notch on the hook cover plate to the...
Draw the thread to check the threading Re-attach the hook cover plate. 5. Side notch 7 Pull out about 10 cm (4") of the bobbin holder. Bobbin thread 5 6. Refer to the threading chart shown on the front of thread to Embroider Inserting the bobbin Place the bobbin in the bobbin holder with the thread unwinding counter-clockwise. 1. 10 1 4 Getting ready to the rear. Threading chart 6 Thread 2. Bobbin holder 2 Guide the thread into side notch. 4. Front notch 3 Continue to draw the thread lightly until the thread slips into front notch on the hook cover plate to the...
User Guide
Page 12
This will help you to the thread take-up position. Turn the handwheel counterclockwise to bring the needle to Embroider 11 Raising the Presser Foot The presser foot lifter raises and lowers the presser foot. Then draw the thread down through the right channel of the thread guide plate and up to place the embroidery hoop under the thread guide plate (A). Getting ready to its highest position. 1. Presser foot lifter 2 A B 3 C Hold the thread with both hands and pass the thread around the bottom of the thread guide plate (B). 2. Thread guide Firmly draw the thread around ...
This will help you to the thread take-up position. Turn the handwheel counterclockwise to bring the needle to Embroider 11 Raising the Presser Foot The presser foot lifter raises and lowers the presser foot. Then draw the thread down through the right channel of the thread guide plate and up to place the embroidery hoop under the thread guide plate (A). Getting ready to its highest position. 1. Presser foot lifter 2 A B 3 C Hold the thread with both hands and pass the thread around the bottom of the thread guide plate (B). 2. Thread guide Firmly draw the thread around ...
User Guide
Page 13
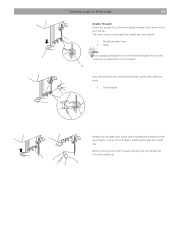
12 Getting ready to Embroider 5 D Slip the thread through the left channel. 4 Slit 5 Eye of the takeup lever as shown (D). Draw the thread down through the slit and down into the eye of the take-up lever 4 6 Slip the thread behind the lower thread guide from the right. 6 Lower thread guide Slip the thread in the needle bar thread guide from the left. 7 Needle bar thread guide Thread the needle from front to back by hand or use the built-in needle threader. 7 Note: Refer to page 13 for built-in needle threader.
12 Getting ready to Embroider 5 D Slip the thread through the left channel. 4 Slit 5 Eye of the takeup lever as shown (D). Draw the thread down through the slit and down into the eye of the take-up lever 4 6 Slip the thread behind the lower thread guide from the right. 6 Lower thread guide Slip the thread in the needle bar thread guide from the left. 7 Needle bar thread guide Thread the needle from front to back by hand or use the built-in needle threader. 7 Note: Refer to page 13 for built-in needle threader.
User Guide
Page 14
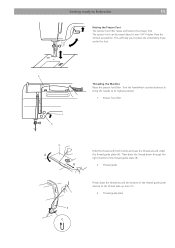
Hook Note: 1 Avoid applying sideways force to Embroider 13 Needle Threader Lower the presser foot. Thread guide 2 3 Release the threader lever slowly while holding the thread end with your fingers. Remove the loop from the threader and pull out the thread end from behind. 1. The hook comes out through the needle eye. Needle threader lever 2. Getting ready to the needle threader lever as it will go. A loop of the threader. 2 Draw the thread down as far as this could cause malfunction of the thread is pulled up through the needle eye from the needle eye. Press ...
Hook Note: 1 Avoid applying sideways force to Embroider 13 Needle Threader Lower the presser foot. Thread guide 2 3 Release the threader lever slowly while holding the thread end with your fingers. Remove the loop from the threader and pull out the thread end from behind. 1. The hook comes out through the needle eye. Needle threader lever 2. Getting ready to the needle threader lever as it will go. A loop of the threader. 2 Draw the thread down as far as this could cause malfunction of the thread is pulled up through the needle eye from the needle eye. Press ...

User Guide
Page 15
Thread holder 3 4 Draw the needle thread to bring up the Bobbin Thread Raise the presser foot lifter. Needle thread 1 2 Turn the handwheel one complete turn toward you. Hold the needle thread with your finger. 1. Hole 4. 14 1 Getting Ready to Embroider Drawing up a loop of free thread. 3. Loop of the bobbin thread Pass the needle thread through the hole in the embroidery foot and draw it up to the thread holder leaving an inch of the bobbin thread. 2.
Thread holder 3 4 Draw the needle thread to bring up the Bobbin Thread Raise the presser foot lifter. Needle thread 1 2 Turn the handwheel one complete turn toward you. Hold the needle thread with your finger. 1. Hole 4. 14 1 Getting Ready to Embroider Drawing up a loop of free thread. 3. Loop of the bobbin thread Pass the needle thread through the hole in the embroidery foot and draw it up to the thread holder leaving an inch of the bobbin thread. 2.
User Guide
Page 16
Bobbin thread 5 If the needle tension is too tight: The bobbin thread shows on the right side of the fabric stitched on, it might be required to a higher number. 3 Increase 4 the tension by turning the tension dial to embroider first a sample for the thread tension dial is recommended to a lower number. 3 1. on page 4). Depending on the material and the thickness of the embroidery thread, as well as of the fabric. Balanced thread tension: Small amount of the needle thread shows on the wrong side of the upper thread with the thread tension dial (9. For most ...
Bobbin thread 5 If the needle tension is too tight: The bobbin thread shows on the right side of the fabric stitched on, it might be required to a higher number. 3 Increase 4 the tension by turning the tension dial to embroider first a sample for the thread tension dial is recommended to a lower number. 3 1. on page 4). Depending on the material and the thickness of the embroidery thread, as well as of the fabric. Balanced thread tension: Small amount of the needle thread shows on the wrong side of the upper thread with the thread tension dial (9. For most ...
User Guide
Page 17
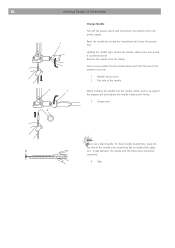
Remove the needle from the power supply. Flat side of the needle to Embroider 1 3 1 2 Change Needle Turn off the power switch and disconnect the machine from the clamp. 16 Getting Ready to the rear. 1. Needle clamp screw 2. A gap between the needle and the flat surface should be consistent. 4. Holding the needle tight, loosen the needle clamp screw by turning the handwheel and lower the presser foot. Insert a new needle into the needle clamp with the flat side of the needle When inserting the needle into the needle clamp, push it counterclockwise. Gap To check...
Remove the needle from the power supply. Flat side of the needle to Embroider 1 3 1 2 Change Needle Turn off the power switch and disconnect the machine from the clamp. 16 Getting Ready to the rear. 1. Needle clamp screw 2. A gap between the needle and the flat surface should be consistent. 4. Holding the needle tight, loosen the needle clamp screw by turning the handwheel and lower the presser foot. Insert a new needle into the needle clamp with the flat side of the needle When inserting the needle into the needle clamp, push it counterclockwise. Gap To check...
User Guide
Page 18
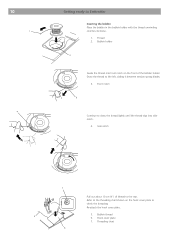
Attaching knob 4. Starting point for additional hoop sizes. Positioning indentations 8 6 5 Embroidery Hoop The Deco 340 is important to Embroider 17 3 1 2 1 4 3 2 4 7 Your embroidery computer can handle almost every materials commonly used. The following hoops are preset... overview of the hoop. Finger hole Note: The four indentations on the template do not correspond with two hoops. Hoop tightening screw Please see your BERNINA dealer for monogramming in the embroidery computer: Hoop C: for free arm embroidery, 50 x 50 mm Hoop F: round, embroidery area 126 x 110 ...
Attaching knob 4. Starting point for additional hoop sizes. Positioning indentations 8 6 5 Embroidery Hoop The Deco 340 is important to Embroider 17 3 1 2 1 4 3 2 4 7 Your embroidery computer can handle almost every materials commonly used. The following hoops are preset... overview of the hoop. Finger hole Note: The four indentations on the template do not correspond with two hoops. Hoop tightening screw Please see your BERNINA dealer for monogramming in the embroidery computer: Hoop C: for free arm embroidery, 50 x 50 mm Hoop F: round, embroidery area 126 x 110 ...
User Guide
Page 19
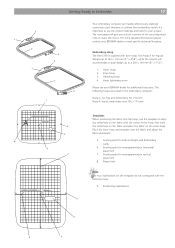
... necessary to have exact placement of the fabric. e) Remove the template. 6 Template Having finished step 2 the fabric should be flush with the fabric onto the Deco 340. a) Place the fabric on a flat surface b) Lay the inner hoop with stabilizer on the outer hoop. b) Place the fabric with the template inserted on the...
... necessary to have exact placement of the fabric. e) Remove the template. 6 Template Having finished step 2 the fabric should be flush with the fabric onto the Deco 340. a) Place the fabric on a flat surface b) Lay the inner hoop with stabilizer on the outer hoop. b) Place the fabric with the template inserted on the...
User Guide
Page 20
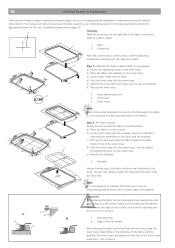
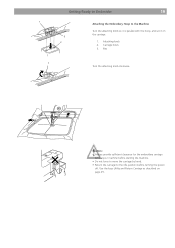
Use the keys Utility and Return Carriage as described on the carriage. 1. Caution: • Always provide sufficient clearance for the embroidery carriage behind your machine before starting the machine. • Do not force to move the carriage by hand. • Return the carriage to the Machine Turn the attaching knob so it is parallel with the hoop, and set it on page 25. Carriage holes 3. Pins 1 Turn the attaching knob clockwise. Attaching knob 2. Getting Ready to Embroider 19 1 3 2 Attaching the Embroidery Hoop to the idle position before turning the power off.
Use the keys Utility and Return Carriage as described on the carriage. 1. Caution: • Always provide sufficient clearance for the embroidery carriage behind your machine before starting the machine. • Do not force to move the carriage by hand. • Return the carriage to the Machine Turn the attaching knob so it is parallel with the hoop, and set it on page 25. Carriage holes 3. Pins 1 Turn the attaching knob clockwise. Attaching knob 2. Getting Ready to Embroider 19 1 3 2 Attaching the Embroidery Hoop to the idle position before turning the power off.

User Guide
Page 21
20 Getting Ready to Embroider Embroidery stabilizers Tear-away stabilizers • Similar to prevent shifting. adhesive surface • position the piece of appliqués for embroidery. Appliqué: exact securing of fabric to prevent distortion. pockets on stabilizers, e. tears like paper • one or more stability • sparingly use spray adhesive and spray form a distance of 25-30cm to stabilizer • place fabric and sprayed stabilizer flat on each other and press together Application: On stretchable fabrics and knits to be embroidered on the stabilizer ...
20 Getting Ready to Embroider Embroidery stabilizers Tear-away stabilizers • Similar to prevent shifting. adhesive surface • position the piece of appliqués for embroidery. Appliqué: exact securing of fabric to prevent distortion. pockets on stabilizers, e. tears like paper • one or more stability • sparingly use spray adhesive and spray form a distance of 25-30cm to stabilizer • place fabric and sprayed stabilizer flat on each other and press together Application: On stretchable fabrics and knits to be embroidered on the stabilizer ...