

User Guide
Page 2
... a double-insulated product nor should a means for use as a toy. An appliance should never be left unattended when using the embroidery module. 18. Do not unplug by a person responsible for their safety. This sewing computer is not intended for grounding be used... administered. 14. Replacement parts for any air vents blocked. ENVIROMENTAL PROTECTION BERNINA is marked with the sewing computer. 2. Do not dispose of grounding. Always unplug this product in terms of double-insulated machines. 1. This sewing computer is being used by persons (including children) with...
... a double-insulated product nor should a means for use as a toy. An appliance should never be left unattended when using the embroidery module. 18. Do not unplug by a person responsible for their safety. This sewing computer is not intended for grounding be used... administered. 14. Replacement parts for any air vents blocked. ENVIROMENTAL PROTECTION BERNINA is marked with the sewing computer. 2. Do not dispose of grounding. Always unplug this product in terms of double-insulated machines. 1. This sewing computer is being used by persons (including children) with...
User Guide
Page 5
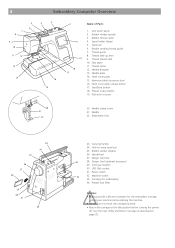
... Handwheel 27. Power switch 33 32. Bobbin thread cutter 4. Face plate 11. Needle plate 14. Hole for the embroidery carriage behind your machine before starting the machine. • Do not force to move the carriage by hand. • Return the carriage to the idle position ...before turning the power off. Extension table (accessory box) 16. Needle 22. Machine socket 33. Thread tension dial 10. Start/Stop button 18. 4 Embroidery Computer Overview 5 4 3 6 7 8 9 10 11 12 13 14 16 15 2 Name of Parts 1 19 18...
... Handwheel 27. Power switch 33 32. Bobbin thread cutter 4. Face plate 11. Needle plate 14. Hole for the embroidery carriage behind your machine before starting the machine. • Do not force to move the carriage by hand. • Return the carriage to the idle position ...before turning the power off. Extension table (accessory box) 16. Needle 22. Machine socket 33. Thread tension dial 10. Start/Stop button 18. 4 Embroidery Computer Overview 5 4 3 6 7 8 9 10 11 12 13 14 16 15 2 Name of Parts 1 19 18...
User Guide
Page 8
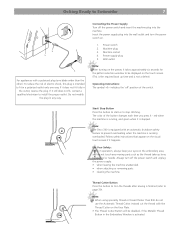
...not fit, contact a qualified electrician to install the proper outlet. Note: The Deco 340 is equipped with an automatic shutdown safety feature to prevent overheating when the machine is stopped. Machine socket 4. red when the machine is running, and green when it does not fit fully in any moving ... boot up lever, handwheel or needle. Thread Cutter Button Press this button to trim the threads after sewing is intended to fit in the Embroidery Window is not a defect) Operating Instructions: The symbol «0» indicates the 'off' position of the switch. Start/ Stop Button...
...not fit, contact a qualified electrician to install the proper outlet. Note: The Deco 340 is equipped with an automatic shutdown safety feature to prevent overheating when the machine is stopped. Machine socket 4. red when the machine is running, and green when it does not fit fully in any moving ... boot up lever, handwheel or needle. Thread Cutter Button Press this button to trim the threads after sewing is intended to fit in the Embroidery Window is not a defect) Operating Instructions: The symbol «0» indicates the 'off' position of the switch. Start/ Stop Button...
User Guide
Page 9
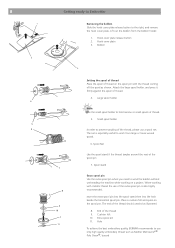
...thread 9. End of the thread should unwind as illustrated. 8. Cushion felt 10. Hole To achieve the best embroidery quality, BERNINA recommends to wind the bobbin without unthreading the machine while working with the thread coming off the spool as shown. Attach the large spool holder, and press ...ready to Embroider Removing the bobbin Slide the hook cover plate release button to prevent tangling of the thread, please use only high quality embroidery thread such as Mettler Metrosene+® Poly Sheen®, Isacord Spool Net Use the spool stand if the thread tangles around the root of...
...thread 9. End of the thread should unwind as illustrated. 8. Cushion felt 10. Hole To achieve the best embroidery quality, BERNINA recommends to wind the bobbin without unthreading the machine while working with the thread coming off the spool as shown. Attach the large spool holder, and press ...ready to Embroider Removing the bobbin Slide the hook cover plate release button to prevent tangling of the thread, please use only high quality embroidery thread such as Mettler Metrosene+® Poly Sheen®, Isacord Spool Net Use the spool stand if the thread tangles around the root of...
User Guide
Page 10
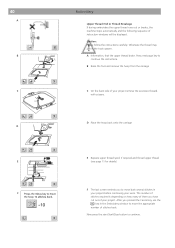
...When the bobbin is running for two minutes. Bobbin thread cutter Notes: Do not move the bobbin winder spindle while the machine is fully wound it will stop the machine then return the bobbin winder spindle to the left. Adjust how much the bobbin is filled by rotating the bobbin winder ...the thread around the bobbin winder thread guide while holding the end of the thread. Press the Start/Stop button again. To achieve the best embroidery quality, BERNINA recommends to the right. Press the Start/Stop button while holding the thread at the spool. 1. Cut the thread close to the hole ...
...When the bobbin is running for two minutes. Bobbin thread cutter Notes: Do not move the bobbin winder spindle while the machine is fully wound it will stop the machine then return the bobbin winder spindle to the left. Adjust how much the bobbin is filled by rotating the bobbin winder ...the thread around the bobbin winder thread guide while holding the end of the thread. Press the Start/Stop button again. To achieve the best embroidery quality, BERNINA recommends to the right. Press the Start/Stop button while holding the thread at the spool. 1. Cut the thread close to the hole ...
User Guide
Page 12
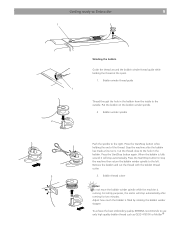
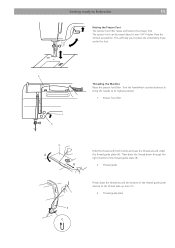
...bring the needle to the thread take-up lever (C). 3. Thread guide Firmly draw the thread around under the foot. 2 1 3 Threading the Machine Raise the presser foot lifter. This will help you to Embroider 11 Raising the Presser Foot The presser foot lifter raises and lowers the presser... foot. Thread guide plate Getting ready to place the embroidery hoop under the thread guide plate (A). Presser foot lifter 2 A B 3 C Hold the thread with both hands and pass the thread around the...
...bring the needle to the thread take-up lever (C). 3. Thread guide Firmly draw the thread around under the foot. 2 1 3 Threading the Machine Raise the presser foot lifter. This will help you to Embroider 11 Raising the Presser Foot The presser foot lifter raises and lowers the presser... foot. Thread guide plate Getting ready to place the embroidery hoop under the thread guide plate (A). Presser foot lifter 2 A B 3 C Hold the thread with both hands and pass the thread around the...
User Guide
Page 20
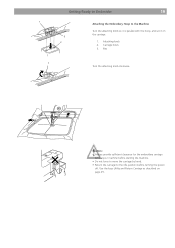
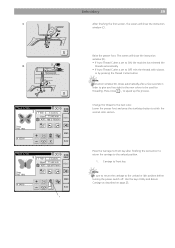
Pins 1 Turn the attaching knob clockwise. Getting Ready to Embroider 19 1 3 2 Attaching the Embroidery Hoop to the idle position before turning the power off. Carriage holes 3. Caution: • Always provide sufficient clearance for the embroidery carriage behind your machine before starting the machine. • Do not force to move the carriage by hand. • Return the carriage to the Machine Turn the attaching knob so it is parallel with the hoop, and set it on page 25. Attaching knob 2. Use the keys Utility and Return Carriage as described on the carriage. 1.
Pins 1 Turn the attaching knob clockwise. Getting Ready to Embroider 19 1 3 2 Attaching the Embroidery Hoop to the idle position before turning the power off. Carriage holes 3. Caution: • Always provide sufficient clearance for the embroidery carriage behind your machine before starting the machine. • Do not force to move the carriage by hand. • Return the carriage to the Machine Turn the attaching knob so it is parallel with the hoop, and set it on page 25. Attaching knob 2. Use the keys Utility and Return Carriage as described on the carriage. 1.
User Guide
Page 26
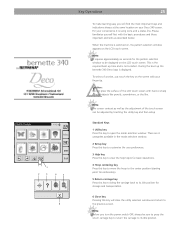
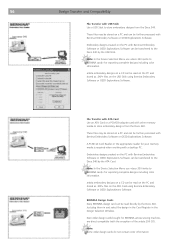
... the required boot up the bernette 340 Deco logo is switched on, the pattern selection window appears on the LCD touch screen. Note: Before you will close the utility selection window and return to the previous screen. Note: It requires approximately six seconds for embroidery). 5 Return carriage key Press... screen can be displayed on the LCD touch screen. During the boot up time and is using icons and a status line. When the machine is displayed. To select a function, just touch the key on your finger tip. There are 4 categories available in the mode selection window...
... the required boot up the bernette 340 Deco logo is switched on, the pattern selection window appears on the LCD touch screen. Note: Before you will close the utility selection window and return to the previous screen. Note: It requires approximately six seconds for embroidery). 5 Return carriage key Press... screen can be displayed on the LCD touch screen. During the boot up time and is using icons and a status line. When the machine is displayed. To select a function, just touch the key on your finger tip. There are 4 categories available in the mode selection window...
User Guide
Page 39
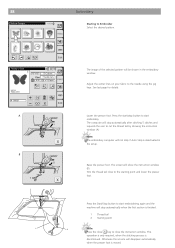
...your fabric to Embroider Select the desired pattern. Press the start/stop button to start embroidering again and the machine will be shown in the setup. 38 Embroidery Starting to the needle using the jog keys. Lower the presser foot. Trim the thread tail close the ...the screens will stop automatically after stitching 5 stitches and requests the user to start embroidery. The screen will not stop automatically when the first section is deactivated in the embroidery window. This operation is only required, when the stitching process is moved. The ...
...your fabric to Embroider Select the desired pattern. Press the start/stop button to start embroidering again and the machine will be shown in the setup. 38 Embroidery Starting to the needle using the jog keys. Lower the presser foot. Trim the thread tail close the ...the screens will stop automatically after stitching 5 stitches and requests the user to start embroidery. The screen will not stop automatically when the first section is deactivated in the embroidery window. This operation is only required, when the stitching process is moved. The ...
User Guide
Page 40
Raise the presser foot. C D # 02260 # 04095 Embroidery 39 After finishing the first section, the screen will show the instruction window (C). Change the thread to the unload position. 1. Press the Carriage to Front ... idle position before turning the power switch off. The screen will show the instruction window (D). • If Auto Thread Cutter is set to ON, the machine has trimmed the threads automatically. • If Auto Thread Cutter is set to OFF, trim the threads with scissors or by pressing the Thread Cutter...
Raise the presser foot. C D # 02260 # 04095 Embroidery 39 After finishing the first section, the screen will show the instruction window (C). Change the thread to the unload position. 1. Press the Carriage to Front ... idle position before turning the power switch off. The screen will show the instruction window (D). • If Auto Thread Cutter is set to ON, the machine has trimmed the threads automatically. • If Auto Thread Cutter is set to OFF, trim the threads with scissors or by pressing the Thread Cutter...
User Guide
Page 41
...and thread upper thread (see page 11 for details) F The last screen reminds you pressed the Cancel key use the key in the Embroidery window to move the appropriate number of your project. Press next page key to continue. After you to move back several stitches in the... on how many of them you have cut out of instruction windows will be displayed. 40 A B C D E F Embroidery Upper Thread End or Thread Breakage If during embroidery the upper thread runs out or breaks, the machine stops automatically and the following sequence of your project remove the excessive threads with scissors.
...and thread upper thread (see page 11 for details) F The last screen reminds you pressed the Cancel key use the key in the Embroidery window to move the appropriate number of your project. Press next page key to continue. After you to move back several stitches in the... on how many of them you have cut out of instruction windows will be displayed. 40 A B C D E F Embroidery Upper Thread End or Thread Breakage If during embroidery the upper thread runs out or breaks, the machine stops automatically and the following sequence of your project remove the excessive threads with scissors.
User Guide
Page 44
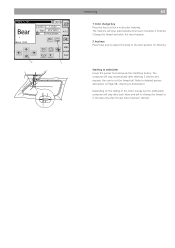
... Page 38, «Starting to Embroider») Depending on the setting of the Color change key the embroidery computer will stop after stitching 5 stitches and requests the user to cut the thread tail. The machine will stop automatically after each character is finished. Bear 2 Lettering 43 1 Color change the thread or it...
... Page 38, «Starting to Embroider») Depending on the setting of the Color change key the embroidery computer will stop after stitching 5 stitches and requests the user to cut the thread tail. The machine will stop automatically after each character is finished. Bear 2 Lettering 43 1 Color change the thread or it...
User Guide
Page 52
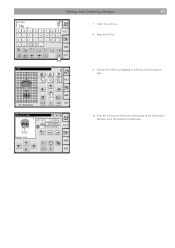
Editing and Combining Designs 51 Gothic Sky a bc d ij kl qrs t yz AB L MS AB AB B e f g h A.B.C mn o p uvwx A A Aa AA Edit 7. Select «k» and «y». 8. Position the letters by dragging or with by using the position keys. 10. Press the OK key and the screen will change to embroider. Press the OK key. 9. Start the machine to the Embroidery Window.
Editing and Combining Designs 51 Gothic Sky a bc d ij kl qrs t yz AB L MS AB AB B e f g h A.B.C mn o p uvwx A A Aa AA Edit 7. Select «k» and «y». 8. Position the letters by dragging or with by using the position keys. 10. Press the OK key and the screen will change to embroider. Press the OK key. 9. Start the machine to the Embroidery Window.
User Guide
Page 55
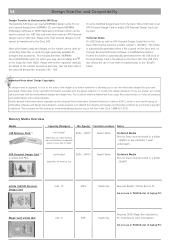
...185 Personal Design Card max. 15 .EXP+ Read only Requires Reader / Writer Box on CD cannot be transferred to the Deco 340. This includes Bernette / BERNINA deco 500/600/650 cards, for details of laptop PC! It is up to the artist of subdirectories in the :\EmbF5 folder... PCMCIA slot of embroidery products by converting these files or cards through Bernina Embroidery Software («Card/Machine Write»). Most other brand cards and designs on the market can be used. 54 Design Transfer and Compatibility Design Transfer to the bernette 340 Deco The bernette 340 Deco can be reached...
...185 Personal Design Card max. 15 .EXP+ Read only Requires Reader / Writer Box on CD cannot be transferred to the Deco 340. This includes Bernette / BERNINA deco 500/600/650 cards, for details of laptop PC! It is up to the artist of subdirectories in the :\EmbF5 folder... PCMCIA slot of embroidery products by converting these files or cards through Bernina Embroidery Software («Card/Machine Write»). Most other brand cards and designs on the market can be used. 54 Design Transfer and Compatibility Design Transfer to the bernette 340 Deco The bernette 340 Deco can be reached...
User Guide
Page 57
... can be further processed with other memory media to store embroidery designs from the Deco 340. artista embroidery designs on the PC with Bernina Embroidery Software or OESD Explorations Software. Note: In the Device Selection Menu use «deco 330 (write to BERNINA card)» for BERNINA artista sewing machine, are direct compatible (with a desktop PC. Even older design cards...
... can be further processed with other memory media to store embroidery designs from the Deco 340. artista embroidery designs on the PC with Bernina Embroidery Software or OESD Explorations Software. Note: In the Device Selection Menu use «deco 330 (write to BERNINA card)» for BERNINA artista sewing machine, are direct compatible (with a desktop PC. Even older design cards...
User Guide
Page 60
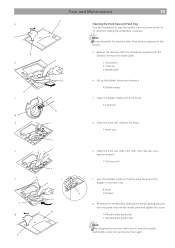
... on the needle plate and tighten the screw. 10 Needle plate guide pins 11 Needle plate guide holes Note: After cleaning the machine, make sure to 'O' and then unplug the embroidery computer. (1) a 1 (2) 2 b 4 c (3) 4 d e (5) 10 f 4 (g7) 2 Care and Maintenance 59 3 Cleaning the Hook Race and Feed Dog Turn the handwheel to raise the needle...
... on the needle plate and tighten the screw. 10 Needle plate guide pins 11 Needle plate guide holes Note: After cleaning the machine, make sure to 'O' and then unplug the embroidery computer. (1) a 1 (2) 2 b 4 c (3) 4 d e (5) 10 f 4 (g7) 2 Care and Maintenance 59 3 Cleaning the Hook Race and Feed Dog Turn the handwheel to raise the needle...

User Guide
Page 62
...stabilizer is not used. 7 The needle thread on the wrong side. Abnormal noise when turning the machine on again. The machine stops and «Lock» is indicated on the status line on the embroidery hoop. 7 A stabilizer is not working correctly. See page 28 The bobbin thread breaks. 1 ...distorted Function keys do not work properly. 1 The fabric is not pulled tightly on the embroidery hoop. 2 The embroider hoop is not fixed securely. 3 The carriage is bumping into something around the machine. The needle breaks. 1 The needle is inserted incorrectly 2 The needle is bent or ...
...stabilizer is not used. 7 The needle thread on the wrong side. Abnormal noise when turning the machine on again. The machine stops and «Lock» is indicated on the status line on the embroidery hoop. 7 A stabilizer is not working correctly. See page 28 The bobbin thread breaks. 1 ...distorted Function keys do not work properly. 1 The fabric is not pulled tightly on the embroidery hoop. 2 The embroider hoop is not fixed securely. 3 The carriage is bumping into something around the machine. The needle breaks. 1 The needle is inserted incorrectly 2 The needle is bent or ...
User Guide
Page 63
... accessories 5 Standard keys 25 Start/ Stop Button 7 Starting to embroider 38, 43 T Templates 17 Thread Tension 15 Threading the Machine 11 Troubleshooting 61 U User Preferences / Setup 27 W Winding the bobbin 9 11/10 EN 502060.06.63 854800087 Letters 45 ...Deleting a letter 44 • Inserting a letter 44 M Monogram, 2 / 3- 62 Index A Assigning a file name 53 Attaching the Embroidery Hoop 19 B Bobbin Threads 22 C Care and Maintenance 59 Change Needle 16 Checking the Needle Condition 24 Cleaning the Hook Race and Feed Dog...
... accessories 5 Standard keys 25 Start/ Stop Button 7 Starting to embroider 38, 43 T Templates 17 Thread Tension 15 Threading the Machine 11 Troubleshooting 61 U User Preferences / Setup 27 W Winding the bobbin 9 11/10 EN 502060.06.63 854800087 Letters 45 ...Deleting a letter 44 • Inserting a letter 44 M Monogram, 2 / 3- 62 Index A Assigning a file name 53 Attaching the Embroidery Hoop 19 B Bobbin Threads 22 C Care and Maintenance 59 Change Needle 16 Checking the Needle Condition 24 Cleaning the Hook Race and Feed Dog...


