Bernina Aurora 440QE Support Question
Bernina Aurora 440QE Support Question
Find answers below for this question about Bernina Aurora 440QE.Need a Bernina Aurora 440QE manual? We have 1 online manual for this item!
Question posted by elizesmit on July 14th, 2013
I Have A Bernina Aurora 440 Embroidery Machine.
While I was busy stitching the design the thread broke, after I have fixed it the machine does' nt want to start working again. What must I do? I do definitely something wrong, please helpL!
Current Answers
Related Bernina Aurora 440QE Manual Pages
User Guide - Page 3
... sew - Your sewing computer
Accessories Details aurora 430 / 440 QE / 450 Setting up the embroidery computer Important embroidery information Embroidery operating requirements Bernina embroidery software Software - on
30-32 33
34-47 48
49-56
All about embroidery
Details Accessories Setting up the sewing computer Thread tension Important facts on PC Starting to embroider Mega-Hoop Stitch...
User Guide - Page 4
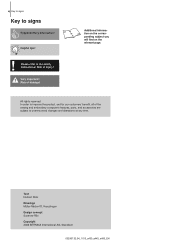
..., all of the sewing and embroidery computer's features, parts..., and accessories are subject to the safety instructions! Risk of damage!
Risk of injury!
Please refer to unannounced changes and alterations at any time. Very important!
Text Herbert Stolz Drawings Müller-Melzer ID, Kreuzlingen Design concept Susanne Ribi Copyright 2008 BERNINA...
User Guide - Page 5
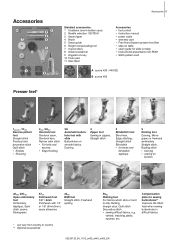
...A
B
B aurora 450
Presser feet*
1430/440 , 1C450 Reverse pattern foot Straight stitch Practical and decorative stitch Quilt stitch • Eyelets • Securing
2430 , 2A450 Overlock foot Overlock seam, Overlock hem, Narrow satin stitch • For knits and
wovens • Edge finishing
3A Automatic buttonhole foot with slide Buttonholes on smooth fabrics, Darning
4 Zipper foot Sewing in...
User Guide - Page 9
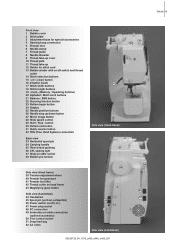
... 35 Rear thread guideng 36 CFL sewing light 37 ...Thread guide 8 Needle threader 9 Thread take-up cover 10 Thread path 11 Thread take-up /down button 27 Mirror image button 28 Slide speed control 29 Start / Stop - Details 9
Front view 1 Bobbin cover 2 Stitch plate 3 Attachment base for stitch card 13 Bobbin winder with on /off («0») 47 Power plug socket 48 PC connection 49 Embroidery...
User Guide - Page 11
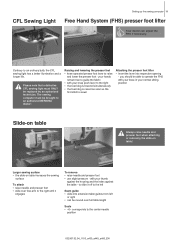
... is raised as soon as the first stitch is sewn
Attaching the presser foot lifter • insert the lever into extension table guides from left
Seam guide • slide into respective opening
- Larger sewing surface • the slide-on table!.... Contrary to raise
and lower the presser foot -
Please note that a defective CFL sewing light must be brought to an authorized BERNINA dealer!
User Guide - Page 13
... Needle
Setting up the sewing computer 13
A
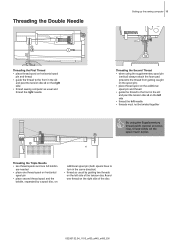
Threading the First Thread • place thread spool on horizontal spool
pin and thread • guide the thread to the front in the slit
and past the tension disc A on the right side • thread sewing computer as usual by a spool disc, on the right side of the tension disc A and...
User Guide - Page 16
Refer to start sewing
! 16 Setting up the sewing computer
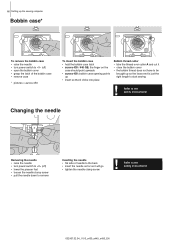
Bobbin case*
A
To remove the bobbin case • raise the needle • turn power switch... the bobbin case latch • aurora 430 / 440 QE: the finger on the
case should point upwards • aurora 450: bobbin case opening points
up as it • close the bobbin cover • the bobbin thread does not have to be
brought ...
User Guide - Page 18
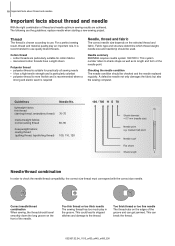
Needle summary BERNINA requires needle system 130/705 H. Guidelines
lightweight fabrics: thin thread (darning thread, embroidery thread)
mediumweight fabrics: normal sewing thread
heavyweight fabrics: sewing thread (quilting thread, topstitching thread)
Needle No. 70-75 80-90 100, 110, 120
130 / 705 H S 70
Shank diameter = 0.7 mm (needle size)
Needle point e.g. medium ball point
Needle scarf ...
User Guide - Page 27
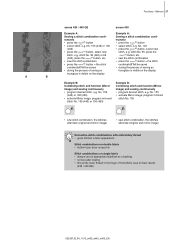
... No. 155 • activate Mirror image, program mirrored
stitch No. 155
• sew stitch combination, the stitches alternate (original and mirror image)
• sew stitch combination, the stitches alternate (original and mirror image)
Decorative stitch combinations with embroidery thread • gives stitches a fuller appearance
Stitch combinations on double fabric • bottom layer does...
User Guide - Page 28
... the available
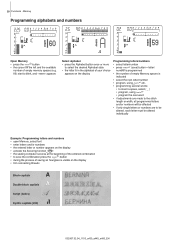
number of empty memory spaces (e.g.
60) start to blink, and «mem» appears
Select alphabet ...8226; program the next word
• if adjustments are made to the stitch
length or width, all programmed letters
and/or numbers will be affected
...display
• activate the Securing function
• the sewing computer secures at the beginning of the entered combination
•...
User Guide - Page 36
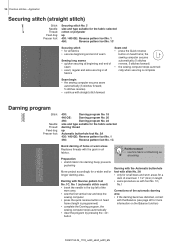
... program No. 22
size and type suitable for the fabric selected
darning thread
up
Presser foot: 430 / 440 QE: Reverse pattern foot No. 1
450:
Reverse pattern foot No. 1C
Securing stitch • for all fabrics • secures beginning and end of seam
Sewing long seams • quicker securing at beginning and end of
seam...
User Guide - Page 46
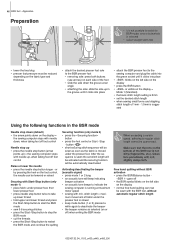
...; attaching the sole: slide the sole up lower thread • hold upper and lower thread and press
the Start-/Stop button to start the BSR mode • sew 5-6 securing stitches • press the Start-/Stop button to stop down (default) • the arrow points down on the display =
the sewing computer stops with needle down the groove at...
User Guide - Page 53
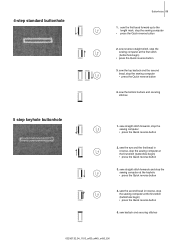
... second bead in reverse, stop the sewing computer
• press the Quick reverse button
2. sew bartack and securing stitches
032907.52.04_1103_a430_a440_a450_EN sew the top bartack and the second bead, stop the sewing computer at the first stitch (buttonhole begin) • press the Quick reverse button
5. sew straight stitch forwards and stop the sewing computer • press the Quick...
User Guide - Page 55
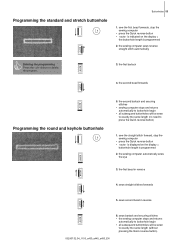
... indicated on the display =
buttonhole length is programmed
2. the first bead in reverse
032907.52.04_1103_a430_a440_a450_EN
6. the first bartack
4. the second bartack and securing stitches
• sewing computer stops and returns automatically to buttonhole begin • all subsequent buttonholes will be sewn to exactly the same length (no need to delete the...
User Guide - Page 56
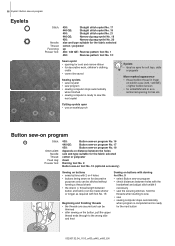
...
430 / 440 QE: Reverse pattern foot No. 1
450:
Reverse pattern foot No. 1C
Sewn eyelet • opening for ties etc. hold the threads when starting to the wrong side and knot
Sewing on buttons with darning foot No. 9 • select Button sew-on program • check distances between holes with the
handwheel and adjust stitch width if...
User Guide - Page 60
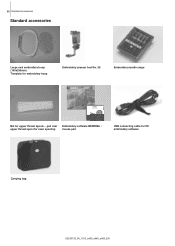
...Standard accessories
Standard accessories
Large oval embroidery hoop (145x255mm) Template for embroidery hoop
Embroidery presser foot No. 26
Embroidery needle range
Art Design V1 Embroidery Software
Net for PC embroidery software
Carrying bag
032907.52.04_1103_a430_a440_a450_EN pull over upper thread spool for even spooling
Embroidery software BERNINA / mouse pad
USB connecting cable for...
User Guide - Page 63
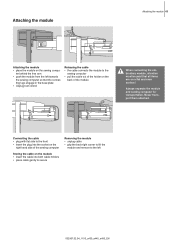
Always separate the module and sewing computer for transportation.
Connecting the cable • plug with flat side to the front • insert the plug into the socket on the
right hand side of the module
When connecting the embroidery module, attention must be paid that the connecting lugs engage in the base plate...
User Guide - Page 73
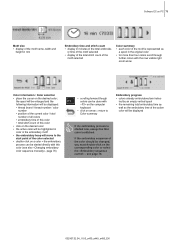
... enlarged and the following information will be displayed: • thread brand / thread number / color
number • position of the current color / total
number of all colors • embroidery time of this color • total stitch count of the active color will move to the start point of the color selected • double-click on PC...
User Guide - Page 75
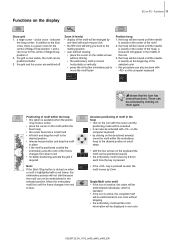
... of Mega-Hoop position 1 and a red cross for better positioning activate the grid if required
Note: If the Start-/Stop button is clicked on when a motif is highlighted with a red frame, the embroidery process will be activated • it can also be activated with «F4» on the
computer keyboard •...
User Guide - Page 85
...
11
Settings
Balance
22
Presser foot pressure
22
Thread tension
17
Setting up the sewing-/embroidery
computer
Embroidery module
63-67
Sewing computer
10-17
Sewing
Accessories
5-7
Function buttons
24-25
Letters (Alphabets)
25, 28
Reverse sewing
25
Sewing corners
21
Sewing stitch combinations
26-28
Sewing with BSR
45
Special characters
25
Using compensating plates...
Similar Questions

Hi My Bernina 440qe Keeps Giving A Thread Break Beep When No Thread Has Broken.
I have checked the bobbin and can't see a problem, I can see the sensor spring moving up and down on...
I have checked the bobbin and can't see a problem, I can see the sensor spring moving up and down on...
(Posted by brendamcfall 4 years ago)


How Do I Reset Timing On Bernette 340 Embroidery Machine?
I have an Bernina Bernette 340 deco embroidery machine. I desperately need instructions for resettin...
I have an Bernina Bernette 340 deco embroidery machine. I desperately need instructions for resettin...
(Posted by amykcamp 10 years ago)

Aurora 430 Embroidery Machine Start Stop Icon
start stop icon comes up but it won't start sewing
start stop icon comes up but it won't start sewing
(Posted by Anonymous-95347 11 years ago)

How Is The Front Cover Removed From A Bernina Aurora 440qe Sewing Machine?
My dealer has had two opportunities to repair my machine and did an OK job except for getting the co...
My dealer has had two opportunities to repair my machine and did an OK job except for getting the co...
(Posted by lholdren 11 years ago)