

User Guide
Page 2
...all controls to the off ) when making any openings on the cord, instead, grasp the plug before pulling. 16. ENVIROMENTAL PROTECTION BERNINA is required around the sewing needle. 6. Do not dispose of this manual. 3. Never operate the sewing computer with the sewing computer....8226; it has a damaged cord or plug, • it is marked with double insulation (except USA / Canada). Use only identical replacement parts. IMPORTANT SAFETY INSTRUCTIONS! 1 When using an electrical appliance, basic safety p recautions should always be followed, including the following: ...
...all controls to the off ) when making any openings on the cord, instead, grasp the plug before pulling. 16. ENVIROMENTAL PROTECTION BERNINA is required around the sewing needle. 6. Do not dispose of this manual. 3. Never operate the sewing computer with the sewing computer....8226; it has a damaged cord or plug, • it is marked with double insulation (except USA / Canada). Use only identical replacement parts. IMPORTANT SAFETY INSTRUCTIONS! 1 When using an electrical appliance, basic safety p recautions should always be followed, including the following: ...
User Guide
Page 5
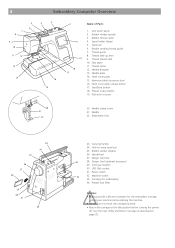
4 Embroidery Computer Overview 5 4 3 6 7 8 9 10 11 12 13 14 16 15 2 Name of Parts 1 19 18 17 1. LCD touch panel 2. Thread tension dial 10. Thread cutter 12. Extension table (accessory box) 16. Pocket for embroidery) 34. Carrying handle 24. ...
4 Embroidery Computer Overview 5 4 3 6 7 8 9 10 11 12 13 14 16 15 2 Name of Parts 1 19 18 17 1. LCD touch panel 2. Thread tension dial 10. Thread cutter 12. Extension table (accessory box) 16. Pocket for embroidery) 34. Carrying handle 24. ...
User Guide
Page 8
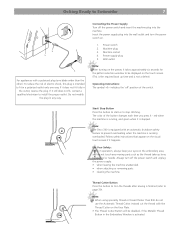
...Embroider 7 1 2 5 3 4 For appliances with a polarized plug (one way. Power switch 2. Power supply plug 5. Note: The Deco 340 is equipped with the Thread Cutter on the embroidery area, and do not use the Automatic Thread Cutter. For Your Safety: While in operation...;0» indicates the 'off the power switch and unplug the power supply: • when leaving the machine unattended. • when attaching or removing parts. • cleaning the machine. red when the machine is running overloaded. Follow safety instructions that appear on . 1. Note: • When using speciality...
...Embroider 7 1 2 5 3 4 For appliances with a polarized plug (one way. Power switch 2. Power supply plug 5. Note: The Deco 340 is equipped with the Thread Cutter on the embroidery area, and do not use the Automatic Thread Cutter. For Your Safety: While in operation...;0» indicates the 'off the power switch and unplug the power supply: • when leaving the machine unattended. • when attaching or removing parts. • cleaning the machine. red when the machine is running overloaded. Follow safety instructions that appear on . 1. Note: • When using speciality...
User Guide
Page 37
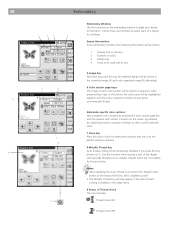
... the design with the colour sequence number as well as metallic threads which are functions to select parts of each color section will be shown in the utility menu. 9 Status of the Deco 340 is shown on the fabric. Notes: • When disabling the Auto Thread Cut function the Thread Cutter Button at...
... the design with the colour sequence number as well as metallic threads which are functions to select parts of each color section will be shown in the utility menu. 9 Status of the Deco 340 is shown on the fabric. Notes: • When disabling the Auto Thread Cut function the Thread Cutter Button at...
User Guide
Page 59
... will see a second file with the same file name, but it also the shape of the individual parts for auto-generation of this .EXP format. .EXP+ artista 630/640, artista 160 - 185 Deco 330/340 Bernina extended .EXP embroidery design format based on ... On LinFlash PC cards the stitch coordinates and color information are...
... will see a second file with the same file name, but it also the shape of the individual parts for auto-generation of this .EXP format. .EXP+ artista 630/640, artista 160 - 185 Deco 330/340 Bernina extended .EXP embroidery design format based on ... On LinFlash PC cards the stitch coordinates and color information are...
User Guide
Page 63
... 21 Embroidery Threads 22 Embroidery Window 36 Extra spool pin 8 Extension Table, detachable 6 F Formatting the memory 29 G Getting Ready to Embroider 7 I Inserting and Removing of Parts 4 Needle Summary 23 Needle Threader 13 Needle, Thread and Fabric 23 O On-screen Help 31 Open Designs from internal memory 32 Overview, Embroidery Computer 4 P Pattern...
... 21 Embroidery Threads 22 Embroidery Window 36 Extra spool pin 8 Extension Table, detachable 6 F Formatting the memory 29 G Getting Ready to Embroider 7 I Inserting and Removing of Parts 4 Needle Summary 23 Needle Threader 13 Needle, Thread and Fabric 23 O On-screen Help 31 Open Designs from internal memory 32 Overview, Embroidery Computer 4 P Pattern...


