

User Guide
Page 2
... and knowledge of burns, fire, electrical shock or injury to environmental protection. ENVIROMENTAL PROTECTION BERNINA is required around the sewing needle. 6. Do not dispose of double-insulated machines. 1.... instructions before using this sewing computer from the electrical outlet immediately after using the embroidery module. 18. Do not operate where aerosol (spray) products are being administered....ventilation openings of the sewing computer and foot controller free from accumulation of design and production technologiy. No grounding means is used by constantly improving them in...
... and knowledge of burns, fire, electrical shock or injury to environmental protection. ENVIROMENTAL PROTECTION BERNINA is required around the sewing needle. 6. Do not dispose of double-insulated machines. 1.... instructions before using this sewing computer from the electrical outlet immediately after using the embroidery module. 18. Do not operate where aerosol (spray) products are being administered....ventilation openings of the sewing computer and foot controller free from accumulation of design and production technologiy. No grounding means is used by constantly improving them in...
User Guide
Page 3
... of available embroidery designs, educational publications and useful accessories we hope you will spend countless hours enjoying the many possibilities to welcome you in order to buy the bernette Deco 340. We are happy, to customize your designs on the screen will provide you even further. 2 Welcome Congratulations on your BERNINA dealer; This product was designed and built...
... of available embroidery designs, educational publications and useful accessories we hope you will spend countless hours enjoying the many possibilities to welcome you in order to buy the bernette Deco 340. We are happy, to customize your designs on the screen will provide you even further. 2 Welcome Congratulations on your BERNINA dealer; This product was designed and built...
User Guide
Page 4
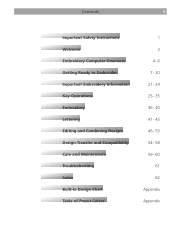
Contents 3 Important Safety Instructions 1 Welcome 2 Embroidery Computer Overview 4- 6 Getting Ready to Embroider 7- 20 Important Embroidery Information 21- 24 Key Operations 25- 35 Embroidery 36- 40 Lettering 41- 45 Editing and Combining Designs 46- 53 Design Transfer and Compatibility 54- 58 Care and Maintenance 59- 60 Troubleshooting 61 Index 62 Built-in Design Chart Appendix Table of Preset Colors Appendix
Contents 3 Important Safety Instructions 1 Welcome 2 Embroidery Computer Overview 4- 6 Getting Ready to Embroider 7- 20 Important Embroidery Information 21- 24 Key Operations 25- 35 Embroidery 36- 40 Lettering 41- 45 Editing and Combining Designs 46- 53 Design Transfer and Compatibility 54- 58 Care and Maintenance 59- 60 Troubleshooting 61 Index 62 Built-in Design Chart Appendix Table of Preset Colors Appendix
User Guide
Page 5
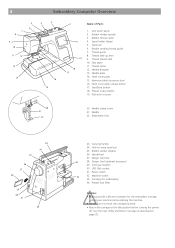
Face plate 11. Extension table (accessory box) 16. Carrying handle 24. Handwheel 27. Design Card slot 34 28. Presser foot lifter Caution: • Always provide sufficient clearance for extra spool pin 25. 4 Embroidery Computer Overview 5 4 3 6 7 8 9 10 11 12 13 14 16 15 2 Name of Parts 1 19 18 17... Hook cover plate release button 17. Start/Stop button 18. USB Stick socket 31. Hook cover plate 15. Thread Cutter button 19. Embroidery foot 25 26 27 28 23 24 29 30 31 32 23. Card eject button 30. LCD touch panel 2. Needle 22. Thread ...
Face plate 11. Extension table (accessory box) 16. Carrying handle 24. Handwheel 27. Design Card slot 34 28. Presser foot lifter Caution: • Always provide sufficient clearance for extra spool pin 25. 4 Embroidery Computer Overview 5 4 3 6 7 8 9 10 11 12 13 14 16 15 2 Name of Parts 1 19 18 17... Hook cover plate release button 17. Start/Stop button 18. USB Stick socket 31. Hook cover plate 15. Thread Cutter button 19. Embroidery foot 25 26 27 28 23 24 29 30 31 32 23. Card eject button 30. LCD touch panel 2. Needle 22. Thread ...
User Guide
Page 18
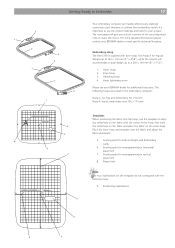
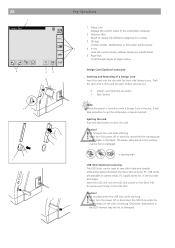
Embroidery Hoop The Deco 340 is important to use the template to 126 x 110 mm (5" x 43/8"), while the hoop B will give you a short overview of the hoop. Inner hoop 3. Finger ... 9 8 7 9 Templates When positioning the fabric into the hoop, use the correct materials and tools for built-in horizontal placement 7. Hoop tightening screw Please see your BERNINA dealer for monogramming in designs and Embroidery cards. 6. Positioning indentations 8 6 5 Getting Ready to a 200 x 140 mm (8" x 51/2"). 1. Starting point for your...
Embroidery Hoop The Deco 340 is important to use the template to 126 x 110 mm (5" x 43/8"), while the hoop B will give you a short overview of the hoop. Inner hoop 3. Finger ... 9 8 7 9 Templates When positioning the fabric into the hoop, use the correct materials and tools for built-in horizontal placement 7. Hoop tightening screw Please see your BERNINA dealer for monogramming in designs and Embroidery cards. 6. Positioning indentations 8 6 5 Getting Ready to a 200 x 140 mm (8" x 51/2"). 1. Starting point for your...
User Guide
Page 27
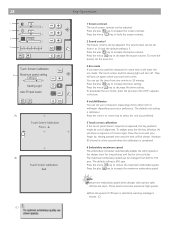
... accessory) Inserting and Removing of a Design Card Insert the card into the USB Stick socket on the Deco 340. Caution! • Do not eject the card while stitching. • Never turn the power off or eject the card while the warning sign or hourglass ... used to you. Otherwise, data stored in this screen will take sometime to get the embroidery computer booted. To remove pull firmly on with the front side facing to save stitch data and transfer embroidery designs between the Deco 340 and your PC. Otherwise, data stored in various sizes and shape. 26 1 Screen Title 5 7 7 Key...
... accessory) Inserting and Removing of a Design Card Insert the card into the USB Stick socket on the Deco 340. Caution! • Do not eject the card while stitching. • Never turn the power off or eject the card while the warning sign or hourglass ... used to you. Otherwise, data stored in this screen will take sometime to get the embroidery computer booted. To remove pull firmly on with the front side facing to save stitch data and transfer embroidery designs between the Deco 340 and your PC. Otherwise, data stored in various sizes and shape. 26 1 Screen Title 5 7 7 Key...
User Guide
Page 29
...speed of 750 spm is selected a warning message is shown. (C) Note Note Reduce the embroidery speed when designs with narrow satin stit chesand fast for short ...61541;eytoincrease the buzzer volume. Press the minus key to reduce the maximum embroidery speed. Window (B6) Eshmobwrsoifdoer rayfmewaxsiemcounmd wspheeendt:he calibration is completed 6Embro&#...
...speed of 750 spm is selected a warning message is shown. (C) Note Note Reduce the embroidery speed when designs with narrow satin stit chesand fast for short ...61541;eytoincrease the buzzer volume. Press the minus key to reduce the maximum embroidery speed. Window (B6) Eshmobwrsoifdoer rayfmewaxsiemcounmd wspheeendt:he calibration is completed 6Embro&#...
User Guide
Page 33
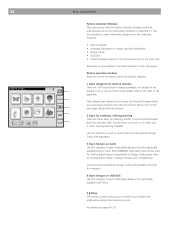
...Design Cards with alphabets. 3 Open Designs on Cards Use this window to open embroidery designs from the following locations: • Built-in Designs • Lettering (integrated or design card with the Pattern Selection Window will start automatically when the embroidery computer is a choice of 3- Every BERNINA embroidery... to open embroidery designs from optionally available USB Sticks. 5 Editing The editing function allows you previously saved into the Deco 340. Pattern selection window Press one of the five tabs to select the desired category. 1 Open designs from internal ...
...Design Cards with alphabets. 3 Open Designs on Cards Use this window to open embroidery designs from the following locations: • Built-in Designs • Lettering (integrated or design card with the Pattern Selection Window will start automatically when the embroidery computer is a choice of 3- Every BERNINA embroidery... to open embroidery designs from optionally available USB Sticks. 5 Editing The editing function allows you previously saved into the Deco 340. Pattern selection window Press one of the five tabs to select the desired category. 1 Open designs from internal ...
User Guide
Page 34
.... The display will show the folders. Use the Page keys 5 design files to scroll to the pages with indiviual or Press the corresponding folder key to page 25 for Embroidery Press the corresponding tab in designs - Note: This key is only shown when the internal memory tab... is displayed in /Personal key Press this particular folder. Personal designs from the various memory sources. 8 designs are shown on the pattern selection keys...
.... The display will show the folders. Use the Page keys 5 design files to scroll to the pages with indiviual or Press the corresponding folder key to page 25 for Embroidery Press the corresponding tab in designs - Note: This key is only shown when the internal memory tab... is displayed in /Personal key Press this particular folder. Personal designs from the various memory sources. 8 designs are shown on the pattern selection keys...
User Guide
Page 37
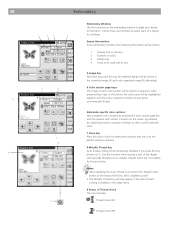
... be shown in the utility menu. 9 Status of the design with the colour sequence number as well as the recommended thread. Notes: • When disabling the Auto Thread Cut function the Thread Cutter Button at the head of the Deco 340 is disabled as well. • This Metallic Thread key will be ... OFF By pressing the Start/Stop key the computer will start to stitch out the selected color. 7 Close key Press this key to close the embroidery window and return to the pattern selection window. 8 Metallic Thread key Auto thread cutting will be used and its size 5 Image key Each time ...
... be shown in the utility menu. 9 Status of the design with the colour sequence number as well as the recommended thread. Notes: • When disabling the Auto Thread Cut function the Thread Cutter Button at the head of the Deco 340 is disabled as well. • This Metallic Thread key will be ... OFF By pressing the Start/Stop key the computer will start to stitch out the selected color. 7 Close key Press this key to close the embroidery window and return to the pattern selection window. 8 Metallic Thread key Auto thread cutting will be used and its size 5 Image key Each time ...
User Guide
Page 38
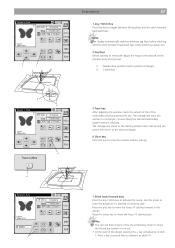
...broken or run out. • At the start of the design pressing the + key will advance to move the hoop 10 stitches back. Press the plus key to move the hoop 10 stitches forward in a rectangle, circumscribing the selected embroidery pattern without tracing. 7 Stitch back/forward keys Press the ...Jog / Stitch key to acitvate this key to trace the design as it is stitched out step by pressing this key. Notes: • You can...
...broken or run out. • At the start of the design pressing the + key will advance to move the hoop 10 stitches back. Press the plus key to move the hoop 10 stitches forward in a rectangle, circumscribing the selected embroidery pattern without tracing. 7 Stitch back/forward keys Press the ...Jog / Stitch key to acitvate this key to trace the design as it is stitched out step by pressing this key. Notes: • You can...
User Guide
Page 47
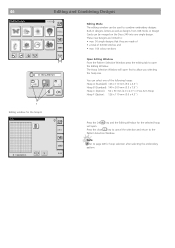
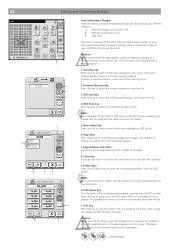
... to page 48 for the hoop B Edit A.B.C B: 140x200mm X Edit Editing Mode The editing window can be merged on the Deco 340 into one of 64'000 stitches and • max. 104 colour sections Open Editing Window From the Pattern Selection Window press the... the Editing Window. 46 Editing and Combining Designs B: 140 x 200 mm A(F) B C X 1 Editing window for hoop selection after selecting the embroidery pattern. The Hoop Selection Window will open. Press the close X key to cancel the selection and return to combine embroidery designs. You can be used to the Pattern Selection...
... to page 48 for the hoop B Edit A.B.C B: 140x200mm X Edit Editing Mode The editing window can be merged on the Deco 340 into one of 64'000 stitches and • max. 104 colour sections Open Editing Window From the Pattern Selection Window press the... the Editing Window. 46 Editing and Combining Designs B: 140 x 200 mm A(F) B C X 1 Editing window for hoop selection after selecting the embroidery pattern. The Hoop Selection Window will open. Press the close X key to cancel the selection and return to combine embroidery designs. You can be used to the Pattern Selection...
User Guide
Page 48
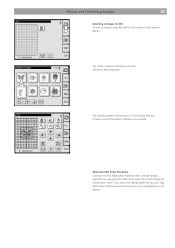
... the pattern indicates it is selected. A.B.C Alternate Edit Entry Procedure Starting from the Embroidery Window (with a design already selected) you may press the Edit tab to Edit To select a design, press the tab for modification. Editing and Combining Designs 47 Edit Selecting a Design to open . Even if you enter the Editing Mode like this, you...
... the pattern indicates it is selected. A.B.C Alternate Edit Entry Procedure Starting from the Embroidery Window (with a design already selected) you may press the Edit tab to Edit To select a design, press the tab for modification. Editing and Combining Designs 47 Edit Selecting a Design to open . Even if you enter the Editing Mode like this, you...
User Guide
Page 53
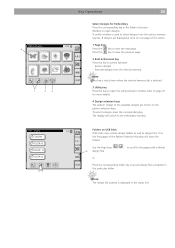
... M_001 M_005 M_002 M_006 M_003 M_004 M_007 M_008 Name 10 OK 6 11 Save Embroidery Designs From the editing window embroidery design can be stored. Note: If no writeable Design Card or USB Stick is shown in order. Designs with designs. On USB Sticks folders are not shown. 5 New Folder key Press this ...= warning sign After saving the design the Edit Window is recommended to a Personal Design Card or USB Stick. Caution: Never turn off the power, eject the Design Card or remove the USB Stick when the warning sign or hourglass appears on the Deco 340 B. USB Stick The built-in ...
... M_001 M_005 M_002 M_006 M_003 M_004 M_007 M_008 Name 10 OK 6 11 Save Embroidery Designs From the editing window embroidery design can be stored. Note: If no writeable Design Card or USB Stick is shown in order. Designs with designs. On USB Sticks folders are not shown. 5 New Folder key Press this ...= warning sign After saving the design the Edit Window is recommended to a Personal Design Card or USB Stick. Caution: Never turn off the power, eject the Design Card or remove the USB Stick when the warning sign or hourglass appears on the Deco 340 B. USB Stick The built-in ...
User Guide
Page 55
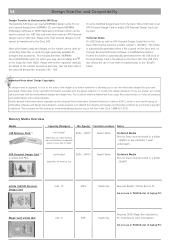
... through Bernina Embroidery Software («Card/Machine Write»). Further general information about Design Copyrights: All designs have purchased. To write modified designs back from BERNINA CD you have a copyright. This folder is automatically generated when a file is to defend the integrity and quality of laptop PC! 54 Design Transfer and Compatibility Design Transfer to the bernette 340 Deco The bernette 340 Deco can...
... through Bernina Embroidery Software («Card/Machine Write»). Further general information about Design Copyrights: All designs have purchased. To write modified designs back from BERNINA CD you have a copyright. This folder is automatically generated when a file is to defend the integrity and quality of laptop PC! 54 Design Transfer and Compatibility Design Transfer to the bernette 340 Deco The bernette 340 Deco can...

User Guide
Page 56
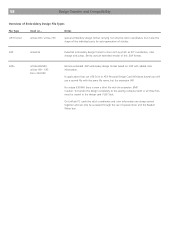
...of the above memory media to transfer embroidery designs into the Deco 340 and back. Read only Convert .ART files on PC Do not use with Deco 340 1) Any brand of USB Stick or ATA PCMCIA card may be used ! Media Studio BERNINA USB Stick Design Transfer and Compatibility 55 Capacity not ...markets the function of every of these cards can however not be guaranteed Transfer of Embroidery Designs Below is a graphical summary of all different ways to Deco 340 Note: CDs produced in PCMCIA slot of laptop PC! (Studio BERNINA CD)* not applicable .EXP(+), (ART)* Only non-licenced CD's can be ...
...of the above memory media to transfer embroidery designs into the Deco 340 and back. Read only Convert .ART files on PC Do not use with Deco 340 1) Any brand of USB Stick or ATA PCMCIA card may be used ! Media Studio BERNINA USB Stick Design Transfer and Compatibility 55 Capacity not ...markets the function of every of these cards can however not be guaranteed Transfer of Embroidery Designs Below is a graphical summary of all different ways to Deco 340 Note: CDs produced in PCMCIA slot of laptop PC! (Studio BERNINA CD)* not applicable .EXP(+), (ART)* Only non-licenced CD's can be ...
User Guide
Page 57
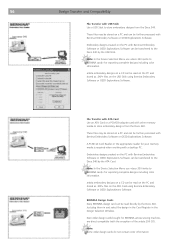
... PC and stored as .EXP+ files on the PC with other memory media to store embroidery designs from the Deco 340. artista embroidery designs on the ATA Card using Bernina Embroidery Software or OESD Explorations Software. File Transfer with ATA Card Use an ATA Card or a... PCMCIA adapter card with Bernina Embroidery Software or OESD Explorations Software can be transferred to the Deco 340 by the ATA Card. Embroidery designs created on the USB Stick using Bernina Embroidery Software or OESD Exploratinons Software. 56 Design Transfer and Compatibility File Transfer with ...
... PC and stored as .EXP+ files on the PC with other memory media to store embroidery designs from the Deco 340. artista embroidery designs on the ATA Card using Bernina Embroidery Software or OESD Explorations Software. File Transfer with ATA Card Use an ATA Card or a... PCMCIA adapter card with Bernina Embroidery Software or OESD Explorations Software can be transferred to the Deco 340 by the ATA Card. Embroidery designs created on the USB Stick using Bernina Embroidery Software or OESD Exploratinons Software. 56 Design Transfer and Compatibility File Transfer with ...
User Guide
Page 58
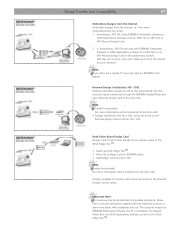
... into Deco 340 Note: Limited functionality! Using BERNINA Embroidery Software or OESD Explorations software write as .EXP+ file to Magic Card for artista 165 / 185. No colour information will be transferred to the Deco 340 Designs modified on the Personal Design Card for your reference. Design Transfer and Compatibility 57 Embroidery Designs from the Internet Embroidery designs from www. Read Other Brand Design Card Design...
... into Deco 340 Note: Limited functionality! Using BERNINA Embroidery Software or OESD Explorations software write as .EXP+ file to Magic Card for artista 165 / 185. No colour information will be transferred to the Deco 340 Designs modified on the Personal Design Card for your reference. Design Transfer and Compatibility 57 Embroidery Designs from the Internet Embroidery designs from www. Read Other Brand Design Card Design...
User Guide
Page 59
... of special driver and the Reader/ Writer box. Caution: To transfer the design completely to the design card / USB Stick. 58 Design Transfer and Compatibility Overview of this .EXP format. .EXP+ artista 630/640, artista 160 - 185 Deco 330/340 Bernina extended .EXP embroidery design format based on ... On LinFlash PC cards the stitch coordinates and color information...
... of special driver and the Reader/ Writer box. Caution: To transfer the design completely to the design card / USB Stick. 58 Design Transfer and Compatibility Overview of this .EXP format. .EXP+ artista 630/640, artista 160 - 185 Deco 330/340 Bernina extended .EXP embroidery design format based on ... On LinFlash PC cards the stitch coordinates and color information...
User Guide
Page 63
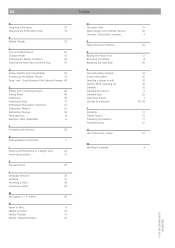
Drop Moving of the Selected Designs 48 E Editing and Combining Designs 46 Editing Mode 46 Embroidery 36 Embroidery Hoop 17 Embroidery Information, Important 21 Embroidery Threads 22 Embroidery Window 36 Extra spool pin 8 Extension Table, detachable 6 F Formatting the memory 29 ... 32 R Raising the Presser Foot 11 Removing the bobbin 8 Replacing the Light Bulb 60 S Save Embroidery Designs 52 Screen Information 36 Selecting a design to edit 47 Starting Point, Selecting the 42 Stabilizer 20 Standard accessories 5 Standard keys 25 Start/ ...
Drop Moving of the Selected Designs 48 E Editing and Combining Designs 46 Editing Mode 46 Embroidery 36 Embroidery Hoop 17 Embroidery Information, Important 21 Embroidery Threads 22 Embroidery Window 36 Extra spool pin 8 Extension Table, detachable 6 F Formatting the memory 29 ... 32 R Raising the Presser Foot 11 Removing the bobbin 8 Replacing the Light Bulb 60 S Save Embroidery Designs 52 Screen Information 36 Selecting a design to edit 47 Starting Point, Selecting the 42 Stabilizer 20 Standard accessories 5 Standard keys 25 Start/ ...


