

User Guide
Page 2
...-insulated product nor should a means for any openings on behalf of BERNINA for grounding be added to the nearest authorized BERNINA dealer or service center for examination, repair, electrical or mechanical adjustment...blocked. Do not pull or push fabric while stitching, this manual. This sewing and embroidery computer is being used or where oxygen is intended for use only. Never operate the... attention is necessary when this sewing computer from the outlet. 15. ENVIROMENTAL PROTECTION BERNINA is committed to «0» (off («0») position then remove the plug ...
...-insulated product nor should a means for any openings on behalf of BERNINA for grounding be added to the nearest authorized BERNINA dealer or service center for examination, repair, electrical or mechanical adjustment...blocked. Do not pull or push fabric while stitching, this manual. This sewing and embroidery computer is being used or where oxygen is intended for use only. Never operate the... attention is necessary when this sewing computer from the outlet. 15. ENVIROMENTAL PROTECTION BERNINA is committed to «0» (off («0») position then remove the plug ...
User Guide
Page 5
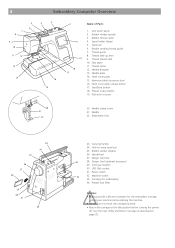
...described on page 25. Spool holder (large) 5. Bobbin winding thread guide 7. Needle plate 14. Pocket for the embroidery carriage behind your machine before starting the machine. • Do not force to move the carriage by hand. • Return the carriage to the idle ... Needle 22. USB Stick socket 31. Bobbin thread cutter 4. Hole for embroidery) 34. Bobbin winder stopper 26. Needle threader 13. Hook cover plate release button 17. Carriage (for extra spool pin 25. Machine socket 33. Power switch 33 32. Needle clamp screw 21. Thread guide...
...described on page 25. Spool holder (large) 5. Bobbin winding thread guide 7. Needle plate 14. Pocket for the embroidery carriage behind your machine before starting the machine. • Do not force to move the carriage by hand. • Return the carriage to the idle ... Needle 22. USB Stick socket 31. Bobbin thread cutter 4. Hole for embroidery) 34. Bobbin winder stopper 26. Needle threader 13. Hook cover plate release button 17. Carriage (for extra spool pin 25. Machine socket 33. Power switch 33 32. Needle clamp screw 21. Thread guide...
User Guide
Page 8
... the Metallic Thread Button in any moving parts such as the thread take-up time and is activated. Do not modify the plug in the Embroidery Window is not a defect) Operating Instructions: The symbol «0» indicates the 'off the power switch and unplug the power supply: • when...thread thicker than the other): To reduce the risk of electric shock, this plug is the required boot up lever, handwheel or needle. Machine socket 4. Note: The Deco 340 is equipped with the Thread Cutter on the touch screen. (This is intended to fit in the outlet, reverse the plug. Insert ...
... the Metallic Thread Button in any moving parts such as the thread take-up time and is activated. Do not modify the plug in the Embroidery Window is not a defect) Operating Instructions: The symbol «0» indicates the 'off the power switch and unplug the power supply: • when...thread thicker than the other): To reduce the risk of electric shock, this plug is the required boot up lever, handwheel or needle. Machine socket 4. Note: The Deco 340 is equipped with the Thread Cutter on the touch screen. (This is intended to fit in the outlet, reverse the plug. Insert ...
User Guide
Page 9
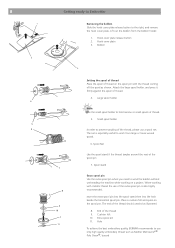
...is also highly recommended. Spool stand Extra spool pin Use the extra spool pin when you need to wind the bobbin without unthreading the machine while working with the thread coming off the spool as Mettler Metrosene+® Poly Sheen®, Isacord Small spool holder In order to...spool net. Insert the extra spool pin into the spool stand then into the hole beside the horizontal spool pin. Hole To achieve the best embroidery quality, BERNINA recommends to work from the bobbin holder. 1. When working on a project. Hook cover plate 3. Large spool holder Note: Use the small spool...
...is also highly recommended. Spool stand Extra spool pin Use the extra spool pin when you need to wind the bobbin without unthreading the machine while working with the thread coming off the spool as Mettler Metrosene+® Poly Sheen®, Isacord Small spool holder In order to...spool net. Insert the extra spool pin into the spool stand then into the hole beside the horizontal spool pin. Hole To achieve the best embroidery quality, BERNINA recommends to work from the bobbin holder. 1. When working on a project. Hook cover plate 3. Large spool holder Note: Use the small spool...
User Guide
Page 10
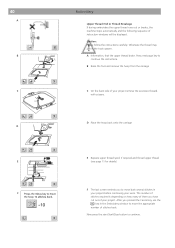
...to stop automatically after the bobbin has made a few turns. For safety purposes, the motor will stop automatically. To achieve the best embroidery quality, BERNINA recommends to the right. Bobbin winder thread guide Thread through the hole in the bobbin. Cut the thread close to the hole in the...quality bobbin thread such as OESD 41ET/W or Mettler® Bobbin thread cutter Notes: Do not move the bobbin winder spindle while the machine is filled by rotating the bobbin winder stopper. Press the Start/Stop button again. Press the Start/Stop button while holding the thread at...
...to stop automatically after the bobbin has made a few turns. For safety purposes, the motor will stop automatically. To achieve the best embroidery quality, BERNINA recommends to the right. Bobbin winder thread guide Thread through the hole in the bobbin. Cut the thread close to the hole in the...quality bobbin thread such as OESD 41ET/W or Mettler® Bobbin thread cutter Notes: Do not move the bobbin winder spindle while the machine is filled by rotating the bobbin winder stopper. Press the Start/Stop button again. Press the Start/Stop button while holding the thread at...
User Guide
Page 12
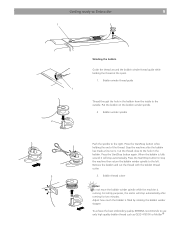
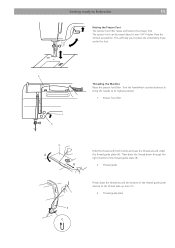
... the thread take-up lever (C). 3. The presser foot can be raised about 6 mm (1/4") higher than the normal up to place the embroidery hoop under the thread guide plate (A). Turn the handwheel counterclockwise to bring the needle to Embroider 11 Raising the Presser Foot The presser foot ...thread around the bottom of the thread guide plate (B). 2. Thread guide Firmly draw the thread around under the foot. 2 1 3 Threading the Machine Raise the presser foot lifter. Getting ready to its highest position. 1. Then draw the thread down through the right channel of the thread guide ...
... the thread take-up lever (C). 3. The presser foot can be raised about 6 mm (1/4") higher than the normal up to place the embroidery hoop under the thread guide plate (A). Turn the handwheel counterclockwise to bring the needle to Embroider 11 Raising the Presser Foot The presser foot ...thread around the bottom of the thread guide plate (B). 2. Thread guide Firmly draw the thread around under the foot. 2 1 3 Threading the Machine Raise the presser foot lifter. Getting ready to its highest position. 1. Then draw the thread down through the right channel of the thread guide ...
User Guide
Page 20
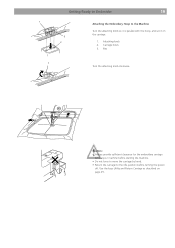
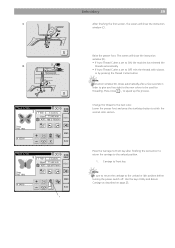
Caution: • Always provide sufficient clearance for the embroidery carriage behind your machine before turning the power off. Carriage holes 3. Use the keys Utility and Return Carriage as described on the carriage. 1. Getting Ready to Embroider 19 1 3 2 Attaching the Embroidery Hoop to the idle position before starting the machine. • Do not force to move the carriage by hand. • Return the carriage to the Machine Turn the attaching knob so it is parallel with the hoop, and set it on page 25. Pins 1 Turn the attaching knob clockwise. Attaching knob 2.
Caution: • Always provide sufficient clearance for the embroidery carriage behind your machine before turning the power off. Carriage holes 3. Use the keys Utility and Return Carriage as described on the carriage. 1. Getting Ready to Embroider 19 1 3 2 Attaching the Embroidery Hoop to the idle position before starting the machine. • Do not force to move the carriage by hand. • Return the carriage to the Machine Turn the attaching knob so it is parallel with the hoop, and set it on page 25. Pins 1 Turn the attaching knob clockwise. Attaching knob 2.
User Guide
Page 26
... hoop to the center position (starting point for embroidery). 5 Return carriage key Press this key to open the mode selection window. This is the required boot up the bernette 340 Deco logo is not a defect. Note: The screen contrast as well as described below. When the machine is using icons and a status line. For your...
... hoop to the center position (starting point for embroidery). 5 Return carriage key Press this key to open the mode selection window. This is the required boot up the bernette 340 Deco logo is not a defect. Note: The screen contrast as well as described below. When the machine is using icons and a status line. For your...
User Guide
Page 39
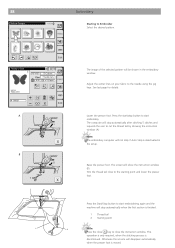
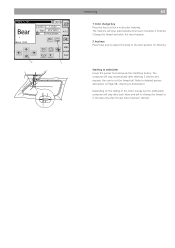
... and requests the user to cut the thread tail by showing the instruction window (A) Note: The embroidery computer will disappear automatically when the presser foot is deactivated in the embroidery window. The computer will stop if Auto Stop is moved. Trim the thread tail close the instruction...will be shown in the setup. A B 1 The image of the selected pattern will show the instruction window (B). Press the start embroidery. Press the Start/Stop button to start embroidering again and the machine will stop button to the starting point and lower the presser foot.
... and requests the user to cut the thread tail by showing the instruction window (A) Note: The embroidery computer will disappear automatically when the presser foot is deactivated in the embroidery window. The computer will stop if Auto Stop is moved. Trim the thread tail close the instruction...will be shown in the setup. A B 1 The image of the selected pattern will show the instruction window (B). Press the start embroidery. Press the Start/Stop button to start embroidering again and the machine will stop button to the starting point and lower the presser foot.
User Guide
Page 40
...Return Carriage as described on page 25. 1 Lower the presser foot and press the start/stop button to speed up this process. C D # 02260 # 04095 Embroidery 39 After finishing the first section, the screen will show the instruction window (C). Carriage to Front key Note: Be sure to return the carriage to... be used for threading. The screen will show the instruction window (D). • If Auto Thread Cutter is set to ON, the machine has trimmed the threads automatically. • If Auto Thread Cutter is set to OFF, trim the threads with scissors or by pressing the Thread ...
...Return Carriage as described on page 25. 1 Lower the presser foot and press the start/stop button to speed up this process. C D # 02260 # 04095 Embroidery 39 After finishing the first section, the screen will show the instruction window (C). Carriage to Front key Note: Be sure to return the carriage to... be used for threading. The screen will show the instruction window (D). • If Auto Thread Cutter is set to ON, the machine has trimmed the threads automatically. • If Auto Thread Cutter is set to OFF, trim the threads with scissors or by pressing the Thread ...
User Guide
Page 41
... start Start/Stop button to move back several stitches in your project before continuing your work. 40 A B C D E F Embroidery Upper Thread End or Thread Breakage If during embroidery the upper thread runs out or breaks, the machine stops automatically and the following sequence of your project. Press next page key to move the appropriate... you pressed the Cancel key use the key in the hook system. A Information, that the upper thread broke. Otherwise the thread may jam in the Embroidery window to continue.
... start Start/Stop button to move back several stitches in your project before continuing your work. 40 A B C D E F Embroidery Upper Thread End or Thread Breakage If during embroidery the upper thread runs out or breaks, the machine stops automatically and the following sequence of your project. Press next page key to move the appropriate... you pressed the Cancel key use the key in the hook system. A Information, that the upper thread broke. Otherwise the thread may jam in the Embroidery window to continue.
User Guide
Page 44
... machine will stop automatically after stitching 5 stitches and requests the user to stitch a multi-color lettering. The computer will stop automatically when each letter and ask to change key Press this key to cut the thread tail. Refer to detailed process description on the setting of the Color change key the embroidery...
... machine will stop automatically after stitching 5 stitches and requests the user to stitch a multi-color lettering. The computer will stop automatically when each letter and ask to change key Press this key to cut the thread tail. Refer to detailed process description on the setting of the Color change key the embroidery...
User Guide
Page 52
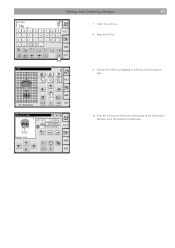
Editing and Combining Designs 51 Gothic Sky a bc d ij kl qrs t yz AB L MS AB AB B e f g h A.B.C mn o p uvwx A A Aa AA Edit 7. Position the letters by dragging or with by using the position keys. 10. Press the OK key and the screen will change to embroider. Select «k» and «y». 8. Press the OK key. 9. Start the machine to the Embroidery Window.
Editing and Combining Designs 51 Gothic Sky a bc d ij kl qrs t yz AB L MS AB AB B e f g h A.B.C mn o p uvwx A A Aa AA Edit 7. Position the letters by dragging or with by using the position keys. 10. Press the OK key and the screen will change to embroider. Select «k» and «y». 8. Press the OK key. 9. Start the machine to the Embroidery Window.
User Guide
Page 55
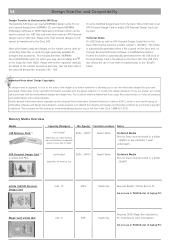
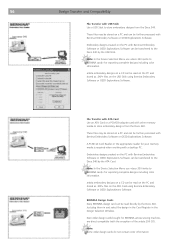
...the embroidery design files you require BERNINA Embroidery Software or OESD Explorations Software which is allowing you to which you have with the embroidered designs and design files. Magic Card artista (#2) max. 6 Requires OESD Magic Box attached to the bernette 340 Deco The bernette 340 Deco can... that licensed designs on the Deco 340. Technical Notes: On USB Sticks as well as ATA Personal Design Cards files for details of embroidery products by converting these files or cards through Bernina Embroidery Software («Card/Machine Write»). Further general information ...
...the embroidery design files you require BERNINA Embroidery Software or OESD Explorations Software which is allowing you to which you have with the embroidered designs and design files. Magic Card artista (#2) max. 6 Requires OESD Magic Box attached to the bernette 340 Deco The bernette 340 Deco can... that licensed designs on the Deco 340. Technical Notes: On USB Sticks as well as ATA Personal Design Cards files for details of embroidery products by converting these files or cards through Bernina Embroidery Software («Card/Machine Write»). Further general information ...
User Guide
Page 57
... for BERNINA artista sewing machine, are direct compatible (with Bernina Embroidery Software or OESD Explorations Software. File Transfer with ATA Card Use an ATA Card or a PCMCIA adapter card with a desktop PC. Even older design cards bought for your memory media is required when working with other memory media to store embroidery designs from the Deco 340.
... for BERNINA artista sewing machine, are direct compatible (with Bernina Embroidery Software or OESD Explorations Software. File Transfer with ATA Card Use an ATA Card or a PCMCIA adapter card with a desktop PC. Even older design cards bought for your memory media is required when working with other memory media to store embroidery designs from the Deco 340.
User Guide
Page 60
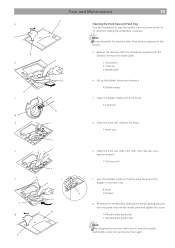
... on the needle plate and tighten the screw. 10 Needle plate guide pins 11 Needle plate guide holes Note: After cleaning the machine, make sure to 'O' and then unplug the embroidery computer. Remove the needle plate. 1 Screwdriver 2 Setscrew 3 Needle plate b Lift up the bobbin holder and remove it. 4 ...dry cloth f Insert the bobbin holder so that the knob fits next to the stopper in this section. Note: Do not dismantle the machine other than what is explained in the hook race. 8 Knob 9 Stopper g Re-attach the needle plate, aligning the needle plate guide pins with ...
... on the needle plate and tighten the screw. 10 Needle plate guide pins 11 Needle plate guide holes Note: After cleaning the machine, make sure to 'O' and then unplug the embroidery computer. Remove the needle plate. 1 Screwdriver 2 Setscrew 3 Needle plate b Lift up the bobbin holder and remove it. 4 ...dry cloth f Insert the bobbin holder so that the knob fits next to the stopper in this section. Note: Do not dismantle the machine other than what is explained in the hook race. 8 Knob 9 Stopper g Re-attach the needle plate, aligning the needle plate guide pins with ...

User Guide
Page 62
...The needle is bent or blunt. 3 The needle thread is not threaded properly. 4 The defective needle (rusted, burred needle eye) is used. 5 The embroidery hoop is not set in the bobbin holder. 3 The bobbin is damaged and does not turn it on the wrong side. Patterns distorted Function keys... do not work properly. 1 The fabric is not pulled tightly on the embroidery hoop. 2 The embroider hoop is not fixed securely. 3 The carriage is bumping into something around the machine. 4 The fabric is caught or pulled for the design being used . 7 The needle thread on...
...The needle is bent or blunt. 3 The needle thread is not threaded properly. 4 The defective needle (rusted, burred needle eye) is used. 5 The embroidery hoop is not set in the bobbin holder. 3 The bobbin is damaged and does not turn it on the wrong side. Patterns distorted Function keys... do not work properly. 1 The fabric is not pulled tightly on the embroidery hoop. 2 The embroider hoop is not fixed securely. 3 The carriage is bumping into something around the machine. 4 The fabric is caught or pulled for the design being used . 7 The needle thread on...
User Guide
Page 63
... accessories 5 Standard keys 25 Start/ Stop Button 7 Starting to embroider 38, 43 T Templates 17 Thread Tension 15 Threading the Machine 11 Troubleshooting 61 U User Preferences / Setup 27 W Winding the bobbin 9 11/10 EN 502060.06.63 854800087 Letters 45 ...Deleting a letter 44 • Inserting a letter 44 M Monogram, 2 / 3- 62 Index A Assigning a file name 53 Attaching the Embroidery Hoop 19 B Bobbin Threads 22 C Care and Maintenance 59 Change Needle 16 Checking the Needle Condition 24 Cleaning the Hook Race and Feed Dog...
... accessories 5 Standard keys 25 Start/ Stop Button 7 Starting to embroider 38, 43 T Templates 17 Thread Tension 15 Threading the Machine 11 Troubleshooting 61 U User Preferences / Setup 27 W Winding the bobbin 9 11/10 EN 502060.06.63 854800087 Letters 45 ...Deleting a letter 44 • Inserting a letter 44 M Monogram, 2 / 3- 62 Index A Assigning a file name 53 Attaching the Embroidery Hoop 19 B Bobbin Threads 22 C Care and Maintenance 59 Change Needle 16 Checking the Needle Condition 24 Cleaning the Hook Race and Feed Dog...


