Bernina Aurora 440QE Support Question
Bernina Aurora 440QE Support Question
Find answers below for this question about Bernina Aurora 440QE.Need a Bernina Aurora 440QE manual? We have 1 online manual for this item!
Question posted by lachterfeld on April 8th, 2014
My Designs Are Not Coming Out In The Center Of The Hoop.
My designs are not coming out in the center of the hoop. Is there a way to reset it?
Current Answers
Related Bernina Aurora 440QE Manual Pages
User Guide - Page 3
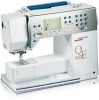
Your sewing computer
Accessories Details aurora 430 / 440 QE / 450 Setting up the embroidery computer Important embroidery information Embroidery operating requirements ...30-32 33
34-47 48
49-56
All about embroidery
Details Accessories Setting up the sewing computer Thread tension Important facts on PC Starting to embroider Mega-Hoop Stitch summary
Index
59 60-62 63-67 67-69
70 70-71 72-77
...
User Guide - Page 4
...will find on the corres- Text Herbert Stolz Drawings Müller-Melzer ID, Kreuzlingen Design concept Susanne Ribi Copyright 2008 BERNINA International AG, Steckborn
032907.52.04_1103_a430_a440_a450_EN
In order to... improve the product, and for our customers' benefit, all of the sewing and embroidery computer's features, parts, and accessories are subject to the safety instructions!...
User Guide - Page 5
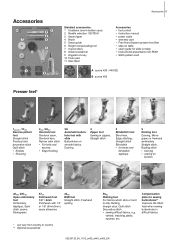
....52.04_1103_a430_a440_a450_EN Compensation plate for sewing buttonholes** Improves the fabric feed when sewing buttonholes in zippers, Straight stitch
5 Blindstitch foot Blind hem, Edge stitching, Straight stitch Blindstitch • for slide-on table • Instructional presentation CD-ROM • Stitch-pattern card
1
A aurora 430 / 440 QE
2
11
A
B
B aurora 450
Presser feet*
1430...
User Guide - Page 9
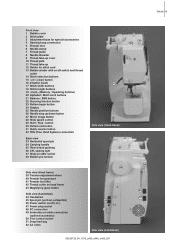
...Back view 33 Horizontal spool pin 34 Carrying handle 35 Rear thread guideng 36 CFL sewing light 37 Slide-on table socket 38 Bobbin pre-tension
Side view (Head frame)....04_1103_a430_a440_a450_EN Details 9
Front view 1 Bobbin cover 2 Stitch plate 3 Attachment base for special accessories 4 Darning hoop connection 5 Presser foot 6 Needle clamp 7 Thread guide 8 Needle threader 9 Thread take-up cover 10...
User Guide - Page 11
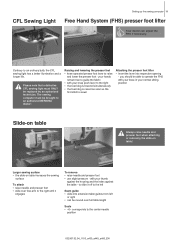
... the presser foot • knee-operated presser foot lever to an authorized BERNINA dealer!
The sewing computer must ONLY be able to guide the fabric • with your knee in your normal... the table - CFL Sewing Light
Setting up the sewing computer 11
Free Hand System (FHS) presser foot lifter
& Your dealer can be moved over free-arm to the center needle
position
032907.52....
User Guide - Page 13
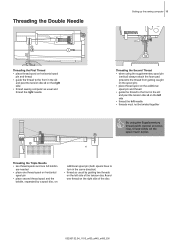
... spool
pin and thread • guide the thread to the front in the slit
and past the tension disc A on the right side • thread sewing computer as usual by guiding two threads on the left needle • threads must not be twisted together
& By using the supplementary spool pin
(vertical...
User Guide - Page 16
...* pictures = aurora 450
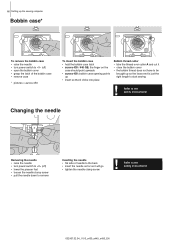
To insert the bobbin case • hold the bobbin case latch • aurora 430 / 440 QE: the finger on the
case should point upwards • aurora 450: bobbin ...the needle clamp screw
!
Refer to the safety instructions!
032907.52.04_1103_a430_a440_a450_EN 16 Setting up the sewing computer
Bobbin case*
A
To remove the bobbin case • raise the needle • turn...
User Guide - Page 18
... replaced regularly.
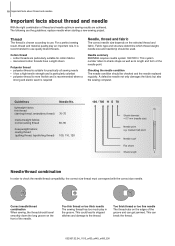
Thread
The thread is recommended to use quality brand threads. Guidelines
lightweight fabrics: thin thread (darning thread, embroidery thread)
mediumweight fabrics: normal sewing thread
heavyweight fabrics: sewing thread (quilting thread, topstitching thread)
Needle No. 70-75 80-90 100, 110, 120
130 / 705 H S 70
Shank diameter = 0.7 mm (needle size)
Needle...
User Guide - Page 27
...), press the
-button, etc.
• sew the stitch combination
• sew the stitch combination
• press the
-button... the
-button
• select stitch, e.g. Functions - Sewing a stitch combination conti-
No. 159
(440) or 130... sew stitch combination, the stitches alternate (original and mirror image)
• sew ...a backing • remove after sewing • thread the lower thread...
User Guide - Page 28
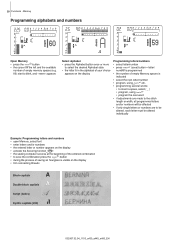
..., select font
• enter letters and/or numbers
• the entered letter or number appears on the display
• activate the Securing function
• the sewing computer secures at the beginning of the entered combination
• to save the combination press the
-button
• during the process of saving an hourglass...
User Guide - Page 36
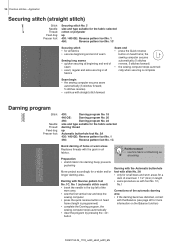
Preparation • stretch fabric into darning hoop; Application
Securing stitch (straight stitch)
5
Stitch: Securing stitch No. 5
...prevents
puckering
Move project accordingly for more information on head
frame (length is complete
Seam begin • the sewing computer secures seam
automatically (5 stitches forward, 5 stitches reverse) • continue with the Balance (see page 22 ...
User Guide - Page 46
...regular stitch length cannot be automatically deactivated
& When exceeding a certain speed, adhering to indicate the
sewing computer is slower • keep mode button (1 or 2) pressed a while again to restart... Stop
- After the sequence is sewn the set the desired stitch length • when sewing small forms and stippling,
stitch length of 1mm - 1.5mm is suggested
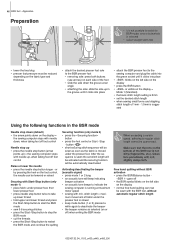
Using the following ...
User Guide - Page 53
... first stitch (buttonhole begin) • press the Quick reverse button
3. sew straight stitch forwards and stop the sewing computer • press the Quick reverse button
4. sew bartack and securing stitches
032907.52.04_1103_a430_a440_a450_EN sew the eye and the first bead in reverse, stop the sewing computer at the first stitch (buttonhole begin )
• press the...
User Guide - Page 55
... straight stitches forwards
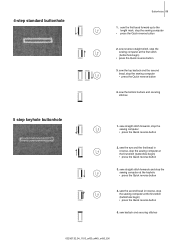
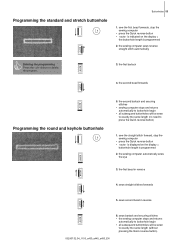
5. Programming the standard and stretch buttonhole
Buttonholes 55
1. the second bead forwards
Programming the round and keyhole buttonhole
5. sews second bead in reverse
4. the sewing computer sews reverse straight stitch automatically
& Deleting the programming Press the «clr»-button to exactly the same length (without pressing the Quick reverse...
User Guide - Page 56
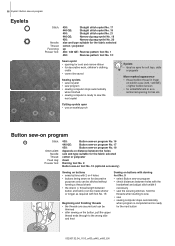
... (430 / 440 QE) = tighter bobbin tension • for embellishment or as required with the
handwheel and adjust stitch width if necessary • sew the securing stitches; 56 Eyelet / Button sew-on program
Eyelets
Stitch:
Needle: Thread: Feed dog: Presser foot:
430:
Straight stitch eyelet No. 17
440 QE:
Straight stitch eyelet No...
User Guide - Page 60
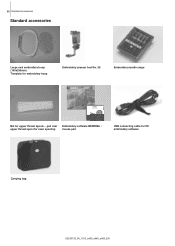
60 Standard accessories
Standard accessories
Large oval embroidery hoop (145x255mm) Template for embroidery hoop
Embroidery presser foot No. 26
Embroidery needle range
Art Design V1 Embroidery Software
Net for PC embroidery software
Carrying bag
032907.52.04_1103_a430_a440_a450_EN pull over upper thread spool for even spooling
Embroidery software BERNINA / mouse ...
User Guide - Page 63
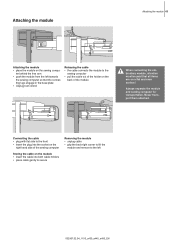
... • grip the back right corner to lift the
module and remove to the left towards
the sewing computer so that the connecting lugs engage in the base plate • Unplug foot control
Releasing the... cable • the cable connects the module to the
sewing computer • pull the cable out of the holder on the
back of the module
When connecting...
User Guide - Page 73
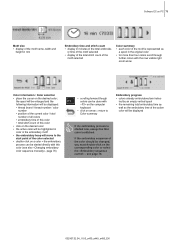
... • display of the motif name, width and
height in mm
Embroidery time and stitch count • display in the embroidery motif • the embroidery hoop will be done with this color • click on the desired color • the active color will be highlighted in color in minutes of this...
User Guide - Page 75
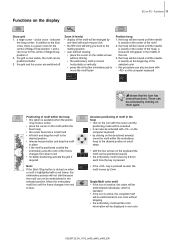
... the keyboard the motif can not be positioned better 3.
the grid and the cursor are switched off
Zoom (4 levels) • display of Mega-Hoop position 3 2. indicates
the hoop center. the hoop will bring you back to the
starting position • user defined viewing:
• place the cursor on the computer keyboard
Positioning of the...
User Guide - Page 85
...8 18, 19
24 19 24 8, 24 14 13 18
O
Optional accessories
Embroidery
61-62
Sewing
7
Overlock
Application
39-40
Overlock foot
5
Stitch patterns
30-33, 81-83
Outline stitch
68
...Overview
Display
23
Embroidery module
59
Function buttons
24-25
Sewing-/embroidery computer
8-9
Stitch patterns
30-32, 81-83
P
Patchwork Patchwork foot
Power cable ...
Similar Questions

Decal Peeling
Is there a replacement for the gold decal on the front of my machine. It came to me that way
Is there a replacement for the gold decal on the front of my machine. It came to me that way
(Posted by sewnvintage 1 year ago)
Wanted :bernina 1260 Sewing Machine.
wanted to buy : Bernina 1260 sewing machine , in good working order.
wanted to buy : Bernina 1260 sewing machine , in good working order.
(Posted by beektze 10 years ago)

I Have A Bernina 1090s Sewing Machine. How You Turn Off The Button Stitch Settin
(Posted by frogg595 10 years ago)

Bernina 1090 S Sewing Machine Manual
I Dont See The User Manual For This Machine For Free Downloading.what User Manual Are The Same As Th...
I Dont See The User Manual For This Machine For Free Downloading.what User Manual Are The Same As Th...
(Posted by cynthianel 10 years ago)

How Is The Front Cover Removed From A Bernina Aurora 440qe Sewing Machine?
My dealer has had two opportunities to repair my machine and did an OK job except for getting the co...
My dealer has had two opportunities to repair my machine and did an OK job except for getting the co...
(Posted by lholdren 11 years ago)