
Bernina Bernette 340 deco Support Question
Bernina Bernette 340 deco Support Question
Find answers below for this question about Bernina Bernette 340 deco.Need a Bernina Bernette 340 deco manual? We have 1 online manual for this item!
Question posted by cgreen12 on December 27th, 2013
Can I Program A Larger Hoop In My 340 Deco?
The person who posted this question about this Bernina product did not include a detailed explanation. Please use the "Request More Information" button to the right if more details would help you to answer this question.
Current Answers
Related Bernina Bernette 340 deco Manual Pages
User Guide - Page 2

... when making any a djustments in terms of double-insulated machines.
1. Replacement parts for a doubleinsulated product must be added to national guidelines.
In case of burns, fire, electrical shock or injury to environmental protection. Never operate the sewing computer with the words «DOUBLE INSULATION» or «DOUBLE INSULATED...
User Guide - Page 3
... further. New features like the USB Stick Port and the Thread Cutter have a wonderful sewing experience with your bernette Deco 340. With a wide selection of all these functions we can support you will have been implemented to make your sewing experience easier and even more satisfactory. Please visit your BERNINA dealer; he will help , ideas...
User Guide - Page 8
... after sewing is running , and green when it is not a defect)
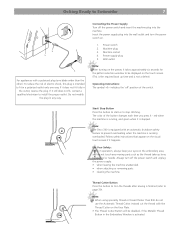
Operating Instructions: The symbol «0» indicates the 'off' position of the switch. red when the machine is running... with a polarized plug (one way. Insert the power supply plug into the machine. Machine socket 4. Note: The Deco 340 is equipped with an automatic shutdown safety feature to fit in any moving parts such...
User Guide - Page 12
...plate (B).
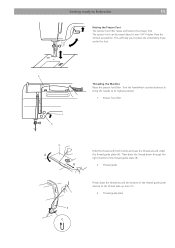
2. Thread guide
Firmly draw the thread around under the foot.
2
1 3
Threading the Machine Raise the presser foot lifter. Then draw the thread down through the right channel of the thread ...guide plate and up to place the embroidery hoop under the thread guide plate (A). The presser foot can be raised about 6 mm (1/4") higher ...
User Guide - Page 18
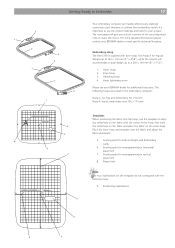
Embroidery Hoop The Deco 340 is important to make this choice. Starting point for built-in horizontal placement 7. Attaching knob 4. Hoop tightening screw
Please see your BERNINA dealer for your BERNINA dealer or read specific technical literature. Inner hoop 3. However, to achieve best embroidery results it is supplied with the reference lines.
9. The next pages will...
User Guide - Page 19
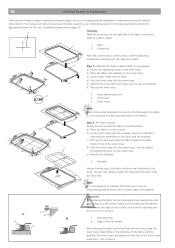
...: the act of the outer hoop. f) Pop out the inner hoop
3
3 Hoop tightening screw
4 Inner hoop
5 Outer hoop
Note: This first step only calibrates the hoop for your fingers, do not sit on the outer hoop.
18
Getting Ready to Embroider
There are now ready to attach the hoop with the fabric onto the Deco 340. Depending on a flat surface...
User Guide - Page 20
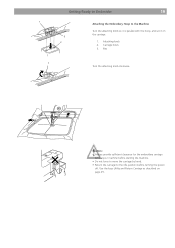
...; Do not force to move the carriage by hand. • Return the carriage to the Machine
Turn the attaching knob so it is parallel with the hoop, and set it on page 25. Attaching knob 2. Carriage holes 3. Use the keys Utility and Return Carriage as described on the carriage.
1. Getting Ready to...
User Guide - Page 21

...
the fabric being used • available in light- Use in conjunction with temporary spray adhesive
before hooping • carefully tear away excess stabilizer from the back of the embroidery after stitching • stabilizer will remain under larger embroidered areas Application: For all wovens and non-stretchables
Cut-away stabilizers • one or...
User Guide - Page 26
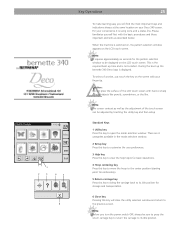
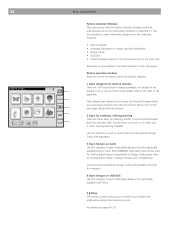
... yourself first with your finger tip. This is the required boot up the bernette 340 Deco logo is displayed. Caution: Do not press the surface of the touch screen...machine is not a defect. There are 4 categories available in the mode selection window.
2 Setup key Press this key to customize the user preferences.
3 Help key Press this key to view the help topics for basic operations.
4 Hoop...
User Guide - Page 27
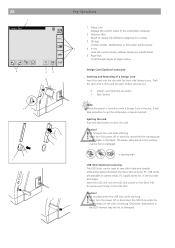
...key:
close the current screen, without saving any modifications.
5 Page-keys:
Scroll through pages of larger menus. Otherwise, data stored in this screen will pop out.
6. Ejecting the card Push the...clicks and the eject button will be used to save stitch data and transfer embroidery designs between the Deco 340 and your PC. 26
1 Screen Title
5
7
7
Key Operations
1 Status Line:
Displays ...
User Guide - Page 33
...further details about compatibility of 3- Please refer to the
3
next page («Built-in the internal memory of the Deco 340
Read how to open designs from these location on the next pages. Further there is a choice of Design Cards please ...available USB Sticks.
5 Editing The editing function allows you previously saved into the Deco 340. For details see page 46- 53. letter and
2-
User Guide - Page 37
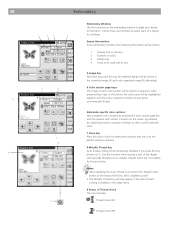
...to close the embroidery window and return to select parts of the Deco 340 is disabled as well. • This Metallic Thread key will only...6 Color section page keys The image of colors 3 Design size 4 Hoop to align your design on the fabric. Embroider specific color sections: Skip..., the following information will be shown.
1 Sewing time in the utility menu.
9 Status of the design with the...
User Guide - Page 47
... the selection and return to open . 46
Editing and Combining Designs
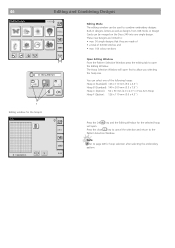
B: 140 x 200 mm
A(F)
B
C
X
1 Editing window for the hoop B
Edit
A.B.C
B: 140x200mm
X
Edit
Editing Mode The editing window can be merged on the Deco 340 into one of 64'000 stitches and • max. 104 colour sections
Open Editing Window From the Pattern Selection...
User Guide - Page 53
... the design the Edit Window is recommended to save the design with the assigned file name. Otherwise, data stored in memory of the Deco 340 can hold a large number of important designs to next page for more details). ATA Personal Design Card C. To select a memory location... power, eject the Design Card or remove the USB Stick when the warning sign or hourglass appears on the Deco 340 B.
User Guide - Page 55
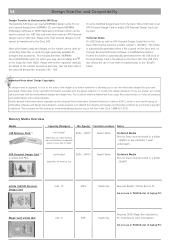
... or cards through Bernina Embroidery Software («Card/Machine Write»). Most other brand cards and designs on the Deco and / or through optionally available PC software and...
Design Transfer to the bernette 340 Deco The bernette 340 Deco can be stored in a folder named «..:\EmbF5». Please refer to the respective manuals for the Deco 340 must be obtained from ...
User Guide - Page 56

... brand of USB Stick or ATA PCMCIA card may be guaranteed
Transfer of Embroidery Designs
Below is a graphical summary of all different ways to Deco 340
Note: CDs produced in PCMCIA slot of these cards can be copied directly onto a USB Stick or an ATA card.
* not relevant for other memory ...
User Guide - Page 57
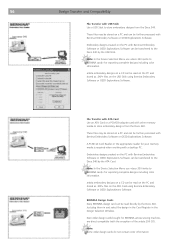
Note: In the Device Selection Menu use «deco 330 (write to BERNINA card)» for BERNINA artista sewing machine, are direct compatible (with Bernina Embroidery Software or OESD Explorations Software can be transferred to the Deco 340 by the USB Stick. Even older design cards bought for exporting complete designs including color information.
Embroidery designs...
User Guide - Page 58
... for artista. download as .EXP+ file to the Deco 340 • Designs modified on the Deco 340 cannot be stored on the Deco 340 cannot be read by means of most other brands can...you may be transferred through the BERNINA Reader/Writer Box and a Personal Design Card to the Deco 340.
embroideryonline.com either 1.
or download as the OESD Magic BoxTM. Note: • Limited functionality...
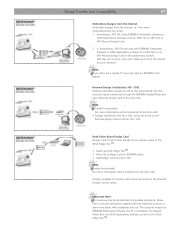
User Guide - Page 59
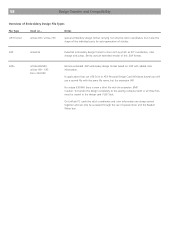
...640 there is even a third file with the extension .BMP. Caution: To transfer the design completely to the sewing computer both or all three files must be accessed through the use USB Stick or ATA Personal Design Card (.... In applications that use of this .EXP format.
.EXP+
artista 630/640, artista 160 - 185 Deco 330/340
Bernina extended .EXP embroidery design format based on ...
User Guide - Page 62

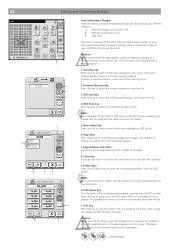
...The fabric is not tightly pulled on the embroidery hoop.
2 The embroider hoop is not fixed securely. 3 The carriage is bumping into something
around the machine.
See pages 11, 12. See page 12.... 2 The control circuit is not used .
The machine does not run.
1 A thread is caught in the
thread holder when starting the machine. 6 Sewing speed is too high for some
reason when embroidering. ...
Similar Questions

New Bulb Not Working In Sewing Machine Bernette 12 What Can It Be
(Posted by Anonymous-152221 8 years ago)


How Do You Get The Design On To The 340 Deco Embroidery Machine Usb
(Posted by martha515 10 years ago)

My Sewing Machine Bernette 15 Stops Working
After 1 day using my Bernette 15 stops working - engine hoots but doesn't rotate spindle and hand wh...
After 1 day using my Bernette 15 stops working - engine hoots but doesn't rotate spindle and hand wh...
(Posted by sgrayxx 12 years ago)