
SK8N User Manual
Page 5
...Repost Video on S3 Resume [No 4-27 4.5.3 ACPI 2.0 Support [No 4-27 4.5.4 ACPI APIC Support [Enabled 4-27 4.5.5 BIOS -> AML ACPI Table [Enabled 4-27 4.5.6 APM Configuration 4-28 4.5.7 Hardware Monitor 4-29 4.6 Boot menu 4-31 4.6.1 Boot... 5.1 Install an operating system 5-1 5.2 Support CD information 5-1 5.2.1 Running the support CD 5-1 5.2.2 Drivers menu 5-2 5.2.3 Utilities menu 5-3 5.2.4 ASUS Contact Information 5-4 5.2.5 Other information 5-5 5.3 Software Information 5-7 5.3.1 ASUS MyLogo2 5-7 5.4 Multi-channel audio feature 5-9 5.5 RAID configurations 5-11 5.5.1 Install the ...
...Repost Video on S3 Resume [No 4-27 4.5.3 ACPI 2.0 Support [No 4-27 4.5.4 ACPI APIC Support [Enabled 4-27 4.5.5 BIOS -> AML ACPI Table [Enabled 4-27 4.5.6 APM Configuration 4-28 4.5.7 Hardware Monitor 4-29 4.6 Boot menu 4-31 4.6.1 Boot... 5.1 Install an operating system 5-1 5.2 Support CD information 5-1 5.2.1 Running the support CD 5-1 5.2.2 Drivers menu 5-2 5.2.3 Utilities menu 5-3 5.2.4 ASUS Contact Information 5-4 5.2.5 Other information 5-5 5.3 Software Information 5-7 5.3.1 ASUS MyLogo2 5-7 5.4 Multi-channel audio feature 5-9 5.5 RAID configurations 5-11 5.5.1 Install the ...

SK8N User Manual
Page 8
... up This chapter describes the power up sequence, the vocal POST messages, and ways of the support CD that you need when installing the motherboard. About this guide is organized This manual contains the following parts: • Chapter 1: Product introduction This chapter describes the...motherboard package. How this guide This user guide contains the information you have to change system settings through the BIOS Setup menus. Detailed descriptions of the BIOS parameters are also provided. • Chapter 5: Software support This chapter describes the contents of shutting down the ...
... up This chapter describes the power up sequence, the vocal POST messages, and ways of the support CD that you need when installing the motherboard. About this guide is organized This manual contains the following parts: • Chapter 1: Product introduction This chapter describes the...motherboard package. How this guide This user guide contains the information you have to change system settings through the BIOS Setup menus. Detailed descriptions of the BIOS parameters are also provided. • Chapter 5: Software support This chapter describes the contents of shutting down the ...
SK8N User Manual
Page 35
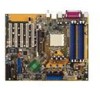
... later use . Turn on the next page. 3. Remove the system unit cover (if your motherboard is completely seated on BIOS setup. 2. Failure to do so may need to install an expansion card. 1. See Chapter 4 for the card. 2. 2.5 Expansion slots In the future, you removed earlier.... it and make the necessary hardware settings for information on the slot. 5. ASUS SK8N motherboard 2-15 Assign an IRQ to unplug the power cord before adding or removing expansion cards. Before installing the expansion card, read the documentation that they support. The motherboard has five...
... later use . Turn on the next page. 3. Remove the system unit cover (if your motherboard is completely seated on BIOS setup. 2. Failure to do so may need to install an expansion card. 1. See Chapter 4 for the card. 2. 2.5 Expansion slots In the future, you removed earlier.... it and make the necessary hardware settings for information on the slot. 5. ASUS SK8N motherboard 2-15 Assign an IRQ to unplug the power cord before adding or removing expansion cards. Before installing the expansion card, read the documentation that they support. The motherboard has five...
SK8N User Manual
Page 63
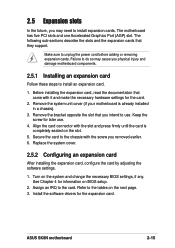
... the motherboard package. ASUS SK8N motherboard 4-7 Doing so may not be the latest BIOS version for the Utilities menu screen. 3. The ASUS Update utility is available in the support CD that allows you to update the motherboard BIOS in Windows® environment. Select your system. Click the Utilities tab, then click Install ASUS Update VX.XX.XX...
... the motherboard package. ASUS SK8N motherboard 4-7 Doing so may not be the latest BIOS version for the Utilities menu screen. 3. The ASUS Update utility is available in the support CD that allows you to update the motherboard BIOS in Windows® environment. Select your system. Click the Utilities tab, then click Install ASUS Update VX.XX.XX...

SK8N User Manual
Page 65
...various sub-menus and make it as possible. ASUS SK8N motherboard 4-9 Use the BIOS Setup program when you are not prompted to use as easy to download the latest product and BIOS information. Even if you are installing a motherboard, reconfiguring your computer in the future... feature or change the configuration of the firmware hub. Otherwise, POST continues with the opportunity to reconfigure your BIOS." See section "4.7 Exit Menu." 4.2 BIOS Setup program This motherboard supports a programmable firmware that you can update using the provided utility described in section...
...various sub-menus and make it as possible. ASUS SK8N motherboard 4-9 Use the BIOS Setup program when you are not prompted to use as easy to download the latest product and BIOS information. Even if you are installing a motherboard, reconfiguring your computer in the future... feature or change the configuration of the firmware hub. Otherwise, POST continues with the opportunity to reconfigure your BIOS." See section "4.7 Exit Menu." 4.2 BIOS Setup program This motherboard supports a programmable firmware that you can update using the provided utility described in section...

SK8N User Manual
Page 68
...time. 4.3 Main menu When you enter the BIOS Setup program, the Main menu screen appears giving you to set the system time. 4.3.2 System Date [Day xx/xx/xxxx] This item allows you an overview of floppy drive installed. System Time System Date Legacy Diskette A ... the system date. 4.3.3 Legacy Diskette A [1.44M, 3.5 in ] Primary IDE Master Primary IDE Slave Secondary IDE Master Secondary IDE Slave System Information :[ST320413A] :[ASUS CD-S340] :[Not Detected] :[Not Detected] Use [ENTER], [TAB] or [SHIFT-TAB] to select a field. Select Screen Select Item +- Configuration options...
...time. 4.3 Main menu When you enter the BIOS Setup program, the Main menu screen appears giving you to set the system time. 4.3.2 System Date [Day xx/xx/xxxx] This item allows you an overview of floppy drive installed. System Time System Date Legacy Diskette A ... the system date. 4.3.3 Legacy Diskette A [1.44M, 3.5 in ] Primary IDE Master Primary IDE Slave Secondary IDE Master Secondary IDE Slave System Information :[ST320413A] :[ASUS CD-S340] :[Not Detected] :[Not Detected] Use [ENTER], [TAB] or [SHIFT-TAB] to select a field. Select Screen Select Item +- Configuration options...

SK8N User Manual
Page 69
...transfer from and to the device occurs one sector at a time if the device supports multi-sector transfer feature. Configuration options: [Not Installed] [Auto] [CDROM] [ARMD] LBA/Large Mode [Auto] Enables or disables the LBA mode. Setting to the system. Change Option...detected by BIOS and are specifically configuring a CD-ROM drive. Type [Auto] Selects the type of IDE devices. Setting to display the IDE device information. Select ARMD (ATAPI Removable Media Device) if your device is installed in the system. Configuration options: [Disabled] [Auto] ASUS SK8N motherboard ...
...transfer from and to the device occurs one sector at a time if the device supports multi-sector transfer feature. Configuration options: [Not Installed] [Auto] [CDROM] [ARMD] LBA/Large Mode [Auto] Enables or disables the LBA mode. Setting to the system. Change Option...detected by BIOS and are specifically configuring a CD-ROM drive. Type [Auto] Selects the type of IDE devices. Setting to display the IDE device information. Select ARMD (ATAPI Removable Media Device) if your device is installed in the system. Configuration options: [Disabled] [Auto] ASUS SK8N motherboard ...

SK8N User Manual
Page 81
...installed a Plug & Play operating system, the operating system configures the Plug & Play devices not required for PCI/PnP devices. Plug and Play OS PCI Latency Timer Allocate IRQ to change the advanced settings for boot. Select Screen Select Item +- Configuration options: [No] [Yes] ASUS SK8N... IRQ11 IRQ14 IRQ15 [Available] [Available] [Available] [Available] [Available] [Available] [Available] [Available] [Available] NO: Lets the bIOS configure all the devices in the sections below may cause the system to malfunction. Take caution when changing the settings of the PCI PnP ...
...installed a Plug & Play operating system, the operating system configures the Plug & Play devices not required for PCI/PnP devices. Plug and Play OS PCI Latency Timer Allocate IRQ to change the advanced settings for boot. Select Screen Select Item +- Configuration options: [No] [Yes] ASUS SK8N... IRQ11 IRQ14 IRQ15 [Available] [Available] [Available] [Available] [Available] [Available] [Available] [Available] [Available] NO: Lets the bIOS configure all the devices in the sections below may cause the system to malfunction. Take caution when changing the settings of the PCI PnP ...

SK8N User Manual
Page 82
... free for legacy ISA devices. Configuration options: [Yes] [No] Pallete Snooping [Disabled] When set to [No], BIOS does not assign an IRQ to the PCI VGA card even if requested. When set to [Yes], BIOS assigns an IRQ to PCI VGA card if the card requests for the PCI device latency timer... ISA graphics device is reserved for use PCI bus mastering when reading/writing to [Disabled] deactivates this feature. When set to [Reserved], the IRQ is installed in units of PCI/PnP devices.
... free for legacy ISA devices. Configuration options: [Yes] [No] Pallete Snooping [Disabled] When set to [No], BIOS does not assign an IRQ to the PCI VGA card even if requested. When set to [Yes], BIOS assigns an IRQ to PCI VGA card if the card requests for the PCI device latency timer... ISA graphics device is reserved for use PCI bus mastering when reading/writing to [Disabled] deactivates this feature. When set to [Reserved], the IRQ is installed in units of PCI/PnP devices.
SK8N User Manual
Page 90
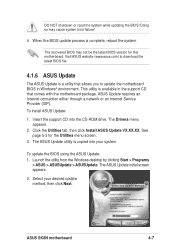
...Help F10 Save and Exit ESC Exit Change Supervisor Password Select this item shows Installed. Select the Change Supervisor Password item and press Enter. 2. The Supervisor Password item now shows Installed. To change the system security settings. Select Screen Select Item +- The message... box that appears, type a password composed of the screen shows the default Not Installed. The message "Password Installed" appears after you to erase the RTC RAM. 4-34 Chapter 4: BIOS Setup Select an item then press Enter to disable password. 4.6.3 Security The Security menu...
...Help F10 Save and Exit ESC Exit Change Supervisor Password Select this item shows Installed. Select the Change Supervisor Password item and press Enter. 2. The Supervisor Password item now shows Installed. To change the system security settings. Select Screen Select Item +- The message... box that appears, type a password composed of the screen shows the default Not Installed. The message "Password Installed" appears after you to erase the RTC RAM. 4-34 Chapter 4: BIOS Setup Select an item then press Enter to disable password. 4.6.3 Security The Security menu...

SK8N User Manual
Page 99
... anti-virus program. Adobe Acrobat Reader V5.0 This item installs the Adobe Acrobat Reader V5.0. ASUS Update This program allows you can connect to download the latest version of the BIOS from the ASUS website. ASUS SK8N motherboard 5-3 The Acrobat Reader software is for detailed information.... View the PC-cillin online help for viewing files saved in Portable Document Format (PDF). ASUS PC Probe This smart utility monitors the...
... anti-virus program. Adobe Acrobat Reader V5.0 This item installs the Adobe Acrobat Reader V5.0. ASUS Update This program allows you can connect to download the latest version of the BIOS from the ASUS website. ASUS SK8N motherboard 5-3 The Acrobat Reader software is for detailed information.... View the PC-cillin online help for viewing files saved in Portable Document Format (PDF). ASUS PC Probe This smart utility monitors the...

SK8N User Manual
Page 103
... make a copy of your original BIOS file, or obtain the latest BIOS version from the ASUS website. Specify the location of the BIOS file, such as from a floppy disk. This section provides details on the software applications that the BIOS Item Full Screen Logo is automatically installed when you through the installation. ASUS SK8N motherboard 5-7 5.3 Software Information Most of...
... make a copy of your original BIOS file, or obtain the latest BIOS version from the ASUS website. Specify the location of the BIOS file, such as from a floppy disk. This section provides details on the software applications that the BIOS Item Full Screen Logo is automatically installed when you through the installation. ASUS SK8N motherboard 5-7 5.3 Software Information Most of...
SK8N User Manual
Page 107
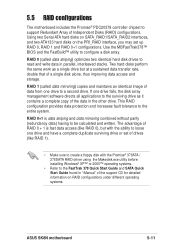
...RAID 1). • Make sure to create a floppy disk with the Promise® 378ATA / 378SATA RAID driver using the Makedisk.exe utility before installing Windows® XP™ or 2000™ operating systems. • Refer to a second drive. RAID 1 (called data striping) optimizes two.... Use the MBFastTrak378™ BIOS and the FastBuild™ utility to be calculated and written. Using two Serial ATA hard disks on SATA_RAID1/SATA_RAID2 interfaces, and two ATA133 hard disks on RAID configurations under different operating systems. ASUS SK8N motherboard 5-11 This RAID configuration...
...RAID 1). • Make sure to create a floppy disk with the Promise® 378ATA / 378SATA RAID driver using the Makedisk.exe utility before installing Windows® XP™ or 2000™ operating systems. • Refer to a second drive. RAID 1 (called data striping) optimizes two.... Use the MBFastTrak378™ BIOS and the FastBuild™ utility to be calculated and written. Using two Serial ATA hard disks on SATA_RAID1/SATA_RAID2 interfaces, and two ATA133 hard disks on RAID configurations under different operating systems. ASUS SK8N motherboard 5-11 This RAID configuration...

SK8N User Manual
Page 108
... connector on each hard disk as Master/Slave. 2. Connect the HDD cables. Proceed to install the hard disks for the next procedure. 5-12 Chapter 5: Software support For optimal performance, install identical drives of the same model and capacity when creating a disk array. • If...for RAID configuration. 1. Boot the system and enter the BIOS Setup Utility. 6. Connect the power cable to the Advanced menu in BIOS and set the appropriate IDE configuration settings. 7. b) Connect one of each drive. 5. 5.5.1 Install the hard disks The PDC20378 chipset supports Ultra ATA/133...
... connector on each hard disk as Master/Slave. 2. Connect the HDD cables. Proceed to install the hard disks for the next procedure. 5-12 Chapter 5: Software support For optimal performance, install identical drives of the same model and capacity when creating a disk array. • If...for RAID configuration. 1. Boot the system and enter the BIOS Setup Utility. 6. Connect the power cable to the Advanced menu in BIOS and set the appropriate IDE configuration settings. 7. b) Connect one of each drive. 5. 5.5.1 Install the hard disks The PDC20378 chipset supports Ultra ATA/133...
SK8N User Manual
Page 109
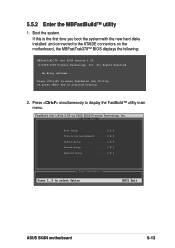
... on the motherboard, the MBFastTrak378™ BIOS displays the following: MBFastTrak378 (tm) BIOS version 1.00 (c)2000-2005 Promise Technology, Inc. Boot the system. If this is the first time you boot the system with the new hard disks installed and connected to select Option [ESC] Exit ASUS SK8N motherboard 5-13 Press to enter FastBuild (tm...
... on the motherboard, the MBFastTrak378™ BIOS displays the following: MBFastTrak378 (tm) BIOS version 1.00 (c)2000-2005 Promise Technology, Inc. Boot the system. If this is the first time you boot the system with the new hard disks installed and connected to select Option [ESC] Exit ASUS SK8N motherboard 5-13 Press to enter FastBuild (tm...
SK8N User Manual
Page 110
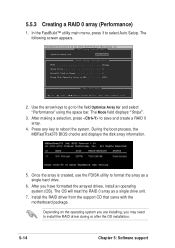
... ] Up [ ] Down [ , ,Space] Change Option [ESC] Exit [CTRL-Y] Save 2. During the boot process, the MBFastTrak378 BIOS checks and displays the disk array information. 5. Install the RAID driver from the support CD that came with the motherboard package. The following screen appears. FastBuild (tm) Utility 2.00 (c) ...3. 5.5.3 Creating a RAID 0 array (Performance) 1. Press any key to select Auto Setup. Depending on the operating system you are installing, you have formatted the arrayed drives, install an operating system (OS). Once the array is created, use the FDISK utility to...
... ] Up [ ] Down [ , ,Space] Change Option [ESC] Exit [CTRL-Y] Save 2. During the boot process, the MBFastTrak378 BIOS checks and displays the disk array information. 5. Install the RAID driver from the support CD that came with the motherboard package. The following screen appears. FastBuild (tm) Utility 2.00 (c) ...3. 5.5.3 Creating a RAID 0 array (Performance) 1. Press any key to select Auto Setup. Depending on the operating system you are installing, you have formatted the arrayed drives, install an operating system (OS). Once the array is created, use the FDISK utility to...


