
Motherboard DIY Troubleshooting Guide
Page 1
Technical Updates SK8N Motherboard IE1379 SK8N Technical Updates SK8N specifications summary (Page xi) Internal I/O BIOS features Industry standard Manageability Power Requirement Form Factor Support CD contents Floppy disk drive connector Primary/Secondary IDE connectors 2... connectors CD/AUX connectors S/PDIF out connector IEEE 1394 connector Serial port 2 connector 4Mb Flash EEPROM AMI BIOS with enhanced ACPI, PnP, DMI2.0, Green ASUS EZ Flash, ASUS MyLogo2, Q-Fan, SM BIOS 2.3, Multi-Language BIOS, CrashFree BIOS2 PCI 2.3, USB 2.0/1.1 DMI 2.0, WOL by PME, WOR by PME ATX power supply (with ...
Technical Updates SK8N Motherboard IE1379 SK8N Technical Updates SK8N specifications summary (Page xi) Internal I/O BIOS features Industry standard Manageability Power Requirement Form Factor Support CD contents Floppy disk drive connector Primary/Secondary IDE connectors 2... connectors CD/AUX connectors S/PDIF out connector IEEE 1394 connector Serial port 2 connector 4Mb Flash EEPROM AMI BIOS with enhanced ACPI, PnP, DMI2.0, Green ASUS EZ Flash, ASUS MyLogo2, Q-Fan, SM BIOS 2.3, Multi-Language BIOS, CrashFree BIOS2 PCI 2.3, USB 2.0/1.1 DMI 2.0, WOL by PME, WOR by PME ATX power supply (with ...

SK8N User Manual
Page 1
Motherboard SK8N User Guide
Motherboard SK8N User Guide

SK8N User Manual
Page 3
... used in this guide ix Typography ix Where to find more information ix SK8N specifications summary x Chapter 1: Product introduction 1.1 Welcome 1-1 1.2 Package contents 1-1 1.3 Special features 1-2 1.3.1 Product Highlights 1-2 1.3.2 Unique ASUS features 1-4 Chapter 2: Hardware information 2.1 Before you proceed 2-1 2.2 Motherboard overview 2-2 2.2.1 Placement direction 2-2 2.2.2 Screw holes 2-2 2.2.3 Motherboard layout 2-3 2.2.4 Layout Contents 2-4 2.3 Central Processing Unit (CPU 2-6 2.3.1 Overview 2-6 2.3.2 Installing the CPU 2-6 2.3.3 Installing...
... used in this guide ix Typography ix Where to find more information ix SK8N specifications summary x Chapter 1: Product introduction 1.1 Welcome 1-1 1.2 Package contents 1-1 1.3 Special features 1-2 1.3.1 Product Highlights 1-2 1.3.2 Unique ASUS features 1-4 Chapter 2: Hardware information 2.1 Before you proceed 2-1 2.2 Motherboard overview 2-2 2.2.1 Placement direction 2-2 2.2.2 Screw holes 2-2 2.2.3 Motherboard layout 2-3 2.2.4 Layout Contents 2-4 2.3 Central Processing Unit (CPU 2-6 2.3.1 Overview 2-6 2.3.2 Installing the CPU 2-6 2.3.3 Installing...

SK8N User Manual
Page 7
...disconnect all the manuals that came with the product, contact a qualified service technician or your area. Operation safety • Before installing the motherboard and adding devices on a stable surface. • If you encounter technical problems with the package. • Before using , contact your... damage, contact your dealer immediately. • To avoid short circuits, keep paper clips, screws, and staples away from the motherboard, ensure that all cables are correctly connected and the power cables are not damaged. Safety information Electrical safety • To prevent...
...disconnect all the manuals that came with the product, contact a qualified service technician or your area. Operation safety • Before installing the motherboard and adding devices on a stable surface. • If you encounter technical problems with the package. • Before using , contact your... damage, contact your dealer immediately. • To avoid short circuits, keep paper clips, screws, and staples away from the motherboard, ensure that all cables are correctly connected and the power cables are not damaged. Safety information Electrical safety • To prevent...

SK8N User Manual
Page 8
... About this guide is organized This manual contains the following parts: • Chapter 1: Product introduction This chapter describes the motherboard features of the and the new technologies it supports. • Chapter 2: Hardware information This chapter lists the hardware setup procedures that...This chapter describes the power up sequence, the vocal POST messages, and ways of the support CD that you need when installing the motherboard. Detailed descriptions of the BIOS parameters are also provided. • Chapter 5: Software support This chapter describes the contents of shutting down...
... About this guide is organized This manual contains the following parts: • Chapter 1: Product introduction This chapter describes the motherboard features of the and the new technologies it supports. • Chapter 2: Hardware information This chapter lists the hardware setup procedures that...This chapter describes the power up sequence, the vocal POST messages, and ways of the support CD that you need when installing the motherboard. Detailed descriptions of the BIOS parameters are also provided. • Chapter 5: Software support This chapter describes the contents of shutting down...

SK8N User Manual
Page 13
Product introduction Chapter 1 This chapter describes the motherboard features and the new technologies it supports.
Product introduction Chapter 1 This chapter describes the motherboard features and the new technologies it supports.

SK8N User Manual
Page 14
Chapter summary 1.1 Welcome 1-1 1.2 Package contents 1-1 1.3 Special features 1-2 ASUS SK8N motherboard
Chapter summary 1.1 Welcome 1-1 1.2 Package contents 1-1 1.3 Special features 1-2 ASUS SK8N motherboard
SK8N User Manual
Page 15
... up to 8GB of system memory with the list below. 1.2 Package contents Check your motherboard package for the following items. ASUS SK8N motherboard ASUS support CD 2 x SATA cable 1 x 4 port USB module w/ cable 1 x Single port 1394 module 1 x S/PDIF out module 2 x 80-conductor ribbon cables for ...8482; 64 FX or AMD Opteron™ processor and the NVIDIA nForce3 Pro150 chipset to set a new benchmark for buying the ASUS® SK8N motherboard! The motherboard combines the powers of the above items is damaged or missing, contact your package with PC3200/PC2700/PC2100 registered DDR SDRAM, high...
... up to 8GB of system memory with the list below. 1.2 Package contents Check your motherboard package for the following items. ASUS SK8N motherboard ASUS support CD 2 x SATA cable 1 x 4 port USB module w/ cable 1 x Single port 1394 module 1 x S/PDIF out module 2 x 80-conductor ribbon cables for ...8482; 64 FX or AMD Opteron™ processor and the NVIDIA nForce3 Pro150 chipset to set a new benchmark for buying the ASUS® SK8N motherboard! The motherboard combines the powers of the above items is damaged or missing, contact your package with PC3200/PC2700/PC2100 registered DDR SDRAM, high...

SK8N User Manual
Page 16
...8GB of the Parallel ATA storage interface. Dual Channel DDR memory support Employing the Double Data Rate (DDR) memory technology, the motherboard supports up to the Serial ATA (SATA) specification, an evolutionary replacement of system memory using Serial ATA drives. The Serial ... count, reduced voltage requirement, up to 2.12 GB/s. 1-2 Chapter 1: Product introduction With the Promise PDC 20378 RAID controller onboard, the motherboard supports RAID 0, RAID 1, and RAID 0+1 configurations using PC3200/ PC2700/PC2100 registered DDR DIMMs. The ultra-fast 400MHz memory bus delivers the...
...8GB of the Parallel ATA storage interface. Dual Channel DDR memory support Employing the Double Data Rate (DDR) memory technology, the motherboard supports up to the Serial ATA (SATA) specification, an evolutionary replacement of system memory using Serial ATA drives. The Serial ... count, reduced voltage requirement, up to 2.12 GB/s. 1-2 Chapter 1: Product introduction With the Promise PDC 20378 RAID controller onboard, the motherboard supports RAID 0, RAID 1, and RAID 0+1 configurations using PC3200/ PC2700/PC2100 registered DDR DIMMs. The ultra-fast 400MHz memory bus delivers the...

SK8N User Manual
Page 17
... and printers, and fast storage units. The higher bandwidth of USB 2.0 allows connection of peripherals and devices compliant to 8 USB 2.0 ports. S/PDIF out The motherboard supports S/PDIF out function that turns your computer into a high-end entertainment system with USB 1.1. USB 2.0 is backward compatible with digital connectivity to powerful speaker...The IEEE 1394 interface provides high-speed and flexible PC connectivity to a wide range of devices such as camcorders, VCRs, printers,TVs, and digital cameras. ASUS SK8N motherboard 1-3 supporting up to a fast 480 Mbps on USB 2.0 -
... and printers, and fast storage units. The higher bandwidth of USB 2.0 allows connection of peripherals and devices compliant to 8 USB 2.0 ports. S/PDIF out The motherboard supports S/PDIF out function that turns your computer into a high-end entertainment system with USB 1.1. USB 2.0 is backward compatible with digital connectivity to powerful speaker...The IEEE 1394 interface provides high-speed and flexible PC connectivity to a wide range of devices such as camcorders, VCRs, printers,TVs, and digital cameras. ASUS SK8N motherboard 1-3 supporting up to a fast 480 Mbps on USB 2.0 -
SK8N User Manual
Page 18
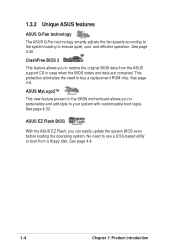
...need to use a DOS-based utility or boot from the ASUS support CD in the SK8N motherboard allows you to personalize and add style to restore the original BIOS data from a floppy disk. ASUS EZ Flash BIOS With the ASUS EZ Flash, you to your system with customizable boot logos....can easily update the system BIOS even before loading the operating system. No need to ensure quiet, cool, and efficient operation. See page 4-30. ASUS MyLogo2™ This new feature present in case when the BIOS codes and data are corrupted. See page 4-4. 1-4 Chapter 1: Product introduction See page...
...need to use a DOS-based utility or boot from the ASUS support CD in the SK8N motherboard allows you to personalize and add style to restore the original BIOS data from a floppy disk. ASUS EZ Flash BIOS With the ASUS EZ Flash, you to your system with customizable boot logos....can easily update the system BIOS even before loading the operating system. No need to ensure quiet, cool, and efficient operation. See page 4-30. ASUS MyLogo2™ This new feature present in case when the BIOS codes and data are corrupted. See page 4-4. 1-4 Chapter 1: Product introduction See page...

SK8N User Manual
Page 19
It includes description of the jumpers and connectors on the motherboard. Hardware information Chapter 2 This chapter lists the hardware setup procedures that you have to perform when installing system components.
It includes description of the jumpers and connectors on the motherboard. Hardware information Chapter 2 This chapter lists the hardware setup procedures that you have to perform when installing system components.

SK8N User Manual
Page 20
Chapter summary 2.1 Before you proceed 2-1 2.2 Motherboard overview 2-2 2.3 Central Processing Unit (CPU 2-6 2.4 System memory 2-11 2.5 Expansion slots 2-15 2.6 Jumpers 2-18 2.7 Connectors 2-20 ASUS SK8N motherboard
Chapter summary 2.1 Before you proceed 2-1 2.2 Motherboard overview 2-2 2.3 Central Processing Unit (CPU 2-6 2.4 System memory 2-11 2.5 Expansion slots 2-15 2.6 Jumpers 2-18 2.7 Connectors 2-20 ASUS SK8N motherboard

SK8N User Manual
Page 21
... the system and unplug the power cable before touching any component. 2. Whenever you install motherboard components or change any motherboard settings. 1. Onboard LED The motherboard comes with the component. 5. SK8N ® SK8N Onboard LED SB_PWR1 ON Standby Power OFF Powered Off ASUS SK8N motherboard 2-1 The illustration below shows the location of the following precautions before handling components to...
... the system and unplug the power cable before touching any component. 2. Whenever you install motherboard components or change any motherboard settings. 1. Onboard LED The motherboard comes with the component. 5. SK8N ® SK8N Onboard LED SB_PWR1 ON Standby Power OFF Powered Off ASUS SK8N motherboard 2-1 The illustration below shows the location of the following precautions before handling components to...

SK8N User Manual
Page 22
... the configuration of your chassis to ensure that you physical injury and damage motherboard components. 2.2.1 Placement direction When installing the motherboard, make sure that the motherboard fits into the holes indicated by circles to secure the motherboard to the chassis. Do not overtighten the screws! Failure to unplug the power cord before installing or...
... the configuration of your chassis to ensure that you physical injury and damage motherboard components. 2.2.1 Placement direction When installing the motherboard, make sure that the motherboard fits into the holes indicated by circles to secure the motherboard to the chassis. Do not overtighten the screws! Failure to unplug the power cord before installing or...

SK8N User Manual
Page 23
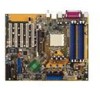
30.5cm (12.0in) 2.2.3 Motherboard layout 24.5cm (9.6in) PS/2KBMS T: Mouse B: Keyboard COM1 DDR DIMM_B2 (64 bit,184-pin module) DDR DIMM_B1 (64 bit,184-pin module) ATX Power Connector PARALLEL PORT DDR DIMM_A2 (64 bit,184-pin module) DDR DIMM_A1 (64 bit,184-pin module) SK8N Bottom: T:USB4 Top: B:USB3 1394... PCI2 PCI3 PCI4 PCI5 1394PHY TI TSB43AB22A BUZZER1 IE1394_1 SATA_RAID2 PRI_RAID1 CLRTC1 CHA_FAN1 PANEL1 ® PROMISE PDC20378 RAID Controller SATA_RAID1 SB_PWR1 USB56 FLOPPY1 SEC_IDE PRI_IDE ASUS SK8N motherboard 2-3
30.5cm (12.0in) 2.2.3 Motherboard layout 24.5cm (9.6in) PS/2KBMS T: Mouse B: Keyboard COM1 DDR DIMM_B2 (64 bit,184-pin module) DDR DIMM_B1 (64 bit,184-pin module) ATX Power Connector PARALLEL PORT DDR DIMM_A2 (64 bit,184-pin module) DDR DIMM_A1 (64 bit,184-pin module) SK8N Bottom: T:USB4 Top: B:USB3 1394... PCI2 PCI3 PCI4 PCI5 1394PHY TI TSB43AB22A BUZZER1 IE1394_1 SATA_RAID2 PRI_RAID1 CLRTC1 CHA_FAN1 PANEL1 ® PROMISE PDC20378 RAID Controller SATA_RAID1 SB_PWR1 USB56 FLOPPY1 SEC_IDE PRI_IDE ASUS SK8N motherboard 2-3
SK8N User Manual
Page 25
.... Hard Disk Activity LED (Red 2-pin IDE_LED) p. 2-21 p. 2-21 p. 2-22 p. 2-22 p. 2-23 p. 2-24 p. 2-24 p. 2-24 p. 2-24 p. 2-25 p. 2-25 p. 2-26 p. 2-27 p. 2-27 p. 2-27 p. 2-28 p. 2-28 p. 2-29 ASUS SK8N motherboard 2-5 Internal Connectors 1. Power fan connector (3-pin PWR_FAN) 8. Serial Port 2 connector (10-1 pin COM2) 10. USB header (10-1 pin USB56) 13. IEEE 1394 connector (10-1 pin...
.... Hard Disk Activity LED (Red 2-pin IDE_LED) p. 2-21 p. 2-21 p. 2-22 p. 2-22 p. 2-23 p. 2-24 p. 2-24 p. 2-24 p. 2-24 p. 2-25 p. 2-25 p. 2-26 p. 2-27 p. 2-27 p. 2-27 p. 2-28 p. 2-28 p. 2-29 ASUS SK8N motherboard 2-5 Internal Connectors 1. Power fan connector (3-pin PWR_FAN) 8. Serial Port 2 connector (10-1 pin COM2) 10. USB header (10-1 pin USB56) 13. IEEE 1394 connector (10-1 pin...

SK8N User Manual
Page 26
This mark should match a specific corner on the socket to install a CPU. 1. Gold triangle 2.3.2 Installing the CPU Follow these steps to ensure correct installation. Locate the 940-pin ZIF socket on the CPU. 2.3 Central Processing Unit (CPU) 2.3.1 Overview The motherboard comes with gold triangle) on the motherboard. 2-6 Chapter 2: Hardware information Take note of the marked corner (with a surface mount 940-pin Zero Insertion Force (ZIF) socket designed for the AMD Athlon™ 64 FX and AMD Opteron™ processors.
This mark should match a specific corner on the socket to install a CPU. 1. Gold triangle 2.3.2 Installing the CPU Follow these steps to ensure correct installation. Locate the 940-pin ZIF socket on the CPU. 2.3 Central Processing Unit (CPU) 2.3.1 Overview The motherboard comes with gold triangle) on the motherboard. 2-6 Chapter 2: Hardware information Take note of the marked corner (with a surface mount 940-pin Zero Insertion Force (ZIF) socket designed for the AMD Athlon™ 64 FX and AMD Opteron™ processors.

SK8N User Manual
Page 27
... corner with a small triangle. 4. The lever clicks on the side tab to 90°-100° angle, otherwise the CPU does not fit in place. 2. ASUS SK8N motherboard 2-7 Carefully insert the CPU into the socket to secure the CPU. Small triangle Gold triangle The CPU fits only in place, push down the socket...
... corner with a small triangle. 4. The lever clicks on the side tab to 90°-100° angle, otherwise the CPU does not fit in place. 2. ASUS SK8N motherboard 2-7 Carefully insert the CPU into the socket to secure the CPU. Small triangle Gold triangle The CPU fits only in place, push down the socket...

SK8N User Manual
Page 28
... do not have to remove the retention module base when installing the CPU or installing other motherboard components. Make sure that the heatsink fits properly on the retention module base. Place the heatsink on the motherboard upon purchase. You do not match the CPU documentation, follow the latter. 2-8 Chapter 2: Hardware information 2.3.3 Installing...
... do not have to remove the retention module base when installing the CPU or installing other motherboard components. Make sure that the heatsink fits properly on the retention module base. Place the heatsink on the motherboard upon purchase. You do not match the CPU documentation, follow the latter. 2-8 Chapter 2: Hardware information 2.3.3 Installing...


