
SK8N User Manual
Page 5
...PCI PnP 4-25 4.5 Power menu 4-27 4.5.1 ACPI Suspend Mode [S3 only 4-27 4.5.2 Repost Video on S3 Resume [No 4-27 4.5.3 ACPI 2.0 Support [No 4-27 4.5.4 ACPI APIC Support [Enabled 4-27 4.5.5 BIOS -> AML ACPI Table [Enabled 4-27 4.5.6 APM Configuration 4-28 4.5.7 Hardware Monitor 4-29 4.6 Boot menu 4-31 4.6.1 Boot Device Priority 4-31 4.6.2 Boot Settings Configuration 4-32 4.6.3 Security 4-34 4.7 Exit menu 4-36 Chapter 5: Software support 5.1 Install an operating system 5-1 5.2 Support CD information 5-1 5.2.1 Running the support CD 5-1 5.2.2 Drivers menu 5-2 5.2.3 Utilities menu...
...PCI PnP 4-25 4.5 Power menu 4-27 4.5.1 ACPI Suspend Mode [S3 only 4-27 4.5.2 Repost Video on S3 Resume [No 4-27 4.5.3 ACPI 2.0 Support [No 4-27 4.5.4 ACPI APIC Support [Enabled 4-27 4.5.5 BIOS -> AML ACPI Table [Enabled 4-27 4.5.6 APM Configuration 4-28 4.5.7 Hardware Monitor 4-29 4.6 Boot menu 4-31 4.6.1 Boot Device Priority 4-31 4.6.2 Boot Settings Configuration 4-32 4.6.3 Security 4-34 4.7 Exit menu 4-36 Chapter 5: Software support 5.1 Install an operating system 5-1 5.2 Support CD information 5-1 5.2.1 Running the support CD 5-1 5.2.2 Drivers menu 5-2 5.2.3 Utilities menu...
SK8N User Manual
Page 15
... NVIDIA nForce3 Pro150 chipset to 8GB of system memory with the list below. 1.2 Package contents Check your motherboard package for the following items. ASUS SK8N motherboard ASUS support CD 2 x SATA cable 1 x 4 port USB module w/ cable 1 x Single port 1394 module 1 x S/PDIF out module 2 x 80-conductor ribbon cables for UltraDMA/66/100/133 IDE drives 1 x 40-conductor IDE cable 1 x Ribbon cable for buying the ASUS® SK8N motherboard! ASUS SK8N motherboard 1-1 Before you start installing the motherboard, and hardware devices on it another...
... NVIDIA nForce3 Pro150 chipset to 8GB of system memory with the list below. 1.2 Package contents Check your motherboard package for the following items. ASUS SK8N motherboard ASUS support CD 2 x SATA cable 1 x 4 port USB module w/ cable 1 x Single port 1394 module 1 x S/PDIF out module 2 x 80-conductor ribbon cables for UltraDMA/66/100/133 IDE drives 1 x 40-conductor IDE cable 1 x Ribbon cable for buying the ASUS® SK8N motherboard! ASUS SK8N motherboard 1-1 Before you start installing the motherboard, and hardware devices on it another...

SK8N User Manual
Page 16
.... With the Promise PDC 20378 RAID controller onboard, the motherboard supports RAID 0, RAID 1, and RAID 0+1 configurations using PC3200/ PC2700/PC2100 registered DDR DIMMs. The ultra-fast 400MHz memory bus delivers the required bandwidth for the latest 3D graphics, multimedia, and Internet applications. Dual Channel DDR memory support Employing the Double Data Rate (DDR) memory technology, the motherboard supports up to the Serial ATA (SATA) specification, an evolutionary replacement of these processors can run applications faster than...
.... With the Promise PDC 20378 RAID controller onboard, the motherboard supports RAID 0, RAID 1, and RAID 0+1 configurations using PC3200/ PC2700/PC2100 registered DDR DIMMs. The ultra-fast 400MHz memory bus delivers the required bandwidth for the latest 3D graphics, multimedia, and Internet applications. Dual Channel DDR memory support Employing the Double Data Rate (DDR) memory technology, the motherboard supports up to the Serial ATA (SATA) specification, an evolutionary replacement of these processors can run applications faster than...
SK8N User Manual
Page 18
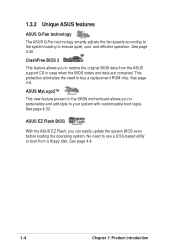
... eliminates the need to buy a replacement ROM chip. ASUS MyLogo2™ This new feature present in case when the BIOS codes and data are corrupted. 1.3.2 Unique ASUS features ASUS Q-Fan technology The ASUS Q-Fan technology smartly adjusts the fan speeds according to the system loading to your system with customizable boot logos. No need to use a DOS-based utility or boot from the ASUS support CD in the SK8N motherboard allows you to personalize and add...
... eliminates the need to buy a replacement ROM chip. ASUS MyLogo2™ This new feature present in case when the BIOS codes and data are corrupted. 1.3.2 Unique ASUS features ASUS Q-Fan technology The ASUS Q-Fan technology smartly adjusts the fan speeds according to the system loading to your system with customizable boot logos. No need to use a DOS-based utility or boot from the ASUS support CD in the SK8N motherboard allows you to personalize and add...
SK8N User Manual
Page 35
... BIOS setup. 2. Refer to use . 4. The following sub-sections describe the slots and the expansion cards that you removed earlier. 6. Before installing the expansion card, read the documentation that came with the slot and press firmly until the card is already installed in a chassis). 3. Replace the system cover. 2.5.2 Configuring an expansion card After installing the expansion card, configure the card by adjusting the software settings. 1. The motherboard has five PCI slots and one Accelerated Graphics Port...
... BIOS setup. 2. Refer to use . 4. The following sub-sections describe the slots and the expansion cards that you removed earlier. 6. Before installing the expansion card, read the documentation that came with the slot and press firmly until the card is already installed in a chassis). 3. Replace the system cover. 2.5.2 Configuring an expansion card After installing the expansion card, configure the card by adjusting the software settings. 1. The motherboard has five PCI slots and one Accelerated Graphics Port...

SK8N User Manual
Page 58
... floppy disk. Boot the system from the support CD to the bootable floppy disk that you see on the screen is for your screen may cause system boot failure! 4-2 Chapter 4: BIOS Setup The BIOS information on your motherboard. A:\>afudos /iSK8N.rom AMI Firmware Update Utility - 2. Copy the AFUDOS.EXE utility from the floppy disk. 4. Save the BIOS file to update the BIOS Update the BIOS using the AFUDOS.EXE utility in DOS environment. 1. Write down the BIOS file name to type the...
... floppy disk. Boot the system from the support CD to the bootable floppy disk that you see on the screen is for your screen may cause system boot failure! 4-2 Chapter 4: BIOS Setup The BIOS information on your motherboard. A:\>afudos /iSK8N.rom AMI Firmware Update Utility - 2. Copy the AFUDOS.EXE utility from the floppy disk. 4. Save the BIOS file to update the BIOS Update the BIOS using the AFUDOS.EXE utility in DOS environment. 1. Write down the BIOS file name to type the...
SK8N User Manual
Page 63
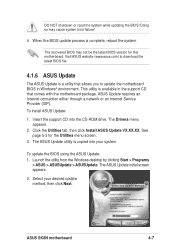
.... ASUS SK8N motherboard 4-7 Launch the utility from the Windows desktop by clicking Start > Programs > ASUS > ASUSUpdate > ASUSUpdate. Doing so may not be the latest BIOS version for the Utilities menu screen. 3. The recovered BIOS may cause system boot failure! 4. To install ASUS Update: 1. See page 5-3 for this motherboard. ASUS Update requires an Internet connection either through a network or an Internet Service Provider (ISP). Click the Utilities tab, then click Install ASUS Update VX.XX.XX. To update the BIOS using the ASUS Update: 1. DO...
.... ASUS SK8N motherboard 4-7 Launch the utility from the Windows desktop by clicking Start > Programs > ASUS > ASUSUpdate > ASUSUpdate. Doing so may not be the latest BIOS version for the Utilities menu screen. 3. The recovered BIOS may cause system boot failure! 4. To install ASUS Update: 1. See page 5-3 for this motherboard. ASUS Update requires an Internet connection either through a network or an Internet Service Provider (ISP). Click the Utilities tab, then click Install ASUS Update VX.XX.XX. To update the BIOS using the ASUS Update: 1. DO...

SK8N User Manual
Page 67
... with the configuration options for that menu. A configurable field is enclosed in ] Primary IDE Master Primary IDE Slave Secondary IDE Master Secondary IDE Slave System Information :[ST320413A] :[ASUS CD-S340] :[Not Detected] :[Not Detected] The other items (Advanced, Power, Boot, and Exit) on the menu bar have their respective menu items. Main menu items Use [ENTER], [TAB] or [SHIFT-TAB] to display the other items on the screen. 4.2.9 General...
... with the configuration options for that menu. A configurable field is enclosed in ] Primary IDE Master Primary IDE Slave Secondary IDE Master Secondary IDE Slave System Information :[ST320413A] :[ASUS CD-S340] :[Not Detected] :[Not Detected] The other items (Advanced, Power, Boot, and Exit) on the menu bar have their respective menu items. Main menu items Use [ENTER], [TAB] or [SHIFT-TAB] to display the other items on the screen. 4.2.9 General...

SK8N User Manual
Page 69
... BIOS and are specifically configuring a CD-ROM drive. Setting to Auto allows automatic selection of device connected to the system. Setting to display the IDE device information. When set to Auto, the data transfer from and to the device occurs multiple sectors at a time. Select a device item then press Enter to Auto enables the LBA mode if the device supports this mode, and if the device was not previously formatted with LBA mode disabled. Type [Auto] Selects the type of IDE devices. Configuration options: [Disabled] [Auto] ASUS SK8N motherboard...
... BIOS and are specifically configuring a CD-ROM drive. Setting to Auto allows automatic selection of device connected to the system. Setting to display the IDE device information. When set to Auto, the data transfer from and to the device occurs multiple sectors at a time. Select a device item then press Enter to Auto enables the LBA mode if the device supports this mode, and if the device was not previously formatted with LBA mode disabled. Type [Auto] Selects the type of IDE devices. Configuration options: [Disabled] [Auto] ASUS SK8N motherboard...

SK8N User Manual
Page 71
... 4.4.1 CPU Configuration The items in MHz [200] This item allows user input of the Advanced menu items. Incorrect field values may cause the system to 300 MHz. ASUS SK8N motherboard 4-15 4.4 Advanced menu The Advanced menu items allow you to overclocking, unplug the power cable; Select Screen Select Item Enter Go to power source and restart system. wait for the CPU and other system devices. CPU OverClock in this menu...
... 4.4.1 CPU Configuration The items in MHz [200] This item allows user input of the Advanced menu items. Incorrect field values may cause the system to 300 MHz. ASUS SK8N motherboard 4-15 4.4 Advanced menu The Advanced menu items allow you to overclocking, unplug the power cable; Select Screen Select Item Enter Go to power source and restart system. wait for the CPU and other system devices. CPU OverClock in this menu...

SK8N User Manual
Page 75
...[2.5V] [2.6V] [2.7V] South Bridge Configuration The Chipset menu item allow you to display the sub-menu. Change Option F1 General Help F10 Save and Exit ESC Exit SMBus Interface [Enabled] This item enables or disables the SMBus controller. Configuration options: [Enabled] [Disabled] [Auto] MAC Interface [Enabled] This item enables or disables the internal 802.3 MAC interface. Configuration options: [Disabled] [Enabled] ASUS SK8N motherboard 4-19 Configuration options: [Enabled] [Disabled] Onboard LAN Boot ROM [Disabled] This item enables or disables the onboard LAN Boot ROM.
...[2.5V] [2.6V] [2.7V] South Bridge Configuration The Chipset menu item allow you to display the sub-menu. Change Option F1 General Help F10 Save and Exit ESC Exit SMBus Interface [Enabled] This item enables or disables the SMBus controller. Configuration options: [Enabled] [Disabled] [Auto] MAC Interface [Enabled] This item enables or disables the internal 802.3 MAC interface. Configuration options: [Disabled] [Enabled] ASUS SK8N motherboard 4-19 Configuration options: [Enabled] [Disabled] Onboard LAN Boot ROM [Disabled] This item enables or disables the onboard LAN Boot ROM.

SK8N User Manual
Page 76
...OHCI handover speed. Configuration options: [Disabled] [Enabled] [Auto] USB 2.0 Controller [Enabled] Allows you to change the USB-related features. USB Configuration The items in this menu allows you to enable or disable the USB 2.0 controller. Configuration options: [Full Speed] [HiSpeed ] 4-20 Chapter 4: BIOS Setup If no USB device is detected, the legacy USB support is enabled. USB Function [Both Controllers] Allows you to activate. Setting to Auto allows the system to display the configuration options. Configuration options: [Disabled] [Enabled] USB 2.0 Controller Mode...
...OHCI handover speed. Configuration options: [Disabled] [Enabled] [Auto] USB 2.0 Controller [Enabled] Allows you to change the USB-related features. USB Configuration The items in this menu allows you to enable or disable the USB 2.0 controller. Configuration options: [Full Speed] [HiSpeed ] 4-20 Chapter 4: BIOS Setup If no USB device is detected, the legacy USB support is enabled. USB Function [Both Controllers] Allows you to activate. Setting to Auto allows the system to display the configuration options. Configuration options: [Disabled] [Enabled] USB 2.0 Controller Mode...

SK8N User Manual
Page 79
... CRC Error. Configuration options: [PCI] [AGP] HyperTransport Configuration The Chipset menu item allow you to MCP2 frequency. Configuration options: [Disabled] [Enabled] LDT to MCP2 Frequency [600 MHz] This item enables or disables the LCT to change the HyperTransport settings. Configuration options: [200 MHz] [400 Mhz] [600 Mhz] ASUS SK8N motherboard 4-23 Select an item then press Enter to select the type of Primary VGA in case of multiple video controllers. This allows to display the sub-menu. HyperTransport Configuration HT Tristate Enable...
... CRC Error. Configuration options: [PCI] [AGP] HyperTransport Configuration The Chipset menu item allow you to MCP2 frequency. Configuration options: [Disabled] [Enabled] LDT to MCP2 Frequency [600 MHz] This item enables or disables the LCT to change the HyperTransport settings. Configuration options: [200 MHz] [400 Mhz] [600 Mhz] ASUS SK8N motherboard 4-23 Select an item then press Enter to select the type of Primary VGA in case of multiple video controllers. This allows to display the sub-menu. HyperTransport Configuration HT Tristate Enable...

SK8N User Manual
Page 81
...], BIOS configures all the devices in the system. Take caution when changing the settings of the PCI PnP menu items. Incorrect field values may cause system to change the advanced settings for boot. The menu includes setting IRQ and DMA channel resources for either PCI/PnP or legacy ISA devices, and setting the memory size block for boot if your system has a Plug and Play operating system. Configuration options: [No] [Yes] ASUS SK8N motherboard 4-25 Select Screen...
...], BIOS configures all the devices in the system. Take caution when changing the settings of the PCI PnP menu items. Incorrect field values may cause system to change the advanced settings for boot. The menu includes setting IRQ and DMA channel resources for either PCI/PnP or legacy ISA devices, and setting the memory size block for boot if your system has a Plug and Play operating system. Configuration options: [No] [Yes] ASUS SK8N motherboard 4-25 Select Screen...

SK8N User Manual
Page 83
.... Configuration options: [Disabled] [Enabled] ASUS SK8N motherboard 4-27 Configuration options: [No] [Yes] 4.5.3 ACPI 2.0 Support [No] Allows you to select the ACPI state to add more tables for ACPI 2.0 specifications. Select Screen Select Item Enter Go to Sub-screen F1 General Help F10 Save and Exit ESC Exit 4.5.1 ACPI Suspend Mode [S3 only] Allows you to be used for the Advanced Power Management (APM). Select an item then press Enter to change the settings for...
.... Configuration options: [Disabled] [Enabled] ASUS SK8N motherboard 4-27 Configuration options: [No] [Yes] 4.5.3 ACPI 2.0 Support [No] Allows you to select the ACPI state to add more tables for ACPI 2.0 specifications. Select Screen Select Item Enter Go to Sub-screen F1 General Help F10 Save and Exit ESC Exit 4.5.1 ACPI Suspend Mode [S3 only] Allows you to be used for the Advanced Power Management (APM). Select an item then press Enter to change the settings for...
SK8N User Manual
Page 90
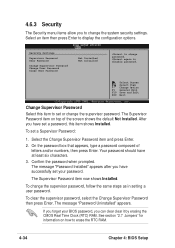
... press Enter to disable password. Security Settings Supervisor Password User Password Change Supervisor Password Change User Password Clear User Password Not Installed Not Installed to change the supervisor password, follow the same steps as in setting a user password. Select Screen Select Item +- If you forget your password. See section "2.7 Jumpers" for information on top of letters and/or numbers, then press Enter. The Supervisor Password item on how to erase the RTC RAM. 4-34 Chapter 4: BIOS Setup Select the Change Supervisor Password...
... press Enter to disable password. Security Settings Supervisor Password User Password Change Supervisor Password Change User Password Clear User Password Not Installed Not Installed to change the supervisor password, follow the same steps as in setting a user password. Select Screen Select Item +- If you forget your password. See section "2.7 Jumpers" for information on top of letters and/or numbers, then press Enter. The Supervisor Password item on how to erase the RTC RAM. 4-34 Chapter 4: BIOS Setup Select the Change Supervisor Password...
SK8N User Manual
Page 97
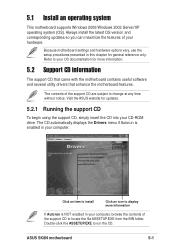
... options vary, use the setup procedures presented in this chapter for updates. 5.2.1 Running the support CD To begin using the support CD, simply insert the CD into your hardware. ASUS SK8N motherboard 5-1 Visit the ASUS website for general reference only. Refer to run the CD. 5.1 Install an operating system This motherboard supports Windows 2000/Windows 2003 Server/XP operating system (OS). The contents of your CD-ROM drive...
... options vary, use the setup procedures presented in this chapter for updates. 5.2.1 Running the support CD To begin using the support CD, simply insert the CD into your hardware. ASUS SK8N motherboard 5-1 Visit the ASUS website for general reference only. Refer to run the CD. 5.1 Install an operating system This motherboard supports Windows 2000/Windows 2003 Server/XP operating system (OS). The contents of your CD-ROM drive...
SK8N User Manual
Page 110
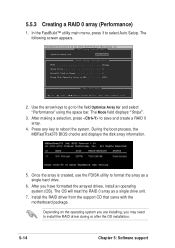
... following screen appears. Use the arrow keys to go to install the RAID driver during or after the OS installation. 5-14 Chapter 5: Software support During the boot process, the MBFastTrak378 BIOS checks and displays the disk array information. 5. FastBuild (tm) Utility 2.00 (c) 2002-2005 Promise Technology, Inc. [ Auto Setup Options Menu ] Optimize Array for and select "Performance" using the space bar. The OS will treat the RAID 0 array as a single hard drive. 6. 5.5.3 Creating a RAID...
... following screen appears. Use the arrow keys to go to install the RAID driver during or after the OS installation. 5-14 Chapter 5: Software support During the boot process, the MBFastTrak378 BIOS checks and displays the disk array information. 5. FastBuild (tm) Utility 2.00 (c) 2002-2005 Promise Technology, Inc. [ Auto Setup Options Menu ] Optimize Array for and select "Performance" using the space bar. The OS will treat the RAID 0 array as a single hard drive. 6. 5.5.3 Creating a RAID...
SK8N User Manual
Page 112
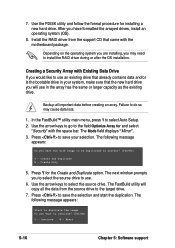
... drive. The Mode field displays "Mirror". 3. The following message appears: Start to the target drive. 7. The following message appears: Do you will copy all important data before creating an array. Abort 5-16 Chapter 5: Software support After you may cause data loss. 1. Use the arrow keys to go to install the RAID driver during or after the OS installation. Create and Duplicate N - Use the arrow keys...
... drive. The Mode field displays "Mirror". 3. The following message appears: Start to the target drive. 7. The following message appears: Do you will copy all important data before creating an array. Abort 5-16 Chapter 5: Software support After you may cause data loss. 1. Use the arrow keys to go to install the RAID driver during or after the OS installation. Create and Duplicate N - Use the arrow keys...
SK8N User Manual
Page 113
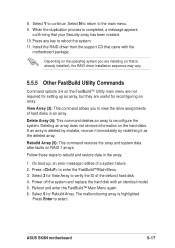
... any key to continue. Depending on the FastBuild™ Utility main menu are not required for View Array to verify the ID of a system failure. 2. Deleting an array does not remove information on RAID 1 arrays. Power off the system and replace the hard disk with the motherboard package. When the duplication process is already installed), the RAID driver installation sequence may vary. 5.5.5 Other FastBuild Utility Commands Command options...
... any key to continue. Depending on the FastBuild™ Utility main menu are not required for View Array to verify the ID of a system failure. 2. Deleting an array does not remove information on RAID 1 arrays. Power off the system and replace the hard disk with the motherboard package. When the duplication process is already installed), the RAID driver installation sequence may vary. 5.5.5 Other FastBuild Utility Commands Command options...


