User Guide
Page 11
...asus.com for Intel CPU support list Intel® H55 Express Chipset 4 x DIMM, max. 16GB, DDR3 2133(O.C.) /1333 / 1066 MHz, non-ECC, un-buffered memory Dual channel memory architecture Supports Intel® Extreme Memory Profile (XMP) * Hyper DIMM support is subject to 2 PATA devices Gigabit LAN controller - P7H55... Some hyper DIMMs only support one DIMM per channel. resolution 1920 x 1200 @60Hz Supports DVI with max. gray slot) 2 x PCI slots Multi-VGA output support: HDMI, DVI-D, and RGB ports Supports HDMI with max. Realtek® 8112L Gigabit LAN controller featuring AI NET2 12 x USB...
...asus.com for Intel CPU support list Intel® H55 Express Chipset 4 x DIMM, max. 16GB, DDR3 2133(O.C.) /1333 / 1066 MHz, non-ECC, un-buffered memory Dual channel memory architecture Supports Intel® Extreme Memory Profile (XMP) * Hyper DIMM support is subject to 2 PATA devices Gigabit LAN controller - P7H55... Some hyper DIMMs only support one DIMM per channel. resolution 1920 x 1200 @60Hz Supports DVI with max. gray slot) 2 x PCI slots Multi-VGA output support: HDMI, DVI-D, and RGB ports Supports HDMI with max. Realtek® 8112L Gigabit LAN controller featuring AI NET2 12 x USB...

User Guide
Page 13
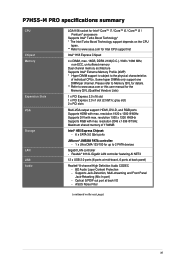
xiii P7H55-M PRO specifications summary Back Panel I/O Ports 1 x PS/2 Keyboard port (purple) 1 x HDMI Output 1 x DVI-D Output 1 x D-Sub Output 1 x Optical S/PDIF Out 1 x RJ45 port 6 x USB 2.0/1.1 ports 8-channel Audio I/O Internal I/O Connectors 3 x USB connectors support additional 6 USB ports 1 x IDE connector 6 x SATA 3.0Gb/s connectors 1 x CPU Fan...BIOS 2.5, ACPI 2.0a, Multi-language BIOS, ASUS EZ Flash 2, ASUS CrashFree BIOS 3 Manageability WfM 2.0, DMI 2.0, WOL by PME, WOR by PME, PXE Support DVD Contents Drivers ASUS Utilities ASUS Update Anti-virus software (OEM version) Form...
xiii P7H55-M PRO specifications summary Back Panel I/O Ports 1 x PS/2 Keyboard port (purple) 1 x HDMI Output 1 x DVI-D Output 1 x D-Sub Output 1 x Optical S/PDIF Out 1 x RJ45 port 6 x USB 2.0/1.1 ports 8-channel Audio I/O Internal I/O Connectors 3 x USB connectors support additional 6 USB ports 1 x IDE connector 6 x SATA 3.0Gb/s connectors 1 x CPU Fan...BIOS 2.5, ACPI 2.0a, Multi-language BIOS, ASUS EZ Flash 2, ASUS CrashFree BIOS 3 Manageability WfM 2.0, DMI 2.0, WOL by PME, WOR by PME, PXE Support DVD Contents Drivers ASUS Utilities ASUS Update Anti-virus software (OEM version) Form...
User Guide
Page 16
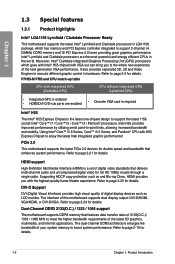
...174; Core™ i7 / Core™ i5 / Core™ i3 / Pentium® processors. Supporting HDCP copy protection such as LCD monitor. P7H55-M PRO and CPU match-up table CPU with integrated GPU (Clarkdale CPU) CPU without integrated GPU (Lynnfield CPU) • Integrated GPU is enabled ...• HDMI/DVI-D/D-sub ports are the most powerful and energy efficient CPUs in hardware. Refer to page 2-21 for double speed and bandwidth that delivers multi-...
...174; Core™ i7 / Core™ i5 / Core™ i3 / Pentium® processors. Supporting HDCP copy protection such as LCD monitor. P7H55-M PRO and CPU match-up table CPU with integrated GPU (Clarkdale CPU) CPU without integrated GPU (Lynnfield CPU) • Integrated GPU is enabled ...• HDMI/DVI-D/D-sub ports are the most powerful and energy efficient CPUs in hardware. Refer to page 2-21 for double speed and bandwidth that delivers multi-...

User Guide
Page 24
The edge with external ports goes to the chassis. Place this side towards the rear of the chassis as indicated in the correct orientation. DO NOT overtighten the screws! Doing so can damage the motherboard. 2.2.3 Placement direction When installing the motherboard, ensure that you place it into the chassis in the image below. 2.2.4 Screw holes Place eight screws into the holes indicated by circles to secure the motherboard to the rear part of the chassis Chapter 2 2-4 Chapter 2: Hardware information
The edge with external ports goes to the chassis. Place this side towards the rear of the chassis as indicated in the correct orientation. DO NOT overtighten the screws! Doing so can damage the motherboard. 2.2.3 Placement direction When installing the motherboard, ensure that you place it into the chassis in the image below. 2.2.4 Screw holes Place eight screws into the holes indicated by circles to secure the motherboard to the rear part of the chassis Chapter 2 2-4 Chapter 2: Hardware information

User Guide
Page 40
... - - shared - - - - - LAN - - - Onboard VGA shared - - - - - - - Chapter 2 2.5.3 Interrupt assignments Standard interrupt assignments IRQ Priority Standard function 0 1 System Timer 1 2 Keyboard Controller 2 - shared - - - - - Redirect to IRQ#9 4 12 Communications Port (COM1)* 5 13 IRQ Holder for PCI Steering* 6 14 Reserved 7 15 Reserved 8 3 System CMOS/Real Time Clock 9 4 IRQ Holder for PCI Steering* 10 5 IRQ Holder for...
... - - shared - - - - - LAN - - - Onboard VGA shared - - - - - - - Chapter 2 2.5.3 Interrupt assignments Standard interrupt assignments IRQ Priority Standard function 0 1 System Timer 1 2 Keyboard Controller 2 - shared - - - - - Redirect to IRQ#9 4 12 Communications Port (COM1)* 5 13 IRQ Holder for PCI Steering* 6 14 Reserved 7 15 Reserved 8 3 System CMOS/Real Time Clock 9 4 IRQ Holder for PCI Steering* 10 5 IRQ Holder for...

User Guide
Page 43
USB 2.0 ports 5 and 6 6. ASUS P7H55-M PRO 2-23 PS/2 keyboard port (purple) 2. USB 2.0 ports 3 and 4 9. LAN (RJ-45) port 5. HDMI out port*** 7. 2.7 Connectors 2.7.1 Rear panel connectors Chapter 2 Rear panel connectors 1. Optical S/PDIF Out port 3. Audio I/O ports** *and **: Refer to the tables on the next page for LAN port and audio port definitions. ***: Refer to the notes and troubleshooting on monitor overscan / underscan problem on the next pages. DVI-D out port 8. USB 2.0 ports 1 and 2 10. VGA out port 4.
USB 2.0 ports 5 and 6 6. ASUS P7H55-M PRO 2-23 PS/2 keyboard port (purple) 2. USB 2.0 ports 3 and 4 9. LAN (RJ-45) port 5. HDMI out port*** 7. 2.7 Connectors 2.7.1 Rear panel connectors Chapter 2 Rear panel connectors 1. Optical S/PDIF Out port 3. Audio I/O ports** *and **: Refer to the tables on the next page for LAN port and audio port definitions. ***: Refer to the notes and troubleshooting on monitor overscan / underscan problem on the next pages. DVI-D out port 8. USB 2.0 ports 1 and 2 10. VGA out port 4.
User Guide
Page 44
...Blu-Ray Disc under Windows® Vista™ / 7™ OS. 2-24 Chapter 2: Hardware information Using the CPU/Memory of the onboard VGA, DVI-D, and HDMI ports. CyberLink PowerDVD v9.0 Ultra Build 2320 • To play Blu-Ray Disc, make sure to use an HDCP compliant monitor. • You can... to return to its original setting or restart the system and press F8 to the next page for your reference. Chapter 2 *LAN port LED indications Activity Link LED Status Description OFF No link ORANGE Linked BLINKING Data activity Speed LED Status Description OFF 10 Mbps connection ORANGE...
...Blu-Ray Disc under Windows® Vista™ / 7™ OS. 2-24 Chapter 2: Hardware information Using the CPU/Memory of the onboard VGA, DVI-D, and HDMI ports. CyberLink PowerDVD v9.0 Ultra Build 2320 • To play Blu-Ray Disc, make sure to use an HDCP compliant monitor. • You can... to return to its original setting or restart the system and press F8 to the next page for your reference. Chapter 2 *LAN port LED indications Activity Link LED Status Description OFF No link ORANGE Linked BLINKING Data activity Speed LED Status Description OFF 10 Mbps connection ORANGE...

User Guide
Page 46
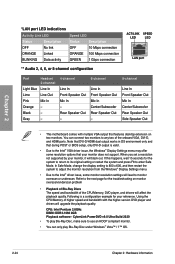
2.7.2 Audio I/O connections Audio I/O ports Connect to Headphone and Mic Connect to Stereo / 2.1-channel Speakers Chapter 2 2-26 Chapter 2: Hardware information
2.7.2 Audio I/O connections Audio I/O ports Connect to Headphone and Mic Connect to Stereo / 2.1-channel Speakers Chapter 2 2-26 Chapter 2: Hardware information

User Guide
Page 50
... opening at the back of the system chassis. The USB module is purchased separately. 2-30 Chapter 2: Hardware information USB1112) These connectors are for a serial (COM) port. Connect the serial port module cable to this connector, then install the module to a slot opening at the back of the system chassis. USB910; Serial...
... opening at the back of the system chassis. The USB module is purchased separately. 2-30 Chapter 2: Hardware information USB1112) These connectors are for a serial (COM) port. Connect the serial port module cable to this connector, then install the module to a slot opening at the back of the system chassis. USB910; Serial...

User Guide
Page 52
..., set the Front Panel Type item in the BIOS setup to this connector. The S/PDIF module is for an additional Sony/Philips Digital Interface (S/PDIF) port(s). 6. Front panel audio connector (10-1 pin AAFP) This connector is purchased separately. 7. Connect one end of the front panel audio I /O module that you connect a high...
..., set the Front Panel Type item in the BIOS setup to this connector. The S/PDIF module is for an additional Sony/Philips Digital Interface (S/PDIF) port(s). 6. Front panel audio connector (10-1 pin AAFP) This connector is purchased separately. 7. Connect one end of the front panel audio I /O module that you connect a high...
User Guide
Page 60
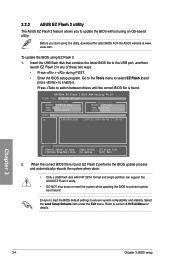
... OS-based utility. ASUSTek EZ Flash 2 BIOS ROM Utility V4.10 FLASH TYPE: WINBOND 25X/Q64 Current ROM BOARD: P7H55-M PRO VER: 0113 DATE: 11/03/2009 Update ROM BOARD: Unknown VER: Unknown DATE: Unknown PATH: A:\ A: ... a USB flash disk with FAT 32/16 format and single partition can support the ASUS EZ Flash 2 utility. • DO NOT shut down or reset the system while updating the BIOS to prevent...latest BIOS file to enable it. Go to the Tools menu to select EZ Flash 2 and press to the USB port, and then launch EZ Flash 2 in any of these two ways: • Press + during POST. •...
... OS-based utility. ASUSTek EZ Flash 2 BIOS ROM Utility V4.10 FLASH TYPE: WINBOND 25X/Q64 Current ROM BOARD: P7H55-M PRO VER: 0113 DATE: 11/03/2009 Update ROM BOARD: Unknown VER: Unknown DATE: Unknown PATH: A:\ A: ... a USB flash disk with FAT 32/16 format and single partition can support the ASUS EZ Flash 2 utility. • DO NOT shut down or reset the system while updating the BIOS to prevent...latest BIOS file to enable it. Go to the Tools menu to select EZ Flash 2 and press to the USB port, and then launch EZ Flash 2 in any of these two ways: • Press + during POST. •...
User Guide
Page 61
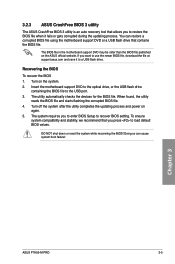
... process. DO NOT shut down or reset the system while recovering the BIOS! Chapter 3 ASUS P7H55-M PRO 3-5 To ensure system compatibility and stability, we recommend that you press to recover ...! Turn off the system after the utility completes the updating process and power on the ASUS official website. Recovering the BIOS To recover the BIOS 1. The utility automatically checks the...motherboard support DVD or a USB flash drive that contains the BIOS file. 3.2.3 ASUS CrashFree BIOS 3 utility The ASUS CrashFree BIOS 3 utility is an auto recovery tool that allows you to restore ...
... process. DO NOT shut down or reset the system while recovering the BIOS! Chapter 3 ASUS P7H55-M PRO 3-5 To ensure system compatibility and stability, we recommend that you press to recover ...! Turn off the system after the utility completes the updating process and power on the ASUS official website. Recovering the BIOS To recover the BIOS 1. The utility automatically checks the...motherboard support DVD or a USB flash drive that contains the BIOS file. 3.2.3 ASUS CrashFree BIOS 3 utility The ASUS CrashFree BIOS 3 utility is an auto recovery tool that allows you to restore ...
User Guide
Page 62
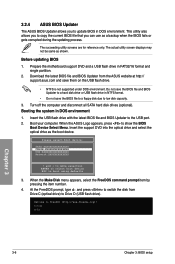
... support DVD and a USB flash drive in DOS environment 1. Turn off the computer and disconnect all SATA hard disk drives (optional). When the ASUS Logo appears, press to Drive D (USB flash drive). The succeeding utility screens are for reference only. Download the latest BIOS file and BIOS Updater ... at http:// support.asus.com and save the BIOS file to a floppy disk due to a hard disk drive or USB flash drive in DOS environment. Welcome to the USB port. 2. When the Make Disk menu appears, select the FreeDOS command prompt item by pressing the item number. 4. Do not save...
... support DVD and a USB flash drive in DOS environment 1. Turn off the computer and disconnect all SATA hard disk drives (optional). When the ASUS Logo appears, press to Drive D (USB flash drive). The succeeding utility screens are for reference only. Download the latest BIOS file and BIOS Updater ... at http:// support.asus.com and save the BIOS file to a floppy disk due to a hard disk drive or USB flash drive in DOS environment. Welcome to the USB port. 2. When the Make Disk menu appears, select the FreeDOS command prompt item by pressing the item number. 4. Do not save...

User Guide
Page 106
...software manual in the bundled motherboard support DVD or click Express Gate environment for better performance. click to the motherboard USB port before use. • ASUS Express Gate supports SATA devices in the 4-10 Chapter 4: Software support Within a few seconds after you quick access to ...Gate's first screen appears within a few seconds of available disk space. See chapter 3 for the exact location of onboard SATA ports. • ASUS Express Gate supports file uploading from the motherboard support DVD before turning on the computer. • Your monitor must support the ...
...software manual in the bundled motherboard support DVD or click Express Gate environment for better performance. click to the motherboard USB port before use. • ASUS Express Gate supports SATA devices in the 4-10 Chapter 4: Software support Within a few seconds after you quick access to ...Gate's first screen appears within a few seconds of available disk space. See chapter 3 for the exact location of onboard SATA ports. • ASUS Express Gate supports file uploading from the motherboard support DVD before turning on the computer. • Your monitor must support the ...

User Guide
Page 107
... Realtek HD Audio Manager for Windows XP Configuration options Control settings window Information button Exit button Minimize button Chapter 4 Information button ASUS P7H55-M PRO 4-11 If the Realtek audio software is correctly installed, you will find the Realtek HD Audio Manager icon on the... HD Audio Manager. The CODEC also includes the Realtek® proprietary UAJ® (Universal Audio Jack) technology for all audio ports, eliminating cable connection errors and giving users plug and play convenience. 4.3.9 Realtek® High Definition Audio utility The Realtek®...
... Realtek HD Audio Manager for Windows XP Configuration options Control settings window Information button Exit button Minimize button Chapter 4 Information button ASUS P7H55-M PRO 4-11 If the Realtek audio software is correctly installed, you will find the Realtek HD Audio Manager icon on the... HD Audio Manager. The CODEC also includes the Realtek® proprietary UAJ® (Universal Audio Jack) technology for all audio ports, eliminating cable connection errors and giving users plug and play convenience. 4.3.9 Realtek® High Definition Audio utility The Realtek®...


