User Guide
Page 2
... MANUAL, INCLUDING THE PRODUCTS AND SOFTWARE DESCRIBED IN IT. ii E5321 Second Edition January 2010 Copyright © 2010 ASUSTeK COMPUTER INC. or (2) the serial number of these licenses are used only for backup purposes, without intent to the owners' benefit, without the express written permission of ASUSTeK COMPUTER INC. ("ASUS"). Offer to obtain the corresponding source code...
... MANUAL, INCLUDING THE PRODUCTS AND SOFTWARE DESCRIBED IN IT. ii E5321 Second Edition January 2010 Copyright © 2010 ASUSTeK COMPUTER INC. or (2) the serial number of these licenses are used only for backup purposes, without intent to the owners' benefit, without the express written permission of ASUSTeK COMPUTER INC. ("ASUS"). Offer to obtain the corresponding source code...

User Guide
Page 13
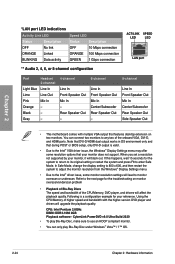
...1 x IDE connector 6 x SATA 3.0Gb/s connectors 1 x CPU Fan connector 1 x 4-pin Chassis Fan connector 1 x Power Fan connector 1 x COM connector 1 x Front panel audio connector 1 x S/PDIF Out Header 1 x Clear CMOS jumper 1 x 24-pin ATX Power connector 1 x 8-pin EATX 12V Power connector 1 x System Panel BIOS Features 64 Mb Flash ROM, SPI, AMI BIOS, PnP, DMI 2.0, WfM 2.0, SM BIOS 2.5, ACPI 2.0a, Multi-language BIOS, ASUS EZ Flash 2, ASUS CrashFree BIOS 3 Manageability WfM 2.0, DMI 2.0, WOL by PME, WOR by PME, PXE Support DVD Contents Drivers ASUS Utilities ASUS Update Anti-virus software (OEM...
...1 x IDE connector 6 x SATA 3.0Gb/s connectors 1 x CPU Fan connector 1 x 4-pin Chassis Fan connector 1 x Power Fan connector 1 x COM connector 1 x Front panel audio connector 1 x S/PDIF Out Header 1 x Clear CMOS jumper 1 x 24-pin ATX Power connector 1 x 8-pin EATX 12V Power connector 1 x System Panel BIOS Features 64 Mb Flash ROM, SPI, AMI BIOS, PnP, DMI 2.0, WfM 2.0, SM BIOS 2.5, ACPI 2.0a, Multi-language BIOS, ASUS EZ Flash 2, ASUS CrashFree BIOS 3 Manageability WfM 2.0, DMI 2.0, WOL by PME, WOR by PME, PXE Support DVD Contents Drivers ASUS Utilities ASUS Update Anti-virus software (OEM...
User Guide
Page 37
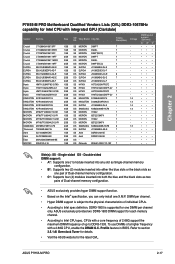
... slots or the black slots as one pair of Dual-channel memory configuration. • C*: Supports four (4) modules inserted into both the blue and the black slots as two pairs of a higher frequency with a 2.66G CPU, enable the DRAM O.C. Profile feature in BIOS. ASUS P7H55-M PRO 2-17 Chapter 2 P7H55-M PRO Motherboard Qualified Vendors Lists (QVL) DDR3-1067MHz capability for each memory channel. • According to Intel CPU spec, CPUs with a core frequency of 2.66G support the maximum DIMM frequency...
... slots or the black slots as one pair of Dual-channel memory configuration. • C*: Supports four (4) modules inserted into both the blue and the black slots as two pairs of a higher frequency with a 2.66G CPU, enable the DRAM O.C. Profile feature in BIOS. ASUS P7H55-M PRO 2-17 Chapter 2 P7H55-M PRO Motherboard Qualified Vendors Lists (QVL) DDR3-1067MHz capability for each memory channel. • According to Intel CPU spec, CPUs with a core frequency of 2.66G support the maximum DIMM frequency...
User Guide
Page 39
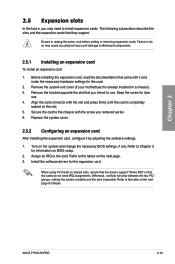
... system and change the necessary BIOS settings, if any. Align the card connector with the slot and press firmly until the card is already installed in a chassis). 3. Refer to the card. When using PCI cards on the next page for details. Replace the system cover. 2.5.2 Configuring an expansion card After installing the expansion card, configure it and make the necessary hardware settings for information on the next page. 3. ASUS P7H55-M PRO 2-19 Failure to...
... system and change the necessary BIOS settings, if any. Align the card connector with the slot and press firmly until the card is already installed in a chassis). 3. Refer to the card. When using PCI cards on the next page for details. Replace the system cover. 2.5.2 Configuring an expansion card After installing the expansion card, configure it and make the necessary hardware settings for information on the next page. 3. ASUS P7H55-M PRO 2-19 Failure to...
User Guide
Page 44
... Intel® VGA driver issue, the Windows® Display Settings menu may offer some resolution options that your monitor does not support. Black - Note that DVI-D/HDMI dual output works in OS environment only and that features desktop extension on monitor overscan/underscan problem • Playback of Blu-Ray Discs The speed and bandwidth of the CPU/Memory, DVD player, and drivers will upgrade the playback quality. Using the CPU/Memory of the onboard VGA, DVI-D, and HDMI ports. Following...
... Intel® VGA driver issue, the Windows® Display Settings menu may offer some resolution options that your monitor does not support. Black - Note that DVI-D/HDMI dual output works in OS environment only and that features desktop extension on monitor overscan/underscan problem • Playback of Blu-Ray Discs The speed and bandwidth of the CPU/Memory, DVD player, and drivers will upgrade the playback quality. Using the CPU/Memory of the onboard VGA, DVI-D, and HDMI ports. Following...

User Guide
Page 57
... Windows® environment. 2. Inappropriate settings of a trained service personnel. 3.2 Updating BIOS The ASUS website publishes the latest BIOS versions to restore the BIOS in the future. Inappropriate BIOS updating may result to instability or failure to update your BIOS if necessary. Carefully follow the instructions of BIOS, DO NOT manually update the BIOS. ASUS CrashFree BIOS 3 utility: Restores the BIOS using the motherboard support DVD or a USB flash drive when the BIOS file fails or gets corrupted. 4. ASUS P7H55-M PRO 3-1 In normal circumstances, the default BIOS settings...
... Windows® environment. 2. Inappropriate settings of a trained service personnel. 3.2 Updating BIOS The ASUS website publishes the latest BIOS versions to restore the BIOS in the future. Inappropriate BIOS updating may result to instability or failure to update your BIOS if necessary. Carefully follow the instructions of BIOS, DO NOT manually update the BIOS. ASUS CrashFree BIOS 3 utility: Restores the BIOS using the motherboard support DVD or a USB flash drive when the BIOS file fails or gets corrupted. 4. ASUS P7H55-M PRO 3-1 In normal circumstances, the default BIOS settings...
User Guide
Page 58
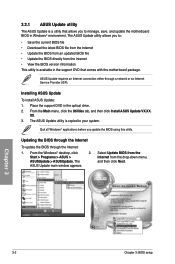
3.2.1 ASUS Update utility The ASUS Update is a utility that comes with the motherboard package. Place the support DVD in the support DVD that allows you to your system. The ASUS Update utility is available in the optical drive. 2. Updating the BIOS through the Internet To update the BIOS through a network or an Internet Service Provider (ISP). From the Windows® desktop, click 2. XX. 3. The ASUS Update main window appears. The ASUS Update utility allows you update the BIOS using this utility. From the Main menu, click the...
3.2.1 ASUS Update utility The ASUS Update is a utility that comes with the motherboard package. Place the support DVD in the support DVD that allows you to your system. The ASUS Update utility is available in the optical drive. 2. Updating the BIOS through the Internet To update the BIOS through a network or an Internet Service Provider (ISP). From the Windows® desktop, click 2. XX. 3. The ASUS Update main window appears. The ASUS Update utility allows you update the BIOS using this utility. From the Main menu, click the...
User Guide
Page 60
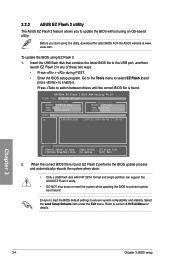
... Flash 2 and press to the USB port, and then launch EZ Flash 2 in any of these two ways: • Press + during POST. • Enter the BIOS setup program. 3.2.2 ASUS EZ Flash 2 utility The ASUS EZ Flash 2 feature allows you start using this utility, download the latest BIOS from the ASUS website at www. Before you to switch between drives until the correct BIOS file is found . Ensure to load the BIOS default settings to section 3.10 Exit Menu...
... Flash 2 and press to the USB port, and then launch EZ Flash 2 in any of these two ways: • Press + during POST. • Enter the BIOS setup program. 3.2.2 ASUS EZ Flash 2 utility The ASUS EZ Flash 2 feature allows you start using this utility, download the latest BIOS from the ASUS website at www. Before you to switch between drives until the correct BIOS file is found . Ensure to load the BIOS default settings to section 3.10 Exit Menu...
User Guide
Page 61
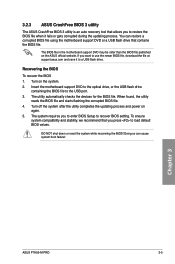
... USB port. 3. The BIOS file in the motherboard support DVD may be older than the BIOS file published on the ASUS official website. If you to enter BIOS Setup to recover BIOS setting. Chapter 3 ASUS P7H55-M PRO 3-5 You can cause system boot failure! Doing so can restore a corrupted BIOS file using the motherboard support DVD or a USB flash drive that contains the BIOS file. The utility automatically checks the devices for the BIOS file. 3.2.3 ASUS CrashFree BIOS 3 utility The ASUS CrashFree BIOS 3 utility is an auto recovery tool that you press to load default BIOS...
... USB port. 3. The BIOS file in the motherboard support DVD may be older than the BIOS file published on the ASUS official website. If you to enter BIOS Setup to recover BIOS setting. Chapter 3 ASUS P7H55-M PRO 3-5 You can cause system boot failure! Doing so can restore a corrupted BIOS file using the motherboard support DVD or a USB flash drive that contains the BIOS file. The utility automatically checks the devices for the BIOS file. 3.2.3 ASUS CrashFree BIOS 3 utility The ASUS CrashFree BIOS 3 utility is an auto recovery tool that you press to load default BIOS...
User Guide
Page 62
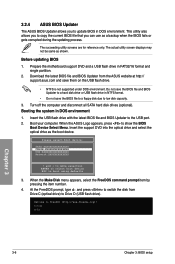
...)! The actual utility screen displays may not be same as the boot device. At the FreeDOS prompt, type d: and press to switch the disk from the ASUS website at http:// support.asus.com and save the BIOS file to a floppy disk due to a hard disk drive or USB flash drive in FAT32/16 format and single partition. 2. Download the latest BIOS file and BIOS Updater from Drive C (optical drive) to boot using defaults 3. Welcome to update BIOS in DOS environment 1. 3.2.4 ASUS BIOS Updater The ASUS BIOS Updater allows you...
...)! The actual utility screen displays may not be same as the boot device. At the FreeDOS prompt, type d: and press to switch the disk from the ASUS website at http:// support.asus.com and save the BIOS file to a floppy disk due to a hard disk drive or USB flash drive in FAT32/16 format and single partition. 2. Download the latest BIOS file and BIOS Updater from Drive C (optical drive) to boot using defaults 3. Welcome to update BIOS in DOS environment 1. 3.2.4 ASUS BIOS Updater The ASUS BIOS Updater allows you...

User Guide
Page 67
... While entering Setup, the BIOS automatically detects the presence of device connected to 3.3.1 BIOS menu screen for each SATA device. Main BIOS SETUP UTILITY SATA 1 Device : Hard Disk Vendor : HDT722516DLA380 Size : 164.7GB LBA Mode : Supported Block Mode : 16Sectors PIO Mode : 4 Async DMA : MultiWord DMA-2 Ultra DMA : Ultra DMA-5 SMART Monitoring:Supported Type LBA/Large Mode Block(Multi-Sector Transfer)M PIO Mode DMA Mode SMART Monitoring 32Bit Data Transfer [Auto] [Auto] [Auto] [Auto] [Auto] [Auto] [Enabled] Select the type of SATA devices. Change...
... While entering Setup, the BIOS automatically detects the presence of device connected to 3.3.1 BIOS menu screen for each SATA device. Main BIOS SETUP UTILITY SATA 1 Device : Hard Disk Vendor : HDT722516DLA380 Size : 164.7GB LBA Mode : Supported Block Mode : 16Sectors PIO Mode : 4 Async DMA : MultiWord DMA-2 Ultra DMA : Ultra DMA-5 SMART Monitoring:Supported Type LBA/Large Mode Block(Multi-Sector Transfer)M PIO Mode DMA Mode SMART Monitoring 32Bit Data Transfer [Auto] [Auto] [Auto] [Auto] [Auto] [Auto] [Enabled] Select the type of SATA devices. Change...

User Guide
Page 69
3.4.2 Storage Configuration The Storage Configuration menu allows you want to use the AHCI (Advanced Host Controller Interface). The AHCI allows the onboard storage driver to enable advanced Serial ATA features that increases storage performance on random workloads by allowing the drive to configure your storage devices. Configuration options: [0] [5] [10] [15] [20] [25] [30] [35] Chapter 3 ASUS P7H55-M PRO 3-13 Main Storage Configuration SATA Configuration Configure SATA as BIOS SETUP UTILITY [Enhanced] [IDE] Hard Disk Write Protect [Disabled] IDE Detect Time Out (Sec)...
3.4.2 Storage Configuration The Storage Configuration menu allows you want to use the AHCI (Advanced Host Controller Interface). The AHCI allows the onboard storage driver to enable advanced Serial ATA features that increases storage performance on random workloads by allowing the drive to configure your storage devices. Configuration options: [0] [5] [10] [15] [20] [25] [30] [35] Chapter 3 ASUS P7H55-M PRO 3-13 Main Storage Configuration SATA Configuration Configure SATA as BIOS SETUP UTILITY [Enhanced] [IDE] Hard Disk Write Protect [Disabled] IDE Detect Time Out (Sec)...

User Guide
Page 71
... and DIMM model you to malfunction. Main Ai Tweaker BIOS SETUP UTILITY Advanced Power Boot Tools Exit Configure System Performance Settings Ai Overclock Tuner CPU Ratio Setting Intel(R) SpeedStep(TM) Tech Intel(R) TurboMode Tech Xtreme Phase Full Power Mode DRAM Frequency QPI Frequency [Auto] [Auto] [Enabled] [Enabled] [Auto] [Auto] [Auto] DRAM Timing Control Warning: this item to overclocking, and it may cause instability. The configuration options for optimizing the system performance. Select either one of CPU overclocking options to Manual after you...
... and DIMM model you to malfunction. Main Ai Tweaker BIOS SETUP UTILITY Advanced Power Boot Tools Exit Configure System Performance Settings Ai Overclock Tuner CPU Ratio Setting Intel(R) SpeedStep(TM) Tech Intel(R) TurboMode Tech Xtreme Phase Full Power Mode DRAM Frequency QPI Frequency [Auto] [Auto] [Enabled] [Enabled] [Auto] [Auto] [Auto] DRAM Timing Control Warning: this item to overclocking, and it may cause instability. The configuration options for optimizing the system performance. Select either one of CPU overclocking options to Manual after you...
User Guide
Page 77
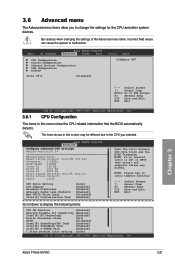
...3 ASUS P7H55-M PRO 3-21 Main Ai Tweaker BIOS SETUP UTILITY Advanced Power Boot CPU Configuration Uncore Configuration Onboard Devices Configuration USB Configuration PCIPnP Intel VT-d [Disabled] Tools Exit Configure CPU. ←→ Select Screen ↑↓ Select Item Enter Go to change the settings for the CPU and other system devices. Be cautious when changing the settings of the Advanced menu items. Incorrect field values can cause the system to display the following items: CPU TM function [Enabled] Execute-Disable Bit Capability [Enabled] Intel(R) HT Technology...
...3 ASUS P7H55-M PRO 3-21 Main Ai Tweaker BIOS SETUP UTILITY Advanced Power Boot CPU Configuration Uncore Configuration Onboard Devices Configuration USB Configuration PCIPnP Intel VT-d [Disabled] Tools Exit Configure CPU. ←→ Select Screen ↑↓ Select Item Enter Go to change the settings for the CPU and other system devices. Be cautious when changing the settings of the Advanced menu items. Incorrect field values can cause the system to display the following items: CPU TM function [Enabled] Execute-Disable Bit Capability [Enabled] Intel(R) HT Technology...

User Guide
Page 81
... SPDIF out. [HDMI] Set to audio output to legacy AC'97. [HD Audio] audio. J-Micron PATA Controller [Enabled] [Enabled] Enables the J-Micron PATA controller. [Disabled] Disables the J-Micron PATA controller. Front Panel Type [HD Audio] [AC97] Set the front panel audio connector (AAFP) mode to HDMI out. LAN Boot ROM [Disabled] This item appears only when you to select the Serial Port1 base address. Configuration options: [Disabled] [3F8/IRQ4] [2F8/IRQ3] [3E8/IRQ4] [2E8/IRQ3] Chapter 3 ASUS P7H55-M PRO 3-25 3.6.3 Onboard Devices Configuration BIOS SETUP UTILITY Advanced...
... SPDIF out. [HDMI] Set to audio output to legacy AC'97. [HD Audio] audio. J-Micron PATA Controller [Enabled] [Enabled] Enables the J-Micron PATA controller. [Disabled] Disables the J-Micron PATA controller. Front Panel Type [HD Audio] [AC97] Set the front panel audio connector (AAFP) mode to HDMI out. LAN Boot ROM [Disabled] This item appears only when you to select the Serial Port1 base address. Configuration options: [Disabled] [3F8/IRQ4] [2F8/IRQ3] [3E8/IRQ4] [2E8/IRQ3] Chapter 3 ASUS P7H55-M PRO 3-25 3.6.3 Onboard Devices Configuration BIOS SETUP UTILITY Advanced...
User Guide
Page 82
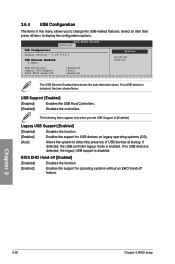
... (OS). [Auto] Allows the system to detect the presence of USB devices at startup. BIOS EHCI Hand-off feature. If no USB device is disabled. If detected, the USB controller legacy mode is enabled. 3.6.4 USB Configuration The items in this menu allows you set USB Support to [Enabled]. Chapter 3 3-26 Chapter 3: BIOS setup Select an item then press to change the USB-related features. The following items appear only when you to display the configuration options.
... (OS). [Auto] Allows the system to detect the presence of USB devices at startup. BIOS EHCI Hand-off feature. If no USB device is disabled. If detected, the USB controller legacy mode is enabled. 3.6.4 USB Configuration The items in this menu allows you set USB Support to [Enabled]. Chapter 3 3-26 Chapter 3: BIOS setup Select an item then press to change the USB-related features. The following items appear only when you to display the configuration options.

User Guide
Page 84
... be switched off some power at S5 state. 3-28 Chapter 3: BIOS setup When set to [Enabled], the ACPI APIC table pointer is included in the Advanced Programmable Interrupt Controller (APIC). When set to [Enabled], the system adds additional tables as per ACPI 2.0 specifications. 3.7.4 ACPI APIC Support [Enabled] [Disabled] [Enabled] When set to [Enabled], power for the Advanced Power Management (APM). Main Ai Tweaker BIOS SETUP UTILITY Advanced Power Boot Tools Exit Suspend Mode Repost Video on S3/STR resume. 3.7.3 ACPI 2.0 Support [Disabled] [Disabled] [Enabled...
... be switched off some power at S5 state. 3-28 Chapter 3: BIOS setup When set to [Enabled], the ACPI APIC table pointer is included in the Advanced Programmable Interrupt Controller (APIC). When set to [Enabled], the system adds additional tables as per ACPI 2.0 specifications. 3.7.4 ACPI APIC Support [Enabled] [Disabled] [Enabled] When set to [Enabled], power for the Advanced Power Management (APM). Main Ai Tweaker BIOS SETUP UTILITY Advanced Power Boot Tools Exit Suspend Mode Repost Video on S3/STR resume. 3.7.3 ACPI 2.0 Support [Disabled] [Disabled] [Enabled...
User Guide
Page 90
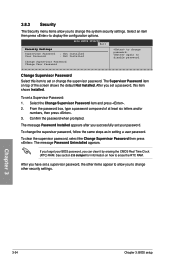
... setting a user password. again to display the configuration options. The message Password Installed appears after you can clear it by erasing the CMOS Real Time Clock (RTC) RAM. If you forget your BIOS password, you successfully set a Supervisor Password: 1. Chapter 3 3-34 Chapter 3: BIOS setup To change password. Select an item then press to disable password. Change Supervisor Password Select this item shows Installed. From the password box, type a password composed of the screen shows the default Not Installed. To clear the supervisor password...
... setting a user password. again to display the configuration options. The message Password Installed appears after you can clear it by erasing the CMOS Real Time Clock (RTC) RAM. If you forget your BIOS password, you successfully set a Supervisor Password: 1. Chapter 3 3-34 Chapter 3: BIOS setup To change password. Select an item then press to disable password. Change Supervisor Password Select this item shows Installed. From the password box, type a password composed of the screen shows the default Not Installed. To clear the supervisor password...

User Guide
Page 97
... to display the ASUS contact information. Chapter 4 Chapter 4: Software support 4.1 Installing an operating system This motherboard supports Windows® XP/ 64-bit XP/ Vista / 64-bit Vista / 7 / 64-bit 7 operating systems (OS). Click an item to open drivers to avail all motherboard features. The Drivers menu shows the available device drivers if The Manual menu contains the system detects installed the list of the support DVD to change at www.asus.com for reference only. ASUS P7H55-M PRO...
... to display the ASUS contact information. Chapter 4 Chapter 4: Software support 4.1 Installing an operating system This motherboard supports Windows® XP/ 64-bit XP/ Vista / 64-bit Vista / 7 / 64-bit 7 operating systems (OS). Click an item to open drivers to avail all motherboard features. The Drivers menu shows the available device drivers if The Manual menu contains the system detects installed the list of the support DVD to change at www.asus.com for reference only. ASUS P7H55-M PRO...

User Guide
Page 106
... detailed software instructions. in the 4-10 Chapter 4: Software support Within a few seconds after you power on USB HDDs and Flash drives, connect the drives to the Internet, Skype, and viewing your computer, you quick access to the motherboard USB port before use. • ASUS Express Gate supports SATA devices in IDE mode only. See chapter 2 for the exact location of onboard SATA ports. • ASUS Express Gate supports file uploading from the motherboard support DVD before turning on the computer. • Your monitor must support the screen resolution...
... detailed software instructions. in the 4-10 Chapter 4: Software support Within a few seconds after you power on USB HDDs and Flash drives, connect the drives to the Internet, Skype, and viewing your computer, you quick access to the motherboard USB port before use. • ASUS Express Gate supports SATA devices in IDE mode only. See chapter 2 for the exact location of onboard SATA ports. • ASUS Express Gate supports file uploading from the motherboard support DVD before turning on the computer. • Your monitor must support the screen resolution...


