
Motherboard Installation Guide
Page 17
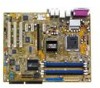
... buying an ASUS® P5RD1-V Deluxe motherboard! Before you for the following items. Motherboard ASUS P5RD1-V Deluxe motherboard I /O shield NTSC-to-PAL adaptor A p p l i c a t i o n C D s ASUS motherboard support CD InterVideo® WinDVD® Suite InterVideo® Home Theater® D o c u m e n t a t i o n User guide If any of ASUS quality motherboards! The motherboard delivers a host of new features and latest technologies, making it , check the...
... buying an ASUS® P5RD1-V Deluxe motherboard! Before you for the following items. Motherboard ASUS P5RD1-V Deluxe motherboard I /O shield NTSC-to-PAL adaptor A p p l i c a t i o n C D s ASUS motherboard support CD InterVideo® WinDVD® Suite InterVideo® Home Theater® D o c u m e n t a t i o n User guide If any of ASUS quality motherboards! The motherboard delivers a host of new features and latest technologies, making it , check the...
Motherboard Installation Guide
Page 63
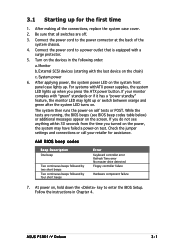
...Connect the power cord to a power outlet that all the connections, replace the system case cover. 2. While the tests are off. 3. Check the jumper settings and connections or call your monitor complies with the last device on . At power on the system front panel case lights ... If you press the ATX power button. If your retailer for the first time 1. Follow the instructions in the following order: a. ASUS P5RD1-V Deluxe 3-1 AMI BIOS beep codes Beep Description One beep Two continuous beeps followed by two short beeps Two continuous beeps followed by four short beeps...
...Connect the power cord to a power outlet that all the connections, replace the system case cover. 2. While the tests are off. 3. Check the jumper settings and connections or call your monitor complies with the last device on . At power on the system front panel case lights ... If you press the ATX power button. If your retailer for the first time 1. Follow the instructions in the following order: a. ASUS P5RD1-V Deluxe 3-1 AMI BIOS beep codes Beep Description One beep Two continuous beeps followed by two short beeps Two continuous beeps followed by four short beeps...
Motherboard Installation Guide
Page 70
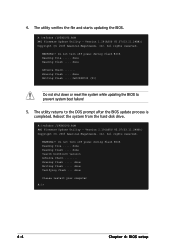
...ASUS V2.07(03.11.24BB)) Copyright (C) 2003 American Megatrends, Inc. The utility returns to prevent system boot failure! 5. Reboot the system from the hard disk drive. done Please restart your computer A:\> 4-4 Chapter 4: BIOS setup The utility verifies the file and starts updating the BIOS. Erasing flash .... done Advance Check...updating the BIOS to the DOS prompt after the BIOS update process is completed. All rights reserved. Version 1.19(ASUS V2.07(03.11.24BB)) Copyright (C) 2003 American Megatrends, Inc. All rights reserved. WARNING!! Erasing flash ...
...ASUS V2.07(03.11.24BB)) Copyright (C) 2003 American Megatrends, Inc. The utility returns to prevent system boot failure! 5. Reboot the system from the hard disk drive. done Please restart your computer A:\> 4-4 Chapter 4: BIOS setup The utility verifies the file and starts updating the BIOS. Erasing flash .... done Advance Check...updating the BIOS to the DOS prompt after the BIOS update process is completed. All rights reserved. Version 1.19(ASUS V2.07(03.11.24BB)) Copyright (C) 2003 American Megatrends, Inc. All rights reserved. WARNING!! Erasing flash ...
Motherboard Installation Guide
Page 71
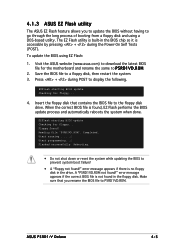
... appears if the correct BIOS file is found in the drive. 4.1.3 ASUS EZ Flash utility The ASUS EZ Flash feature allows you rename the BIOS file to a floppy disk, then restart the system. 3. R O M. 2. A "P5RD1VD.ROM not found ! EZFlash starting BIOS update Checking for floppy... Press + during the Power-On Self Tests (POST). Completed... BIOS file to P5RD1VD.ROM. error message appears if there is accessible by pressing + during POST to prevent system boot failure! • A "Floppy not found!" ASUS P5RD1-V Deluxe 4-5
... appears if the correct BIOS file is found in the drive. 4.1.3 ASUS EZ Flash utility The ASUS EZ Flash feature allows you rename the BIOS file to a floppy disk, then restart the system. 3. R O M. 2. A "P5RD1VD.ROM not found ! EZFlash starting BIOS update Checking for floppy... Press + during the Power-On Self Tests (POST). Completed... BIOS file to P5RD1VD.ROM. error message appears if there is accessible by pressing + during POST to prevent system boot failure! • A "Floppy not found!" ASUS P5RD1-V Deluxe 4-5
Motherboard Installation Guide
Page 72
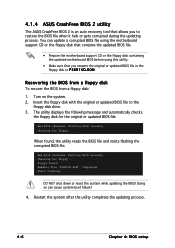
... Recovering the BIOS from a floppy disk To recover the BIOS from a floppy disk: 1. Bad BIOS checksum. Starting BIOS recovery... 4.1.4 ASUS CrashFree BIOS 2 utility The ASUS CrashFree BIOS 2 is an auto recovery tool that you to restore the BIOS file when it fails or gets corrupted during the updating... process. Bad BIOS checksum. Starting BIOS recovery... When found ! Checking for floppy... Floppy found , the utility reads the BIOS file ...
... Recovering the BIOS from a floppy disk To recover the BIOS from a floppy disk: 1. Bad BIOS checksum. Starting BIOS recovery... 4.1.4 ASUS CrashFree BIOS 2 utility The ASUS CrashFree BIOS 2 is an auto recovery tool that you to restore the BIOS file when it fails or gets corrupted during the updating... process. Bad BIOS checksum. Starting BIOS recovery... When found ! Checking for floppy... Floppy found , the utility reads the BIOS file ...

Motherboard Installation Guide
Page 73
Bad BIOS checksum. Bad BIOS checksum. Floppy not found , the utility automatically checks the optical drive for CD-ROM... Reading file "P5RD1VD.ROM". Insert the support CD to download the latest BIOS file. DO NOT shut ... 3. The utility then updates the corrupted BIOS file. CD-ROM found! Start flashing... Restart the system after the utility completes the updating process. Completed. ASUS P5RD1-V Deluxe 4-7 Checking for the original or updated BIOS file. Doing so can cause system boot failure! 4. Starting BIOS recovery... The recovered BIOS may not be the latest...
Bad BIOS checksum. Bad BIOS checksum. Floppy not found , the utility automatically checks the optical drive for CD-ROM... Reading file "P5RD1VD.ROM". Insert the support CD to download the latest BIOS file. DO NOT shut ... 3. The utility then updates the corrupted BIOS file. CD-ROM found! Start flashing... Restart the system after the utility completes the updating process. Completed. ASUS P5RD1-V Deluxe 4-7 Checking for the original or updated BIOS file. Doing so can cause system boot failure! 4. Starting BIOS recovery... The recovered BIOS may not be the latest...
Motherboard Installation Guide
Page 89
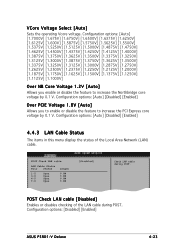
... Pair Status Length 1-2 Open 3-6 Open 4-5 Open 7-8 Open 0.0M 0.0M 0.0M 0.0M [Disabled] Check LAN cable during POST. Configuration options: [Auto] [Disabled] [Enabled] 4.4.3 LAN Cable Status The items in...] [Enabled] Over PCIE Voltage 1.8V [Auto] Allows you enable or disable the feature to increase the PCI Express core voltage by 0.1 V. Configuration options: [Disabled] [Enabled] ASUS P5RD1-V Deluxe 4-23 Configuration options: [Auto] [1.7000V] [1.675V] [1.6750V] [1.6500V] [1.6375V] [1.6250V] [1.6125V] [1.600V] [1.5875V] [1.5750V] [1.5625V] [1.5500V] [1.5375V] [1....
... Pair Status Length 1-2 Open 3-6 Open 4-5 Open 7-8 Open 0.0M 0.0M 0.0M 0.0M [Disabled] Check LAN cable during POST. Configuration options: [Auto] [Disabled] [Enabled] 4.4.3 LAN Cable Status The items in...] [Enabled] Over PCIE Voltage 1.8V [Auto] Allows you enable or disable the feature to increase the PCI Express core voltage by 0.1 V. Configuration options: [Disabled] [Enabled] ASUS P5RD1-V Deluxe 4-23 Configuration options: [Auto] [1.7000V] [1.675V] [1.6750V] [1.6500V] [1.6375V] [1.6250V] [1.6125V] [1.600V] [1.5875V] [1.5750V] [1.5625V] [1.5500V] [1.5375V] [1....
Motherboard Installation Guide
Page 91
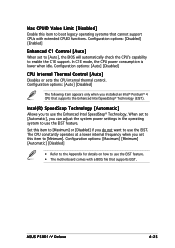
...Configuration options: [Maximum] [Minimum] [Automatic] [Disabled] • Refer to the Appendix for details on how to use the EIST feature. ASUS P5RD1-V Deluxe 4-25 In C1E mode, the CPU power consumption is lower when idle. Intel(R) SpeedStep Technology [Automatic] Allows you can adjust the system power...8226; The motherboard comes with extended CPUID functions. Set this item to [Minimum]. When set to [Auto], the BIOS will automatically check the CPU's capability to enable the C1E support. Configuration options: [Auto] [Disabled] The following item appears only when you do ...
...Configuration options: [Maximum] [Minimum] [Automatic] [Disabled] • Refer to the Appendix for details on how to use the EIST feature. ASUS P5RD1-V Deluxe 4-25 In C1E mode, the CPU power consumption is lower when idle. Intel(R) SpeedStep Technology [Automatic] Allows you can adjust the system power...8226; The motherboard comes with extended CPUID functions. Set this item to [Minimum]. When set to [Auto], the BIOS will automatically check the CPU's capability to enable the C1E support. Configuration options: [Auto] [Disabled] The following item appears only when you do ...
Motherboard Installation Guide
Page 105
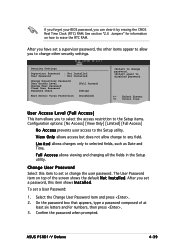
... Password User Access Level Change User Password Clear User Password Password Check [Full Access] [Setup] Boot Sector Virus Protection [Disabled] to change to change the user password. The User Password item on how to selected fields, such as Date and Time. ASUS P5RD1-V Deluxe 4-39 again to the Setup utility. If you forget your...
... Password User Access Level Change User Password Clear User Password Password Check [Full Access] [Setup] Boot Sector Virus Protection [Disabled] to change to change the user password. The User Password item on how to selected fields, such as Date and Time. ASUS P5RD1-V Deluxe 4-39 again to the Setup utility. If you forget your...

Motherboard Installation Guide
Page 106
...Virus Protection [Disabled] Allows you to exit. 4-40 Chapter 4: BIOS setup Select one of the options from this item to [Setup], BIOS checks for the BIOS items, and save or discard your password successfully. The message "Password Installed" appears after saving the changes. Clear User Password ...Select this menu or from the legend bar to enable or disable the boot sector virus protection. Password Check [Setup] When set your changes to [Always], BIOS checks for this menu. Pressing does not immediately exit this operation. F10 key can be used for user password...
...Virus Protection [Disabled] Allows you to exit. 4-40 Chapter 4: BIOS setup Select one of the options from this item to [Setup], BIOS checks for the BIOS items, and save or discard your password successfully. The message "Password Installed" appears after saving the changes. Clear User Password ...Select this menu or from the legend bar to enable or disable the boot sector virus protection. Password Check [Setup] When set your changes to [Always], BIOS checks for this menu. Pressing does not immediately exit this operation. F10 key can be used for user password...

Motherboard Installation Guide
Page 117
...." • Make sure that will conveniently guide you wish to make a copy of the applications in GIF, JPG, or BMP file formats. Refer to use ASUS MyLogo2. Check the option L a u n c h M y L o g o t o r e p l a c e s y s t e m b o o t l o g o b e f o r e f l a s h i n g B I O S f r o m a f i l e from the ... Launch the ASUS Update utility. Select U p d a t e B I O S, then click N e x t. 4. The ASUS MyLogo2™ is set to [Enabled] if you through the installation. To launch the ASUS MyLogo2™: 1. The ASUS MyLogo2 window appears. 6. ASUS P5RD1-V Deluxe 5-7 See ...
...." • Make sure that will conveniently guide you wish to make a copy of the applications in GIF, JPG, or BMP file formats. Refer to use ASUS MyLogo2. Check the option L a u n c h M y L o g o t o r e p l a c e s y s t e m b o o t l o g o b e f o r e f l a s h i n g B I O S f r o m a f i l e from the ... Launch the ASUS Update utility. Select U p d a t e B I O S, then click N e x t. 4. The ASUS MyLogo2™ is set to [Enabled] if you through the installation. To launch the ASUS MyLogo2™: 1. The ASUS MyLogo2 window appears. 6. ASUS P5RD1-V Deluxe 5-7 See ...

Motherboard Installation Guide
Page 119
...incorporated in the BIOS Setup. VCT is detected on the LAN cable(s) connected to the LAN port(s). • If you want the system to check the status of up to display the screen below. 3. Using the Virtual Cable Tester™ To use the the Marvell® Virtual Cable ...LAN cable before entering the OS, enable the item P o s t C h e c k L A N C a b l e in the network systems sofware for ideal field support as well as development diagnostics. ASUS P5RD1-V Deluxe 5-9 The VCT feature reduces networking and support costs through a highly manageable and controlled network system.
...incorporated in the BIOS Setup. VCT is detected on the LAN cable(s) connected to the LAN port(s). • If you want the system to check the status of up to display the screen below. 3. Using the Virtual Cable Tester™ To use the the Marvell® Virtual Cable ...LAN cable before entering the OS, enable the item P o s t C h e c k L A N C a b l e in the network systems sofware for ideal field support as well as development diagnostics. ASUS P5RD1-V Deluxe 5-9 The VCT feature reduces networking and support costs through a highly manageable and controlled network system.
Motherboard Installation Guide
Page 123
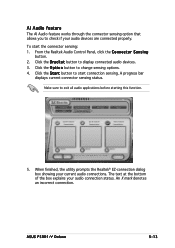
... box explains your current audio connections. When finished, the utility prompts the Realtek® EZ-connection dialog box showing your audio connection status. ASUS P5RD1-V Deluxe 5-13 Make sure to check if your audio devices are connected properly. AI Audio feature The AI Audio feature works through the connector sensing option that allows you...
... box explains your current audio connections. When finished, the utility prompts the Realtek® EZ-connection dialog box showing your audio connection status. ASUS P5RD1-V Deluxe 5-13 Make sure to check if your audio devices are connected properly. AI Audio feature The AI Audio feature works through the connector sensing option that allows you...
Motherboard Installation Guide
Page 155
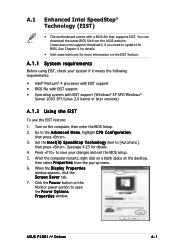
A.1.1 System requirements Before using EIST, check your changes and exit the BIOS setup. 5. Turn on the Monitor power section to open the Power Options Properties window. Set the Intel(R) SpeedStep Technology ...; BIOS file with EIST support • Operating system with a BIOS file that supports EIST. When the Display Properties window appears, click the Screen Saver tab. 7. ASUS P5RD1-V Deluxe A-1 See Chapter 4 for details. • Visit www.intel.com for details. 4. Go to [Automatic], then press . Press to update the BIOS. After the computer restarts...
A.1.1 System requirements Before using EIST, check your changes and exit the BIOS setup. 5. Turn on the Monitor power section to open the Power Options Properties window. Set the Intel(R) SpeedStep Technology ...; BIOS file with EIST support • Operating system with a BIOS file that supports EIST. When the Display Properties window appears, click the Screen Saver tab. 7. ASUS P5RD1-V Deluxe A-1 See Chapter 4 for details. • Visit www.intel.com for details. 4. Go to [Automatic], then press . Press to update the BIOS. After the computer restarts...

