
Motherboard Installation Guide
Page 4
... off the computer 3-2 3.2.1 Using the OS shut down function 3-2 3.2.2 Using the dual function power switch 3-2 Chapter 4: BIOS setup 4.1 Managing and updating your BIOS 4-1 4.1.1 Creating a bootable floppy disk 4-1 4.1.2 AFUDOS utility 4-2 4.1.3 ASUS EZ Flash utility 4-5 4.1.4 ASUS CrashFree BIOS 2 utility 4-6 4.1.5 ASUS Update utility 4-8 4.2 BIOS setup program 4-11 4.2.1 BIOS menu screen 4-12 4.2.2 Menu bar 4-12 4.2.3 Navigation keys 4-12 4.2.4 Menu items 4-13 4.2.5 Sub-menu items...
... off the computer 3-2 3.2.1 Using the OS shut down function 3-2 3.2.2 Using the dual function power switch 3-2 Chapter 4: BIOS setup 4.1 Managing and updating your BIOS 4-1 4.1.1 Creating a bootable floppy disk 4-1 4.1.2 AFUDOS utility 4-2 4.1.3 ASUS EZ Flash utility 4-5 4.1.4 ASUS CrashFree BIOS 2 utility 4-6 4.1.5 ASUS Update utility 4-8 4.2 BIOS setup program 4-11 4.2.1 BIOS menu screen 4-12 4.2.2 Menu bar 4-12 4.2.3 Navigation keys 4-12 4.2.4 Menu items 4-13 4.2.5 Sub-menu items...

Motherboard Installation Guide
Page 9
...flyers, that you need when installing and configuring the motherboard. The Appendix also includes information on ASUS hardware and software products. ix ASUS websites The ASUS website provides updated information on the optional remote controller, the key table, and international TV systems and standards.... Where to find more information Refer to change system settings through the BIOS Setup menus. How this...
...flyers, that you need when installing and configuring the motherboard. The Appendix also includes information on ASUS hardware and software products. ix ASUS websites The ASUS website provides updated information on the optional remote controller, the key table, and international TV systems and standards.... Where to find more information Refer to change system settings through the BIOS Setup menus. How this...
Motherboard Installation Guide
Page 21
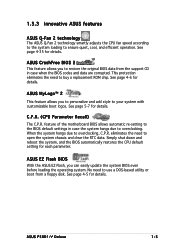
... personalize and add style to ensure quiet, cool, and efficient operation. ASUS P5RD1-V Deluxe 1-5 ASUS CrashFree BIOS 2 This feature allows you can easily update the system BIOS even before loading the operating system. This protection eliminates the need to the BIOS default settings in case when the BIOS codes and data are corrupted. When the system hangs due to...
... personalize and add style to ensure quiet, cool, and efficient operation. ASUS P5RD1-V Deluxe 1-5 ASUS CrashFree BIOS 2 This feature allows you can easily update the system BIOS even before loading the operating system. This protection eliminates the need to the BIOS default settings in case when the BIOS codes and data are corrupted. When the system hangs due to...

Motherboard Installation Guide
Page 66
Chapter summary 4 4.1 Managing and updating your BIOS 4-1 4.2 BIOS setup program 4-11 4.3 Main menu 4-14 4.4 Advanced menu 4-18 4.5 Power menu 4-32 4.6 Boot menu 4-36 4.7 Exit menu 4-40 ASUS P5RD1-V Deluxe
Chapter summary 4 4.1 Managing and updating your BIOS 4-1 4.2 BIOS setup program 4-11 4.3 Main menu 4-14 4.4 Advanced menu 4-18 4.5 Power menu 4-32 4.6 Boot menu 4-36 4.7 Exit menu 4-40 ASUS P5RD1-V Deluxe
Motherboard Installation Guide
Page 67
...a 1.44 MB floppy disk to restore the BIOS in case you to the optical drive. b. d. e. ASUS P5RD1-V Deluxe 4-1 Do either one of boot disks for ... S U S A F U D O S (Updates the BIOS in Windows® environment.) Refer to create a bootable floppy disk. A S U S U p d a t e (Updates the BIOS in DOS mode using the ASUS Update or AFUDOS utilities. 4.1.1 Creating a bootable floppy disk 1. A F o r m a t 3 1 / 2 F l o p p y D i s k window appears. Click S t a r t, then select R u n. A S U S E Z F l a s h (Updates the BIOS using a bootable floppy disk or the motherboard support CD...
...a 1.44 MB floppy disk to restore the BIOS in case you to the optical drive. b. d. e. ASUS P5RD1-V Deluxe 4-1 Do either one of boot disks for ... S U S A F U D O S (Updates the BIOS in Windows® environment.) Refer to create a bootable floppy disk. A S U S U p d a t e (Updates the BIOS in DOS mode using the ASUS Update or AFUDOS utilities. 4.1.1 Creating a bootable floppy disk 1. A F o r m a t 3 1 / 2 F l o p p y D i s k window appears. Click S t a r t, then select R u n. A S U S E Z F l a s h (Updates the BIOS using a bootable floppy disk or the motherboard support CD...

Motherboard Installation Guide
Page 68
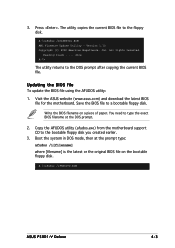
... are for the extension name. Copy the AFUDOS utility (afudos.exe) from the motherboard support CD to the bootable floppy disk you to update the BIOS file in DOS mode, then at least 600 KB free space to the bootable floppy disk. 4.1.2 AFUDOS utility The AFUDOS utility allows you...; Make sure that the floppy disk is your optical drive. Copying the current BIOS To copy the current BIOS file using a bootable floppy disk with the updated BIOS file. Press , then follow screen instructions to copy the current BIOS file that D: is not write-protected and has at the prompt type: afudos...
... are for the extension name. Copy the AFUDOS utility (afudos.exe) from the motherboard support CD to the bootable floppy disk you to update the BIOS file in DOS mode, then at least 600 KB free space to the bootable floppy disk. 4.1.2 AFUDOS utility The AFUDOS utility allows you...; Make sure that the floppy disk is your optical drive. Copying the current BIOS To copy the current BIOS file using a bootable floppy disk with the updated BIOS file. Press , then follow screen instructions to copy the current BIOS file that D: is not write-protected and has at the prompt type: afudos...
Motherboard Installation Guide
Page 69
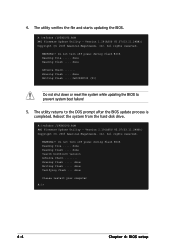
A:\>afudos /oOLDBIOS1.ROM AMI Firmware Update Utility - The utility copies the current BIOS file to the DOS prompt after copying the current BIOS file. Reading flash ..... A:\>afudos /iP5RD1VD.ROM ASUS P5RD1-V Deluxe 4-3 3. Version 1.10 Copyright (C) 2002 American Megatrends, Inc. done A:\> The utility returns to the floppy disk. You need to type the exact BIOS filename at the prompt...
A:\>afudos /oOLDBIOS1.ROM AMI Firmware Update Utility - The utility copies the current BIOS file to the DOS prompt after copying the current BIOS file. Reading flash ..... A:\>afudos /iP5RD1VD.ROM ASUS P5RD1-V Deluxe 4-3 3. Version 1.10 Copyright (C) 2002 American Megatrends, Inc. done A:\> The utility returns to the floppy disk. You need to type the exact BIOS filename at the prompt...
Motherboard Installation Guide
Page 70
... returns to prevent system boot failure! 5. Version 1.19(ASUS V2.07(03.11.24BB)) Copyright (C) 2003 American Megatrends, Inc. WARNING!! A:\>afudos /iP5RD1VD.ROM AMI Firmware Update Utility - Reboot the system from the hard disk drive. The utility verifies the file and starts updating the BIOS. All rights reserved. done Advance Check........ done Writing flash...
... returns to prevent system boot failure! 5. Version 1.19(ASUS V2.07(03.11.24BB)) Copyright (C) 2003 American Megatrends, Inc. WARNING!! A:\>afudos /iP5RD1VD.ROM AMI Firmware Update Utility - Reboot the system from the hard disk drive. The utility verifies the file and starts updating the BIOS. All rights reserved. done Advance Check........ done Writing flash...
Motherboard Installation Guide
Page 71
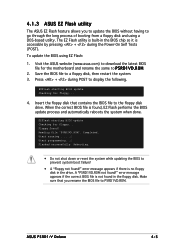
... a floppy disk, then restart the system. 3. A "P5RD1VD.ROM not found ! ASUS P5RD1-V Deluxe 4-5 Save the BIOS file to prevent system boot failure! • A "Floppy not found , EZ Flash performs the BIOS update process and automatically reboots the system when done. EZFlash starting BIOS update Checking for floppy... Start erasing.......| Start programming...| Flashed successfully. Reading file "P5RD1VD.ROM". Completed...
... a floppy disk, then restart the system. 3. A "P5RD1VD.ROM not found ! ASUS P5RD1-V Deluxe 4-5 Save the BIOS file to prevent system boot failure! • A "Floppy not found , EZ Flash performs the BIOS update process and automatically reboots the system when done. EZFlash starting BIOS update Checking for floppy... Start erasing.......| Start programming...| Flashed successfully. Reading file "P5RD1VD.ROM". Completed...
Motherboard Installation Guide
Page 72
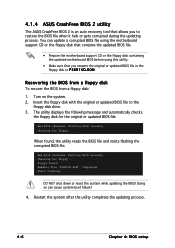
... the floppy disk with the original or updated BIOS file to P 5 R D 1 V D . Checking for floppy... Reading file "P5RD1VD.ROM". 4.1.4 ASUS CrashFree BIOS 2 utility The ASUS CrashFree BIOS 2 is an auto recovery tool that you to restore the BIOS file when it fails or gets corrupted during the updating process. R O M. Bad BIOS checksum. Bad BIOS checksum. Checking for floppy... Restart the system...
... the floppy disk with the original or updated BIOS file to P 5 R D 1 V D . Checking for floppy... Reading file "P5RD1VD.ROM". 4.1.4 ASUS CrashFree BIOS 2 utility The ASUS CrashFree BIOS 2 is an auto recovery tool that you to restore the BIOS file when it fails or gets corrupted during the updating process. R O M. Bad BIOS checksum. Bad BIOS checksum. Checking for floppy... Restart the system...

Motherboard Installation Guide
Page 73
... the optical drive for floppy... The utility then updates the corrupted BIOS file. Start flashing... Doing so can cause system boot failure! 4. ASUS P5RD1-V Deluxe 4-7 Checking for the original or updated BIOS file. CD-ROM found ! Completed. Restart the system after the utility completes the updating process. Starting BIOS recovery... Starting BIOS recovery... The utility displays the following message and...
... the optical drive for floppy... The utility then updates the corrupted BIOS file. Start flashing... Doing so can cause system boot failure! 4. ASUS P5RD1-V Deluxe 4-7 Checking for the original or updated BIOS file. CD-ROM found ! Completed. Restart the system after the utility completes the updating process. Starting BIOS recovery... Starting BIOS recovery... The utility displays the following message and...
Motherboard Installation Guide
Page 74
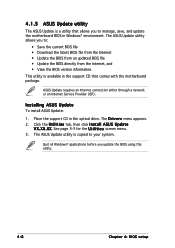
... in Windows® environment. Click the U t i l i t i e s tab, then click I n s t a l l A S U S U p d a t e V X . See page 5-3 for the U t i l i t i e s screen menu. 3. Installing ASUS Update To install ASUS Update: 1. X X . The ASUS Update utility is available in the support CD that allows you update the BIOS using this utility. 4-8 Chapter 4: BIOS setup The D r i v e r s menu appears. 2. X X. This utility is copied to your system. Quit all Windows® applications...
... in Windows® environment. Click the U t i l i t i e s tab, then click I n s t a l l A S U S U p d a t e V X . See page 5-3 for the U t i l i t i e s screen menu. 3. Installing ASUS Update To install ASUS Update: 1. X X . The ASUS Update utility is available in the support CD that allows you update the BIOS using this utility. 4-8 Chapter 4: BIOS setup The D r i v e r s menu appears. 2. X X. This utility is copied to your system. Quit all Windows® applications...
Motherboard Installation Guide
Page 75
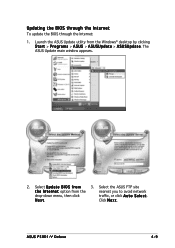
Select U p d a t e B I n t e r n e t option from the Windows® desktop by clicking S t a r t > P r o g r a m s > A S U S > A S U S U p d a t e > A S U S U p d a t e. Click N e x t. Launch the ASUS Update utility from the nearest you to avoid network drop-down menu, then click traffic, or click A u t o S e l e c t. Select the ASUS FTP site t h e I O S f r o m 3. ASUS P5RD1-V Deluxe 4-9 The ASUS Update main window appears. 2. N e x t. Updating the BIOS through the Internet To update the BIOS through the Internet: 1.
Select U p d a t e B I n t e r n e t option from the Windows® desktop by clicking S t a r t > P r o g r a m s > A S U S > A S U S U p d a t e > A S U S U p d a t e. Click N e x t. Launch the ASUS Update utility from the nearest you to avoid network drop-down menu, then click traffic, or click A u t o S e l e c t. Select the ASUS FTP site t h e I O S f r o m 3. ASUS P5RD1-V Deluxe 4-9 The ASUS Update main window appears. 2. N e x t. Updating the BIOS through the Internet To update the BIOS through the Internet: 1.
Motherboard Installation Guide
Page 76
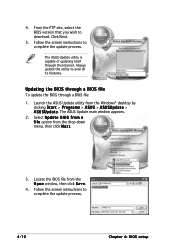
... screen instructions to complete the update process. 4-10 Chapter 4: BIOS setup Follow the screen instructions to complete the update process. The ASUS Update utility is capable of updating itself through a BIOS file: 1. From the FTP site, select the BIOS version that you wish to avail all its features. Updating the BIOS through a BIOS file To update the BIOS through the Internet. Select U p d a t e B I O S f r o m a f i l e option...
... screen instructions to complete the update process. 4-10 Chapter 4: BIOS setup Follow the screen instructions to complete the update process. The ASUS Update utility is capable of updating itself through a BIOS file: 1. From the FTP site, select the BIOS version that you wish to avail all its features. Updating the BIOS through a BIOS file To update the BIOS through the Internet. Select U p d a t e B I O S f r o m a f i l e option...
Motherboard Installation Guide
Page 77
... BIOS setup screens shown in this motherboard. ASUS P5RD1-V Deluxe 4-11 Even if you are installing a motherboard, reconfiguring your screen. • Visit the ASUS website (www.asus.com) to make it lets you scroll through the various sub-menus and make your selections from the available options using the provided utility described in section "4.1 Managing and updating...
... BIOS setup screens shown in this motherboard. ASUS P5RD1-V Deluxe 4-11 Even if you are installing a motherboard, reconfiguring your screen. • Visit the ASUS website (www.asus.com) to make it lets you scroll through the various sub-menus and make your selections from the available options using the provided utility described in section "4.1 Managing and updating...
Motherboard Installation Guide
Page 90
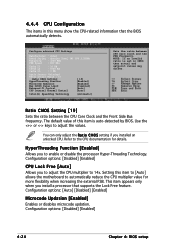
...an invalid ratio is set in this item is auto-detected by BIOS. HyperThreading Function [Enabled] Allows you install a processor that the BIOS automatically detects. Configuration options: [Disabled] [Enabled] 4-24 Chapter 4: BIOS setup Use the or keys to automatically reduce the CPU multiplier value...L2 Cache L3 : 16 KB : 1024 KB : 0 KB Ratio Status: Unlocked Ratio Actual Value : 16 Ratio CMOS Setting: HyperThreading Function Microcode Updation: Max CPUID Value Limit: Enhanced C1 Control CPU Internal Thermal Control [ 19] [Enabled] [Enabled] [Disabled] [Auto] [Auto] Intel(R) ...
...an invalid ratio is set in this item is auto-detected by BIOS. HyperThreading Function [Enabled] Allows you install a processor that the BIOS automatically detects. Configuration options: [Disabled] [Enabled] 4-24 Chapter 4: BIOS setup Use the or keys to automatically reduce the CPU multiplier value...L2 Cache L3 : 16 KB : 1024 KB : 0 KB Ratio Status: Unlocked Ratio Actual Value : 16 Ratio CMOS Setting: HyperThreading Function Microcode Updation: Max CPUID Value Limit: Enhanced C1 Control CPU Internal Thermal Control [ 19] [Enabled] [Enabled] [Disabled] [Auto] [Auto] Intel(R) ...
Motherboard Installation Guide
Page 113
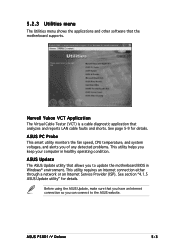
... The Virtual Cable Tester (VCT) is a cable diagnostic application that you have an Internet connection so you can connect to update the motherboard BIOS in healthy operating condition. ASUS P5RD1-V Deluxe 5-3 See page 5-9 for details. See section "4.1.5 ASUS Update utility" for details. This utility requires an Internet connection either through a network or an Internet Service Provider (ISP...
... The Virtual Cable Tester (VCT) is a cable diagnostic application that you have an Internet connection so you can connect to update the motherboard BIOS in healthy operating condition. ASUS P5RD1-V Deluxe 5-3 See page 5-9 for details. See section "4.1.5 ASUS Update utility" for details. This utility requires an Internet connection either through a network or an Internet Service Provider (ISP...

Motherboard Installation Guide
Page 117
... image that appears on screen during the Power-On-Self-Tests (POST). When prompted, locate the new BIOS file, then click N e x t. Check the option L a u n c h M y L o g o t o r e p l a c e s y s t e m b o o t l o g o b e f o r e f l a s h i n g B I O S f r o m a f i l e from the drop down menu, then click N e x t. 5. ASUS P5RD1-V Deluxe 5-7 To launch the ASUS MyLogo2™: 1. Launch the ASUS Update utility. The ASUS MyLogo2™ is automatically installed when you through the installation. The...
... image that appears on screen during the Power-On-Self-Tests (POST). When prompted, locate the new BIOS file, then click N e x t. Check the option L a u n c h M y L o g o t o r e p l a c e s y s t e m b o o t l o g o b e f o r e f l a s h i n g B I O S f r o m a f i l e from the drop down menu, then click N e x t. 5. ASUS P5RD1-V Deluxe 5-7 To launch the ASUS MyLogo2™: 1. Launch the ASUS Update utility. The ASUS MyLogo2™ is automatically installed when you through the installation. The...
Motherboard Installation Guide
Page 118
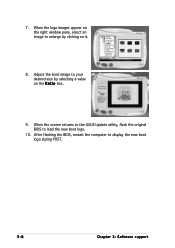
When the logo images appear on the right window pane, select an image to load the new boot logo. 10. When the screen returns to the ASUS Update utility, flash the original BIOS to enlarge by selecting a value on it. 8. Adjust the boot image to display the new boot logo during POST. 5-8 Chapter 5: Software support 7. After flashing the BIOS, restart the computer to your desired size by clicking on the R a t i o box. 9.
When the logo images appear on the right window pane, select an image to load the new boot logo. 10. When the screen returns to the ASUS Update utility, flash the original BIOS to enlarge by selecting a value on it. 8. Adjust the boot image to display the new boot logo during POST. 5-8 Chapter 5: Software support 7. After flashing the BIOS, restart the computer to your desired size by clicking on the R a t i o box. 9.
Motherboard Installation Guide
Page 155
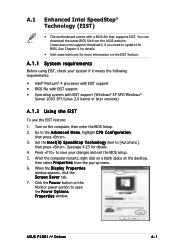
...meets the following requirements: • Intel® Pentium® 4 processor with EIST support • BIOS file with EIST support • Operating system with a BIOS file that supports EIST. ASUS P5RD1-V Deluxe A-1 Go to open the Power Options Properties window. A.1 Enhanced Intel SpeedStep® Technology (EIST) ... Display Properties window appears, click the Screen Saver tab. 7. Click the Power button on the EIST feature. You can download the latest BIOS file from the pop-up menu. 6. See Chapter 4 for details. • Visit www.intel.com for details. 4. After the computer...
...meets the following requirements: • Intel® Pentium® 4 processor with EIST support • BIOS file with EIST support • Operating system with a BIOS file that supports EIST. ASUS P5RD1-V Deluxe A-1 Go to open the Power Options Properties window. A.1 Enhanced Intel SpeedStep® Technology (EIST) ... Display Properties window appears, click the Screen Saver tab. 7. Click the Power button on the EIST feature. You can download the latest BIOS file from the pop-up menu. 6. See Chapter 4 for details. • Visit www.intel.com for details. 4. After the computer...


