Motherboard Installation Guide
Page 18
... MHz front side bus (FSB), dual channel DDR memory, three PCI Express x1 slots, and a PCI Express x16 slot for discrete graphics card. PCI Express™ interface The motherboard fully supports PCI Express, the latest I /O controller hub that provides the interface for details. PCI Express features point-to-point serial interconnections between devices and allows higher clockspeeds by automatically adjusting the CPU voltage and core frequency depending on the CPU loading and system speed or power requirement. This high speed interface is fully...
... MHz front side bus (FSB), dual channel DDR memory, three PCI Express x1 slots, and a PCI Express x16 slot for discrete graphics card. PCI Express™ interface The motherboard fully supports PCI Express, the latest I /O controller hub that provides the interface for details. PCI Express features point-to-point serial interconnections between devices and allows higher clockspeeds by automatically adjusting the CPU voltage and core frequency depending on the CPU loading and system speed or power requirement. This high speed interface is fully...
Motherboard Installation Guide
Page 19
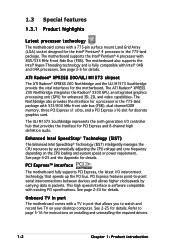
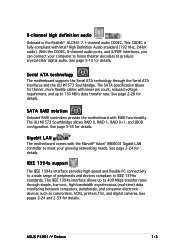
... LAN The motherboard comes with RAID functionality. See pages 2-24 and 2-33 for details. ASUS P5RD1-V Deluxe 1-3 See page 5-35 for details. See page 2-24 for details. The ULI M1573 Southbridge allows RAID 0, RAID 1, RAID 0+1, and JBOD configuration. See page 5-10 for details. With the CODEC, 8-channel audio ports, and S/PDIF interfaces, you can connect your growing networking needs. The SATA specification allows for details. 8-channel high definition audio Onboard is...
... LAN The motherboard comes with RAID functionality. See pages 2-24 and 2-33 for details. ASUS P5RD1-V Deluxe 1-3 See page 5-35 for details. See page 2-24 for details. The ULI M1573 Southbridge allows RAID 0, RAID 1, RAID 0+1, and JBOD configuration. See page 5-10 for details. With the CODEC, 8-channel audio ports, and S/PDIF interfaces, you can connect your growing networking needs. The SATA specification allows for details. 8-channel high definition audio Onboard is...
Motherboard Installation Guide
Page 21
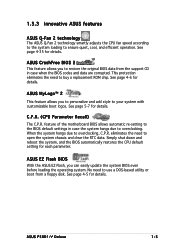
... feature allows you to personalize and add style to use a DOS-based utility or boot from the support CD in case the system hangs due to overclocking, C.P.R. No need to open the system chassis and clear the RTC data. 1.3.3 Innovative ASUS features ASUS Q-Fan 2 technology The ASUS Q-Fan 2 technology smartly adjusts the CPU fan speed according to the system loading to restore the original BIOS data from a floppy disk. See page 4-5 for details.
... feature allows you to personalize and add style to use a DOS-based utility or boot from the support CD in case the system hangs due to overclocking, C.P.R. No need to open the system chassis and clear the RTC data. 1.3.3 Innovative ASUS features ASUS Q-Fan 2 technology The ASUS Q-Fan 2 technology smartly adjusts the CPU fan speed according to the system loading to restore the original BIOS data from a floppy disk. See page 4-5 for details.
Motherboard Installation Guide
Page 37
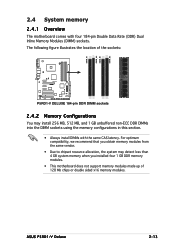
...-ECC DDR DIMMs into the DIMM sockets using the memory configurations in this section. • Always install DIMMs with four 184-pin Double Data Rate (DDR) Dual Inline Memory Modules (DIMM) sockets. ASUS P5RD1-V Deluxe 2-13 The following figure illustrates the location of 128 Mb chips or double sided x16 memory modules. DIMM_A1 DIMM_A2 DIMM_B1 DIMM_B2 2.4 System memory 2.4.1 Overview The motherboard comes with the same CAS latency...
...-ECC DDR DIMMs into the DIMM sockets using the memory configurations in this section. • Always install DIMMs with four 184-pin Double Data Rate (DDR) Dual Inline Memory Modules (DIMM) sockets. ASUS P5RD1-V Deluxe 2-13 The following figure illustrates the location of 128 Mb chips or double sided x16 memory modules. DIMM_A1 DIMM_A2 DIMM_B1 DIMM_B2 2.4 System memory 2.4.1 Overview The motherboard comes with the same CAS latency...
Motherboard Installation Guide
Page 42
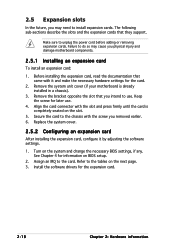
... installing the expansion card, configure it and make the necessary hardware settings for later use . Assign an IRQ to unplug the power cord before adding or removing expansion cards. Remove the bracket opposite the slot that they support. Align the card connector with the screw you physical injury and damage motherboard components. 2.5.1 Installing an expansion card To install an expansion card: 1. Keep the screw for the card. 2. Turn on BIOS setup. 2. 2.5 Expansion slots...
... installing the expansion card, configure it and make the necessary hardware settings for later use . Assign an IRQ to unplug the power cord before adding or removing expansion cards. Remove the bracket opposite the slot that they support. Align the card connector with the screw you physical injury and damage motherboard components. 2.5.1 Installing an expansion card To install an expansion card: 1. Keep the screw for the card. 2. Turn on BIOS setup. 2. 2.5 Expansion slots...
Motherboard Installation Guide
Page 47
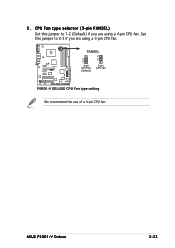
ASUS P5RD1-V Deluxe 2-23 3 . FANSEL P5RD1-V ® 2 1 4-pin CPU fan (Default) 3 2 3-pin CPU fan P5RD1-V DELUXE CPU Fan type setting We recommend the use of a 4-pin CPU fan. Set this jumper to 2-3 if you are using a 4-pin CPU fan. CPU Fan type selector (3-pin FANSEL) Set this jumper to 1-2 (Default) if you are using a 3-pin CPU fan.
ASUS P5RD1-V Deluxe 2-23 3 . FANSEL P5RD1-V ® 2 1 4-pin CPU fan (Default) 3 2 3-pin CPU fan P5RD1-V DELUXE CPU Fan type setting We recommend the use of a 4-pin CPU fan. Set this jumper to 2-3 if you are using a 4-pin CPU fan. CPU Fan type selector (3-pin FANSEL) Set this jumper to 1-2 (Default) if you are using a 3-pin CPU fan.

Motherboard Installation Guide
Page 68
... BIOS To copy the current BIOS file using a bootable floppy disk with the updated BIOS file. Copy the AFUDOS utility (afudos.exe) from the motherboard support CD to continue. 2. Boot the system in DOS mode, then at least 600 KB free space to update the BIOS file in DOS environment using the AFUDOS utility: • Make sure that D: is any user-assigned filename not more than eight alphanumeric characters for the main...
... BIOS To copy the current BIOS file using a bootable floppy disk with the updated BIOS file. Copy the AFUDOS utility (afudos.exe) from the motherboard support CD to continue. 2. Boot the system in DOS mode, then at least 600 KB free space to update the BIOS file in DOS environment using the AFUDOS utility: • Make sure that D: is any user-assigned filename not more than eight alphanumeric characters for the main...
Motherboard Installation Guide
Page 74
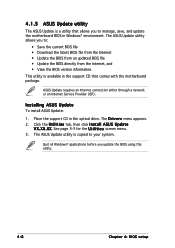
... the motherboard BIOS in Windows® environment. X X . ASUS Update requires an Internet connection either through a network or an Internet Service Provider (ISP). This utility is available in the optical drive. Installing ASUS Update To install ASUS Update: 1. Click the U t i l i t i e s tab, then click I n s t a l l A S U S U p d a t e V X . See page 5-3 for the U t i l i t i e s screen menu. 3. 4.1.5 ASUS Update utility The ASUS Update is a utility that comes with the motherboard package. Place the support CD in the support CD that allows you update the BIOS using...
... the motherboard BIOS in Windows® environment. X X . ASUS Update requires an Internet connection either through a network or an Internet Service Provider (ISP). This utility is available in the optical drive. Installing ASUS Update To install ASUS Update: 1. Click the U t i l i t i e s tab, then click I n s t a l l A S U S U p d a t e V X . See page 5-3 for the U t i l i t i e s screen menu. 3. 4.1.5 ASUS Update utility The ASUS Update is a utility that comes with the motherboard package. Place the support CD in the support CD that allows you update the BIOS using...

Motherboard Installation Guide
Page 79
... Main menu items 4.2.5 Sub-menu items A solid triangle before each item on any menu screen means that item. 4.2.8 Scroll bar A scroll bar appears on the right side of options. Scroll bar ASUS P5RD1-V Deluxe 4-13 You cannot select an item that is user-configurable, you can change the value of a field, select it then press to PCI VGA Palette Snooping PCI IDE BusMaster [No] [64] [Yes] [Disabled] [Enabled...
... Main menu items 4.2.5 Sub-menu items A solid triangle before each item on any menu screen means that item. 4.2.8 Scroll bar A scroll bar appears on the right side of options. Scroll bar ASUS P5RD1-V Deluxe 4-13 You cannot select an item that is user-configurable, you can change the value of a field, select it then press to PCI VGA Palette Snooping PCI IDE BusMaster [No] [64] [Yes] [Disabled] [Enabled...

Motherboard Installation Guide
Page 81
...) M [Auto] PIO Mode [Auto] DMA Mode [Auto] SMART Monitoring [Auto] 32Bit Data Transfer [Disabled] Select the type of IDE drive. Configuration options: [Not Installed] [Auto] [CDROM] [ARMD] LBA/Large Mode [Auto] Enables or disables the LBA mode. These values are specifically configuring a CD-ROM drive. Setting to display the IDE device information. Type [Auto] Selects the type of device connected to Auto allows automatic selection of IDE devices. Setting to the system. 4.3.4 Primary, Secondary, Third, Fourth, Fifth, and Sixth IDE Master/Slave While entering Setup, the BIOS...
...) M [Auto] PIO Mode [Auto] DMA Mode [Auto] SMART Monitoring [Auto] 32Bit Data Transfer [Disabled] Select the type of IDE drive. Configuration options: [Not Installed] [Auto] [CDROM] [ARMD] LBA/Large Mode [Auto] Enables or disables the LBA mode. These values are specifically configuring a CD-ROM drive. Setting to display the IDE device information. Type [Auto] Selects the type of device connected to Auto allows automatic selection of IDE devices. Setting to the system. 4.3.4 Primary, Secondary, Third, Fourth, Fifth, and Sixth IDE Master/Slave While entering Setup, the BIOS...
Motherboard Installation Guide
Page 84
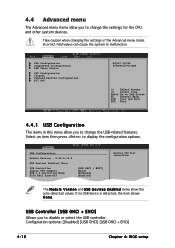
... to change the settings for the CPU and other system devices. USB Configuration Module Version - 2.24.0-10.4 USB Devices Enabled: None USB Controller Legacy USB Support USB 2.0 Controller Mode BIOS EHCI Hand-Off [USB OHCI + EHCI] [Auto] [HiSpeed] [Enabled] Enables USB host controllers. Select an item then press to malfunction. USB Configuration JumperFree Configuration LAN Cable Status CPU Configuration Chipset Onboard Devices Configuration PCI PnP Adjust system frequency/voltage 4.4.1 USB Configuration The items in this menu allow you to disable or select the USB controller...
... to change the settings for the CPU and other system devices. USB Configuration Module Version - 2.24.0-10.4 USB Devices Enabled: None USB Controller Legacy USB Support USB 2.0 Controller Mode BIOS EHCI Hand-Off [USB OHCI + EHCI] [Auto] [HiSpeed] [Enabled] Enables USB host controllers. Select an item then press to malfunction. USB Configuration JumperFree Configuration LAN Cable Status CPU Configuration Chipset Onboard Devices Configuration PCI PnP Adjust system frequency/voltage 4.4.1 USB Configuration The items in this menu allow you to disable or select the USB controller...
Motherboard Installation Guide
Page 85
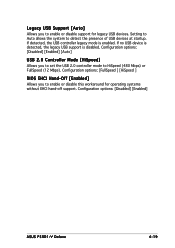
... ] BIOS EHCI Hand-Off [Enabled] Allows you to HiSpeed (480 Mbps) or FullSpeed (12 Mbps). Configuration options: [Disabled] [Enabled] [Auto] USB 2.0 Controller Mode [HiSpeed] Allows you to set the USB 2.0 controller mode to enable or disable this workaround for legacy USB devices. If detected, the USB controller legacy mode is disabled. Setting to Auto allows the system to enable or disable support for operating systems without EHCI hand-off support. Configuration options: [Disabled] [Enabled] ASUS P5RD1-V Deluxe 4-19 Legacy USB Support [Auto] Allows you to detect the presence of USB...
... ] BIOS EHCI Hand-Off [Enabled] Allows you to HiSpeed (480 Mbps) or FullSpeed (12 Mbps). Configuration options: [Disabled] [Enabled] [Auto] USB 2.0 Controller Mode [HiSpeed] Allows you to set the USB 2.0 controller mode to enable or disable this workaround for legacy USB devices. If detected, the USB controller legacy mode is disabled. Setting to Auto allows the system to enable or disable support for operating systems without EHCI hand-off support. Configuration options: [Disabled] [Enabled] ASUS P5RD1-V Deluxe 4-19 Legacy USB Support [Auto] Allows you to detect the presence of USB...
Motherboard Installation Guide
Page 90
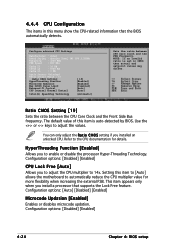
... Ratio Status: Unlocked Ratio Actual Value : 16 Ratio CMOS Setting: HyperThreading Function Microcode Updation: Max CPUID Value Limit: Enhanced C1 Control CPU Internal Thermal Control [ 19] [Enabled] [Enabled] [Disabled] [Auto] [Auto] Intel(R) SpeedStep Technology [Automatic] Sets the ratio between the CPU Core Clock and the Front Side Bus frequency. The default value of this item to [Auto] allows the motherboard to automatically reduce the CPU multiplier value for details. You can only adjust the...
... Ratio Status: Unlocked Ratio Actual Value : 16 Ratio CMOS Setting: HyperThreading Function Microcode Updation: Max CPUID Value Limit: Enhanced C1 Control CPU Internal Thermal Control [ 19] [Enabled] [Enabled] [Disabled] [Auto] [Auto] Intel(R) SpeedStep Technology [Automatic] Sets the ratio between the CPU Core Clock and the Front Side Bus frequency. The default value of this item to [Auto] allows the motherboard to automatically reduce the CPU multiplier value for details. You can only adjust the...
Motherboard Installation Guide
Page 91
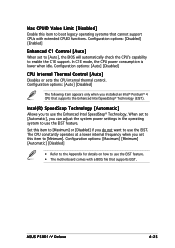
...; Technology. Set this item to use the EIST feature. • The motherboard comes with extended CPUID functions. In C1E mode, the CPU power consumption is lower when idle. The CPU constantly operates at a lower internal frequency when you to boot legacy operating systems that cannot support CPUs with a BIOS file that supports the Enhanced Intel SpeedStep® Technology (EIST). Configuration options: [Disabled] [Enabled] Enhanced C1 Control [Auto] When set this item to [Automatic], you installed...
...; Technology. Set this item to use the EIST feature. • The motherboard comes with extended CPUID functions. In C1E mode, the CPU power consumption is lower when idle. The CPU constantly operates at a lower internal frequency when you to boot legacy operating systems that cannot support CPUs with a BIOS file that supports the Enhanced Intel SpeedStep® Technology (EIST). Configuration options: [Disabled] [Enabled] Enhanced C1 Control [Auto] When set this item to [Automatic], you installed...

Motherboard Installation Guide
Page 98
.... Configuration options: [Disabled] [Enabled] 4-32 Chapter 4: BIOS setup When set to Enabled, the ACPI APIC table pointer is included in the Advanced Programmable Interrupt Controller (APIC). Configuration options: [No] [Yes] 4.5.3 ACPI 2.0 Support [No] Allows you to select the Advanced Configuration and Power Interface (ACPI) state to be used for System Suspend. 4.5.1 Suspend Mode [Auto] Allows you to add more tables for system suspend. Select an item then press to display the configuration options. Configuration options...
.... Configuration options: [Disabled] [Enabled] 4-32 Chapter 4: BIOS setup When set to Enabled, the ACPI APIC table pointer is included in the Advanced Programmable Interrupt Controller (APIC). Configuration options: [No] [Yes] 4.5.3 ACPI 2.0 Support [No] Allows you to select the Advanced Configuration and Power Interface (ACPI) state to be used for System Suspend. 4.5.1 Suspend Mode [Auto] Allows you to add more tables for system suspend. Select an item then press to display the configuration options. Configuration options...
Motherboard Installation Guide
Page 104
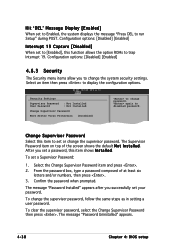
...Security Settings Supervisor Password : Not Installed User Password : Not Installed Change Supervisor Password Boot Sector Virus Protection [Disabled] to display the configuration options. The message "Password Installed" appears after you to change password. To clear the supervisor password, select the Change Supervisor Password then press . again to set or change the supervisor password, follow the same steps as in setting a user password. Change Supervisor Password Select this function allows the option ROMs to run Setup" during POST. The message "Password...
...Security Settings Supervisor Password : Not Installed User Password : Not Installed Change Supervisor Password Boot Sector Virus Protection [Disabled] to display the configuration options. The message "Password Installed" appears after you to change password. To clear the supervisor password, select the Change Supervisor Password then press . again to set or change the supervisor password, follow the same steps as in setting a user password. Change Supervisor Password Select this function allows the option ROMs to run Setup" during POST. The message "Password...
Motherboard Installation Guide
Page 105
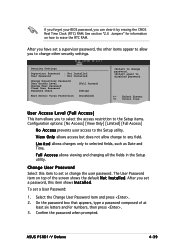
...i t e d allows changes only to disabled password. To set a supervisor password, the other security settings. ASUS P5RD1-V Deluxe 4-39 Select the Change User Password item and press . 2. After you to erase the RTC RAM. Confirm the password when prompted. Security Settings Supervisor Password : Not Installed User Password : Not Installed Change Supervisor Password User Access Level Change User Password Clear User Password Password Check [Full Access] [Setup] Boot Sector Virus Protection [Disabled] to the Setup utility. See section "2.6 Jumpers" for information on top...
...i t e d allows changes only to disabled password. To set a supervisor password, the other security settings. ASUS P5RD1-V Deluxe 4-39 Select the Change User Password item and press . 2. After you to erase the RTC RAM. Confirm the password when prompted. Security Settings Supervisor Password : Not Installed User Password : Not Installed Change Supervisor Password User Access Level Change User Password Clear User Password Password Check [Full Access] [Setup] Boot Sector Virus Protection [Disabled] to the Setup utility. See section "2.6 Jumpers" for information on top...
Motherboard Installation Guide
Page 111
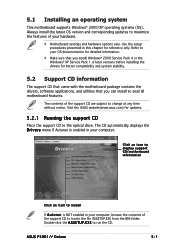
... the ASUS website(www.asus.com) for updates. 5.2.1 Running the support CD Place the support CD to run the CD. The contents of the support CD to your hardware. • Motherboard settings and hardware options vary. ASUS P5RD1-V Deluxe 5-1 Refer to locate the file ASSETUP.EXE from the BIN folder. Click an icon to display support CD/motherboard information Click an item to install If A u t o r u n is enabled in your...
... the ASUS website(www.asus.com) for updates. 5.2.1 Running the support CD Place the support CD to run the CD. The contents of the support CD to your hardware. • Motherboard settings and hardware options vary. ASUS P5RD1-V Deluxe 5-1 Refer to locate the file ASSETUP.EXE from the BIN folder. Click an icon to display support CD/motherboard information Click an item to install If A u t o r u n is enabled in your...
Motherboard Installation Guide
Page 113
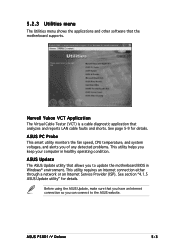
... in Windows® environment. This utility requires an Internet connection either through a network or an Internet Service Provider (ISP). See page 5-9 for details. ASUS PC Probe This smart utility monitors the fan speed, CPU temperature, and system voltages, and alerts you of any detected problems. This utility helps you can connect to update the motherboard BIOS in healthy operating condition. Before using the ASUS Update, make sure that analyzes and reports LAN cable faults and shorts.
... in Windows® environment. This utility requires an Internet connection either through a network or an Internet Service Provider (ISP). See page 5-9 for details. ASUS PC Probe This smart utility monitors the fan speed, CPU temperature, and system voltages, and alerts you of any detected problems. This utility helps you can connect to update the motherboard BIOS in healthy operating condition. Before using the ASUS Update, make sure that analyzes and reports LAN cable faults and shorts.
Motherboard Installation Guide
Page 152
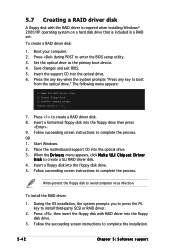
... motherboard support CD into the optical drive. 6. Write-protect the floppy disk to create a RAID driver disk. 8. Press during POST to install third-party SCSI or RAID driver. 2. The following menu appears: 1) Make SIS RAID Driver Disk 2) Format Floppy Disk 3) FreeDOS command prompt Please choose 1 ~ 3:_ 7. Set the optical drive as the primary boot device. 4. Insert a floppy disk into the floppy drive then press . 9. During the OS installation, the system prompts you to press the F6 key to enter the BIOS setup utility...
... motherboard support CD into the optical drive. 6. Write-protect the floppy disk to create a RAID driver disk. 8. Press during POST to install third-party SCSI or RAID driver. 2. The following menu appears: 1) Make SIS RAID Driver Disk 2) Format Floppy Disk 3) FreeDOS command prompt Please choose 1 ~ 3:_ 7. Set the optical drive as the primary boot device. 4. Insert a floppy disk into the floppy drive then press . 9. During the OS installation, the system prompts you to press the F6 key to enter the BIOS setup utility...


