

User Manual
Page 1
Motherboard P5P41T/USB3
Motherboard P5P41T/USB3

User Manual
Page 3
Contents Notices...vi Safety information vii About this guide vii P5P41T/USB3 specifications summary ix Chapter 1: Product introduction 1.1 Welcome 1-1 1.2 Package contents 1-1 1.3 Special features 1-1 1.3.1 Product highlights 1-1 1.3.2 Innovative ASUS features 1-2 1.4 Before you proceed 1-5 1.5 Motherboard overview 1-6 1.5.1 Placement direction 1-6 1.5.2 Screw holes 1-6 1.5.3 Motherboard layout 1-7 1.5.4 Layout contents 1-7 1.6 Central Processing Unit (CPU 1-8 1.6.1 Installing the CPU 1-8 1.6.2 Installing the CPU heatsink ...
Contents Notices...vi Safety information vii About this guide vii P5P41T/USB3 specifications summary ix Chapter 1: Product introduction 1.1 Welcome 1-1 1.2 Package contents 1-1 1.3 Special features 1-1 1.3.1 Product highlights 1-1 1.3.2 Innovative ASUS features 1-2 1.4 Before you proceed 1-5 1.5 Motherboard overview 1-6 1.5.1 Placement direction 1-6 1.5.2 Screw holes 1-6 1.5.3 Motherboard layout 1-7 1.5.4 Layout contents 1-7 1.6 Central Processing Unit (CPU 1-8 1.6.1 Installing the CPU 1-8 1.6.2 Installing the CPU heatsink ...

User Manual
Page 9
P5P41T/USB3 specifications summary CPU Chipset Front Side Bus Memory Expansion slots Storage LAN Audio USB ASUS unique features LGA775 socket for Intel® Core™2 Quad / Core™2 Extreme / Core™2 Duo / Pentium® dual-core / Celeron®... (4 ports at mid-board, 2 ports at back panel) 2 x USB 3.0 ports (2 ports at back panel) ASUS Anti-Surge ASUS CrashFree BIOS 3 ASUS AI NET2 ASUS Q-Fan ASUS EZ Flash 2 ASUS MyLogo 2 ASUS Turbo Key ASUS Express Gate ASUS Extreme Design ASUS EPU-4 Engine ASUS Auto Tuning (Fast Mode only) (continued on the next page) ix To know the rank of...
P5P41T/USB3 specifications summary CPU Chipset Front Side Bus Memory Expansion slots Storage LAN Audio USB ASUS unique features LGA775 socket for Intel® Core™2 Quad / Core™2 Extreme / Core™2 Duo / Pentium® dual-core / Celeron®... (4 ports at mid-board, 2 ports at back panel) 2 x USB 3.0 ports (2 ports at back panel) ASUS Anti-Surge ASUS CrashFree BIOS 3 ASUS AI NET2 ASUS Q-Fan ASUS EZ Flash 2 ASUS MyLogo 2 ASUS Turbo Key ASUS Express Gate ASUS Extreme Design ASUS EPU-4 Engine ASUS Auto Tuning (Fast Mode only) (continued on the next page) ix To know the rank of...

User Manual
Page 10
P5P41T/USB3 specifications summary Back panel I/O ports Internal connectors BIOS Manageability Accessories Support DVD Form factor 1 x PS/2 keyboard port 1 x PS/2 mouse port 1 x Optical S/PDIF out port 1 x COM port 1 x LPT port 1 x LAN (RJ-45) port 4 x USB 2.0/1.1 ports 2 x USB3.0/USB 2.0/1.1 Combo ports 3 x audio jacks 2 x USB 2.0/1.1 connectors..., PME Wake up 1 x Ultra DMA 100/66/33 cable 2 x Serial ATA cables 1 x I/O shield 1 x User Manual Drivers ASUS PC Probe II ASUS Update Anti-Virus software (OEM version) ATX form factor: 12 in x 8.3 in (30.5 cm x 21.1 cm) * Specifications are subject...
P5P41T/USB3 specifications summary Back panel I/O ports Internal connectors BIOS Manageability Accessories Support DVD Form factor 1 x PS/2 keyboard port 1 x PS/2 mouse port 1 x Optical S/PDIF out port 1 x COM port 1 x LPT port 1 x LAN (RJ-45) port 4 x USB 2.0/1.1 ports 2 x USB3.0/USB 2.0/1.1 Combo ports 3 x audio jacks 2 x USB 2.0/1.1 connectors..., PME Wake up 1 x Ultra DMA 100/66/33 cable 2 x Serial ATA cables 1 x I/O shield 1 x User Manual Drivers ASUS PC Probe II ASUS Update Anti-Virus software (OEM version) ATX form factor: 12 in x 8.3 in (30.5 cm x 21.1 cm) * Specifications are subject...

User Manual
Page 11
.... 1.2 Package contents Check your motherboard package for the following items. Motherboard Cables Accessories Application DVD Documentation ASUS P5P41T/USB3 motherboard 2 x Serial ATA cables 1 x Ultra DMA 133/100/66 cable 1 x I/O shield ASUS motherboard support DVD User Manual If any of ASUS quality motherboards! Before you for multitasking, multimedia, and enthusiastic gamers with 1333/1066/800MHz FSB...
.... 1.2 Package contents Check your motherboard package for the following items. Motherboard Cables Accessories Application DVD Documentation ASUS P5P41T/USB3 motherboard 2 x Serial ATA cables 1 x Ultra DMA 133/100/66 cable 1 x I/O shield ASUS motherboard support DVD User Manual If any of ASUS quality motherboards! Before you for multitasking, multimedia, and enthusiastic gamers with 1333/1066/800MHz FSB...
User Manual
Page 13
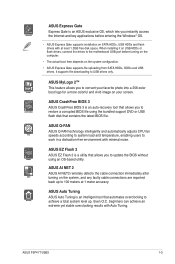
...USB HDDs and flash drives with Auto Tuning. beginners can achieve an extreme yet stable overclocking results with at 1 meter accuracy. ASUS P5P41T/USB3 1-3 ASUS Auto Tuning ASUS Auto Tuning is a utility that automates overclocking to convert your favorite photo into a 256-color boot logo for a more colorful ...and vivid image on your screen. ASUS EZ Flash 2 ASUS EZ Flash 2 is an intelligent tool that allows you to achieve a total system level up to USB drives only. When ...
...USB HDDs and flash drives with Auto Tuning. beginners can achieve an extreme yet stable overclocking results with at 1 meter accuracy. ASUS P5P41T/USB3 1-3 ASUS Auto Tuning ASUS Auto Tuning is a utility that automates overclocking to convert your favorite photo into a 256-color boot logo for a more colorful ...and vivid image on your screen. ASUS EZ Flash 2 ASUS EZ Flash 2 is an intelligent tool that allows you to achieve a total system level up to USB drives only. When ...

User Manual
Page 15
... indicate that the ATX power supply is switched off or the power cord is ON, in sleep mode, or in any motherboard component. P5P41T/USB3 SB_PWR ON OFF Standy Power Powered Off P5P41T/USB3 Onboard LED ASUS P5P41T/USB3 1-5 This is a reminder that you uninstall any motherboard settings. • Unplug the power cord from the power supply.
... indicate that the ATX power supply is switched off or the power cord is ON, in sleep mode, or in any motherboard component. P5P41T/USB3 SB_PWR ON OFF Standy Power Powered Off P5P41T/USB3 Onboard LED ASUS P5P41T/USB3 1-5 This is a reminder that you uninstall any motherboard settings. • Unplug the power cord from the power supply.

User Manual
Page 16
... the correct orientation. Do not overtighten the screws! Failure to do so can damage the motherboard. Place this side towards the rear of the chassis P5P41T/USB3 1-6 Chapter 1: Product introduction Doing so can cause you physical injury and damage motherboard components. 1.5.1 Placement direction When installing the motherboard, ensure that the motherboard fits...
... the correct orientation. Do not overtighten the screws! Failure to do so can damage the motherboard. Place this side towards the rear of the chassis P5P41T/USB3 1-6 Chapter 1: Product introduction Doing so can cause you physical injury and damage motherboard components. 1.5.1 Placement direction When installing the motherboard, ensure that the motherboard fits...

User Manual
Page 17
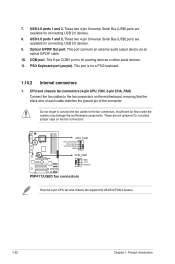
...1-18 4. Serial ATA connectors (7-pin SATA1~4) 6. Digital audio connector (4-1 pin 1-21 SPDIF_OUT) 1-23 12. Front panel audio connector (10-1 pin AAFP) 1-22 ASUS P5P41T/USB3 1-7 USB connectors (10-1 USB56, USB78) 1-25 1-22 11. ATX power connectors (24-pin EATXPWR, 4-pin ATX12V) 1-21 7. 2. CPU and chassis fan ...LGA775 USB3_12 LAN1_USB12 Intel® G41 30.5cm(12.0in) AUDIO EATXPWR ICS 954 A4 CHA_FAN 1 AAFP PCIE Gb LAN PCIEX1_1 P5P41T/USB3 PCIEX16_1 2 Super I/O PCIEX1_2 Lithium Cell CMOS Power PCI1 ALC 887 SPDIF_OUT PCI2 PCI3 12 11 Intel® ICH7 SATA1 SATA2 ...
...1-18 4. Serial ATA connectors (7-pin SATA1~4) 6. Digital audio connector (4-1 pin 1-21 SPDIF_OUT) 1-23 12. Front panel audio connector (10-1 pin AAFP) 1-22 ASUS P5P41T/USB3 1-7 USB connectors (10-1 USB56, USB78) 1-25 1-22 11. ATX power connectors (24-pin EATXPWR, 4-pin ATX12V) 1-21 7. 2. CPU and chassis fan ...LGA775 USB3_12 LAN1_USB12 Intel® G41 30.5cm(12.0in) AUDIO EATXPWR ICS 954 A4 CHA_FAN 1 AAFP PCIE Gb LAN PCIEX1_1 P5P41T/USB3 PCIEX16_1 2 Super I/O PCIEX1_2 Lithium Cell CMOS Power PCI1 ALC 887 SPDIF_OUT PCI2 PCI3 12 11 Intel® ICH7 SATA1 SATA2 ...

User Manual
Page 18
... that the cam box is facing towards you see any damage to ensure system stability. • Upon purchase of the PnP cap. P5P41T/USB3 P5P41T/USB3 CPU socket 775 Before installing the CPU, ensure that the PnP cap is on the motherboard. 1.6 Central Processing Unit (CPU) The ... PnP cap is shipment/transit-related. • Keep the cap after installing the motherboard. Contact your left. 1-8 Chapter 1: Product introduction ASUS will process Return Merchandise Authorization (RMA) requests only if the motherboard comes with the Intel® Enhanced Intel SpeedStep® Technology (EIST)...
... that the cam box is facing towards you see any damage to ensure system stability. • Upon purchase of the PnP cap. P5P41T/USB3 P5P41T/USB3 CPU socket 775 Before installing the CPU, ensure that the PnP cap is on the motherboard. 1.6 Central Processing Unit (CPU) The ... PnP cap is shipment/transit-related. • Keep the cap after installing the motherboard. Contact your left. 1-8 Chapter 1: Product introduction ASUS will process Return Merchandise Authorization (RMA) requests only if the motherboard comes with the Intel® Enhanced Intel SpeedStep® Technology (EIST)...
User Manual
Page 19
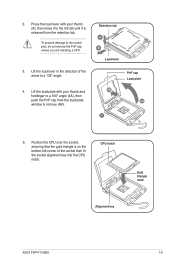
... your thumb and forefinger to a 100º angle (4A), then push the PnP cap from the retention tab. CPU notch Gold triangle mark Alignment key ASUS P5P41T/USB3 1-9 Position the CPU over the socket, ensuring that the gold triangle is released from the load plate window to remove (4B). Press the load lever...
... your thumb and forefinger to a 100º angle (4A), then push the PnP cap from the retention tab. CPU notch Gold triangle mark Alignment key ASUS P5P41T/USB3 1-9 Position the CPU over the socket, ensuring that the gold triangle is released from the load plate window to remove (4B). Press the load lever...

User Manual
Page 21
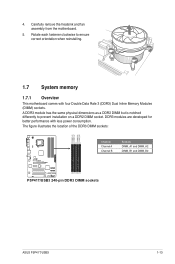
If you buy a boxed Intel® processor, the package includes the CPU fan and heatsink assembly. ASUS P5P41T/USB3 1-11 Place the heatsink on the motherboard. Push down two fasteners at a time in a diagonal sequence to secure the heatsink and fan assembly in a push-...
If you buy a boxed Intel® processor, the package includes the CPU fan and heatsink assembly. ASUS P5P41T/USB3 1-11 Place the heatsink on the motherboard. Push down two fasteners at a time in a diagonal sequence to secure the heatsink and fan assembly in a push-...

User Manual
Page 22
Hardware monitoring errors can occur if you fail to connect the CPU fan connector! A B A B B A B A 1-12 Chapter 1: Product introduction 3. P5P41T/USB3 CPU_FAN CPU FAN PWM CPU FAN IN CPU FAN PWR GND P5P41T/USB3 CPU fan connector Do not forget to plug this connector. 1.6.3 Uninstalling the CPU heatsink and fan To uninstall the CPU heatsink and...
Hardware monitoring errors can occur if you fail to connect the CPU fan connector! A B A B B A B A 1-12 Chapter 1: Product introduction 3. P5P41T/USB3 CPU_FAN CPU FAN PWM CPU FAN IN CPU FAN PWR GND P5P41T/USB3 CPU fan connector Do not forget to plug this connector. 1.6.3 Uninstalling the CPU heatsink and fan To uninstall the CPU heatsink and...
User Manual
Page 23
... with less power consumption. The figure illustrates the location of the DDR3 DIMM sockets: DIMM_A1 DIMM_A2 DIMM_B1 DIMM_B2 P5P41T/USB3 Channel Channel A Channel B Sockets DIMM_A1 and DIMM_A2 DIMM_B1 and DIMM_B2 P5P41T/USB3 240-pin DDR3 DIMM sockets ASUS P5P41T/USB3 1-13 DDR3 modules are developed for better performance with four Double Data Rate 3 (DDR3) Dual Inline Memory...
... with less power consumption. The figure illustrates the location of the DDR3 DIMM sockets: DIMM_A1 DIMM_A2 DIMM_B1 DIMM_B2 P5P41T/USB3 Channel Channel A Channel B Sockets DIMM_A1 and DIMM_A2 DIMM_B1 and DIMM_B2 P5P41T/USB3 240-pin DDR3 DIMM sockets ASUS P5P41T/USB3 1-13 DDR3 modules are developed for better performance with four Double Data Rate 3 (DDR3) Dual Inline Memory...

User Manual
Page 24
... on the motherboard, the actual usable memory for the OS can be about 3GB or less. Voltage 1.35V (low voltage) - Use a maximum of the following: - P5P41T/USB3 Motherboard Qualified Vendors Lists (QVL) DDR3-1333 MHz capability Vendor Crucial Crucial ELPIDA Part No. DIMM support A* B* C* •• • •• •• •...
... on the motherboard, the actual usable memory for the OS can be about 3GB or less. Voltage 1.35V (low voltage) - Use a maximum of the following: - P5P41T/USB3 Motherboard Qualified Vendors Lists (QVL) DDR3-1333 MHz capability Vendor Crucial Crucial ELPIDA Part No. DIMM support A* B* C* •• • •• •• •...

User Manual
Page 27
... SS PSC A3P1GF3DGF928M9B05 - SS SAMSUNG SEC 846 HCH9 - K4B1G08460 SS Samsung SEC 913 HCH9 - DS Micron DS - 9GF27D9KPT - DS PSC A3P1GF3DGF928M9B05 - SEC816HCH9K4B1G0846D - Visit the ASUS website at www.asus.com for the latest QVL. ASUS P5P41T/USB3 1-17 Double - Chip No. SS Samsung K4B1G0846D-HCH9 - DS Samsung SEC 913 HCH9 - K4B1G0846E SS - - - Single-sided / DS -
... SS PSC A3P1GF3DGF928M9B05 - SS SAMSUNG SEC 846 HCH9 - K4B1G08460 SS Samsung SEC 913 HCH9 - DS Micron DS - 9GF27D9KPT - DS PSC A3P1GF3DGF928M9B05 - SEC816HCH9K4B1G0846D - Visit the ASUS website at www.asus.com for the latest QVL. ASUS P5P41T/USB3 1-17 Double - Chip No. SS Samsung K4B1G0846D-HCH9 - DS Samsung SEC 913 HCH9 - K4B1G0846E SS - - - Single-sided / DS -

User Manual
Page 29
.... 1.8.1 Installing an expansion card To install an expansion card: 1. Failure to install expansion cards. Turn on BIOS setup. 2. Install the software drivers for later use . ASUS P5P41T/USB3 1-19 Before installing the expansion card, read the documentation that complies with the slot and press firmly until the card is already installed in a chassis...
.... 1.8.1 Installing an expansion card To install an expansion card: 1. Failure to install expansion cards. Turn on BIOS setup. 2. Install the software drivers for later use . ASUS P5P41T/USB3 1-19 Before installing the expansion card, read the documentation that complies with the slot and press firmly until the card is already installed in a chassis...

User Manual
Page 30
You can clear the CMOS memory of date, time, and system setup parameters by erasing the CMOS RTC RAM data. P5P41T/USB3 CLRTC 12 23 Normal (Default) P5P41T/USB3 Clear RTC RAM Clear RTC To erase the RTC RAM: 1. Turn OFF the computer and unplug the power cord. 2. For system failure due to clear ...
You can clear the CMOS memory of date, time, and system setup parameters by erasing the CMOS RTC RAM data. P5P41T/USB3 CLRTC 12 23 Normal (Default) P5P41T/USB3 Clear RTC RAM Clear RTC To erase the RTC RAM: 1. Turn OFF the computer and unplug the power cord. 2. For system failure due to clear ...
User Manual
Page 31
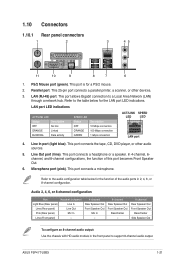
... for the LAN port LED indications. This port connects a headphone or a speaker. Refer to the table below for a PS/2 mouse. 2. Parallel port. Microphone port (pink). ASUS P5P41T/USB3 1-21 Line Out port (lime). This 25-pin port connects a parallel printer, a scanner, or other audio sources. 5. LAN port LED indications ACT/LINK LED Status...
... for the LAN port LED indications. This port connects a headphone or a speaker. Refer to the table below for a PS/2 mouse. 2. Parallel port. Microphone port (pink). ASUS P5P41T/USB3 1-21 Line Out port (lime). This 25-pin port connects a parallel printer, a scanner, or other audio sources. 5. LAN port LED indications ACT/LINK LED Status...
User Manual
Page 32
... (4-pin CPU_FAN, 3-pin CHA_FAN) Connect the fan cables to the fan connectors. P5P41T/USB3 CPU_FAN CPU FAN PWM CPU FAN IN CPU FAN PWR GND CHA_FAN GND +12V Rotation P5P41T/USB3 fan connectors Only the 4-pin CPU fan and chassis fan support the ASUS Q-FAN 2 feature. 1-22 Chapter 1: Product introduction 7. Optical S/PDIF Out port. This...
... (4-pin CPU_FAN, 3-pin CHA_FAN) Connect the fan cables to the fan connectors. P5P41T/USB3 CPU_FAN CPU FAN PWM CPU FAN IN CPU FAN PWR GND CHA_FAN GND +12V Rotation P5P41T/USB3 fan connectors Only the 4-pin CPU fan and chassis fan support the ASUS Q-FAN 2 feature. 1-22 Chapter 1: Product introduction 7. Optical S/PDIF Out port. This...

