P4BP-MX User Manual
Page 12
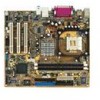
Supporting up to set a new benchmark for buying the ASUS® P4BP-MX motherboard! Before you start installing the motherboard, and hardware devices on ... the list below. 1.2 Package contents Check your motherboard package for the following items. ASUS P4BP-MX motherboard ASUS motherboard support CD 1 x IDE cable 1 x Floppy disk cable I/O shield Bag of extra jumper caps User guide If ...any of ASUS quality motherboards! The motherboard delivers a host of power computing! Thank you ahead in the world of new...
Supporting up to set a new benchmark for buying the ASUS® P4BP-MX motherboard! Before you start installing the motherboard, and hardware devices on ... the list below. 1.2 Package contents Check your motherboard package for the following items. ASUS P4BP-MX motherboard ASUS motherboard support CD 1 x IDE cable 1 x Floppy disk cable I/O shield Bag of extra jumper caps User guide If ...any of ASUS quality motherboards! The motherboard delivers a host of power computing! Thank you ahead in the world of new...
P4BP-MX User Manual
Page 13
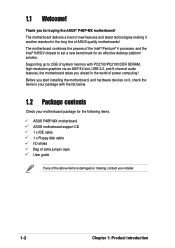
.... 6 USB 2.0 ports The motherboard implements the new Universal Serial Bus (USB) 2.0 specification, extending the connection speed from 12 Mbps on USB 1.1 to powerful speaker systems. ASUS P4BP-MX motherboard 1-3 1.3 Special features 1.3.1 Product Highlights Latest processor technology The motherboard comes with a 478-pin surface mount, Zero Insertion Force (ZIF) socket for the Intel®...
.... 6 USB 2.0 ports The motherboard implements the new Universal Serial Bus (USB) 2.0 specification, extending the connection speed from 12 Mbps on USB 1.1 to powerful speaker systems. ASUS P4BP-MX motherboard 1-3 1.3 Special features 1.3.1 Product Highlights Latest processor technology The motherboard comes with a 478-pin surface mount, Zero Insertion Force (ZIF) socket for the Intel®...
P4BP-MX User Manual
Page 15
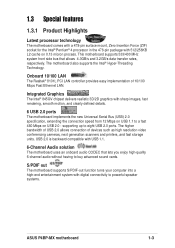
.... 1.4 Before you proceed Take note of the system chassis. 3. Before you install or remove any component, place it on them. 4. P4BP-MX P4BP-MX Onboard LED LED2 ON Standby Power OFF Powered Off ASUS P4BP-MX motherboard 1-5 Unplug the power cord from the power supply. Use a grounded wrist strap or touch a safely grounded object or discharge any...
.... 1.4 Before you proceed Take note of the system chassis. 3. Before you install or remove any component, place it on them. 4. P4BP-MX P4BP-MX Onboard LED LED2 ON Standby Power OFF Powered Off ASUS P4BP-MX motherboard 1-5 Unplug the power cord from the power supply. Use a grounded wrist strap or touch a safely grounded object or discharge any...
P4BP-MX User Manual
Page 17
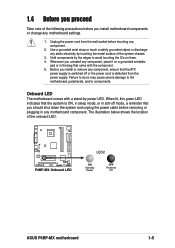
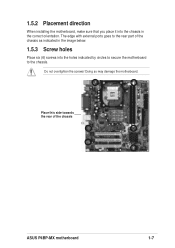
Place this side towards the rear of the chassis as indicated in the image below. 1.5.3 Screw holes Place six (6) screws into the chassis in the correct orientation. The edge with external ports goes to the rear part of the chassis ASUS P4BP-MX motherboard 1-7 Do not overtighten the screws! Doing so may damage the motherboard. 1.5.2 Placement direction When installing the motherboard, make sure that you place it into the holes indicated by circles to secure the motherboard to the chassis.
Place this side towards the rear of the chassis as indicated in the image below. 1.5.3 Screw holes Place six (6) screws into the chassis in the correct orientation. The edge with external ports goes to the rear part of the chassis ASUS P4BP-MX motherboard 1-7 Do not overtighten the screws! Doing so may damage the motherboard. 1.5.2 Placement direction When installing the motherboard, make sure that you place it into the holes indicated by circles to secure the motherboard to the chassis.
P4BP-MX User Manual
Page 19
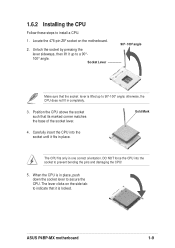
... to indicate that its marked corner matches the base of the socket lever. The CPU fits only in place. The lever clicks on the motherboard. 2. ASUS P4BP-MX motherboard 1-9 When the CPU is in completely. 3. otherwise, the CPU does not fit in place, push down the socket lever to a 90°- 100°...
... to indicate that its marked corner matches the base of the socket lever. The CPU fits only in place. The lever clicks on the motherboard. 2. ASUS P4BP-MX motherboard 1-9 When the CPU is in completely. 3. otherwise, the CPU does not fit in place, push down the socket lever to a 90°- 100°...
P4BP-MX User Manual
Page 21
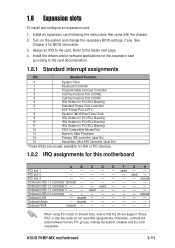
... on the system and change the necessary BIOS settings, if any. used - - See Chapter 2 for this motherboard A B C D E F G H PCI slot 1 - - - - - Onboard USB 2.0 controller shared Onboard LAN - ASUS P4BP-MX motherboard 1-11 used - - - - - 1.8 Expansion slots To install and configure an expansion card: 1. PCI slot 3 shared Onboard USB 1.1 controller 1shared Onboard USB 1.1 controller 2 - - - PCI slot 2 - - - - - -
... on the system and change the necessary BIOS settings, if any. used - - See Chapter 2 for this motherboard A B C D E F G H PCI slot 1 - - - - - Onboard USB 2.0 controller shared Onboard LAN - ASUS P4BP-MX motherboard 1-11 used - - - - - 1.8 Expansion slots To install and configure an expansion card: 1. PCI slot 3 shared Onboard USB 1.1 controller 1shared Onboard USB 1.1 controller 2 - - - PCI slot 2 - - - - - -
P4BP-MX User Manual
Page 23
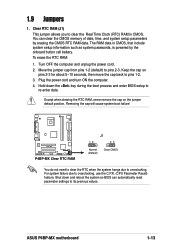
... clear the CMOS memory of date, time, and system setup parameters by the onboard button cell battery. Removing the cap will cause system boot failure! ASUS P4BP-MX motherboard 1-13 The RAM data in CMOS. To erase the RTC RAM: 1. Except when clearing the RTC RAM, never remove the cap on pins 2-3 ...for about 5~10 seconds, then move the cap back to pins 1-2. 3. Move the jumper cap from pins 1-2 (default) to overclocking. P4BP-MX P4BP-MX Clear RTC RAM J1 12 23 Normal (Default) Clear CMOS You do not need to clear the RTC when the system hangs due to pins...
... clear the CMOS memory of date, time, and system setup parameters by the onboard button cell battery. Removing the cap will cause system boot failure! ASUS P4BP-MX motherboard 1-13 The RAM data in CMOS. To erase the RTC RAM: 1. Except when clearing the RTC RAM, never remove the cap on pins 2-3 ...for about 5~10 seconds, then move the cap back to pins 1-2. 3. Move the jumper cap from pins 1-2 (default) to overclocking. P4BP-MX P4BP-MX Clear RTC RAM J1 12 23 Normal (Default) Clear CMOS You do not need to clear the RTC when the system hangs due to pins...
P4BP-MX User Manual
Page 25
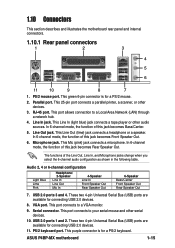
... In (light blue) jack connects a tape player or other audio sources. This green 6-pin connector is for connecting USB 2.0 devices. 8. Line Out jack. Parallel port. ASUS P4BP-MX motherboard 1-15 1.10 Connectors This section describes and illustrates the motherboard rear panel and internal connectors. 1.10.1 Rear panel connectors 1 2 3 4 5 6 11 10...
... In (light blue) jack connects a tape player or other audio sources. This green 6-pin connector is for connecting USB 2.0 devices. 8. Line Out jack. Parallel port. ASUS P4BP-MX motherboard 1-15 1.10 Connectors This section describes and illustrates the motherboard rear panel and internal connectors. 1.10.1 Rear panel connectors 1 2 3 4 5 6 11 10...
P4BP-MX User Manual
Page 27
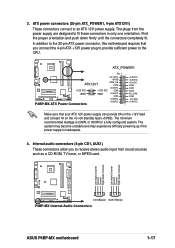
... on the +5-volt standby lead (+5VSB). 3. ATX_POWER1 Pin 1 +12.0VDC +5VSB ATX12V1 PWR_OK COM P4BP-MX +12V DC GND +12V DC GND +5.0VDC COM +5.0VDC COM +3.3VDC P4BP-MX ATX Power Connectors +3.3VDC +5.0VDC +5.0VDC -5.0VDC COM COM COM PS_ON# COM -12.0VDC +3.3VDC...one orientation. Left Audio Channel Ground Ground Right Audio Channel Left Audio Channel Ground Ground Right Audio Channel P4BP-MX CD1(Black) AUX1(White) P4BP-MX Internal Audio Connectors ASUS P4BP-MX motherboard 1-17 Find the proper orientation and push down firmly until the connectors completely fit. Internal audio...
... on the +5-volt standby lead (+5VSB). 3. ATX_POWER1 Pin 1 +12.0VDC +5VSB ATX12V1 PWR_OK COM P4BP-MX +12V DC GND +12V DC GND +5.0VDC COM +5.0VDC COM +3.3VDC P4BP-MX ATX Power Connectors +3.3VDC +5.0VDC +5.0VDC -5.0VDC COM COM COM PS_ON# COM -12.0VDC +3.3VDC...one orientation. Left Audio Channel Ground Ground Right Audio Channel Left Audio Channel Ground Ground Right Audio Channel P4BP-MX CD1(Black) AUX1(White) P4BP-MX Internal Audio Connectors ASUS P4BP-MX motherboard 1-17 Find the proper orientation and push down firmly until the connectors completely fit. Internal audio...
P4BP-MX User Manual
Page 29
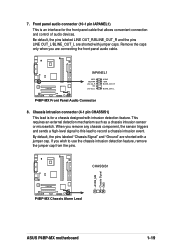
... (10-1 pin IAPANEL1) This is for the front panel cable that allows convenient connection and control of audio devices. CHASSIS1 +5VSB_MB Chassis Signal GND P4BP-MX P4BP-MX Chassis Alarm Lead ASUS P4BP-MX motherboard 1-19 Chassis intrusion connector (4-1 pin CHASSIS1) This lead is an interface for a chassis designed with intrusion detection feature. Remove the caps only...
... (10-1 pin IAPANEL1) This is for the front panel cable that allows convenient connection and control of audio devices. CHASSIS1 +5VSB_MB Chassis Signal GND P4BP-MX P4BP-MX Chassis Alarm Lead ASUS P4BP-MX motherboard 1-19 Chassis intrusion connector (4-1 pin CHASSIS1) This lead is an interface for a chassis designed with intrusion detection feature. Remove the caps only...
P4BP-MX User Manual
Page 31
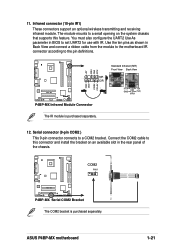
... connector (10-pin IR1) These connectors support an optional wireless transmitting and receiving infrared module. COM2 PIN 1 P4BP-MX P4BP-MX Serial COM2 Bracket The COM2 bracket is purchased separately. 12. ASUS P4BP-MX motherboard 1-21 Serial connector (9-pin COM2 ) This 9-pin connector connects to set UART2 for use with IR...cable from the module to the motherboard IR connector according to a small opening on the system chassis that supports this feature. P4BP-MX IRAX GND CIRRX CIR+5V +5V IRRX GND IRTX Standard Infrared (SIR) Front View Back View SIR CIR IRTX +5V GND (NC...
... connector (10-pin IR1) These connectors support an optional wireless transmitting and receiving infrared module. COM2 PIN 1 P4BP-MX P4BP-MX Serial COM2 Bracket The COM2 bracket is purchased separately. 12. ASUS P4BP-MX motherboard 1-21 Serial connector (9-pin COM2 ) This 9-pin connector connects to set UART2 for use with IR...cable from the module to the motherboard IR connector according to a small opening on the system chassis that supports this feature. P4BP-MX IRAX GND CIRRX CIR+5V +5V IRRX GND IRTX Standard Infrared (SIR) Front View Back View SIR CIR IRTX +5V GND (NC...
P4BP-MX User Manual
Page 33
Chapter 2 This chapter tells how to change system settings through the BIOS Setup menus. BIOS information ASUS P4BP-MX motherboard 2-1 Detailed descriptions of the BIOS parameters are also provided.
Chapter 2 This chapter tells how to change system settings through the BIOS Setup menus. BIOS information ASUS P4BP-MX motherboard 2-1 Detailed descriptions of the BIOS parameters are also provided.
P4BP-MX User Manual
Page 34
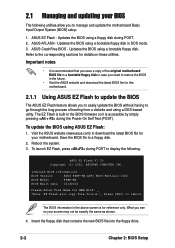
...display the following utilities allow you see on these utilities. What you to the corresponding sections for your motherboard. Updates the BIOS using ASUS EZ Flash: 1. Refer to manage and update the motherboard Basic Input/Output System (BIOS) setup. 1. Updates the BIOS using a... the new BIOS file into the floppy drive. 2-2 Chapter 2: BIOS Setup ASUS EZ Flash V1.00 Copyright (C) 2002, ASUSTeK COMPUTER INC. [Onboard BIOS Information] BIOS Version : ASUS P4BP-MX ACPI BIOS Revision 1002 BIOS Model : P4BP-MX BIOS Built Date : 01/28/04 Please Enter File Name for NEW BIOS...
...display the following utilities allow you see on these utilities. What you to the corresponding sections for your motherboard. Updates the BIOS using ASUS EZ Flash: 1. Refer to manage and update the motherboard Basic Input/Output System (BIOS) setup. 1. Updates the BIOS using a... the new BIOS file into the floppy drive. 2-2 Chapter 2: BIOS Setup ASUS EZ Flash V1.00 Copyright (C) 2002, ASUSTeK COMPUTER INC. [Onboard BIOS Information] BIOS Version : ASUS P4BP-MX ACPI BIOS Revision 1002 BIOS Model : P4BP-MX BIOS Built Date : 01/28/04 Please Enter File Name for NEW BIOS...

P4BP-MX User Manual
Page 35
...system with the update process or press to complete format process. 3. This file works only in the correct file name and press . 6. ASUS P4BP-MX motherboard 2-3 EZ Flash will automatically access drive A to look for a few minutes to exit EZ Flash and reboot the system without updating the...key to update the main BIOS area. Wait for the file name that you downloaded from the ASUS website, then press . The following message appears on screen. [BIOS Information in File] BIOS Version: P4BP-MX Boot Block WARNING! To copy, type the command line: COPY D:\AFLASH.EXE\AFLASH.EXE A:\ then...
...system with the update process or press to complete format process. 3. This file works only in the correct file name and press . 6. ASUS P4BP-MX motherboard 2-3 EZ Flash will automatically access drive A to look for a few minutes to exit EZ Flash and reboot the system without updating the...key to update the main BIOS area. Wait for the file name that you downloaded from the ASUS website, then press . The following message appears on screen. [BIOS Information in File] BIOS Version: P4BP-MX Boot Block WARNING! To copy, type the command line: COPY D:\AFLASH.EXE\AFLASH.EXE A:\ then...
P4BP-MX User Manual
Page 37
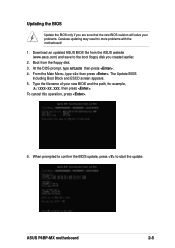
Download an updated ASUS BIOS file from the floppy disk. 3. To cancel this operation, press . 6. When prompted to confirm the BIOS update, press to the boot floppy disk you ...) and save to start the update. Type the filename of your problems. Careless updating may result to more problems with the motherboard! 1. ASUS P4BP-MX motherboard 2-5 The Update BIOS Including Boot Block and ESCD screen appears. 5. At the DOS prompt, type AFLASH then press . 4. Updating the BIOS Update the BIOS ...
Download an updated ASUS BIOS file from the floppy disk. 3. To cancel this operation, press . 6. When prompted to confirm the BIOS update, press to the boot floppy disk you ...) and save to start the update. Type the filename of your problems. Careless updating may result to more problems with the motherboard! 1. ASUS P4BP-MX motherboard 2-5 The Update BIOS Including Boot Block and ESCD screen appears. 5. At the DOS prompt, type AFLASH then press . 4. Updating the BIOS Update the BIOS ...
P4BP-MX User Manual
Page 39
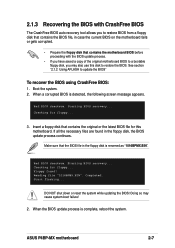
... screen message appears. Starting BIOS recovery... Insert a floppy disk that contains the original or the latest BIOS file for this disk to restore the BIOS. ASUS P4BP-MX motherboard 2-7 Reading file "1016BPMX.BIN". See section "2.1.2 Using AFLASH to update the BIOS" To recover the BIOS using CrashFree BIOS: 1. Bad BIOS checksum. 2.1.3 Recovering the...
... screen message appears. Starting BIOS recovery... Insert a floppy disk that contains the original or the latest BIOS file for this disk to restore the BIOS. ASUS P4BP-MX motherboard 2-7 Reading file "1016BPMX.BIN". See section "2.1.2 Using AFLASH to update the BIOS" To recover the BIOS using CrashFree BIOS: 1. Bad BIOS checksum. 2.1.3 Recovering the...
P4BP-MX User Manual
Page 41
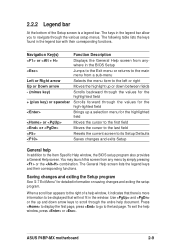
... screen lists the legend keys and their corresponding functions. Press to display the first page, press to go to navigate through the various setup menus. ASUS P4BP-MX motherboard 2-9 The following table lists the keys found in the legend bar with their corresponding functions. Navigation Key(s) Function Description or Displays the General Help...
... screen lists the legend keys and their corresponding functions. Press to display the first page, press to go to navigate through the various setup menus. ASUS P4BP-MX motherboard 2-9 The following table lists the keys found in the legend bar with their corresponding functions. Navigation Key(s) Function Description or Displays the General Help...
P4BP-MX User Manual
Page 43
... password, anyone can clear it by the onboard button cell battery. Halt On [All Errors] This field specifies the types of 1.2MB (as above appears. ASUS P4BP-MX motherboard 2-11 If you to halt. Passwords are not case sensitive, meaning, passwords typed in a password then press .
... password, anyone can clear it by the onboard button cell battery. Halt On [All Errors] This field specifies the types of 1.2MB (as above appears. ASUS P4BP-MX motherboard 2-11 If you to halt. Passwords are not case sensitive, meaning, passwords typed in a password then press .

P4BP-MX User Manual
Page 45
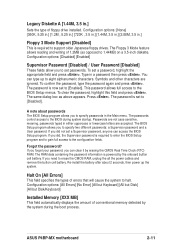
... to determine the correct value. Other options for cylinders, heads, or sectors. Refer to the drive documentation to [Manual]. To make changes to this field. ASUS P4BP-MX motherboard 2-13 If no drive is necessary for drives with more than 504MB storage capacity. Translation Method [LBA] Select the hard disk drive type in...
... to determine the correct value. Other options for cylinders, heads, or sectors. Refer to the drive documentation to [Manual]. To make changes to this field. ASUS P4BP-MX motherboard 2-13 If no drive is necessary for drives with more than 504MB storage capacity. Translation Method [LBA] Select the hard disk drive type in...
P4BP-MX User Manual
Page 47
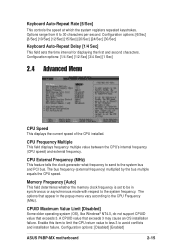
Configuration options: [Disabled] [Enabled] ASUS P4BP-MX motherboard 2-15 Configuration options: [1/4 Sec] [1/2 Sec] [3/4 Sec] [1 Sec] 2.4 Advanced Menu CPU Speed This displays the current speed of the CPU installed. CPU Frequency Multiple This ...
Configuration options: [Disabled] [Enabled] ASUS P4BP-MX motherboard 2-15 Configuration options: [1/4 Sec] [1/2 Sec] [3/4 Sec] [1 Sec] 2.4 Advanced Menu CPU Speed This displays the current speed of the CPU installed. CPU Frequency Multiple This ...


