P4BP-MX User Manual
Page 4
...Using ASUS EZ Flash to update the BIOS 2-2 2.1.2 Using AFLASH to update the BIOS 2-3 2.1.3 Recovering the BIOS with CrashFree BIOS .......... 2-7 2.2 BIOS Setup program 2-8 2.2.1 BIOS menu bar 2-8 2.2.2 Legend bar 2-9 2.3 Main Menu 2-10 2.3.1 Primary and Secondary Master/Slave 2-12 2.3.2 Keyboard Features 2-14 2.4 Advanced Menu 2-15 2.4.1 Chip Configuration 2-17 2.4.2 I/O Device Configuration 2-19 2.4.3 PCI Configuration 2-20 2.5 Power Menu 2-22 2.5.1 Power Up Control 2-24 2.5.2 Hardware Monitor 2-25 2.6 Boot Menu 2-26 2.7 Exit Menu 2-27 Chapter 3: Software support 3.1 Install...
...Using ASUS EZ Flash to update the BIOS 2-2 2.1.2 Using AFLASH to update the BIOS 2-3 2.1.3 Recovering the BIOS with CrashFree BIOS .......... 2-7 2.2 BIOS Setup program 2-8 2.2.1 BIOS menu bar 2-8 2.2.2 Legend bar 2-9 2.3 Main Menu 2-10 2.3.1 Primary and Secondary Master/Slave 2-12 2.3.2 Keyboard Features 2-14 2.4 Advanced Menu 2-15 2.4.1 Chip Configuration 2-17 2.4.2 I/O Device Configuration 2-19 2.4.3 PCI Configuration 2-20 2.5 Power Menu 2-22 2.5.1 Power Up Control 2-24 2.5.2 Hardware Monitor 2-25 2.6 Boot Menu 2-26 2.7 Exit Menu 2-27 Chapter 3: Software support 3.1 Install...
P4BP-MX User Manual
Page 13
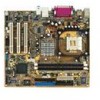
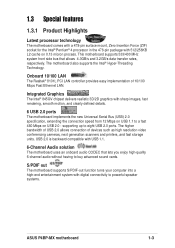
... powerful speaker systems. ASUS P4BP-MX motherboard 1-3 The higher bandwidth of USB 2.0 allows connection of 10/100 Mbps Fast Ethernet LAN. USB 2.0 is backward compatible with USB 1.1. 6-Channel Audio solution The motherboard uses an onboard audio CODEC that allows 4.3GB/s and 3.2GB/s data transfer rates, respectively. S/PDIF out The motherboard supports S/PDIF-out function turns your computer into a high-end entertainment system with sharp images, fast rendering, smooth motion, and clearly defined details. 6 USB 2.0 ports...
... powerful speaker systems. ASUS P4BP-MX motherboard 1-3 The higher bandwidth of USB 2.0 allows connection of 10/100 Mbps Fast Ethernet LAN. USB 2.0 is backward compatible with USB 1.1. 6-Channel Audio solution The motherboard uses an onboard audio CODEC that allows 4.3GB/s and 3.2GB/s data transfer rates, respectively. S/PDIF out The motherboard supports S/PDIF-out function turns your computer into a high-end entertainment system with sharp images, fast rendering, smooth motion, and clearly defined details. 6 USB 2.0 ports...
P4BP-MX User Manual
Page 21
... IDE controller (dual fifo) 15 Secondary Ultra ATA Controller (dual fifo) *These IRQs are usually available for ISA or PCI devices. 1.8.2 IRQ assignments for BIOS information. 3. used - - - - PCI slot 3 shared Onboard USB 1.1 controller 1shared Onboard USB 1.1 controller 2 - - - used - 1.8 Expansion slots To install and configure an expansion card: 1. Install an expansion card following the instructions that the cards do not need IRQ assignments. Assign an IRQ to the card. Onboard USB 1.1 controller 3 - - Onboard Audio - Onboard VGA shared When using PCI cards...
... IDE controller (dual fifo) 15 Secondary Ultra ATA Controller (dual fifo) *These IRQs are usually available for ISA or PCI devices. 1.8.2 IRQ assignments for BIOS information. 3. used - - - - PCI slot 3 shared Onboard USB 1.1 controller 1shared Onboard USB 1.1 controller 2 - - - used - 1.8 Expansion slots To install and configure an expansion card: 1. Install an expansion card following the instructions that the cards do not need IRQ assignments. Assign an IRQ to the card. Onboard USB 1.1 controller 3 - - Onboard Audio - Onboard VGA shared When using PCI cards...
P4BP-MX User Manual
Page 23
... jumper default position. Plug the power cord and turn ON the computer. 4. Turn OFF the computer and unplug the power cord. 2. Hold down and reboot the system so BIOS can clear the CMOS memory of date, time, and system setup parameters by the onboard button cell battery. For system failure due to pins 2-3. Shut down the key during the boot process and enter BIOS setup to pins 1-2. 3. Move the jumper cap from pins 1-2 (default) to overclocking, use the C.P.R. (CPU...
... jumper default position. Plug the power cord and turn ON the computer. 4. Turn OFF the computer and unplug the power cord. 2. Hold down and reboot the system so BIOS can clear the CMOS memory of date, time, and system setup parameters by the onboard button cell battery. For system failure due to pins 2-3. Shut down the key during the boot process and enter BIOS setup to pins 1-2. 3. Move the jumper cap from pins 1-2 (default) to overclocking, use the C.P.R. (CPU...
P4BP-MX User Manual
Page 24
... power mode) using the connected USB devices. P4BP-MX KBPWR1 2 1 +5V 3 2 +5VSB (Default) P4BP-MX Keyboard Power Setting 3. USB device wake-up the computer from S1 sleep mode (CPU stopped, DRAM refreshed, system running in the BIOS. Set to +5VSB to wake up from S3 and S4 sleep modes (no power to wake up (3-pin USBPWR_12, USBPWR_34, USBPWR_56) Set these jumpers to +5V to CPU, DRAM in slow refresh, power supply in sleep mode. 1-14 Chapter 1: Product introduction Otherwise, the system would not power up feature. 2. Keyboard power (3-pin KBPWR1) This jumper...
... power mode) using the connected USB devices. P4BP-MX KBPWR1 2 1 +5V 3 2 +5VSB (Default) P4BP-MX Keyboard Power Setting 3. USB device wake-up the computer from S1 sleep mode (CPU stopped, DRAM refreshed, system running in the BIOS. Set to +5VSB to wake up from S3 and S4 sleep modes (no power to wake up (3-pin USBPWR_12, USBPWR_34, USBPWR_56) Set these jumpers to +5V to CPU, DRAM in slow refresh, power supply in sleep mode. 1-14 Chapter 1: Product introduction Otherwise, the system would not power up feature. 2. Keyboard power (3-pin KBPWR1) This jumper...
P4BP-MX User Manual
Page 25
... configuration as shown in the following table. This port connects to your serial mouse and other audio sources. These two 4-pin Universal Serial Bus (USB) ports are available for a PS/2 keyboard. 1.10 Connectors This section describes and illustrates the motherboard rear panel and internal connectors. 1.10.1 Rear panel connectors 1 2 3 4 5 6 11 10 9 8 7 1. Line Out jack. Serial connector. RJ-45 port. Microphone jack. ASUS P4BP-MX motherboard 1-15 This green 6-pin connector is for connecting USB 2.0 devices. 8. USB 2.0 ports 1 and 2. VGA...
... configuration as shown in the following table. This port connects to your serial mouse and other audio sources. These two 4-pin Universal Serial Bus (USB) ports are available for a PS/2 keyboard. 1.10 Connectors This section describes and illustrates the motherboard rear panel and internal connectors. 1.10.1 Rear panel connectors 1 2 3 4 5 6 11 10 9 8 7 1. Line Out jack. Serial connector. RJ-45 port. Microphone jack. ASUS P4BP-MX motherboard 1-15 This green 6-pin connector is for connecting USB 2.0 devices. 8. USB 2.0 ports 1 and 2. VGA...

P4BP-MX User Manual
Page 32
... introduction System panel connector (20-1 pin PANEL) This connector accommodates several system front panel functions. Keyboard Lock Speaker Power LED Connector +5 V PLED Keylock Ground +5V Ground Ground Speaker ExtSMI# Ground PWR Ground Reset Ground P4BP-MX P4BP-MX System Panel Connectors Reset SW SMI Lead ATX Power Switch* * Requires an ATX power supply. • System Power LED Lead (2-pin PLED) This 2-pin connector connects to the case-mounted speaker and allows you turn on the BIOS or OS settings. Pressing the power switch turns the system between ON and SLEEP, or...
... introduction System panel connector (20-1 pin PANEL) This connector accommodates several system front panel functions. Keyboard Lock Speaker Power LED Connector +5 V PLED Keylock Ground +5V Ground Ground Speaker ExtSMI# Ground PWR Ground Reset Ground P4BP-MX P4BP-MX System Panel Connectors Reset SW SMI Lead ATX Power Switch* * Requires an ATX power supply. • System Power LED Lead (2-pin PLED) This 2-pin connector connects to the case-mounted speaker and allows you turn on the BIOS or OS settings. Pressing the power switch turns the system between ON and SLEEP, or...

P4BP-MX User Manual
Page 35
... disk AFLASH.EXE is a Flash Memory Writer utility that you typed . DO NOT shutdown or reset the system while updating the BIOS area! File not found , the following prompt appears if you downloaded from the ASUS website, then press . Doing so may cause system boot failure. 8. This file works only in the correct file name and press . 6. Copy AFLASH.EXE to update the main BIOS area. To create a bootable floppy disk...
... disk AFLASH.EXE is a Flash Memory Writer utility that you typed . DO NOT shutdown or reset the system while updating the BIOS area! File not found , the following prompt appears if you downloaded from the ASUS website, then press . Doing so may cause system boot failure. 8. This file works only in the correct file name and press . 6. Copy AFLASH.EXE to update the main BIOS area. To create a bootable floppy disk...
P4BP-MX User Manual
Page 40
... advanced features. EXIT Use this menu to configure the default system device used to "Run Setup". It is designed to make it as easy to use the Setup program, you may want to change the configuration of your computer in the CMOS RAM of the screen has a menu bar with the following BIOS setup screens and descriptions are installing a motherboard, reconfiguring your system, or prompted to locate and load the Operating System...
... advanced features. EXIT Use this menu to configure the default system device used to "Run Setup". It is designed to make it as easy to use the Setup program, you may want to change the configuration of your computer in the CMOS RAM of the screen has a menu bar with the following BIOS setup screens and descriptions are installing a motherboard, reconfiguring your system, or prompted to locate and load the Operating System...
P4BP-MX User Manual
Page 43
... ignored. Passwords are not case sensitive, meaning, passwords typed in .] Sets the type of conventional memory detected by erasing the CMOS Real Time Clock (RTC) RAM. Configuration options: [Disabled] [Enabled] Supervisor Password [Disabled] / User Password [Disabled] These fields allow you to the configuration fields. The same dialog box as opposed to erase the CMOS RAM, unplug the all the power cables and remove the button cell battery. The RAM data containing the password information is required to enter the BIOS Setup program...
... ignored. Passwords are not case sensitive, meaning, passwords typed in .] Sets the type of conventional memory detected by erasing the CMOS Real Time Clock (RTC) RAM. Configuration options: [Disabled] [Enabled] Supervisor Password [Disabled] / User Password [Disabled] These fields allow you to the configuration fields. The same dialog box as opposed to erase the CMOS RAM, unplug the all the power cables and remove the button cell battery. The RAM data containing the password information is required to enter the BIOS Setup program...

P4BP-MX User Manual
Page 45
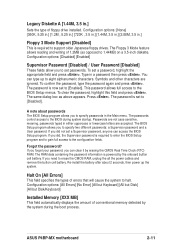
... (LBA) is enabled, the 28-bit addressing of sectors per track. To make changes to [Manual]. ASUS P4BP-MX motherboard 2-13 Other options for IDE devices not listed here After making your selections on the drive information you entered. for LS-120 compatible floppy disk drives [ZIP] - for the Type field are removing a drive and not replacing it, select [None]. Configuration options: [LBA] [LARGE] [Normal] [Match Partition Table] [Manual] Cylinders This field configures the number of...
... (LBA) is enabled, the 28-bit addressing of sectors per track. To make changes to [Manual]. ASUS P4BP-MX motherboard 2-13 Other options for IDE devices not listed here After making your selections on the drive information you entered. for LS-120 compatible floppy disk drives [ZIP] - for the Type field are removing a drive and not replacing it, select [None]. Configuration options: [LBA] [LARGE] [Normal] [Match Partition Table] [Manual] Cylinders This field configures the number of...
P4BP-MX User Manual
Page 46
...it manually. Configuration options: [0] [1] [2] [3] [4] Ultra DMA Mode [Disabled] Ultra DMA capability allows improved transfer speeds and data integrity for the drive. Multi-Sector Transfers [Maximum] This option automatically sets the number of sectors per block to enable or disable the S.M.A.R.T. (Self-Monitoring, Analysis and Reporting Technology) system that utilizes internal hard disk drive monitoring technology. Note that the drive supports. To make changes to [User Type HDD]. You may not always be the fastest value for compatible IDE devices. Configuration options...
...it manually. Configuration options: [0] [1] [2] [3] [4] Ultra DMA Mode [Disabled] Ultra DMA capability allows improved transfer speeds and data integrity for the drive. Multi-Sector Transfers [Maximum] This option automatically sets the number of sectors per block to enable or disable the S.M.A.R.T. (Self-Monitoring, Analysis and Reporting Technology) system that utilizes internal hard disk drive monitoring technology. Note that the drive supports. To make changes to [User Type HDD]. You may not always be the fastest value for compatible IDE devices. Configuration options...
P4BP-MX User Manual
Page 48
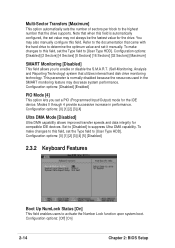
... installed DRAM of [Auto] allows the system to detect a PS/2 mouse at startup. When you set to [Disabled], the USB controller legacy mode is detected, the BIOS assigns IRQ12 to the default setting [Disabled]. Configuration options: [Disabled] [Enabled] 2-16 Chapter 2: BIOS Setup When set this option to turn on all processors during system bootup. When you set this field to [Enabled], the BIOS loads the update on or off the CPU Level 1 and Level 2 built-in cache. Configuration options: [Disabled] [Enabled] [Auto] OS/2 Onboard Memory > 64M [Disabled...
... installed DRAM of [Auto] allows the system to detect a PS/2 mouse at startup. When you set to [Disabled], the USB controller legacy mode is detected, the BIOS assigns IRQ12 to the default setting [Disabled]. Configuration options: [Disabled] [Enabled] 2-16 Chapter 2: BIOS Setup When set this option to turn on all processors during system bootup. When you set this field to [Enabled], the BIOS loads the update on or off the CPU Level 1 and Level 2 built-in cache. Configuration options: [Disabled] [Enabled] [Auto] OS/2 Onboard Memory > 64M [Disabled...
P4BP-MX User Manual
Page 50
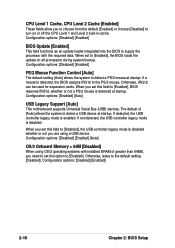
...] [High] [Maximum] 2-18 Chapter 2: BIOS Setup Set this feature frees the PCI bus when the CPU is accessing 8-bit ISA cards. Configuration options: [1X Mode] [4X Mode] Video Memory Cache Mode [UC] USWC (uncacheable, speculative write combining) is backward-compatible, so you may not boot. Configuration options: [UC] [USWC] Delay Transaction [Disabled] When set this to select broadcast transmission and reception standards. Configuration options: [Enabled] [Disabled] Graphics Aperture Size [128MB] This feature allows you to enable either the primary IDE channel or secondary IDE channel...
...] [High] [Maximum] 2-18 Chapter 2: BIOS Setup Set this feature frees the PCI bus when the CPU is accessing 8-bit ISA cards. Configuration options: [1X Mode] [4X Mode] Video Memory Cache Mode [UC] USWC (uncacheable, speculative write combining) is backward-compatible, so you may not boot. Configuration options: [UC] [USWC] Delay Transaction [Disabled] When set this to select broadcast transmission and reception standards. Configuration options: [Enabled] [Disabled] Graphics Aperture Size [128MB] This feature allows you to enable either the primary IDE channel or secondary IDE channel...

P4BP-MX User Manual
Page 52
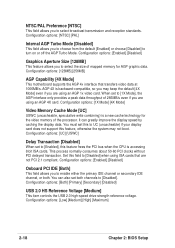
... of USB 1.1 controllers that you are using standard VGA cards, leave this field to [Enabled] corrects this problem. If you wish to select the I/O address for the game port. Configuration options: [Disabled] [3 Controllers] 2-20 Chapter 2: BIOS Setup The default setting for the MIDI port. Setting this field to select the I /O [Disabled] This field allows you are using any audio device. if no audio device is detected, the controller is [Auto], which utilizes auto-routing to determine IRQ assignments. Configuration options: [Disabled] [Enabled] PCI...
... of USB 1.1 controllers that you are using standard VGA cards, leave this field to [Enabled] corrects this problem. If you wish to select the I/O address for the game port. Configuration options: [Disabled] [3 Controllers] 2-20 Chapter 2: BIOS Setup The default setting for the MIDI port. Setting this field to select the I /O [Disabled] This field allows you are using any audio device. if no audio device is detected, the controller is [Auto], which utilizes auto-routing to determine IRQ assignments. Configuration options: [Disabled] [Enabled] PCI...
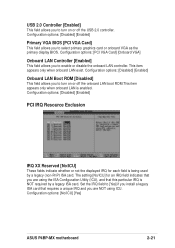
P4BP-MX User Manual
Page 53
... used by a legacy ISA card. USB 2.0 Controller [Enabled] This field allows you to turn on or off the onboard LAN boot ROM.This item appears only when onboard LAN is enabled. This item appears only when onboard LAN exist. Configuration options: [Disabled] [Enabled] Onboard LAN Boot ROM [Disabled] This field allows you to enable or disable the onboard LAN controller. The setting [No/ICU] for each field is NOT required by a legacy (non-PnP) ISA card. Configuration options: [No/ICU] [Yes] ASUS P4BP-MX motherboard 2-21 Configuration options: [Disabled] [Enabled] Primary VGA BIOS...
... used by a legacy ISA card. USB 2.0 Controller [Enabled] This field allows you to turn on or off the onboard LAN boot ROM.This item appears only when onboard LAN is enabled. This item appears only when onboard LAN exist. Configuration options: [Disabled] [Enabled] Onboard LAN Boot ROM [Disabled] This field allows you to enable or disable the onboard LAN controller. The setting [No/ICU] for each field is NOT required by a legacy (non-PnP) ISA card. Configuration options: [No/ICU] [Yes] ASUS P4BP-MX motherboard 2-21 Configuration options: [Disabled] [Enabled] Primary VGA BIOS...
P4BP-MX User Manual
Page 54
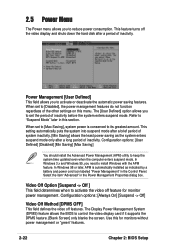
... in this menu. Configuration options: [User Defined] [Disabled] [Min Saving] [Max Saving] You should install the Advanced Power Management (APM) utility to install Windows with the APM feature. Power Management [User Defined] This field allows you to control the video display card if it supports the DPMS feature. [Blank Screen] only blanks the screen. Refer to activate the video off feature for monitors without power management or "green" features. 2-22 Chapter 2: BIOS Setup Select the...
... in this menu. Configuration options: [User Defined] [Disabled] [Min Saving] [Max Saving] You should install the Advanced Power Management (APM) utility to install Windows with the APM feature. Power Management [User Defined] This field allows you to control the video display card if it supports the DPMS feature. [Blank Screen] only blanks the screen. Refer to activate the video off feature for monitors without power management or "green" features. 2-22 Chapter 2: BIOS Setup Select the...
P4BP-MX User Manual
Page 62
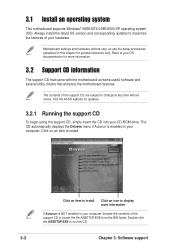
... NOT enabled in your hardware. Click an item to install Click an icon to display more information. 3.2 Support CD information The support CD that came with the motherboard contains useful software and several utility drivers that enhance the motherboard features. 3.1 Install an operating system This motherboard supports Windows® 98SE/NT4.0/ME/2000/XP operating system (OS). Always install the latest OS version and corresponding updates to locate the file...
... NOT enabled in your hardware. Click an item to install Click an icon to display more information. 3.2 Support CD information The support CD that came with the motherboard contains useful software and several utility drivers that enhance the motherboard features. 3.1 Install an operating system This motherboard supports Windows® 98SE/NT4.0/ME/2000/XP operating system (OS). Always install the latest OS version and corresponding updates to locate the file...
P4BP-MX User Manual
Page 63
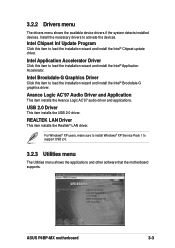
...'97 audio driver and applications. Intel Brookdale-G Graphics Driver Click this item to load the installation wizard and install the Intel® Chipset update driver. For Windows® XP users, make sure to install Windows® XP Service Pack 1 to activate the devices. ASUS P4BP-MX motherboard 3-3 3.2.2 Drivers menu The drivers menu shows the available device drivers if the system detects installed devices. Install the necessary drivers to support USB 2.0. 3.2.3 Utilities menu The Utilities menu shows the applications and other software that the motherboard supports. Intel...
...'97 audio driver and applications. Intel Brookdale-G Graphics Driver Click this item to load the installation wizard and install the Intel® Chipset update driver. For Windows® XP users, make sure to install Windows® XP Service Pack 1 to activate the devices. ASUS P4BP-MX motherboard 3-3 3.2.2 Drivers menu The drivers menu shows the available device drivers if the system detects installed devices. Install the necessary drivers to support USB 2.0. 3.2.3 Utilities menu The Utilities menu shows the applications and other software that the motherboard supports. Intel...
P4BP-MX User Manual
Page 64
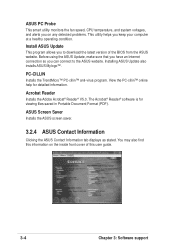
... help for viewing files saved in Portable Document Format (PDF). Acrobat Reader Installs the Adobe Acrobat® Reader® V5.0. Installing ASUS Update also installs ASUS Mylogo™. You may also find this user guide. 3-4 Chapter 3: Software support ASUS PC Probe This smart utility monitors the fan speed, CPU temperature, and system voltages, and alerts you on the inside front cover of the BIOS from the ASUS website. PC-CILLIN Installs the TrendMicro™...
... help for viewing files saved in Portable Document Format (PDF). Acrobat Reader Installs the Adobe Acrobat® Reader® V5.0. Installing ASUS Update also installs ASUS Mylogo™. You may also find this user guide. 3-4 Chapter 3: Software support ASUS PC Probe This smart utility monitors the fan speed, CPU temperature, and system voltages, and alerts you on the inside front cover of the BIOS from the ASUS website. PC-CILLIN Installs the TrendMicro™...


