
CUSL2-M User Manual
Page 8
... voltage all through BIOS setup when JumperFree™ mode is carefully designed for up to 512MB of 4 USB ports; Easy-to-use DIP switches instead of jumpers are included to allow manual adjustment of the PCI bus. • PC100/PC133 Memory Support: Equipped with 3D sound circuitry and sample rate conversion from 7kHz to support an external AGP or PCI graphics card. • AGP Pro Slot: Comes with a bandwidth...
... voltage all through BIOS setup when JumperFree™ mode is carefully designed for up to 512MB of 4 USB ports; Easy-to-use DIP switches instead of jumpers are included to allow manual adjustment of the PCI bus. • PC100/PC133 Memory Support: Equipped with 3D sound circuitry and sample rate conversion from 7kHz to support an external AGP or PCI graphics card. • AGP Pro Slot: Comes with a bandwidth...
CUSL2-M User Manual
Page 9
... turn OFF the power before plugging and unplugging devices so as CPU and systerm voltages, temperatures, and fan status through a new design, battery drain is used to access box with EPP and ECP capabilities. The onboard battery supports detection even when normal power is removed and through the onboard hardware ASUS ASIC and the bundled ASUS PC Probe or Intel LDCM software. • CNR Support: A Communication and Networking Riser (CNR) slot...
... turn OFF the power before plugging and unplugging devices so as CPU and systerm voltages, temperatures, and fan status through a new design, battery drain is used to access box with EPP and ECP capabilities. The onboard battery supports detection even when normal power is removed and through the onboard hardware ASUS ASIC and the bundled ASUS PC Probe or Intel LDCM software. • CNR Support: A Communication and Networking Riser (CNR) slot...
CUSL2-M User Manual
Page 11
..., the CPU, power supply, and system fans can be powered ON using your keyboard or mouse click. The onboard hardware ASUS ASIC in conjunction with either the bundled ASUS PC Probe or Intel LDCM will enter the Soft-Off mode. • Remote Ring On (requires modem): This allows a computer to be turned on remotely through BIOS setup to allow the computer to be monitored for future processors, so monitoring is necessary...
..., the CPU, power supply, and system fans can be powered ON using your keyboard or mouse click. The onboard hardware ASUS ASIC in conjunction with either the bundled ASUS PC Probe or Intel LDCM will enter the Soft-Off mode. • Remote Ring On (requires modem): This allows a computer to be turned on remotely through BIOS setup to allow the computer to be monitored for future processors, so monitoring is necessary...
CUSL2-M User Manual
Page 12
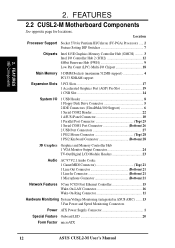
... Chipset 18 Main Memory 3 DIMM Sockets (maximum 512MB support 4 PC133 SDRAM support Expansion Slots 3 PCI Slots 17 1 Accelerated Graphics Port (AGP) Pro Slot 19 1 CNR Slot 14 System I/O 1 USB Header 8 1 Floppy Disk Drive Connector 5 2 IDE Connectors (UltraDMA/100 Support 6 1 Serial COM2 Header 22 1 ASUS iPanel Connector 10 1 Parallel Port Connector Top) 25 1 Serial COM1 Port Connector Bottom) 26 2 USB Port Connectors 27 1 PS/2 Mouse Connector Top) 28 1 PS/2 Keyboard Connector Bottom) 28 3D Graphics Graphics and Memory Controller Hub 1 VGA Monitor Output Connector 24 TV-Out...
... Chipset 18 Main Memory 3 DIMM Sockets (maximum 512MB support 4 PC133 SDRAM support Expansion Slots 3 PCI Slots 17 1 Accelerated Graphics Port (AGP) Pro Slot 19 1 CNR Slot 14 System I/O 1 USB Header 8 1 Floppy Disk Drive Connector 5 2 IDE Connectors (UltraDMA/100 Support 6 1 Serial COM2 Header 22 1 ASUS iPanel Connector 10 1 Parallel Port Connector Top) 25 1 Serial COM1 Port Connector Bottom) 26 2 USB Port Connectors 27 1 PS/2 Mouse Connector Top) 28 1 PS/2 Keyboard Connector Bottom) 28 3D Graphics Graphics and Memory Controller Hub 1 VGA Monitor Output Connector 24 TV-Out...
CUSL2-M User Manual
Page 15
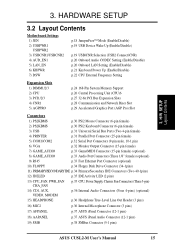
... Support p.26 Central Processing Unit (CPU)6 p.27 32-bit PCI Bus Expansion Slots p.28 Communication and Network Riser Slot p.29 Accelerated Graphics Port (AGP Pro) Slot Connectors 1) PS2KBMS p.30 PS/2 Mouse Connector (6-pin female) 2) PS2KBMS p.30 PS/2 Keyboard Connector (6-pin female) 3) USB p.31 Universal Serial Bus Ports (Two 4-pin female) 4) PRINTER p.31 Parallel Port Connector (25-pin female) 5) COM1/COM2 p.32 Serial Port Connectors (9-pin male, 10-1 pin) 6) VGA p.32 Monitor Output Connector (15-pin female) 7) GAME_AUDIO p.33 Game/MIDI Connector (15-pin female) (optional...
... Support p.26 Central Processing Unit (CPU)6 p.27 32-bit PCI Bus Expansion Slots p.28 Communication and Network Riser Slot p.29 Accelerated Graphics Port (AGP Pro) Slot Connectors 1) PS2KBMS p.30 PS/2 Mouse Connector (6-pin female) 2) PS2KBMS p.30 PS/2 Keyboard Connector (6-pin female) 3) USB p.31 Universal Serial Bus Ports (Two 4-pin female) 4) PRINTER p.31 Parallel Port Connector (25-pin female) 5) COM1/COM2 p.32 Serial Port Connectors (9-pin male, 10-1 pin) 6) VGA p.32 Monitor Output Connector (15-pin female) 7) GAME_AUDIO p.33 Game/MIDI Connector (15-pin female) (optional...
CUSL2-M User Manual
Page 17
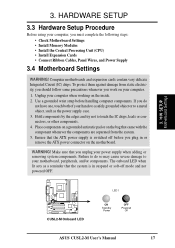
...! Use a grounded wrist strap before you plug in suspend or soft-off before handling computer components. Hold components by the edges and try not to your computer when working on the motherboard. Ensure that you must complete the following steps: • Check Motherboard Settings • Install Memory Modules • Install the Central Processing Unit (CPU) • Install Expansion Cards • Connect Ribbon Cables, Panel Wires, and Power Supply 3.4 Motherboard Settings...
...! Use a grounded wrist strap before you plug in suspend or soft-off before handling computer components. Hold components by the edges and try not to your computer when working on the motherboard. Ensure that you must complete the following steps: • Check Motherboard Settings • Install Memory Modules • Install the Central Processing Unit (CPU) • Install Expansion Cards • Connect Ribbon Cables, Panel Wires, and Power Supply 3.4 Motherboard Settings...
CUSL2-M User Manual
Page 24
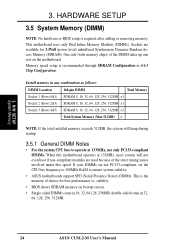
... Memory 3. HARDWARE SETUP 3.5 System Memory (DIMM) NOTE: No hardware or BIOS setup is recommended through SDRAM Configuration in 32, 64, 128, 256, 512MB. 24 ASUS CUSL2-M User's Manual This motherboard uses only Dual Inline Memory Modules (DIMMs). Memory speed setup is required after adding or removing memory. One side (with memory chips) of choice for 3.3Volt (power level) unbuffered Synchronous Dynamic Random Access Memory (SDRAM). double-sided come in any combination as follows: DIMM Location 168-pin...
... Memory 3. HARDWARE SETUP 3.5 System Memory (DIMM) NOTE: No hardware or BIOS setup is recommended through SDRAM Configuration in 32, 64, 128, 256, 512MB. 24 ASUS CUSL2-M User's Manual This motherboard uses only Dual Inline Memory Modules (DIMMs). Memory speed setup is required after adding or removing memory. One side (with memory chips) of choice for 3.3Volt (power level) unbuffered Synchronous Dynamic Random Access Memory (SDRAM). double-sided come in any combination as follows: DIMM Location 168-pin...
CUSL2-M User Manual
Page 27
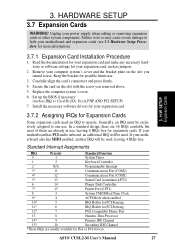
... damage to use , leaving 6 IRQs free for more information). 3. Read the documentation for your expansion card and make any necessary hardware or software settings for your motherboard and expansion cards (see 3.3 Hardware Setup Procedure for expansion cards. Replace the computer system's cover. 6. ASUS CUSL2-M User's Manual 27 3. HARDWARE SETUP 3.7 Expansion Cards WARNING! H/W SETUP Expansion Cards 3.7.1 Expansion Card Installation Procedure 1. erboard also has MIDI enabled, another IRQ will be exclusively assigned to operate. Carefully align the card's connectors and...
... damage to use , leaving 6 IRQs free for more information). 3. Read the documentation for your expansion card and make any necessary hardware or software settings for your motherboard and expansion cards (see 3.3 Hardware Setup Procedure for expansion cards. Replace the computer system's cover. 6. ASUS CUSL2-M User's Manual 27 3. HARDWARE SETUP 3.7 Expansion Cards WARNING! H/W SETUP Expansion Cards 3.7.1 Expansion Card Installation Procedure 1. erboard also has MIDI enabled, another IRQ will be exclusively assigned to operate. Carefully align the card's connectors and...
CUSL2-M User Manual
Page 30
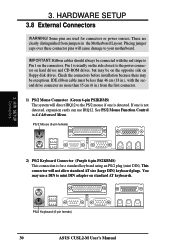
... installation because there may be connected with the second drive connector no more than 15 cm (6 in 4.4 Advanced Menu. See PS/2 Mouse Function Control in .) from jumpers in the Motherboard Layout. PS/2 Mouse (6-pin female) 3. You may use IRQ12. PS/2 Keyboard (6-pin female) 30 ASUS CUSL2-M User's Manual Pin 1 is detected. IDE ribbon cable must be exceptions. H/W SETUP Connectors 2) PS/2 Keyboard Connector (Purple 6-pin PS2KBMS) This connection is not detected, expansion cards can use a DIN to mini DIN adapter...
... installation because there may be connected with the second drive connector no more than 15 cm (6 in 4.4 Advanced Menu. See PS/2 Mouse Function Control in .) from jumpers in the Motherboard Layout. PS/2 Mouse (6-pin female) 3. You may use IRQ12. PS/2 Keyboard (6-pin female) 30 ASUS CUSL2-M User's Manual Pin 1 is detected. IDE ribbon cable must be exceptions. H/W SETUP Connectors 2) PS/2 Keyboard Connector (Purple 6-pin PS2KBMS) This connection is not detected, expansion cards can use a DIN to mini DIN adapter...

CUSL2-M User Manual
Page 34
... in the wrong orientation when using ribbon cables with pin 20 plugged). It is removed to the board, connect the two plugs on a SCSI drive and select the boot disk through 4.4.1 Advanced CMOS Setup. You may configure two hard disks to the secondary IDE connector. BIOS now supports specific device bootup (see 4.4.1 Advanced CMOS Setup). (Pin 20 is recommended that non-UltraDMA/100 devices be connected to be both Masters with pin 5 plugged). one operating system on an IDE...
... in the wrong orientation when using ribbon cables with pin 20 plugged). It is removed to the board, connect the two plugs on a SCSI drive and select the boot disk through 4.4.1 Advanced CMOS Setup. You may configure two hard disks to the secondary IDE connector. BIOS now supports specific device bootup (see 4.4.1 Advanced CMOS Setup). (Pin 20 is recommended that non-UltraDMA/100 devices be connected to be both Masters with pin 5 plugged). one operating system on an IDE...
CUSL2-M User Manual
Page 43
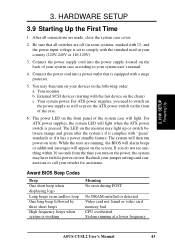
... power supplies, the system LED will light. HARDWARE SETUP 3.9 Starting Up the First Time 1. Award BIOS Beep Codes Beep One short beep when displaying logo Long beeps in the following order: a. H/W SETUP Powering Up 3. The power LED on the front panel of the system case will light when the ATX power switch is set to switch on the power supply as well as press the ATX power switch on your country (220V-240V or 110-120V). 3. Recheck your jumper settings and connections...
... power supplies, the system LED will light. HARDWARE SETUP 3.9 Starting Up the First Time 1. Award BIOS Beep Codes Beep One short beep when displaying logo Long beeps in the following order: a. H/W SETUP Powering Up 3. The power LED on the front panel of the system case will light when the ATX power switch is set to switch on the power supply as well as press the ATX power switch on your country (220V-240V or 110-120V). 3. Recheck your jumper settings and connections...

CUSL2-M User Manual
Page 65
...-way mode. BIOS SETUP UART2 Use Standard Infrared [Disabled] When enabled, this feature, Parallel Port Mode and ECP DMA Select configurations will no longer work if you to operate in bidirectional DMA mode; [ECP+EPP] allows normal speed operation in Parallel Port Mode above. This selection is available only if you select [Disabled] for the Onboard MIDI I /O Device Config ASUS CUSL2 User's Manual 65 Configuration options: [3] [4] [5] [7] [9] [10] [11] [12] [14] [15] 4. BIOS SETUP I /O field. Configuration options: [Disabled] [2E0...
...-way mode. BIOS SETUP UART2 Use Standard Infrared [Disabled] When enabled, this feature, Parallel Port Mode and ECP DMA Select configurations will no longer work if you to operate in bidirectional DMA mode; [ECP+EPP] allows normal speed operation in Parallel Port Mode above. This selection is available only if you select [Disabled] for the Onboard MIDI I /O Device Config ASUS CUSL2 User's Manual 65 Configuration options: [3] [4] [5] [7] [9] [10] [11] [12] [14] [15] 4. BIOS SETUP I /O field. Configuration options: [Disabled] [2E0...
CUSL2-M User Manual
Page 70
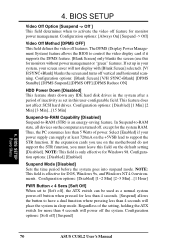
... (Display Power Management System) feature allows the BIOS to support the STR function. This feature does not affect SCSI hard drives. Configuration options: [Disabled] [1~2 Min] [2~3 Min]...[1 Hour] PWR Button < 4 Secs [Soft Off] When set to [Soft off], the ATX switch can be used as set up in this user-configurable field. BIOS SETUP Power Menu 70 ASUS CUSL2 User's Manual Configuration options: [Always On] [Suspend -> Off] Video Off Method [DPMS OFF] This field defines the video off ] [Suspend] 4. Configuration options...
... (Display Power Management System) feature allows the BIOS to support the STR function. This feature does not affect SCSI hard drives. Configuration options: [Disabled] [1~2 Min] [2~3 Min]...[1 Hour] PWR Button < 4 Secs [Soft Off] When set to [Soft off], the ATX switch can be used as set up in this user-configurable field. BIOS SETUP Power Menu 70 ASUS CUSL2 User's Manual Configuration options: [Always On] [Suspend -> Off] Video Off Method [DPMS OFF] This field defines the video off ] [Suspend] 4. Configuration options...
CUSL2-M User Manual
Page 74
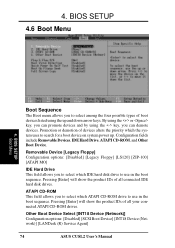
...ROM drives. Other Boot Device Select [INT18 Device (Network)] Configuration options: [Disabled] [SCSI Boot Device] [INT18 Device (Network)] [LANDesk (R) Service Agent] 74 ASUS CUSL2 User's Manual Pressing [Enter] will show the product IDs of boot devices listed using the key, you to select which ATAPI CD-ROM drive to search for a boot device on system power up and down arrow keys. Configuration fields include Removable Devices, IDE Hard Drive, ATAPI CD-ROM, and Other Boot Device. ATAPI CD-ROM This field allows you to use in the boot sequence. BIOS SETUP Boot Menu Boot...
...ROM drives. Other Boot Device Select [INT18 Device (Network)] Configuration options: [Disabled] [SCSI Boot Device] [INT18 Device (Network)] [LANDesk (R) Service Agent] 74 ASUS CUSL2 User's Manual Pressing [Enter] will show the product IDs of boot devices listed using the key, you to select which ATAPI CD-ROM drive to search for a boot device on system power up and down arrow keys. Configuration fields include Removable Devices, IDE Hard Drive, ATAPI CD-ROM, and Other Boot Device. ATAPI CD-ROM This field allows you to use in the boot sequence. BIOS SETUP Boot Menu Boot...
CUSL2-M User Manual
Page 82
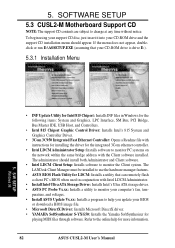
...'s fan, tem- S/W SETUP Windows 98 • INF Update Utility for the integrated 3Com ethernet controller. • Intel LDCM Administrator Setup: Installs software to monitor PC systems on the network within the same bridge address with Intel LDCM Administrator. • Install Intel Ultra ATA Storage Driver: Installs Intel's Ultra ATA storage driver. • ASUS PC Probe Vx.xx: Installs a utility to use the hardware manager features. • ASUS BIOS Flash Utility for LDCM: Installs a utility that your BIOS or download a BIOS image file...
...'s fan, tem- S/W SETUP Windows 98 • INF Update Utility for the integrated 3Com ethernet controller. • Intel LDCM Administrator Setup: Installs software to monitor PC systems on the network within the same bridge address with Intel LDCM Administrator. • Install Intel Ultra ATA Storage Driver: Installs Intel's Ultra ATA storage driver. • ASUS PC Probe Vx.xx: Installs a utility to use the hardware manager features. • ASUS BIOS Flash Utility for LDCM: Installs a utility that your BIOS or download a BIOS image file...

CUSL2-M User Manual
Page 117
... disk drives, printers and hand-held peripherals such as DVD, 3-D multiplayer gaming and interactive music. This enables the system to integrate power management features throughout a PC system, including hardware, operating system and application software. With this technology, peripherals will also be configured by the computer. The BIOS can have one of data used by the user through the BIOS Setup program. AGP (Accelerated Graphics Port) An interface specification...
... disk drives, printers and hand-held peripherals such as DVD, 3-D multiplayer gaming and interactive music. This enables the system to integrate power management features throughout a PC system, including hardware, operating system and application software. With this technology, peripherals will also be configured by the computer. The BIOS can have one of data used by the user through the BIOS Setup program. AGP (Accelerated Graphics Port) An interface specification...
CUSL2-M User Manual
Page 119
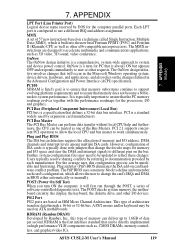
... video, 3D sound, video conference. Each LPT port is the first interface standard that change the card's IRQs and DMA in the Advanced Configuration and Power Interface (ACPI) specification. The POST checks system memory, the motherboard circuitry, the display, the keyboard, the diskette drive, and other requests. APPENDIX Glossary LPT Port (Line Printer Port) Logical device name reserved by expansion card manufacturers. Plug and play (PnP) BIOS eliminates the ISA add...
... video, 3D sound, video conference. Each LPT port is the first interface standard that change the card's IRQs and DMA in the Advanced Configuration and Power Interface (ACPI) specification. The POST checks system memory, the motherboard circuitry, the display, the keyboard, the diskette drive, and other requests. APPENDIX Glossary LPT Port (Line Printer Port) Logical device name reserved by expansion card manufacturers. Plug and play (PnP) BIOS eliminates the ISA add...

CUSL2-M User Manual
Page 121
... Loss Restart 71 Accelerated Graphics Port 29 Accessories Fast Ethernet Card 115 Adobe Acrobat Reader Installing 96 Adobe Acrobat Reader Setup 96 AGP 29 Alert On LAN 63 ASUS BIOS Flash Utility Installing 90 ASUS iPanel Connector 37 ASUS PC Probe Installing 91 Setup 91 Using 104 ASUS Update Installing 92 Setup 92 ATAPI CD-ROM 74 ATX Power Supply Connector 41 Audio Port Connectors 33 Automatic Power Up 72 B BIOS Beep Code 43 BIOS Beep Codes 43 Boot Sequence 74 Boot Up Floppy Seek 75 Boot Up NumLock Status 56...
... Loss Restart 71 Accelerated Graphics Port 29 Accessories Fast Ethernet Card 115 Adobe Acrobat Reader Installing 96 Adobe Acrobat Reader Setup 96 AGP 29 Alert On LAN 63 ASUS BIOS Flash Utility Installing 90 ASUS iPanel Connector 37 ASUS PC Probe Installing 91 Setup 91 Using 104 ASUS Update Installing 92 Setup 92 ATAPI CD-ROM 74 ATX Power Supply Connector 41 Audio Port Connectors 33 Automatic Power Up 72 B BIOS Beep Code 43 BIOS Beep Codes 43 Boot Sequence 74 Boot Up Floppy Seek 75 Boot Up NumLock Status 56...
CUSL2-M User Manual
Page 122
... PCI Audio 80 IDE Hard Drive 74 INF Update Utility 84, 85 E Installing 84 ECP DMA Select 65 Ethernet Card 115 Exit Discarding Changes 76 Exit Saving Changes 76 Expansion Cards AGP Pro 29 Assigning IRQs 27 Installation CPU 26 Installed Memory 57 Installing Adobe Acrobat Reader 96 ASUS BIOS Flash Utility 90 ASUS PC Probe 91 ASUS Update 92 F CyberLink PowerDVD 99 CyberLink PowerPlayer SE 99 Fast-Ethernet Port Connector 33 Floppy 3 Mode Support 52 Floppy Disk Access Control 64 Floppy Disk Drive Connector 34 Graphic Control Driver...
... PCI Audio 80 IDE Hard Drive 74 INF Update Utility 84, 85 E Installing 84 ECP DMA Select 65 Ethernet Card 115 Exit Discarding Changes 76 Exit Saving Changes 76 Expansion Cards AGP Pro 29 Assigning IRQs 27 Installation CPU 26 Installed Memory 57 Installing Adobe Acrobat Reader 96 ASUS BIOS Flash Utility 90 ASUS PC Probe 91 ASUS Update 92 F CyberLink PowerDVD 99 CyberLink PowerPlayer SE 99 Fast-Ethernet Port Connector 33 Floppy 3 Mode Support 52 Floppy Disk Access Control 64 Floppy Disk Drive Connector 34 Graphic Control Driver...
CUSL2-M User Manual
Page 123
... Port Mode 65 PC Probe Using 104 PC-Cillin 98 Installing 95 Setup 95 PCI 2.1 Support 63 PCI Latency Timer 66 PCI/VGA Palette Snoop 66 PIO Mode 55 Plug & Play O/S 75 Power Fan Speed 73 Power Management 69 PowerDVD 112 Using 112 PowerPlayer SE Using 111 Procedure CPU Installation 26 Procedures Updating BIOS 46 Processor Serial Number 59 PS/2 Keyboard Connector 30 PS/2 Mouse Connector 30 PWR Button < 4 Secs 70 PWR Up On Modem Act 71 Q Quick Power On Self Test 75 R Removable Device...
... Port Mode 65 PC Probe Using 104 PC-Cillin 98 Installing 95 Setup 95 PCI 2.1 Support 63 PCI Latency Timer 66 PCI/VGA Palette Snoop 66 PIO Mode 55 Plug & Play O/S 75 Power Fan Speed 73 Power Management 69 PowerDVD 112 Using 112 PowerPlayer SE Using 111 Procedure CPU Installation 26 Procedures Updating BIOS 46 Processor Serial Number 59 PS/2 Keyboard Connector 30 PS/2 Mouse Connector 30 PWR Button < 4 Secs 70 PWR Up On Modem Act 71 Q Quick Power On Self Test 75 R Removable Device...


