Asus ExpertCenter E500 G9 Support and Manuals
Get Help and Manuals for this Asus item
View All Support Options Below
Free Asus ExpertCenter E500 G9 manuals!
Problems with Asus ExpertCenter E500 G9?
Ask a Question
Free Asus ExpertCenter E500 G9 manuals!
Problems with Asus ExpertCenter E500 G9?
Ask a Question
Popular Asus ExpertCenter E500 G9 Manual Pages
E500 G9 English User Manual - Page 11
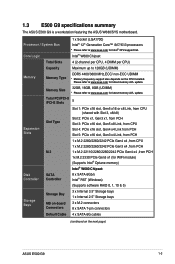
1.3 E500 G9 specifications summary
The ASUS E500 G9 is a workstation featuring the ASUS W680/SYS motherboard. Processor / System Bus Core Logic
1 x Socket (LGA1700) Intel® 12th Generation Core™ i9/i7/i5/i3 processors * Please refer to www.asus.com for Intel® CPU support list. Memory Size
32GB, 16GB, 8GB (UDIMM)
* Please refer to www.asus.com for...
E500 G9 English User Manual - Page 13
ASUS E500 G9
1-5 E500 G9 specifications summary
OS Support
Windows® 11 Pro for the latest OS support. Management Software
ASUS Control Center support
Regulatory Compliance
BSMI, CE, FCC, Energy Star
423 mm x 190 mm x 435 mm Dimension (HH x WW x DD)
16.7" x 7.48" x 17.1"
Net Weight Kg (CPU, DRAM & ...
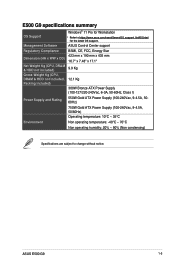
E500 G9 English User Manual - Page 15
... OUT
REAR
2.5G C/SUB
MIC IN LINE OUT LINE IN KY
Single power supply
120 mm x 120 mm system fan vents
PCIe latch Expansion slots
ASUS E500 G9
1-7 1.5 Rear panel features
The rear panel includes a slot for the motherboard rear I/O ports, expansion slots, a vent for the system fan, and the power supply...
E500 G9 English User Manual - Page 16
...
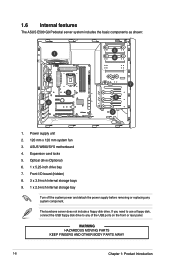
The ASUS E500 G9 Pedestal server system includes the basic components as shown:
1. Front I/O board (hidden) 8. 3 x 3.5-inch Internal storage bays 9. 1 x 2.5-inch Internal storage bay
Turn off the system power and detach the power supply before removing or replacing any of the USB ports on the front or rear panel. WARNING HAZARDOUS MOVING PARTS KEEP...
E500 G9 English User Manual - Page 33
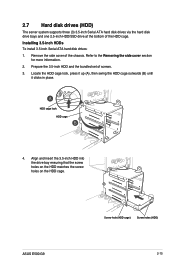
HDD cage lock HDD cage
4. ASUS E500 G9
Screw hole (HDD cage) Screw holes (HDD) ... the screw holes on the HDD cage. 2.7 Hard disk drives (HDD)
The server system supports three (3) 3.5-inch Serial ATA hard disk drives via the hard disk drive bays and one .... Prepare the 3.5-inch HDD and the bundled set of screws. 3.
Installing 3.5-inch HDDs To install 3.5-inch Serial ATA hard disk drives: 1.
E500 G9 English User Manual - Page 35
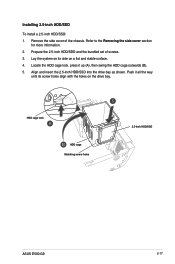
Prepare the 2.5-inch HDD/SDD and the bundled set of the chassis. Locate the HDD cage lock, press it all the way
until its...up (A), then swing the HDD cage outwards (B). 5. HDD cage lock
HDD cage Matching screw holes
2.5-inch HDD/SSD
ASUS E500 G9
2-17 Installing 2.5-inch HDD/SSD
To install a 2.5-inch HDD/SSD: 1. Align and insert the 2.5-inch HDD/SSD into the drive bay as shown. Refer...
E500 G9 English User Manual - Page 37
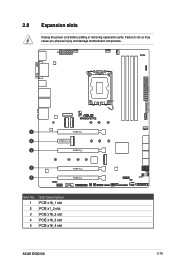
Slot No. 1 2 3 4 5
Slot Description PCIE x16_1 slot PCIE x1_2 slot PCIE x16_2 slot PCIE x16_3 slot PCIE x16_4 slot
ASUS E500 G9
2-19
Failure to do so may cause you physical injury and damage motherboard components. 2.8 Expansion slots
Unplug the power cord before adding or removing expansion cards.
E500 G9 English User Manual - Page 39
PCIe latch
ASUS E500 G9
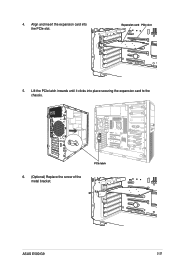
2-21 Lift the PCIe latch inwards until it clicks into the PCIe slot. Align and insert the expansion card into place securing the expansion card to the chassis.
6. (Optional) Replace the screw of the metal bracket. Expansion card PCIe slot
5.
4.
E500 G9 English User Manual - Page 41
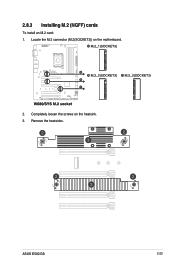
Locate the M.2 connector (M.2(SOCKET3)) on the heatsink. 3.
2.8.3 Installing M.2 (NGFF) cards
To install an M.2 card: 1. Remove the heatsinks. ASUS E500 G9
2-23 Completely loosen the screws on the motherboard.
2.
E500 G9 English User Manual - Page 43
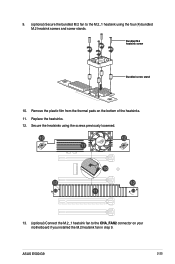
Replace the heatsinks. 12.
ASUS E500 G9
2-25 Remove the plastic film from the thermal pads on your motherboard if you installed the M.2 heatsink fan in step 9.
Bundled M.2 heatsink screw
Bundled screw stand
10. Secure the heatsinks using the screws previously loosened.
13. (optional) Connect the M.2_1 ...
E500 G9 English User Manual - Page 45
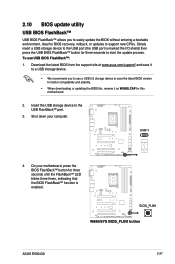
... the support site at www.asus.com/support/ and save the latest BIOS version for better compatibility and stability.
• When downloading or updating the BIOS file, rename it
to a USB storage device.
• We recommend you to use USB BIOS FlashBack™: 1. Insert the USB storage device to start the update process. ASUS E500 G9
2-27...
E500 G9 English User Manual - Page 47
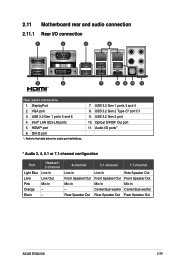
... Front Speaker Out Mic In Center/Sub woofer Rear Speaker Out
Side Speaker Out Front Speaker Out Mic In Center/Sub woofer Rear Speaker Out
ASUS E500 G9
2-29 USB 3.2 Gen 2 port 10. VGA port 3. USB 3.2 Gen 1 ports 5 and 6 4. USB 3.2 Gen 1 ports 3 and 4 8. Optical S/PDIF Out port 11. Intel® LAN I225...
E500 G9 English User Manual - Page 49

Connect to 4-channel Speakers Connect to 5.1-channel Speakers Connect to 7.1-channel Speakers
ASUS E500 G9
2-31
E500 G9 English User Manual - Page 137
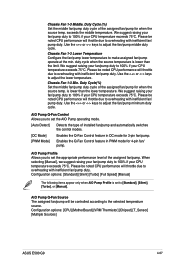
...is set the AIO Pump operating...Cycle(%)
Set the middle fan/pump duty cycle of installed fan/pump... selecting [Manual], we suggest raising your fan...Manual]
The following items appear only when AIO Pump Profile is lower than the lower temperature.
We suggest raising your fan/pump duty to set...176;C. Duty Cycle (%)
Set the middle fan/pump... Pump Profile
Allows you to set to overheating with inefficient fan/...
E500 G9 English User Manual - Page 171

Out of the Architectural Protocols are found Invalid password Error loading Boot Option (LoadImage returned error) Boot Option is failed (StartImage returned error) Flash update is failed Reset protocol is not available
ASUS E500 G9
A-5 Code A5 A6 A7 A8 A9 AA AB AC AD AE AF B0 B1 B2 B3 B4 B5 B6 B7 B8- BF D0 D1...
Asus ExpertCenter E500 G9 Reviews
We have not received any reviews for Asus yet.