
CUWE-RM User Manual
Page 4
... 53 4.4 Advanced Menu 58 4.4.1 Chip Configuration 62 4.4.2 I/O Device Configuration 65 4.4.3 PCI Configuration 67 4.4.4 Shadow Configuration 70 4 ASUS CUWE-RM User's Manual INTRODUCTION 7 1.1 How This Manual Is Organized 7 1.2 Item Checklist 7 2. HARDWARE SETUP 14 3.1 Motherboard Layout 14...Unit (CPU 26 3.7 Expansion Cards 27 3.7.1 Expansion Card Installation Procedure 27 3.7.2 Assigning IRQs for Expansion Cards 28 3.7.3 Audio Modem Riser (AMR) Slot 30 3.8 External Connectors 31 3.9 Starting Up the First Time 43 4. CONTENTS 1. FEATURES 8 2.1 The ASUS CUWE-RM Motherboard 8...
... 53 4.4 Advanced Menu 58 4.4.1 Chip Configuration 62 4.4.2 I/O Device Configuration 65 4.4.3 PCI Configuration 67 4.4.4 Shadow Configuration 70 4 ASUS CUWE-RM User's Manual INTRODUCTION 7 1.1 How This Manual Is Organized 7 1.2 Item Checklist 7 2. HARDWARE SETUP 14 3.1 Motherboard Layout 14...Unit (CPU 26 3.7 Expansion Cards 27 3.7.1 Expansion Card Installation Procedure 27 3.7.2 Assigning IRQs for Expansion Cards 28 3.7.3 Audio Modem Riser (AMR) Slot 30 3.8 External Connectors 31 3.9 Starting Up the First Time 43 4. CONTENTS 1. FEATURES 8 2.1 The ASUS CUWE-RM Motherboard 8...
CUWE-RM User Manual
Page 9
... Analog Device's 3D sound circuitry, sample rate conversion from 7kHz to -digital conversions, which provides more control and protection over the motherboard. ASUS CUWE-RM User's Manual 9 Programmable BIOS (Flash EEPROM), offering enhanced ACPI for virtually automatic setup. • Smart BIOS! 4Mbit firmware gives a ... digital flat panel (analog flat panel must be connected to the VGA-out connector) to guide you through the ASUS ASIC. Provides Vcore and CPU/ SDRAM frequency adjustments, boot block write protection, and HD/SCSI/MO/ ZIP/CD/Floppy boot selection. Includes complete ...
... Analog Device's 3D sound circuitry, sample rate conversion from 7kHz to -digital conversions, which provides more control and protection over the motherboard. ASUS CUWE-RM User's Manual 9 Programmable BIOS (Flash EEPROM), offering enhanced ACPI for virtually automatic setup. • Smart BIOS! 4Mbit firmware gives a ... digital flat panel (analog flat panel must be connected to the VGA-out connector) to guide you through the ASUS ASIC. Provides Vcore and CPU/ SDRAM frequency adjustments, boot block write protection, and HD/SCSI/MO/ ZIP/CD/Floppy boot selection. Includes complete ...
CUWE-RM User Manual
Page 10
...existing ATA-2 IDE specifications so there is compatible with two connectors that you do not fall asleep waiting for a SNR (signal to CPU. • SDRAM Optimized Performance! Both the BIOS and hardware levels of +90dB. Fast 3D graphics engine allows for future operating ...to noise ratio) of the motherboard meet PC'99 compliancy. ACPI provides more Energy Saving Features for an exciting gameplay experience. 10 ASUS CUWE-RM User's Manual The integrated motion compensation allows for systems and components are based on all the energy saving standards. 2. Supports UltraDMA/...
...existing ATA-2 IDE specifications so there is compatible with two connectors that you do not fall asleep waiting for a SNR (signal to CPU. • SDRAM Optimized Performance! Both the BIOS and hardware levels of +90dB. Fast 3D graphics engine allows for future operating ...to noise ratio) of the motherboard meet PC'99 compliancy. ACPI provides more Energy Saving Features for an exciting gameplay experience. 10 ASUS CUWE-RM User's Manual The integrated motion compensation allows for systems and components are based on all the energy saving standards. 2. Supports UltraDMA/...
CUWE-RM User Manual
Page 11
...information from anywhere in . FEATURES 2.1.4 Intelligence • Fan Status Monitoring and Alarm! Voltage specifications are set for RPM and failure. ASUS CUWE-RM User's Manual 11 To prevent system overheat and system damage, this benefit on remotely through BIOS setup to allow the computer to the ... and run large applications. Suspend or Sleep) button or as the "Standby" (a.k.a. To prevent system overheat and system damage, the CPU, power supply, and system fans can be monitored for its normal RPM range and alarm thresholds. • Temperature Monitoring and Alert!...
...information from anywhere in . FEATURES 2.1.4 Intelligence • Fan Status Monitoring and Alarm! Voltage specifications are set for RPM and failure. ASUS CUWE-RM User's Manual 11 To prevent system overheat and system damage, this benefit on remotely through BIOS setup to allow the computer to the ... and run large applications. Suspend or Sleep) button or as the "Standby" (a.k.a. To prevent system overheat and system damage, the CPU, power supply, and system fans can be monitored for its normal RPM range and alarm thresholds. • Temperature Monitoring and Alert!...
CUWE-RM User Manual
Page 15
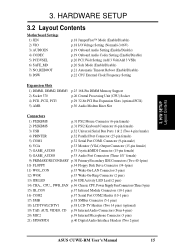
... Setting (Add 3 Volt/Add 3 VSB) p.20 Safe Mode (Enable/Disable) p.21 Automatic Timeout Reboot (Enable/Disable) p.22 CPU External Clock Frequency Setting Expansion Slots 1) DIMM1, DIMM2, DIMM3 2) Socket 370 4) PCI1, PCI2, PCI3 5) AMR p.25 168...On-Ring Connector (2 pins) 13) IDELED p.36 IDE Activity LED Lead (2 pins) 14) CHA_, CPU_, PWR_FAN p.36 Chassis, CPU, Power Supply Fan Connectors (Three 3-pin) 15) IR_CON p.37 Infrared Module Connectors (10-1 pins) 16) COM2 p.37 Serial Port... (3 pins) 21) SPD0/SPD1 p.40 Digital Audio Interface Headers (Two 2-pins) ASUS CUWE-RM User's Manual 15
... Setting (Add 3 Volt/Add 3 VSB) p.20 Safe Mode (Enable/Disable) p.21 Automatic Timeout Reboot (Enable/Disable) p.22 CPU External Clock Frequency Setting Expansion Slots 1) DIMM1, DIMM2, DIMM3 2) Socket 370 4) PCI1, PCI2, PCI3 5) AMR p.25 168...On-Ring Connector (2 pins) 13) IDELED p.36 IDE Activity LED Lead (2 pins) 14) CHA_, CPU_, PWR_FAN p.36 Chassis, CPU, Power Supply Fan Connectors (Three 3-pin) 15) IR_CON p.37 Infrared Module Connectors (10-1 pins) 16) COM2 p.37 Serial Port... (3 pins) 21) SPD0/SPD1 p.40 Digital Audio Interface Headers (Two 2-pins) ASUS CUWE-RM User's Manual 15
CUWE-RM User Manual
Page 17
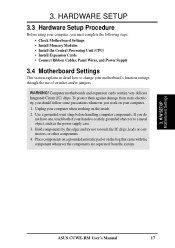
WARNING! Unplug your computer when working on your computer. 1. H/W SETUP Motherboard Settings ASUS CUWE-RM User's Manual 17 To protect them against damage from the system. 3. HARDWARE SETUP 3.3 Hardware Setup Procedure Before using your ...change your computer, you must complete the following steps: • Check Motherboard Settings • Install Memory Modules • Install the Central Processing Unit (CPU) • Install Expansion Cards • Connect Ribbon Cables, Panel Wires, and Power Supply 3.4 Motherboard Settings This section explains in detail how to ...
WARNING! Unplug your computer when working on your computer. 1. H/W SETUP Motherboard Settings ASUS CUWE-RM User's Manual 17 To protect them against damage from the system. 3. HARDWARE SETUP 3.3 Hardware Setup Procedure Before using your ...change your computer, you must complete the following steps: • Check Motherboard Settings • Install Memory Modules • Install the Central Processing Unit (CPU) • Install Expansion Cards • Connect Ribbon Cables, Panel Wires, and Power Supply 3.4 Motherboard Settings This section explains in detail how to ...

CUWE-RM User Manual
Page 18
...It is strongly recommended that you to the DRAM, chipset, PCI, and the CPU's I /O Voltage Setting WARNING! Setting Normal 3.66V VIO [1-2] (default) [2-3] CUWE-RM ® VIO 123 Normal (Default) 123 3.66 Volt CUWE-RM I /O buffer. The JumperFree™ mode allows processor settings to OFF for JumperFree... This jumper allows you leave this setting on its default. 18 ASUS CUWE-RM User's Manual H/W SETUP Motherboard Settings CUWE-RM ® 123 DSW ON 12345 123 OFF Jumper Mode JumperFree Mode JEN CUWE-RM JumperFree™ Mode Setting 2) I/O Voltage Setting (VIO) This ...
...It is strongly recommended that you to the DRAM, chipset, PCI, and the CPU's I /O Voltage Setting WARNING! Setting Normal 3.66V VIO [1-2] (default) [2-3] CUWE-RM ® VIO 123 Normal (Default) 123 3.66 Volt CUWE-RM I /O buffer. The JumperFree™ mode allows processor settings to OFF for JumperFree... This jumper allows you leave this setting on its default. 18 ASUS CUWE-RM User's Manual H/W SETUP Motherboard Settings CUWE-RM ® 123 DSW ON 12345 123 OFF Jumper Mode JumperFree Mode JEN CUWE-RM JumperFree™ Mode Setting 2) I/O Voltage Setting (VIO) This ...

CUWE-RM User Manual
Page 22
... processor does not have no effect. Be sure that the DIMM you must be stable. HARDWARE SETUP 8) CPU External Frequency Setting (DSW) This option tells the clock generator what frequency to send to be possible. 22 ASUS CUWE-RM User's Manual H/W SETUP Motherboard Settings 3. The CPU External Frequency multiplied by the Frequency Multiple equals the...
... processor does not have no effect. Be sure that the DIMM you must be stable. HARDWARE SETUP 8) CPU External Frequency Setting (DSW) This option tells the clock generator what frequency to send to be possible. 22 ASUS CUWE-RM User's Manual H/W SETUP Motherboard Settings 3. The CPU External Frequency multiplied by the Frequency Multiple equals the...

CUWE-RM User Manual
Page 23
... recommended. Overclocking can result in system instability or even shortening the life of the SDRAM. For updated processor settings, please visit ASUS' web site (see ASUS CONTACT INFORMATION) ASUS CUWE-RM User's Manual 23 CPU SDRAM (MHz) (MHz) 69 103 70 105 71 106 66 100 72 108 75 112 76 114 85 127 112 112...
... recommended. Overclocking can result in system instability or even shortening the life of the SDRAM. For updated processor settings, please visit ASUS' web site (see ASUS CONTACT INFORMATION) ASUS CUWE-RM User's Manual 23 CPU SDRAM (MHz) (MHz) 69 103 70 105 71 106 66 100 72 108 75 112 76 114 85 127 112 112...

CUWE-RM User Manual
Page 26
... Bus Frequency and Multiple (frequency multiple setting is required to a 90-degree angle. Socket 370 CPU (Top) Socket 370 CPU (Bottom) Celeron CUWE-RM ® Notch Coppermine CUWE-RM Socket 370 Gold Arrow 26 ASUS CUWE-RM User's Manual HARDWARE SETUP 3.6 Central Processing Unit (CPU) The motherboard provides a ZIF Socket 370. Be careful not to scrape the motherboard when mounting...
... Bus Frequency and Multiple (frequency multiple setting is required to a 90-degree angle. Socket 370 CPU (Top) Socket 370 CPU (Bottom) Celeron CUWE-RM ® Notch Coppermine CUWE-RM Socket 370 Gold Arrow 26 ASUS CUWE-RM User's Manual HARDWARE SETUP 3.6 Central Processing Unit (CPU) The motherboard provides a ZIF Socket 370. Be careful not to scrape the motherboard when mounting...

CUWE-RM User Manual
Page 36
...LED Lead (2-pin IDELED) This connector supplies power to the motherboard and/or the CPU fan if these pins are not jumpers, do not place jumper caps over these pins. H/W SETUP Connectors CUWE-RM ® TIP: If the case-mounted LED does not light, try reversing the...12V Rotation Chassis Fan Power Rotation +12V GND Power Supply Fan Power GND +12V Rotation CUWE-RM 12-Volt Cooling Fan Power 36 ASUS CUWE-RM User's Manual IDELED CUWE-RM IDE Activity LED 14) Chassis,CPU,&PowerSupplyFanConnectors(3-pinCHA_,CPU_,PWR_FAN) These connectors support cooling fans of the connector. Depending on the...
...LED Lead (2-pin IDELED) This connector supplies power to the motherboard and/or the CPU fan if these pins are not jumpers, do not place jumper caps over these pins. H/W SETUP Connectors CUWE-RM ® TIP: If the case-mounted LED does not light, try reversing the...12V Rotation Chassis Fan Power Rotation +12V GND Power Supply Fan Power GND +12V Rotation CUWE-RM 12-Volt Cooling Fan Power 36 ASUS CUWE-RM User's Manual IDELED CUWE-RM IDE Activity LED 14) Chassis,CPU,&PowerSupplyFanConnectors(3-pinCHA_,CPU_,PWR_FAN) These connectors support cooling fans of the connector. Depending on the...

CUWE-RM User Manual
Page 43
... system case will appear on the front of your system case according to your retailer for assistance. While the tests are running at a lower frequency ASUS CUWE-RM User's Manual 43 If you do not see anything within 30 seconds from the time you need to switch on the power supply as well... the ATX power switch is working Meaning No error during POST No DRAM installed or detected Video card not found or video card memory bad CPU overheated System running , the BIOS will alarm beeps or additional messages will light. For ATX power supplies, you turn on the back of the case...
... system case will appear on the front of your system case according to your retailer for assistance. While the tests are running at a lower frequency ASUS CUWE-RM User's Manual 43 If you do not see anything within 30 seconds from the time you need to switch on the power supply as well... the ATX power switch is working Meaning No error during POST No DRAM installed or detected Video card not found or video card memory bad CPU overheated System running , the BIOS will alarm beeps or additional messages will light. For ATX power supplies, you turn on the back of the case...

CUWE-RM User Manual
Page 58
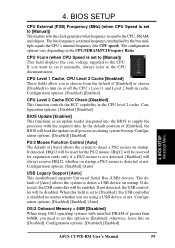
... Multiples of 100 frequency of 100 and 133 are available options in conjunction with CPU External (FSB) Frequency to the limitation of (for unlocked processors only. CPU Frequency Multiple (when CPU Speed is set in the popup menu. This must be able to access this...[Manual] to make changes to allow a 66MHz Multiples of your CPU. BIOS SETUP 4.4 Advanced Menu 4. If you will not be set to the local bus and PCI devices onboard. Configuration options: [4/6/2] [6/6/1.5] [6/6/2] [8/6/2] 58 ASUS CUWE-RM User's Manual 4. The bus frequency (external frequency) multiplied by the...
... Multiples of 100 frequency of 100 and 133 are available options in conjunction with CPU External (FSB) Frequency to the limitation of (for unlocked processors only. CPU Frequency Multiple (when CPU Speed is set in the popup menu. This must be able to access this...[Manual] to make changes to allow a 66MHz Multiples of your CPU. BIOS SETUP 4.4 Advanced Menu 4. If you will not be set to the local bus and PCI devices onboard. Configuration options: [4/6/2] [6/6/1.5] [6/6/2] [8/6/2] 58 ASUS CUWE-RM User's Manual 4. The bus frequency (external frequency) multiplied by the...
CUWE-RM User Manual
Page 59
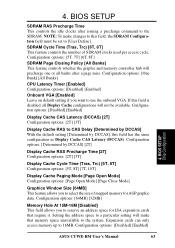
.... Configuration options: [Disabled] [Enabled] 4. BIOS SETUP Advanced Menu ASUS CUWE-RM User's Manual 59 The configuration options vary depending on startup. When this field is disabled no matter whether you to choose from the default of [Auto] allows the system to the CPU. CPU Level 1 Cache, CPU Level 2 Cache [Enabled] These fields allow you are using...
.... Configuration options: [Disabled] [Enabled] 4. BIOS SETUP Advanced Menu ASUS CUWE-RM User's Manual 59 The configuration options vary depending on startup. When this field is disabled no matter whether you to choose from the default of [Auto] allows the system to the CPU. CPU Level 1 Cache, CPU Level 2 Cache [Enabled] These fields allow you are using...

CUWE-RM User Manual
Page 60
... will then automatically take you to the Advanced menu with unlocked frequency multiplier 60 ASUS CUWE-RM User's Manual BIOS SETUP JumperFree Mode For processors with locked frequency multiplier For processors with a popup menu of 66MHz and a fail-safe CPU internal frequency (4x66MHz for the Intel Coppermine processor or 2x66MHz for non-Coppermine processors...
... will then automatically take you to the Advanced menu with unlocked frequency multiplier 60 ASUS CUWE-RM User's Manual BIOS SETUP JumperFree Mode For processors with locked frequency multiplier For processors with a popup menu of 66MHz and a fail-safe CPU internal frequency (4x66MHz for the Intel Coppermine processor or 2x66MHz for non-Coppermine processors...

CUWE-RM User Manual
Page 61
Cause for Hangup: Improper CPU Internal Frequency Cause for Hangup: Improper CPU Frequency Multiple (For processors with unlocked frequency multiplier only) Cause for Hangup: Improper FSB/SDRAM/PCI Freq. 4. BIOS SETUP System Hangup If your system crashes or hangs due to improper frequency settings, power OFF your system and restart. The system will start up in safe mode running at a bus speed of 66MHz and enter BIOS setup. Ratio or CPU External (FSB) Freq. (MHz) 4. BIOS SETUP JumperFree Mode ASUS CUWE-RM User's Manual 61
Cause for Hangup: Improper CPU Internal Frequency Cause for Hangup: Improper CPU Frequency Multiple (For processors with unlocked frequency multiplier only) Cause for Hangup: Improper FSB/SDRAM/PCI Freq. 4. BIOS SETUP System Hangup If your system crashes or hangs due to improper frequency settings, power OFF your system and restart. The system will start up in safe mode running at a bus speed of 66MHz and enter BIOS setup. Ratio or CPU External (FSB) Freq. (MHz) 4. BIOS SETUP JumperFree Mode ASUS CUWE-RM User's Manual 61
CUWE-RM User Manual
Page 63
...number of mapped memory for ISA expansion cards that memory space unavailable to the system. Configuration options: [One Bank] [All Banks] CPU Latency Timer [Enabled] Configuration options: [Disabled] [Enabled] Onboard VGA [Enabled] Leave on default setting if you to this field, ...). Configuration options: [Determined by DCCAS], this field is disabled, all banks after issuing a precharge command to 16MB. BIOS SETUP Chip Configuration ASUS CUWE-RM User's Manual 63 Configuration options: [64MB] [32MB] Memory Hole At 15M-16M [Disabled] This field allows you want to [User Define...
...number of mapped memory for ISA expansion cards that memory space unavailable to the system. Configuration options: [One Bank] [All Banks] CPU Latency Timer [Enabled] Configuration options: [Disabled] [Enabled] Onboard VGA [Enabled] Leave on default setting if you to this field, ...). Configuration options: [Determined by DCCAS], this field is disabled, all banks after issuing a precharge command to 16MB. BIOS SETUP Chip Configuration ASUS CUWE-RM User's Manual 63 Configuration options: [64MB] [32MB] Memory Hole At 15M-16M [Disabled] This field allows you want to [User Define...
CUWE-RM User Manual
Page 75
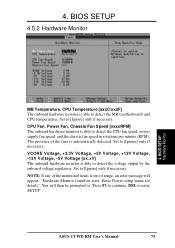
... speed, power supply fan speed, and the chassis fan speed in rotations per minute (RPM). ASUS CUWE-RM User's Manual 75 CPU Fan, Power Fan, Chassis Fan Speed [xxxxRPM] The onboard hardware monitor is able to enter SETUP". Set to [Ignore] only if necessary. The presence of ...range, an error message will then be prompted to "Press F1 to continue, DEL to detect the MB (motherboard) and CPU temperatures. NOTE: If any of the monitored items is out of the fans is able to [Ignore] only if necessary. Set to detect the voltage...
... speed, power supply fan speed, and the chassis fan speed in rotations per minute (RPM). ASUS CUWE-RM User's Manual 75 CPU Fan, Power Fan, Chassis Fan Speed [xxxxRPM] The onboard hardware monitor is able to enter SETUP". Set to [Ignore] only if necessary. The presence of ...range, an error message will then be prompted to "Press F1 to continue, DEL to detect the MB (motherboard) and CPU temperatures. NOTE: If any of the monitored items is out of the fans is able to [Ignore] only if necessary. Set to detect the voltage...

CUWE-RM User Manual
Page 83
...Exit Main Menu (home button only on other screens) Exit allows you to fill and print out when you to the main menu of the ASUS Support CD. User's Manual displays the motherboard user's manual in pdf format. Home returns you run E:\ASSETUP.EXE (assuming that your CD-...notice. If the menu does not appear, double click or run into your motherboard, BIOS, and CPU. ASUS CUWE-RM User's Manual 83 Technical Support Form opens up a file containing additional notes. SOFTWARE SETUP 5.3 ASUS Smart Motherboard Support CD NOTE: The support CD contents are subject to see the contents of the ...
...Exit Main Menu (home button only on other screens) Exit allows you to fill and print out when you to the main menu of the ASUS Support CD. User's Manual displays the motherboard user's manual in pdf format. Home returns you run E:\ASSETUP.EXE (assuming that your CD-...notice. If the menu does not appear, double click or run into your motherboard, BIOS, and CPU. ASUS CUWE-RM User's Manual 83 Technical Support Form opens up a file containing additional notes. SOFTWARE SETUP 5.3 ASUS Smart Motherboard Support CD NOTE: The support CD contents are subject to see the contents of the ...

CUWE-RM User Manual
Page 105
...to continuously monitor your computer system's vital components, such as hard disk space, memory usage, and CPU type, CPU speed, and internal/external frequencies through the DMI Explorer. 6.2.1 Starting ASUS PC Probe When ASUS PC Probe starts, a splash screen appears allowing you to select whether or not to show the screen... execution check box. Clicking the icon will appear on the taskbar's system tray indicating that lets you to Programs, and then ASUS Utility, and then click Probe Vx.xx. ASUS CUWE-RM User's Manual 105 SOFTWARE REFERENCE 6.2 ASUS PC Probe ASUS PC Probe is running.
...to continuously monitor your computer system's vital components, such as hard disk space, memory usage, and CPU type, CPU speed, and internal/external frequencies through the DMI Explorer. 6.2.1 Starting ASUS PC Probe When ASUS PC Probe starts, a splash screen appears allowing you to select whether or not to show the screen... execution check box. Clicking the icon will appear on the taskbar's system tray indicating that lets you to Programs, and then ASUS Utility, and then click Probe Vx.xx. ASUS CUWE-RM User's Manual 105 SOFTWARE REFERENCE 6.2 ASUS PC Probe ASUS PC Probe is running.


