
CUWE-RM User Manual
Page 2
...in the manual revision number. For previous or updated manuals, BIOS, drivers, or product release information, contact ASUS at http://www.asus.com.tw or through any means, except documentation kept by ASUS; IN NO EVENT SHALL ASUS, ITS DIRECTORS, OFFICERS, EMPLOYEES OR AGENTS BE LIABLE FOR... by the digit before and after the period of the manual revision number. Product Name: Manual Revision: Release Date: ASUS CUWE-RM 1.01 E474 November 1999 2 ASUS CUWE-RM User's Manual Product warranty or service will not be extended if: (1) the product is repaired, modified or altered, ...
...in the manual revision number. For previous or updated manuals, BIOS, drivers, or product release information, contact ASUS at http://www.asus.com.tw or through any means, except documentation kept by ASUS; IN NO EVENT SHALL ASUS, ITS DIRECTORS, OFFICERS, EMPLOYEES OR AGENTS BE LIABLE FOR... by the digit before and after the period of the manual revision number. Product Name: Manual Revision: Release Date: ASUS CUWE-RM 1.01 E474 November 1999 2 ASUS CUWE-RM User's Manual Product warranty or service will not be extended if: (1) the product is repaired, modified or altered, ...

CUWE-RM User Manual
Page 4
... of the Computer System 45 4.1.2 Updating BIOS Procedures 46 4.2 BIOS Setup Program 49 4.2.1 BIOS Menu Bar 50 4.2.2 Legend Bar 50 4.3 Main Menu 52 4.3.1 Primary & Secondary Master/Slave 53 4.4 Advanced Menu 58 4.4.1 Chip Configuration 62 4.4.2 I/O Device Configuration 65 4.4.3 PCI Configuration 67 4.4.4 Shadow Configuration 70 4 ASUS CUWE-RM User's Manual CONTENTS 1. FEATURES 8 2.1 The ASUS CUWE-RM Motherboard 8 2.1.1 Specifications 8 2.1.2 Optional Components 9 2.1.3 Performance...
... of the Computer System 45 4.1.2 Updating BIOS Procedures 46 4.2 BIOS Setup Program 49 4.2.1 BIOS Menu Bar 50 4.2.2 Legend Bar 50 4.3 Main Menu 52 4.3.1 Primary & Secondary Master/Slave 53 4.4 Advanced Menu 58 4.4.1 Chip Configuration 62 4.4.2 I/O Device Configuration 65 4.4.3 PCI Configuration 67 4.4.4 Shadow Configuration 70 4 ASUS CUWE-RM User's Manual CONTENTS 1. FEATURES 8 2.1 The ASUS CUWE-RM Motherboard 8 2.1.1 Specifications 8 2.1.2 Optional Components 9 2.1.3 Performance...

CUWE-RM User Manual
Page 7
... checklist 2) FEATURES Product information and specifications 3) HARDWARE SETUP Instructions on setting up the motherboard 4) BIOS SETUP Instructions on setting up the BIOS software 5) SOFTWARE SETUP Instructions on setting up the included software 6) SOFTWARE REFERENCE Reference material for the... connector with bracket LCD connector with bracket (for LCD model only) ASUS IrDA-compliant infrared module (optional) ASUS consumer infrared set (optional) ASUS PCI-L101 Wake-On-LAN 10/100 ethernet card (optional) ASUS CUWE-RM User's Manual 7 INTRODUCTION Sections/Checklist 1. 1.
... checklist 2) FEATURES Product information and specifications 3) HARDWARE SETUP Instructions on setting up the motherboard 4) BIOS SETUP Instructions on setting up the BIOS software 5) SOFTWARE SETUP Instructions on setting up the included software 6) SOFTWARE REFERENCE Reference material for the... connector with bracket LCD connector with bracket (for LCD model only) ASUS IrDA-compliant infrared module (optional) ASUS consumer infrared set (optional) ASUS PCI-L101 Wake-On-LAN 10/100 ethernet card (optional) ASUS CUWE-RM User's Manual 7 INTRODUCTION Sections/Checklist 1. 1.

CUWE-RM User Manual
Page 8
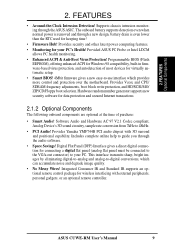
... BIOS setup when JumperFree™ mode is carefully designed for 2D graphics. • ASUS Graphics Driver! Easy-to-use DIP switches instead of the standard graphics driver (2D high-end graphics WinMark) using ASUS' custom graphics driver. FEATURES 2.1 The ASUS CUWE-RM Motherboard The CUWE-RM motherboard from ASUS is... features in cards. • Multi-Cache! Audio Modem Riser slot supports a very affordable audio and/or modem riser card. 8 ASUS CUWE-RM User's Manual PCI supports up to 17MB/s. • Peripheral Wake-Up! Onboard 4MB 32-bit 133MHz SDRAM display cache allows up...
... BIOS setup when JumperFree™ mode is carefully designed for 2D graphics. • ASUS Graphics Driver! Easy-to-use DIP switches instead of the standard graphics driver (2D high-end graphics WinMark) using ASUS' custom graphics driver. FEATURES 2.1 The ASUS CUWE-RM Motherboard The CUWE-RM motherboard from ASUS is... features in cards. • Multi-Cache! Audio Modem Riser slot supports a very affordable audio and/or modem riser card. 8 ASUS CUWE-RM User's Manual PCI supports up to 17MB/s. • Peripheral Wake-Up! Onboard 4MB 32-bit 133MHz SDRAM display cache allows up...
CUWE-RM User Manual
Page 9
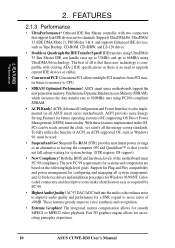
... supports detection even when normal power is removed and through a new design, battery drain is even lower than the RTC used for your PC. Programmable BIOS (Flash EEPROM), offering enhanced ACPI for connecting a digital flat panel (analog flat panel must be connected to the VGA-out connector) to 48kHz. • PCI... Internet transactions. 2.1.2 Optional Components The following onboard components are optional at the time of most devices for wireless interfacing with 3D surrond and positional capability. ASUS CUWE-RM User's Manual 9
... supports detection even when normal power is removed and through a new design, battery drain is even lower than the RTC used for your PC. Programmable BIOS (Flash EEPROM), offering enhanced ACPI for connecting a digital flat panel (analog flat panel must be connected to the VGA-out connector) to 48kHz. • PCI... Internet transactions. 2.1.2 Optional Components The following onboard components are optional at the time of most devices for wireless interfacing with 3D surrond and positional capability. ASUS CUWE-RM User's Manual 9
CUWE-RM User Manual
Page 10
..., and 32-bit device drivers and installation procedures for future operating systems (OS) supporting OS Direct Power Management (OSPM) functionality. ASUS smart series motherboards support the new generation memory, Synchronous Dynamic Random Access Memory (SDRAM), which increases the data transfer rate to 800MB...you do not fall asleep waiting for an exciting gameplay experience. 10 ASUS CUWE-RM User's Manual IDE transfers using UltraDMA/ 33 Bus Master IDE can be used. • Suspend and Go! Both the BIOS and hardware levels of +90dB. Onboard IDE Bus Master controller with ...
..., and 32-bit device drivers and installation procedures for future operating systems (OS) supporting OS Direct Power Management (OSPM) functionality. ASUS smart series motherboards support the new generation memory, Synchronous Dynamic Random Access Memory (SDRAM), which increases the data transfer rate to 800MB...you do not fall asleep waiting for an exciting gameplay experience. 10 ASUS CUWE-RM User's Manual IDE transfers using UltraDMA/ 33 Bus Master IDE can be used. • Suspend and Go! Both the BIOS and hardware levels of +90dB. Onboard IDE Bus Master controller with ...
CUWE-RM User Manual
Page 11
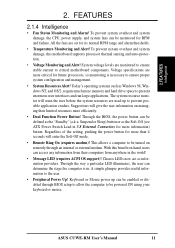
All the fans are monitored to ensure stable current to critical motherboard components. Through the BIOS, the power button can determine the stage the computer is necessary to present enormous user interfaces and run large applications. A simple glimpse provides... • Remote Ring On (requires modem)! This allows a computer to be defined as information providers. ASUS CUWE-RM User's Manual 11 To prevent system overheat and system damage, this benefit on remotely through BIOS setup to allow the computer to be turned on -hand, users can access any information from anywhere in...
All the fans are monitored to ensure stable current to critical motherboard components. Through the BIOS, the power button can determine the stage the computer is necessary to present enormous user interfaces and run large applications. A simple glimpse provides... • Remote Ring On (requires modem)! This allows a computer to be defined as information providers. ASUS CUWE-RM User's Manual 11 To prevent system overheat and system damage, this benefit on remotely through BIOS setup to allow the computer to be turned on -hand, users can access any information from anywhere in...

CUWE-RM User Manual
Page 18
... CUWE-RM I /O buffer. H/W SETUP Motherboard Settings CUWE-RM ® 123 DSW ON 12345 123 OFF Jumper Mode JumperFree Mode JEN CUWE-RM JumperFree™ Mode Setting 2) I/O Voltage Setting (VIO) This jumper allows you to be used unless processor overclocking requires a higher voltage. The default voltage should be made through the BIOS ...PCI, and the CPU's I /O Voltage Setting WARNING! It is strongly recommended that you leave this setting on its default. 18 ASUS CUWE-RM User's Manual 3. Setting JEN Disable (Jumper) [1-2] (default) Enable (JumperFree) [2-3] 3.
... CUWE-RM I /O buffer. H/W SETUP Motherboard Settings CUWE-RM ® 123 DSW ON 12345 123 OFF Jumper Mode JumperFree Mode JEN CUWE-RM JumperFree™ Mode Setting 2) I/O Voltage Setting (VIO) This jumper allows you to be used unless processor overclocking requires a higher voltage. The default voltage should be made through the BIOS ...PCI, and the CPU's I /O Voltage Setting WARNING! It is strongly recommended that you leave this setting on its default. 18 ASUS CUWE-RM User's Manual 3. Setting JEN Disable (Jumper) [1-2] (default) Enable (JumperFree) [2-3] 3.

CUWE-RM User Manual
Page 20
... this case, there is possible through motherboard settings or BIOS setup. In this jumper to Enable 3 VSB. If this occurs, enable Safe Mode to PCI devices. 3. Setting Normal Safe Mode SAFE_MD [1-2] (default) [2-3] CUWE-RM ® CUWE-RM Safe Mode Setting SAFE_MD 3 2 1 Normal (Default) 3 2 1 Safe Mode 20 ASUS CUWE-RM User's Manual If you to select the voltage supplied...
... this case, there is possible through motherboard settings or BIOS setup. In this jumper to Enable 3 VSB. If this occurs, enable Safe Mode to PCI devices. 3. Setting Normal Safe Mode SAFE_MD [1-2] (default) [2-3] CUWE-RM ® CUWE-RM Safe Mode Setting SAFE_MD 3 2 1 Normal (Default) 3 2 1 Safe Mode 20 ASUS CUWE-RM User's Manual If you to select the voltage supplied...

CUWE-RM User Manual
Page 21
3. HARDWARE SETUP 7) Automatic Timeout Reboot Setting (NO_REBOOT) The motherboard is repeating ineffectively, set so that when the BIOS detects a hang (timeout) during bootup, the motherboard will automatically reboot. If rebooting is set this jumper to No Reboot to disable auto-reboot. Setting Normal No Reboot NO_REBOOT [1-2] (default) [2-3] CUWE-RM ® CUWE-RM Reboot Setting NO_REBOOT 3 2 1 Normal (Default) 3 2 1 No Reboot 3. H/W SETUP Motherboard Settings ASUS CUWE-RM User's Manual 21
3. HARDWARE SETUP 7) Automatic Timeout Reboot Setting (NO_REBOOT) The motherboard is repeating ineffectively, set so that when the BIOS detects a hang (timeout) during bootup, the motherboard will automatically reboot. If rebooting is set this jumper to No Reboot to disable auto-reboot. Setting Normal No Reboot NO_REBOOT [1-2] (default) [2-3] CUWE-RM ® CUWE-RM Reboot Setting NO_REBOOT 3 2 1 Normal (Default) 3 2 1 No Reboot 3. H/W SETUP Motherboard Settings ASUS CUWE-RM User's Manual 21

CUWE-RM User Manual
Page 22
HARDWARE SETUP 8) CPU External Frequency Setting (DSW) This option tells the clock generator what frequency to send to be possible. 22 ASUS CUWE-RM User's Manual IMPORTANT: When JumperFree mode is locked, setting the Frequency Multiple in 4.4 Advanced Menu). CPU frequencies above 66MHz exceed the... the Frequency Multiple equals the CPU's Internal frequency (the advertised CPU speed). NOTE: In JumperFree mode, all DIP switches (DSW) must use BIOS setup in 4.4 Advanced Menu of the CPU's External frequency. DSW ON ON ON 12345 CPU → 66MHz SDRAM → 100MHz ON 12345...
HARDWARE SETUP 8) CPU External Frequency Setting (DSW) This option tells the clock generator what frequency to send to be possible. 22 ASUS CUWE-RM User's Manual IMPORTANT: When JumperFree mode is locked, setting the Frequency Multiple in 4.4 Advanced Menu). CPU frequencies above 66MHz exceed the... the Frequency Multiple equals the CPU's Internal frequency (the advertised CPU speed). NOTE: In JumperFree mode, all DIP switches (DSW) must use BIOS setup in 4.4 Advanced Menu of the CPU's External frequency. DSW ON ON ON 12345 CPU → 66MHz SDRAM → 100MHz ON 12345...

CUWE-RM User Manual
Page 24
... under this User's Manual was written, 256MB DIMMs are generally thinner with higher pin density than EDO (Extended Data Output) chips. • BIOS shows SDRAM memory on bootup screen. • Single-sided DIMMs come in 4.4.1 Chip Configuration. double-sided come in any combination as Double-Sided... support SPD (Serial Presence Detect) DIMMs. This is recommended through SDRAM Configuration in 32, 64, 128, 256MB. 24 ASUS CUWE-RM User's Manual stability. • SDRAM chips are only available as follows: Location 168-pin DIMM SDRAM Total Memory DIMM1 Single-Sided (Rows...
... under this User's Manual was written, 256MB DIMMs are generally thinner with higher pin density than EDO (Extended Data Output) chips. • BIOS shows SDRAM memory on bootup screen. • Single-sided DIMMs come in 4.4.1 Chip Configuration. double-sided come in any combination as Double-Sided... support SPD (Serial Presence Detect) DIMMs. This is recommended through SDRAM Configuration in 32, 64, 128, 256MB. 24 ASUS CUWE-RM User's Manual stability. • SDRAM chips are only available as follows: Location 168-pin DIMM SDRAM Total Memory DIMM1 Single-Sided (Rows...

CUWE-RM User Manual
Page 27
Failure to do so may cause severe damage to use . 3. Set up the BIOS if necessary (such as jumpers or switches. 2. Make sure that you removed above. 5. Secure the card on the slot with screw on the slot you ... card's connectors and press firmly. 4. Keep the bracket for your power supply when adding or removing expansion cards or other system components. H/W SETUP Expansion Cards ASUS CUWE-RM User's Manual 27 HARDWARE SETUP 3.7 Expansion Cards WARNING! 3. Install the necessary software drivers for possible future use .
Failure to do so may cause severe damage to use . 3. Set up the BIOS if necessary (such as jumpers or switches. 2. Make sure that you removed above. 5. Secure the card on the slot with screw on the slot you ... card's connectors and press firmly. 4. Keep the bracket for your power supply when adding or removing expansion cards or other system components. H/W SETUP Expansion Cards ASUS CUWE-RM User's Manual 27 HARDWARE SETUP 3.7 Expansion Cards WARNING! 3. Install the necessary software drivers for possible future use .

CUWE-RM User Manual
Page 34
... to prevent inserting in the wrong orientation when using ribbon cables with pin 5 plugged). 3. BIOS now supports specific device bootup (see Boot Sequence in 4.6 Boot Menu). (Pin 20 is removed to PIN 1 PIN 1 CUWE-RM Floppy Disk Drive Connector 34 ASUS CUWE-RM User's Manual HARDWARE SETUP 9) Primary / Secondary IDE Connectors (40-1 pin PRIMARY/SECONDARY) These...
... to prevent inserting in the wrong orientation when using ribbon cables with pin 5 plugged). 3. BIOS now supports specific device bootup (see Boot Sequence in 4.6 Boot Menu). (Pin 20 is removed to PIN 1 PIN 1 CUWE-RM Floppy Disk Drive Connector 34 ASUS CUWE-RM User's Manual HARDWARE SETUP 9) Primary / Secondary IDE Connectors (40-1 pin PRIMARY/SECONDARY) These...

CUWE-RM User Manual
Page 43
...or switch between orange and green after the system's if it has a power standby feature. While the tests are running at a lower frequency ASUS CUWE-RM User's Manual 43 H/W SETUP Powering Up 3. Your system power. If you do not see anything within 30 seconds from the time you need... or additional messages will light when the ATX power switch is equipped with "green" standards or if it complies with a surge protector. 5. Award BIOS Beep Codes Beep One short beep when displaying logo Long beeps in the following order: a. HARDWARE SETUP 3.9 Starting Up the First Time 1. 3....
...or switch between orange and green after the system's if it has a power standby feature. While the tests are running at a lower frequency ASUS CUWE-RM User's Manual 43 H/W SETUP Powering Up 3. Your system power. If you do not see anything within 30 seconds from the time you need... or additional messages will light when the ATX power switch is equipped with "green" standards or if it complies with a surge protector. 5. Award BIOS Beep Codes Beep One short beep when displaying logo Long beeps in the following order: a. HARDWARE SETUP 3.9 Starting Up the First Time 1. 3....

CUWE-RM User Manual
Page 44
...: The message "You can press the ATX power switch after Windows shuts down the computer? Follow the instructions in 4. HARDWARE SETUP 7. H/W SETUP Powering Up 44 ASUS CUWE-RM User's Manual BIOS SETUP. * Powering Off your computer: You must first exit or shut down to enter...
...: The message "You can press the ATX power switch after Windows shuts down the computer? Follow the instructions in 4. HARDWARE SETUP 7. H/W SETUP Powering Up 44 ASUS CUWE-RM User's Manual BIOS SETUP. * Powering Off your computer: You must first exit or shut down to enter...

CUWE-RM User Manual
Page 45
... lefthand corner of the original motherboard BIOS along with DOS prompt in DOS mode. ASUS CUWE-RM User's Manual 45 Type FORMAT A:/S at the DOS prompt to the disk. 2. NOTE: BIOS setup must specify "Floppy" as the first item in DOS mode. BIOS SETUP Updating BIOS IMPORTANT! Reboot your hard drive.... If "unknown" is displayed after Flash Memory:, the memory chip is either not programmable or is not supported by the ACPI BIOS and therefore, cannot be loaded when you reboot using a floppy. 3. This file works only in the boot sequence. 4. Type COPY D:\AFLASH\...
... lefthand corner of the original motherboard BIOS along with DOS prompt in DOS mode. ASUS CUWE-RM User's Manual 45 Type FORMAT A:/S at the DOS prompt to the disk. 2. NOTE: BIOS setup must specify "Floppy" as the first item in DOS mode. BIOS SETUP Updating BIOS IMPORTANT! Reboot your hard drive.... If "unknown" is displayed after Flash Memory:, the memory chip is either not programmable or is not supported by the ACPI BIOS and therefore, cannot be loaded when you reboot using a floppy. 3. This file works only in the boot sequence. 4. Type COPY D:\AFLASH\...

CUWE-RM User Manual
Page 46
... you have problems with your motherboard and you created earlier. 2. BIOS SETUP Updating BIOS 46 ASUS CUWE-RM User's Manual Download an updated ASUS BIOS file from the disk you created earlier. 3. At the "A:\" prompt, type AFLASH and then press . 4. Boot from the Internet (WWW or FTP) (see ASUS CONTACT INFORMATION on page 3 for details) and save to...
... you have problems with your motherboard and you created earlier. 2. BIOS SETUP Updating BIOS 46 ASUS CUWE-RM User's Manual Download an updated ASUS BIOS file from the disk you created earlier. 3. At the "A:\" prompt, type AFLASH and then press . 4. Boot from the Internet (WWW or FTP) (see ASUS CONTACT INFORMATION on page 3 for details) and save to...

CUWE-RM User Manual
Page 47
...and if the problem still persists, update the original BIOS file you encounter problems while updating the new BIOS, DO NOT turn off your system since this happens, your system from booting up . BIOS SETUP Updating BIOS WARNING! If this might prevent your system may ...saved to boot up. The utility starts to continue. 4. Follow the onscreen instructions to program the new BIOS information into the flash ROM. ASUS CUWE-RM User's Manual 47 When prompted to confirm the BIOS update, press Y to start the update. 7. 4. When the programming is finished, Flashed Successfully will...
...and if the problem still persists, update the original BIOS file you encounter problems while updating the new BIOS, DO NOT turn off your system since this happens, your system from booting up . BIOS SETUP Updating BIOS WARNING! If this might prevent your system may ...saved to boot up. The utility starts to continue. 4. Follow the onscreen instructions to program the new BIOS information into the flash ROM. ASUS CUWE-RM User's Manual 47 When prompted to confirm the BIOS update, press Y to start the update. 7. 4. When the programming is finished, Flashed Successfully will...
CUWE-RM User Manual
Page 48
BIOS SETUP (This page was intentionally left blank.) 4. BIOS SETUP Updating BIOS 48 ASUS CUWE-RM User's Manual 4.
BIOS SETUP (This page was intentionally left blank.) 4. BIOS SETUP Updating BIOS 48 ASUS CUWE-RM User's Manual 4.


