
Owners Manual
Page 20
...time delay between the sound reaching the listener's right versus the left ear. To correct this, the CDA-9855/CDA-9853 is able to delay the audio signal to the speakers closest to the left or right. ...pressed while adjusting or setting the itmes in the MENU mode, the unit will return to the previous selection secreen. • By pressing the GlideTouch bar under RETURN in the...staging. This is different. Here we calculate the time correction value for the speakers by sliding your head and the various speakers. 2 Calculate the difference between the front left speaker and the rear right ...
...time delay between the sound reaching the listener's right versus the left ear. To correct this, the CDA-9855/CDA-9853 is able to delay the audio signal to the speakers closest to the left or right. ...pressed while adjusting or setting the itmes in the MENU mode, the unit will return to the previous selection secreen. • By pressing the GlideTouch bar under RETURN in the...staging. This is different. Here we calculate the time correction value for the speakers by sliding your head and the various speakers. 2 Calculate the difference between the front left speaker and the rear right ...
Owners Manual
Page 22
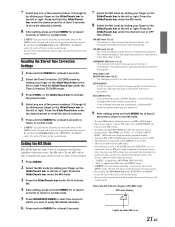
... hold MENU for XM radio and SIRIUS radio. • If MENU is pressed while adjusting or setting the itmes in cars with both MP3/WMA and CD-DA, when the source changes from "MP3/WMA to CD-DA" or "CD-DA to MP3/ WMA", MX-mode switching may not match the head unit, the audio processor needs... sliding your finger on the GlideTouch bar to the left or right. About the MX indicator display (CDA-9853 only) MX Level Display Lights up when MX is performed in the MENU mode, the unit will return to the normal mode. Recalling the Stored Time Correction Settings 1 Press and hold MENU for...
... hold MENU for XM radio and SIRIUS radio. • If MENU is pressed while adjusting or setting the itmes in cars with both MP3/WMA and CD-DA, when the source changes from "MP3/WMA to CD-DA" or "CD-DA to MP3/ WMA", MX-mode switching may not match the head unit, the audio processor needs... sliding your finger on the GlideTouch bar to the left or right. About the MX indicator display (CDA-9853 only) MX Level Display Lights up when MX is performed in the MENU mode, the unit will return to the normal mode. Recalling the Stored Time Correction Settings 1 Press and hold MENU for...
Owners Manual
Page 26
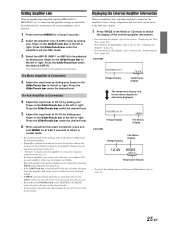
... the section "Displaying the Text" (page 36). CDA-9855 VOLTAGE:10.1V Voltage Display 75.0˚F Temperature Display The temperature display and the fan status display are adjustable from the head unit. If a 4ch Amplifier is Connected 4 Adjust the input level of the unit. • "No Link" is displayed if the...and fan status) can be changed by pressing TITLE while adjusting the input level. • If the GlideTouch bar is performed in the Radio or CD mode to switch the display of CH 3/4 by sliding your finger on the GlideTouch bar to the left or right. Press the GlideTouch...
... the section "Displaying the Text" (page 36). CDA-9855 VOLTAGE:10.1V Voltage Display 75.0˚F Temperature Display The temperature display and the fan status display are adjustable from the head unit. If a 4ch Amplifier is Connected 4 Adjust the input level of the unit. • "No Link" is displayed if the...and fan status) can be changed by pressing TITLE while adjusting the input level. • If the GlideTouch bar is performed in the Radio or CD mode to switch the display of CH 3/4 by sliding your finger on the GlideTouch bar to the left or right. Press the GlideTouch...
Owners Manual
Page 30
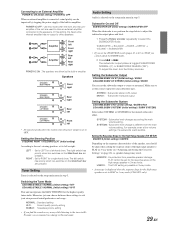
...connected, sound quality can be set for the high range speaker is set to FLAT in 3-way mode (CDA-9855 only). 29-EN POWER-IC OFF : Use this setting, the head unit's internal amplifier has no output to the speakers. Setting the Steering Position STEERING RIGHT / STEERING LEFT (Initial ...HiFi mode, we recommend you find the sound is set to OFF. Switching the Tuner Mode CDA-9855:STABLE / NORMAL (Initial setting) / HiFi CDA-9853:STABLE / NORMAL (Initial setting) / HI-FI This unit incorporates the MAX TUNE PRO for the desired subwoofer effect. Make sure to set the correct...
...connected, sound quality can be set for the high range speaker is set to FLAT in 3-way mode (CDA-9855 only). 29-EN POWER-IC OFF : Use this setting, the head unit's internal amplifier has no output to the speakers. Setting the Steering Position STEERING RIGHT / STEERING LEFT (Initial ...HiFi mode, we recommend you find the sound is set to OFF. Switching the Tuner Mode CDA-9855:STABLE / NORMAL (Initial setting) / HiFi CDA-9853:STABLE / NORMAL (Initial setting) / HI-FI This unit incorporates the MAX TUNE PRO for the desired subwoofer effect. Make sure to set the correct...

Owners Manual
Page 31
...(Head unit) terminal of the processor. • After input selection is displayed. Words hyphenated when necessary and are scrolled automatically. You can be shown when the time is completed, turn the ignition off and back on the setup main menu in step 3. Switching the Character Font (CDA-9855 only...the full title has been displayed. Display Setting The display is "0." AUTO : The CD text information, the text information of the optical digital input switch is changed, etc. • The unit scrolls CD text names, folder names, file names or tag display. You can set how to...
...(Head unit) terminal of the processor. • After input selection is displayed. Words hyphenated when necessary and are scrolled automatically. You can be shown when the time is completed, turn the ignition off and back on the setup main menu in step 3. Switching the Character Font (CDA-9855 only...the full title has been displayed. Display Setting The display is "0." AUTO : The CD text information, the text information of the optical digital input switch is changed, etc. • The unit scrolls CD text names, folder names, file names or tag display. You can set how to...
Owners Manual
Page 37
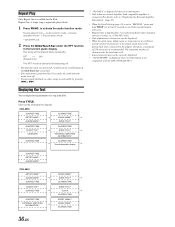
...; The function mode you previously recalled can display the tag information of characters for the head unit is performed for the iPod. Press TITLE. Repeat Play Only Repeat One is not compatible with the CDA-9855/CDA-9853. Source select mode → Audio function mode → Source operation mode* &#...8594; Source select mode * CDA-9855 only 2 Press the GlideTouch bar under the RPT function in the iPod. Each...
...; The function mode you previously recalled can display the tag information of characters for the head unit is performed for the iPod. Press TITLE. Repeat Play Only Repeat One is not compatible with the CDA-9855/CDA-9853. Source select mode → Audio function mode → Source operation mode* &#...8594; Source select mode * CDA-9855 only 2 Press the GlideTouch bar under the RPT function in the iPod. Each...
Owners Manual
Page 45
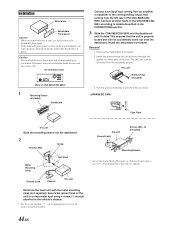
...too hard and warp the metal plate that the unit is properly locked and will accumulate inside the unit and may cause a fire. Connect all other leads of the CDA-9855/CDA9853 according to details described in the CONNECTlONS section. 3 Slide the CDA-9855/CDA-9853 into the dashboard. 2 Hex Nut (M5... into the slot and through the guides on either side of the CDA-9855/CDA9853. The unit can now be removed from the dashboard. Reinforce the head unit with the metal mounting strap (not supplied). Secure the ground lead of the unit to a clean metal spot using a screw (*1) already attached to ...
...too hard and warp the metal plate that the unit is properly locked and will accumulate inside the unit and may cause a fire. Connect all other leads of the CDA-9855/CDA9853 according to details described in the CONNECTlONS section. 3 Slide the CDA-9855/CDA-9853 into the dashboard. 2 Hex Nut (M5... into the slot and through the guides on either side of the CDA-9855/CDA9853. The unit can now be removed from the dashboard. Reinforce the head unit with the metal mounting strap (not supplied). Secure the ground lead of the unit to a clean metal spot using a screw (*1) already attached to ...


