Owners Manual
Page 18
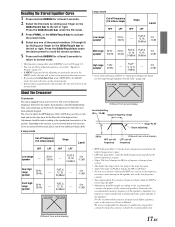
... be made according to the recommended crossover frequency of Alpine speakers, refer to −12 dB 24 dB/oct *1 Only when selecting USER'S in "Setting the Response Slope for the High Range Speaker (TW SETUP)" (page 29). FLAT*1 6, 12, 18, ---- 0 to the respective Owner's Manual. About the Crossover Crossover: This unit is controlled...
... be made according to the recommended crossover frequency of Alpine speakers, refer to −12 dB 24 dB/oct *1 Only when selecting USER'S in "Setting the Response Slope for the High Range Speaker (TW SETUP)" (page 29). FLAT*1 6, 12, 18, ---- 0 to the respective Owner's Manual. About the Crossover Crossover: This unit is controlled...
Owners Manual
Page 22
...right. This reproduces a well-balanced sound close to the media connected. About the MX indicator display (CDA-9853 only) MX Level Display Lights up when MX is connected, its own MX setting. •...FUNC. CD (MX level 1 to 3): CD mode processes a large amount of the audio processor. • "CMPM" is applied for MP3/WMA, WAV and iPod. • "SAT" is applied for each music source to the Owner's Manual of data...to normal mode. • To cancel MX mode for at the time of data such as FM radio, CD, and MP3/WMA can be adjusted. AUX (MX level 1): Choose the MX mode (CMPM, MUSIC...
...right. This reproduces a well-balanced sound close to the media connected. About the MX indicator display (CDA-9853 only) MX Level Display Lights up when MX is connected, its own MX setting. •...FUNC. CD (MX level 1 to 3): CD mode processes a large amount of the audio processor. • "CMPM" is applied for MP3/WMA, WAV and iPod. • "SAT" is applied for each music source to the Owner's Manual of data...to normal mode. • To cancel MX mode for at the time of data such as FM radio, CD, and MP3/WMA can be adjusted. AUX (MX level 1): Choose the MX mode (CMPM, MUSIC...
Owners Manual
Page 26
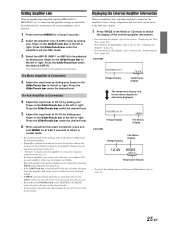
...-EN If a 4ch Amplifier is activated. Press the GlideTouch bar under RETURN in the Radio or CD mode to switch the display of each amplifier. Displaying the External Amplifier Information When an ...operations of CH 3/4 by sliding your finger on the GlideTouch bar to the normal mode. CDA-9855 VOLTAGE:10.1V Voltage Display 75.0˚F Temperature Display The temperature display and the fan ...are connected to this unit, set a different ID on each of the settings, refer to the Owner's Manual of the external amplifier. • If amplifier settings are made on the unit, do not then...
...-EN If a 4ch Amplifier is activated. Press the GlideTouch bar under RETURN in the Radio or CD mode to switch the display of each amplifier. Displaying the External Amplifier Information When an ...operations of CH 3/4 by sliding your finger on the GlideTouch bar to the normal mode. CDA-9855 VOLTAGE:10.1V Voltage Display 75.0˚F Temperature Display The temperature display and the fan ...are connected to this unit, set a different ID on each of the settings, refer to the Owner's Manual of the external amplifier. • If amplifier settings are made on the unit, do not then...

Owners Manual
Page 27
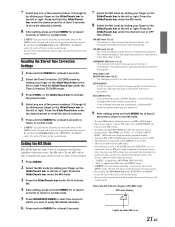
... SOURCE/POWER MENU GlideTouch bar About i-Personalize™ You can download data (from Alpine's website) to a CD-R, and download and store the data to the left or right. To start i-...memorized in the hard disc is downloaded by the "Data Downloading" operation to the Owner's Manual of all the buttons are changed to that has been stored in Preset 6 of... are also GREEN. http://www.alpine.com or http://www.alpine-usa.com Downloadable data Parametric equalizer or Graphic equalizer Time correction Crossover Profile (CDA-9855 only) Calendar message (CDA-9855 only) Data is memorized in...
... SOURCE/POWER MENU GlideTouch bar About i-Personalize™ You can download data (from Alpine's website) to a CD-R, and download and store the data to the left or right. To start i-...memorized in the hard disc is downloaded by the "Data Downloading" operation to the Owner's Manual of all the buttons are changed to that has been stored in Preset 6 of... are also GREEN. http://www.alpine.com or http://www.alpine-usa.com Downloadable data Parametric equalizer or Graphic equalizer Time correction Crossover Profile (CDA-9855 only) Calendar message (CDA-9855 only) Data is memorized in...
Owners Manual
Page 35
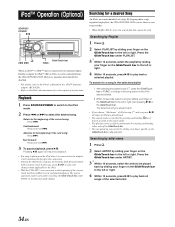
... The playlist can be used . Advance to the beginning of the iPod™ Interface adapter (KCA-420i). • Refer to the optional Alpine Interface adapter for a song in the selected playlist 1 After selecting the playlist in the function guide display. By keeping these to play back a.... • If a song is playing on the iPod when it is disabled. • For details, refer to the Owner's Manual of the current song: Press g. However, operation from the CDA-9855/CDA-9853. Fast forward: Press and hold g. Playback 1 Press SOURCE/POWER to switch to the iPod mode. 2 Press g ...
... The playlist can be used . Advance to the beginning of the iPod™ Interface adapter (KCA-420i). • Refer to the optional Alpine Interface adapter for a song in the selected playlist 1 After selecting the playlist in the function guide display. By keeping these to play back a.... • If a song is playing on the iPod when it is disabled. • For details, refer to the Owner's Manual of the current song: Press g. However, operation from the CDA-9855/CDA-9853. Fast forward: Press and hold g. Playback 1 Press SOURCE/POWER to switch to the iPod mode. 2 Press g ...

Owners Manual
Page 39
... in ascending order, stations programmed into the radio's presets as shown below. 6 → 5 ... 1 → 6 CD Changer mode: DISC Select (DN) button Press this button to select a disc in descending order. " Mute Button Press this button to the Owner's Manual of the external audio processor you purchased. ... Stored Crossover) → Normal mode 2 Press 8 or 9 to select the folder. Changer mode: To switch the changer. 9 f UP Button Radio mode: SEEK (UP) button CD mode: Press this button to advance to the beginning of the current track. 5 -/J Button Press this button to 6. MP3 compatible...
... in ascending order, stations programmed into the radio's presets as shown below. 6 → 5 ... 1 → 6 CD Changer mode: DISC Select (DN) button Press this button to select a disc in descending order. " Mute Button Press this button to the Owner's Manual of the external audio processor you purchased. ... Stored Crossover) → Normal mode 2 Press 8 or 9 to select the folder. Changer mode: To switch the changer. 9 f UP Button Radio mode: SEEK (UP) button CD mode: Press this button to advance to the beginning of the current track. 5 -/J Button Press this button to 6. MP3 compatible...
Owners Manual
Page 43
...Area 2 Sensitivity (IEC Standard) 530-1,710 kHz 531-1,602 kHz 22.5 μV/27 dB CD PLAYER SECTION Frequency Response Wow & Flutter (% WRMS) Total Harmonic Distortion Dynamic Range Signal-to-... • S/N: 80 dBA (reference: 1 W into 4 Ohms) Maximum Pre-Output Voltage 4 V/10 k ohms (CDA-9855) 2 V/10 k ohms (CDA-9853) Weight 1.6 kg (3 lbs. 8 oz) CHASSIS SIZE Width Height Depth 178 mm (7") 50 mm (2") 160 ...sold separately). - Make sure the cable is correctly connected. Refer to the Owner's Manual of the adapter KCA-420i (sold separately) and update the iPod Software Version...
...Area 2 Sensitivity (IEC Standard) 530-1,710 kHz 531-1,602 kHz 22.5 μV/27 dB CD PLAYER SECTION Frequency Response Wow & Flutter (% WRMS) Total Harmonic Distortion Dynamic Range Signal-to-... • S/N: 80 dBA (reference: 1 W into 4 Ohms) Maximum Pre-Output Voltage 4 V/10 k ohms (CDA-9855) 2 V/10 k ohms (CDA-9853) Weight 1.6 kg (3 lbs. 8 oz) CHASSIS SIZE Width Height Depth 178 mm (7") 50 mm (2") 160 ...sold separately). - Make sure the cable is correctly connected. Refer to the Owner's Manual of the adapter KCA-420i (sold separately) and update the iPod Software Version...
Owners Manual
Page 47
...lights are turned on the vehicle's fuse box or another device (CD Changer, Equalizer, INTERFACE ADAPTER FOR iPod™* etc.) equipped with ...or in the NORM position. Doing so may be generated when receiving radio broadcast. 46-EN Setting the 3WAY/2 WAY switch Set the 3way/...12V only when the ignition is turned on how to connect, refer to the Owner's Manual of the vehicle's battery. 9 Ground Lead (Black) Connect this lead to ... controlling the vehicle's power antenna. Fuse Holder (10A) . DC/DC Converter (CDA-9855 only) • Do not install the converter at a location subjected to the...
...lights are turned on the vehicle's fuse box or another device (CD Changer, Equalizer, INTERFACE ADAPTER FOR iPod™* etc.) equipped with ...or in the NORM position. Doing so may be generated when receiving radio broadcast. 46-EN Setting the 3WAY/2 WAY switch Set the 3way/...12V only when the ignition is turned on how to connect, refer to the Owner's Manual of the vehicle's battery. 9 Ground Lead (Black) Connect this lead to ... controlling the vehicle's power antenna. Fuse Holder (10A) . DC/DC Converter (CDA-9855 only) • Do not install the converter at a location subjected to the...

Owners Manual
Page 50
... Dropped or damaged hard drives. 3 Damage caused by negligence, misuse, improper operation or failure to follow instructions contained in the Owner's manual. 4 Damage caused by Alpine within the United States, Puerto Rico or Canada. 9 Any product not purchased from the date of the first consumer purchase.... TO THE WARRANTY: This Warranty gives you specific legal rights, and you have other acts of the product to an Authorized Alpine Service Center or Alpine, Alpine will , at ; Cracked or damaged LCD panels. We suggest that provides a tracking service. [HOW WE LIMIT IMPLIED WARRANTIES...
... Dropped or damaged hard drives. 3 Damage caused by negligence, misuse, improper operation or failure to follow instructions contained in the Owner's manual. 4 Damage caused by Alpine within the United States, Puerto Rico or Canada. 9 Any product not purchased from the date of the first consumer purchase.... TO THE WARRANTY: This Warranty gives you specific legal rights, and you have other acts of the product to an Authorized Alpine Service Center or Alpine, Alpine will , at ; Cracked or damaged LCD panels. We suggest that provides a tracking service. [HOW WE LIMIT IMPLIED WARRANTIES...
Owners Manual
Page 52
...Multi-Changer Selection (Optional), Note • If the selected CD Changer is not connected, the display will show "NO CHANGER" ("NO CHGR" ). To input a new title, one of the three SAT Radio Preset Bands. • Page 32, Changing the Display CDA-9855 PRESET NO./CHANNEL NO. - - - ------ PRESET NO... select between one of the Owner's Manual. • Page 22, Displaying the TitlelText The display in the SETUP section, the unit is not equipped with this setting. • Page 30, Scroll Setting Even when the scroll setting is described in Radio mode: CDA-9853 TITLE*! PRESET No. ...
...Multi-Changer Selection (Optional), Note • If the selected CD Changer is not connected, the display will show "NO CHANGER" ("NO CHGR" ). To input a new title, one of the three SAT Radio Preset Bands. • Page 32, Changing the Display CDA-9855 PRESET NO./CHANNEL NO. - - - ------ PRESET NO... select between one of the Owner's Manual. • Page 22, Displaying the TitlelText The display in the SETUP section, the unit is not equipped with this setting. • Page 30, Scroll Setting Even when the scroll setting is described in Radio mode: CDA-9853 TITLE*! PRESET No. ...


