
Owners Manual
Page 2
... Turning Power On and Off 7 Initial System Start-Up 7 Setting the Time and Calendar (CDA-9855 only 7 Setting Time (CDA-9853 only 7 Opening and Closing the Movable Display ...... 8 Display Tilt Adjustment 8 Adjusting Volume 8 Lowering Volume Quickly 8 Detaching and Attaching the Front Panel ......... 8 Radio Changing the Radio Frequencies for each Country 9 Listening to Radio 9 Manual Storing of Station Presets 9 Automatic Memory of Station Presets 9 Tuning to Preset Stations 10 Station Title Search Function 10 Freqency Search Function 10 CD / MP3 / WMA Playback 10 Repeat Play...
... Turning Power On and Off 7 Initial System Start-Up 7 Setting the Time and Calendar (CDA-9855 only 7 Setting Time (CDA-9853 only 7 Opening and Closing the Movable Display ...... 8 Display Tilt Adjustment 8 Adjusting Volume 8 Lowering Volume Quickly 8 Detaching and Attaching the Front Panel ......... 8 Radio Changing the Radio Frequencies for each Country 9 Listening to Radio 9 Manual Storing of Station Presets 9 Automatic Memory of Station Presets 9 Tuning to Preset Stations 10 Station Title Search Function 10 Freqency Search Function 10 CD / MP3 / WMA Playback 10 Repeat Play...
Owners Manual
Page 3
SETUP General Setting Setting the Clock display (CLOCK MODE) (CDA-9855 only 28 Playing MP3/WMA Data (PLAY MODE) ..... 28 Sound (Beep) Guide Function 28 Turning Mute Mode On/Off 28 Setting Tone Defeat for External Devices ....... 28 Setting the AUX Mode (V-Link 28 Setting the External Digital Input 28 Connecting to an External Amplifier 29 Setting the Steering Position 29 Tuner Setting Switching the Tuner Mode 29 Audio Setting Subwoofer On and Off 29 Setting the Subwoofer Output 29 Setting the Subwoofer System 29 Setting the Response Slope for the High Range...
SETUP General Setting Setting the Clock display (CLOCK MODE) (CDA-9855 only 28 Playing MP3/WMA Data (PLAY MODE) ..... 28 Sound (Beep) Guide Function 28 Turning Mute Mode On/Off 28 Setting Tone Defeat for External Devices ....... 28 Setting the AUX Mode (V-Link 28 Setting the External Digital Input 28 Connecting to an External Amplifier 29 Setting the Steering Position 29 Tuner Setting Switching the Tuner Mode 29 Audio Setting Subwoofer On and Off 29 Setting the Subwoofer Output 29 Setting the Subwoofer System 29 Setting the Response Slope for the High Range...
Owners Manual
Page 5
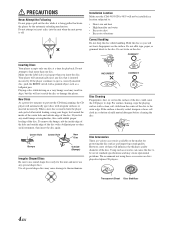
...; Excessive vibrations Correct Handling Do not drop the disc while handling. If the player continues to the disc. New Discs As a protective measure to prevent the CD from the center of the disc. When a new disc is facing up when you insert the disc. Transparent Sheet Disc Stabilizer 4-EN Installation Location Make sure the CDA-9855/CDA-9853 will automatically eject discs with a ballpoint pen or other such instrument...
...; Excessive vibrations Correct Handling Do not drop the disc while handling. If the player continues to the disc. New Discs As a protective measure to prevent the CD from the center of the disc. When a new disc is facing up when you insert the disc. Transparent Sheet Disc Stabilizer 4-EN Installation Location Make sure the CDA-9855/CDA-9853 will automatically eject discs with a ballpoint pen or other such instrument...

Owners Manual
Page 8
... adjusting or setting the itmes in the MENU mode, the unit will return to the previous selection secreen. • By pressing the GlideTouch bar under RETURN in the MENU mode, the unit will return to the normal mode. • If no peration is performed for at least 2 seconds after changing the car battery, etc. 1 Turn off the unit. • The first time power is turned on, the volume will reset...
... adjusting or setting the itmes in the MENU mode, the unit will return to the previous selection secreen. • By pressing the GlideTouch bar under RETURN in the MENU mode, the unit will return to the normal mode. • If no peration is performed for at least 2 seconds after changing the car battery, etc. 1 Turn off the unit. • The first time power is turned on, the volume will reset...
Owners Manual
Page 10
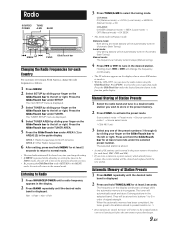
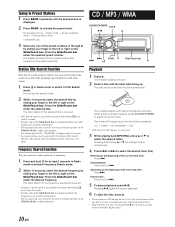
... ST indicator appears on the display when a stereo FM station is pressed while adjusting or setting the itmes in the MENU mode, the unit will be stored in (Automatic Seek Tuning). Listening to the left or right. to activate the preset mode. to select the source operation mode. The frequency on the GlideTouch bar to store in order of signal strength. Changing the Radio Frequencies for each band; Press the...
... ST indicator appears on the display when a stereo FM station is pressed while adjusting or setting the itmes in the MENU mode, the unit will be stored in (Automatic Seek Tuning). Listening to the left or right. to activate the preset mode. to select the source operation mode. The frequency on the GlideTouch bar to store in order of signal strength. Changing the Radio Frequencies for each band; Press the...
Owners Manual
Page 11
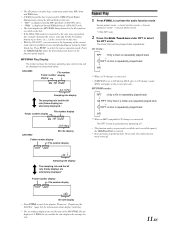
... facing up your search by sliding your finger to the left or right on the frequency selected is received. • Frequency Search mode is connected 3 While playing back MP3/WMA, press 8 or 9 to skip frequencies. Do not load more than one of the GlideTouch bar is canceled by its eject cycle. Source select mode → Preset mode → Source operation mode* → Source select mode CD / MP3 / WMA SOURCE/POWER TITLE -/J 8 * CDA-9855 only 3 Select any one disc...
... facing up your search by sliding your finger to the left or right on the frequency selected is received. • Frequency Search mode is connected 3 While playing back MP3/WMA, press 8 or 9 to skip frequencies. Do not load more than one of the GlideTouch bar is canceled by its eject cycle. Source select mode → Preset mode → Source operation mode* → Source select mode CD / MP3 / WMA SOURCE/POWER TITLE -/J 8 * CDA-9855 only 3 Select any one disc...
Owners Manual
Page 12
... desired function shown in CD changer mode, M.I .X. CDA-9855 . to select the source operation mode. Please see "Displaying the Title/Text" (page 22) for 10 seconds, the audio function mode turns off ) *1 When a CD changer is connected. • If REPEAT is set to ON during WMA playback. (CDA-9853 only) • The track display for MP3/WMA data playback is the file numbers recorded on the disc. • If the HDA-5460 model is connected...
... desired function shown in CD changer mode, M.I .X. CDA-9855 . to select the source operation mode. Please see "Displaying the Title/Text" (page 22) for 10 seconds, the audio function mode turns off ) *1 When a CD changer is connected. • If REPEAT is set to ON during WMA playback. (CDA-9853 only) • The track display for MP3/WMA data playback is the file numbers recorded on the disc. • If the HDA-5460 model is connected...
Owners Manual
Page 16
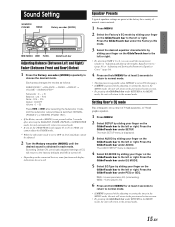
GlideTouch bar Adjusting Balance (Between Left and Right)/ Fader (Between Front and Rear)/Defeat 1 Press the Rotary encoder (MODE) repeatedly to OFF, its level and phase cannot be adjusted. 2 Turn the Rotary encoder (MODE) until the desired sound is displayed. 3 Select AUDIO by sliding your finger on the connected devices, some functions and display indications do not work. Press the GlideTouch bar under the Factory's EQ mode. 3 Select the desired equalizer characteristic...
GlideTouch bar Adjusting Balance (Between Left and Right)/ Fader (Between Front and Rear)/Defeat 1 Press the Rotary encoder (MODE) repeatedly to OFF, its level and phase cannot be adjusted. 2 Turn the Rotary encoder (MODE) until the desired sound is displayed. 3 Select AUDIO by sliding your finger on the connected devices, some functions and display indications do not work. Press the GlideTouch bar under the Factory's EQ mode. 3 Select the desired equalizer characteristic...
Owners Manual
Page 22
... Mode MX (Media Xpander) makes vocals or instruments sound distinct regardless of data during playback. MX uses this large data quantity to reproduce a more clearly. (DVD MUSIC): A DVD or Video CD contains a large quantity of data such as FM radio, CD, and MP3/WMA can be selected. 9 After setting, press and hold MENU for at least 2 seconds to return to normal mode. 5 Press SOURCE/POWER to select the source...
... Mode MX (Media Xpander) makes vocals or instruments sound distinct regardless of data during playback. MX uses this large data quantity to reproduce a more clearly. (DVD MUSIC): A DVD or Video CD contains a large quantity of data such as FM radio, CD, and MP3/WMA can be selected. 9 After setting, press and hold MENU for at least 2 seconds to return to normal mode. 5 Press SOURCE/POWER to select the source...
Owners Manual
Page 26
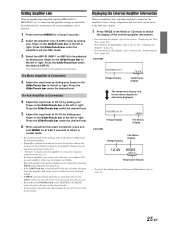
... unit, do not then change the setting with the amplifier buttons as the amplifier display may flicker. • External amplifier information display can be changed by pressing TITLE while adjusting the input level. • If the GlideTouch bar is pressed and held while adjusting the input level, the amplifier link mode can be switched between Celsius and Fahrenheit, refer to be adjusted is removed or its power cannot be adjusted. 1 Press and hold MENU...
... unit, do not then change the setting with the amplifier buttons as the amplifier display may flicker. • External amplifier information display can be changed by pressing TITLE while adjusting the input level. • If the GlideTouch bar is pressed and held while adjusting the input level, the amplifier link mode can be switched between Celsius and Fahrenheit, refer to be adjusted is removed or its power cannot be adjusted. 1 Press and hold MENU...

Owners Manual
Page 27
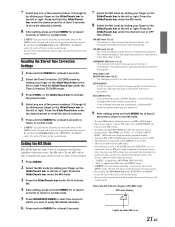
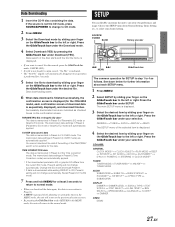
... http://www.alpine-usa.com Downloadable data Parametric equalizer or Graphic equalizer Time correction Crossover Profile (CDA-9855 only) Calendar message (CDA-9855 only) Data is downloaded by sliding your finger on -screen instructions. The lighting color of the Parametric EQ mode or Graphic EQ mode. The file name of the Time Correction mode. If you have already been stored in Preset 6 of download data shall be used . Data is set to...
... http://www.alpine-usa.com Downloadable data Parametric equalizer or Graphic equalizer Time correction Crossover Profile (CDA-9855 only) Calendar message (CDA-9855 only) Data is downloaded by sliding your finger on -screen instructions. The lighting color of the Parametric EQ mode or Graphic EQ mode. The file name of the Time Correction mode. If you have already been stored in Preset 6 of download data shall be used . Data is set to...
Owners Manual
Page 28
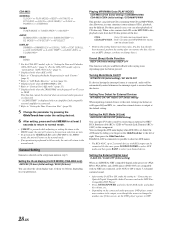
... right. CDA-9855: GENERAL CLOCK MODE*1 ↔ CLOCK ADJUST ↔ PLAY MODE ↔ BEEP ↔ INT MUTE ↔ INT AUDIO ↔ AUX IN ↔ (AUX NAME)*2 ↔ D-AUX ↔ POWER IC ↔ STEERING ↔ CLOCK MODE*1 TUNER TUNER MODE ↔ TUNER AREA*3 ↔ XM ADF*4 ↔ TUNER MODE AUDIO SUBWOOFER ↔ SUBW CH ↔ SUBW SYSTEM*5 ↔ EQ MODE*6 ↔ TW SETUP*7 ↔ A.PROC TYPE ↔ SUBWOOFER DISPLAY DIMMER ↔ DIMMER LEVEL ↔ SCROLL TYPE ↔ TEXT SCROLL ↔ FONT SELECT ↔...
... right. CDA-9855: GENERAL CLOCK MODE*1 ↔ CLOCK ADJUST ↔ PLAY MODE ↔ BEEP ↔ INT MUTE ↔ INT AUDIO ↔ AUX IN ↔ (AUX NAME)*2 ↔ D-AUX ↔ POWER IC ↔ STEERING ↔ CLOCK MODE*1 TUNER TUNER MODE ↔ TUNER AREA*3 ↔ XM ADF*4 ↔ TUNER MODE AUDIO SUBWOOFER ↔ SUBW CH ↔ SUBW SYSTEM*5 ↔ EQ MODE*6 ↔ TW SETUP*7 ↔ A.PROC TYPE ↔ SUBWOOFER DISPLAY DIMMER ↔ DIMMER LEVEL ↔ SCROLL TYPE ↔ TEXT SCROLL ↔ FONT SELECT ↔...
Owners Manual
Page 29
... disc. (If you use an MP3 changer, you can select the clock display type, 12-hour or 24-hour, depending on your finger on the connected audio processor, DVD player sound may be difficult. For the CDA-9853 model, refer to "Setting Time (CDA-9853 only)" (page 7). *2 Displayed only when AUX is ON. *3 Refer to "Changing the Radio Frequencies for external devices is output at least 2 seconds to return to normal mode. • If MENU...
... disc. (If you use an MP3 changer, you can select the clock display type, 12-hour or 24-hour, depending on your finger on the connected audio processor, DVD player sound may be difficult. For the CDA-9853 model, refer to "Setting Time (CDA-9853 only)" (page 7). *2 Displayed only when AUX is ON. *3 Refer to "Changing the Radio Frequencies for external devices is output at least 2 seconds to return to normal mode. • If MENU...
Owners Manual
Page 30
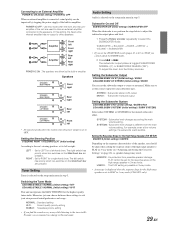
...; VOLUME → SUBWOOFER • If you find the sound is selected on the setup main menu in step 3. Make sure to set to drive speakers. Switching the Tuner Mode CDA-9855:STABLE / NORMAL (Initial setting) / HiFi CDA-9853:STABLE / NORMAL (Initial setting) / HI-FI This unit incorporates the MAX TUNE PRO for the high range speaker is still audible. POWER-IC OFF : Use this setting, the head unit's internal amplifier has no output to OFF. The left Rear right POWER...
...; VOLUME → SUBWOOFER • If you find the sound is selected on the setup main menu in step 3. Make sure to set to drive speakers. Switching the Tuner Mode CDA-9855:STABLE / NORMAL (Initial setting) / HiFi CDA-9853:STABLE / NORMAL (Initial setting) / HI-FI This unit incorporates the MAX TUNE PRO for the high range speaker is still audible. POWER-IC OFF : Use this setting, the head unit's internal amplifier has no output to OFF. The left Rear right POWER...

Owners Manual
Page 31
... setting D-AUX to ON in "Setting the External Digital Input," do not fit in the display at one character at a time. Connect the DVD player to the optical digital input (Head unit) terminal of the vehicle ON.This mode is useful if you feel the unit's backlighting is too bright at the factory is completed, turn the ignition off and back on . Dimmer Control DIMMER AUTO (Initial setting) / DIMMER MANUAL Set the DIMMER control to AUTO to the audio...
... setting D-AUX to ON in "Setting the External Digital Input," do not fit in the display at one character at a time. Connect the DVD player to the optical digital input (Head unit) terminal of the vehicle ON.This mode is useful if you feel the unit's backlighting is too bright at the factory is completed, turn the ignition off and back on . Dimmer Control DIMMER AUTO (Initial setting) / DIMMER MANUAL Set the DIMMER control to AUTO to the audio...
Owners Manual
Page 32
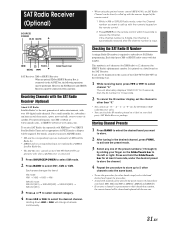
... connected at the same time. The unit alternately displays "RADIO ID" for 2 seconds, then the ID number for 10 seconds. 2 To cancel the ID number display, set the channel to other than "0." • You cannot use this number. However, the XM Receiver and SIRIUS Receiver cannot be displayed on the screen of the CDA-9855/CDA-9853 in the following operations may be performed. Receiving Channels with the SAT Radio Receiver (Optional) About SAT Radio Satellite Radio* is input...
... connected at the same time. The unit alternately displays "RADIO ID" for 2 seconds, then the ID number for 10 seconds. 2 To cancel the ID number display, set the channel to other than "0." • You cannot use this number. However, the XM Receiver and SIRIUS Receiver cannot be displayed on the screen of the CDA-9855/CDA-9853 in the following operations may be performed. Receiving Channels with the SAT Radio Receiver (Optional) About SAT Radio Satellite Radio* is input...

Owners Manual
Page 38
...CD Changers. GlideTouch bar Controlling CD Changer (Optional) An optional 6-disc or 12-disc CD Changer may be used. With a CD Changer connected to activate the CD Changer mode. Alternatively, press SOURCE on page 28. 37-EN to the left or right. Source selection mode ↔ Audio function mode ↔ Direct disc recall mode ↔ Source operation mode* ↔ Source selection mode * CDA-9855 only 3 Select a disc (1 to 6) by this unit. For details, please see "Setting the AUX Mode (V-Link)" on the remote control (RUE4202) to the Ai-NET input of this unit. If you use...
...CD Changers. GlideTouch bar Controlling CD Changer (Optional) An optional 6-disc or 12-disc CD Changer may be used. With a CD Changer connected to activate the CD Changer mode. Alternatively, press SOURCE on page 28. 37-EN to the left or right. Source selection mode ↔ Audio function mode ↔ Direct disc recall mode ↔ Source operation mode* ↔ Source selection mode * CDA-9855 only 3 Select a disc (1 to 6) by this unit. For details, please see "Setting the AUX Mode (V-Link)" on the remote control (RUE4202) to the Ai-NET input of this unit. If you use...

Owners Manual
Page 39
... is connected.*1 7 Power Button Press this button to turn the power on Remote Control 1 Source Button Press this button to select the audio source. 2 Volume Adjustment Buttons To increase the volume level: Press the L button To decrease the volume level: Press the K button 3 8 Button Radio mode: Pressing this button will select, in descending order, stations programmed into the radio's presets as shown below . 1 → 2 ... 6 → 1 CD Changer mode: DISC Select (UP) button Press this button to select the folder. For details, refer to select the mode. EQ mode: Select from MEMORY...
... is connected.*1 7 Power Button Press this button to turn the power on Remote Control 1 Source Button Press this button to select the audio source. 2 Volume Adjustment Buttons To increase the volume level: Press the L button To decrease the volume level: Press the K button 3 8 Button Radio mode: Pressing this button will select, in descending order, stations programmed into the radio's presets as shown below . 1 → 2 ... 6 → 1 CD Changer mode: DISC Select (UP) button Press this button to select the folder. For details, refer to select the mode. EQ mode: Select from MEMORY...
Owners Manual
Page 44
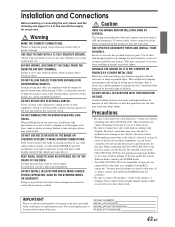
... sure to connect the color coded leads according to the diagram. amplifier) having RCA connectors. SERIAL NUMBER: INSTALLATION DATE: INSTALLATION TECHNICIAN: PLACE OF PURCHASE: 43-EN Precautions • Be sure to disconnect the cable from moving parts (like the seat rails) or sharp or pointed edges. Cables or wiring that penetrates into these leads to provide power for this manual thoroughly for connection to other units. If...
... sure to connect the color coded leads according to the diagram. amplifier) having RCA connectors. SERIAL NUMBER: INSTALLATION DATE: INSTALLATION TECHNICIAN: PLACE OF PURCHASE: 43-EN Precautions • Be sure to disconnect the cable from moving parts (like the seat rails) or sharp or pointed edges. Cables or wiring that penetrates into these leads to provide power for this manual thoroughly for connection to other units. If...
Owners Manual
Page 47
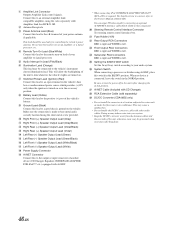
... receiving radio broadcast. 46-EN DC/DC Converter (CDA-9855 only) • Do not install the converter at a location subjected to the Owner's Manual of the unit, otherwise noise may cause a malfunction. • Do not bundle the DC/DC converter cable with CD Changer) > RCA Extension Cable (sold ) Amplifier Link box KCE-511M. 2 Antenna Receptacle 3 Power Antenna Lead (Blue) Connect this lead to the output or input connector of your power antenna, if applicable. 1 Amplifier...
... receiving radio broadcast. 46-EN DC/DC Converter (CDA-9855 only) • Do not install the converter at a location subjected to the Owner's Manual of the unit, otherwise noise may cause a malfunction. • Do not bundle the DC/DC converter cable with CD Changer) > RCA Extension Cable (sold ) Amplifier Link box KCE-511M. 2 Antenna Receptacle 3 Power Antenna Lead (Blue) Connect this lead to the output or input connector of your power antenna, if applicable. 1 Amplifier...


