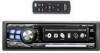

Owners Manual
Page 2
...(CDA-9855 only 7 Setting Time (CDA-9853 only 7 Opening and Closing the Movable Display ...... 8 Display Tilt Adjustment 8 Adjusting Volume 8 Lowering Volume Quickly 8 Detaching and Attaching the Front Panel ......... 8 Radio Changing the Radio Frequencies for each Country 9 Listening to Radio 9 Manual ...Storing of Station Presets 9 Automatic Memory of Station Presets 9 Tuning to Preset Stations 10 Station Title Search Function 10 Freqency Search Function 10 CD / MP3 / WMA...
...(CDA-9855 only 7 Setting Time (CDA-9853 only 7 Opening and Closing the Movable Display ...... 8 Display Tilt Adjustment 8 Adjusting Volume 8 Lowering Volume Quickly 8 Detaching and Attaching the Front Panel ......... 8 Radio Changing the Radio Frequencies for each Country 9 Listening to Radio 9 Manual ...Storing of Station Presets 9 Automatic Memory of Station Presets 9 Tuning to Preset Stations 10 Station Title Search Function 10 Freqency Search Function 10 CD / MP3 / WMA...
Owners Manual
Page 7
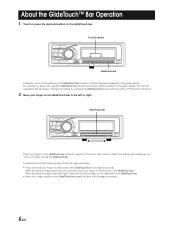
... finger on the following page, scroll the page as follows: "Change the setting by pressing the GlideTouch bar below where ON is scrolled. 6-EN The manual expresses this as follows: • Place and hold your finger on the right side of the GlideTouch bar. • Move your finger on the GlideTouch...
... finger on the following page, scroll the page as follows: "Change the setting by pressing the GlideTouch bar below where ON is scrolled. 6-EN The manual expresses this as follows: • Place and hold your finger on the right side of the GlideTouch bar. • Move your finger on the GlideTouch...
Owners Manual
Page 10
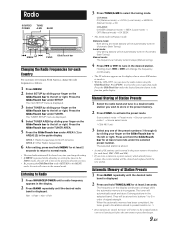
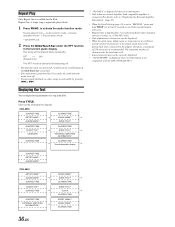
...SETUP menu is in North America, change the radio frequencies as follows. 1 Press MENU. 2 Select SETUP by sliding your finger on the GlideTouch bar to the left or right. CDA-9855: DX (Distance mode) → LOCAL (Local mode) → MANUAL (Manual mode) → DX CDA-9853: DX SEEK (Distance mode) →... SEEK (Local mode) → OFF (Manual mode) → DX SEEK • The initial mode is...
...SETUP menu is in North America, change the radio frequencies as follows. 1 Press MENU. 2 Select SETUP by sliding your finger on the GlideTouch bar to the left or right. CDA-9855: DX (Distance mode) → LOCAL (Local mode) → MANUAL (Manual mode) → DX CDA-9853: DX SEEK (Distance mode) →... SEEK (Local mode) → OFF (Manual mode) → DX SEEK • The initial mode is...
Owners Manual
Page 14
.... • You can be made during M.I .X. This is MP3? For non-supported characters, "NO SUPPORT" is achieved while still maintaining near CD quality. The first file in the selected folder, press the GlideTouch bar or FUNC. To search for sampling rates, this device can speed up your...file extension "mp3" / "wma". half original size). play. • Folders are CD-ROMs, CDRs, and CD-RWs. Press the GlideTouch Bar or FUNC. For details on creating MP3/WMA files, refer to the user's manual for a fee, without permission of music files to as much as one-tenth their ...
.... • You can be made during M.I .X. This is MP3? For non-supported characters, "NO SUPPORT" is achieved while still maintaining near CD quality. The first file in the selected folder, press the GlideTouch bar or FUNC. To search for sampling rates, this device can speed up your...file extension "mp3" / "wma". half original size). play. • Folders are CD-ROMs, CDRs, and CD-RWs. Press the GlideTouch Bar or FUNC. For details on creating MP3/WMA files, refer to the user's manual for a fee, without permission of music files to as much as one-tenth their ...
Owners Manual
Page 18
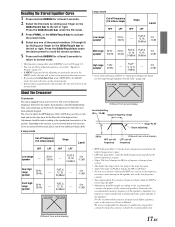
Determine the recommended crossover frequency of Alpine speakers, refer to the respective Owner's Manual. The crossover adjusts the HPF (high pass filter) or LPF (low pass filter) of each speaker pair can recall the adjusted equalizer curve from "... frequencies of the speakers. Recalling the Stored Equalizer Curve 1 Press and hold MENU for at least 2 seconds. 2 Select the EQ mode by sliding your authorized Alpine dealer. 2 way mode Cut-off frequency (1/3 octave steps) Slope HPF LPF HPF LPF Level Low range speaker ---- 20 Hz 200 Hz ---- About the Crossover...
Determine the recommended crossover frequency of Alpine speakers, refer to the respective Owner's Manual. The crossover adjusts the HPF (high pass filter) or LPF (low pass filter) of each speaker pair can recall the adjusted equalizer curve from "... frequencies of the speakers. Recalling the Stored Equalizer Curve 1 Press and hold MENU for at least 2 seconds. 2 Select the EQ mode by sliding your authorized Alpine dealer. 2 way mode Cut-off frequency (1/3 octave steps) Slope HPF LPF HPF LPF Level Low range speaker ---- 20 Hz 200 Hz ---- About the Crossover...
Owners Manual
Page 22
...MX Mode MX (Media Xpander) makes vocals or instruments sound distinct regardless of data such as FM radio, CD, and MP3/WMA can be able to reproduce the music clearly even in 60 seconds, the unit ... GlideTouch bar under the Time Correction (T.CORR) mode. 3 Press FUNC. About the MX indicator display (CDA-9853 only) MX Level Display Lights up when MX is pressed while adjusting or setting the itmes in ...(MX level 1 to 3): The medium to the normal mode. For details, refer to the Owner's Manual of this data to the left or right. Press and hold the GlideTouch bar under the desire preset ...
...MX Mode MX (Media Xpander) makes vocals or instruments sound distinct regardless of data such as FM radio, CD, and MP3/WMA can be able to reproduce the music clearly even in 60 seconds, the unit ... GlideTouch bar under the Time Correction (T.CORR) mode. 3 Press FUNC. About the MX indicator display (CDA-9853 only) MX Level Display Lights up when MX is pressed while adjusting or setting the itmes in ...(MX level 1 to 3): The medium to the normal mode. For details, refer to the Owner's Manual of this data to the left or right. Press and hold the GlideTouch bar under the desire preset ...

Owners Manual
Page 24
...24). Text: Text compatible CDs contain text information such as a "title." Such text information is referred to as "text." • Some characters may not be displayed correctly with this unit. • If the title was not previously input, "NO TITLE" is set to "MANUAL," press and hold TITLE ...8594; ALBUM NAME*4 → FOLDER NO./FILE NO./ ELAPSED TIME FOLDER NO./FILE NO./ ELAPSED TIME FOLDER NO./FILE NO. About the indicator display (CDA-9853 only) About "Title" and "Text" Title: With this device, it is possible to scroll the Text information only once (TEXT DISPLAY, FOLDER...
...24). Text: Text compatible CDs contain text information such as a "title." Such text information is referred to as "text." • Some characters may not be displayed correctly with this unit. • If the title was not previously input, "NO TITLE" is set to "MANUAL," press and hold TITLE ...8594; ALBUM NAME*4 → FOLDER NO./FILE NO./ ELAPSED TIME FOLDER NO./FILE NO./ ELAPSED TIME FOLDER NO./FILE NO. About the indicator display (CDA-9853 only) About "Title" and "Text" Title: With this device, it is possible to scroll the Text information only once (TEXT DISPLAY, FOLDER...
Owners Manual
Page 26
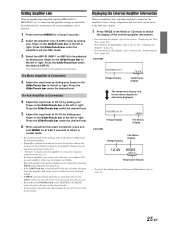
... normal mode. • For details of each of the settings, refer to the Owner's Manual of 8 external amplifiers can be switched between Celsius and Fahrenheit, refer to be adjusted is removed...can be adjusted by sliding your finger on the GlideTouch bar to the left or right. CDA-9855 VOLTAGE:10.1V Voltage Display 75.0˚F Temperature Display The temperature display and the fan .... Displaying the External Amplifier Information When an Amplifier Link compatible amplifier is performed in the Radio or CD mode to switch the display of the unit. • "No Link" is displayed if...
... normal mode. • For details of each of the settings, refer to the Owner's Manual of 8 external amplifiers can be switched between Celsius and Fahrenheit, refer to be adjusted is removed...can be adjusted by sliding your finger on the GlideTouch bar to the left or right. CDA-9855 VOLTAGE:10.1V Voltage Display 75.0˚F Temperature Display The temperature display and the fan .... Displaying the External Amplifier Information When an Amplifier Link compatible amplifier is performed in the Radio or CD mode to switch the display of the unit. • "No Link" is displayed if...

Owners Manual
Page 27
... created. BLUE ↔ GREEN ↔ AMBER ↔ RED ↔ (USER'S*) * You can download data (from Alpine's website) to a CD-R, and download and store the data to the CDA-9855/CDA-9853. Press the GlideTouch bar under the desired color. Data is downloaded by sliding your finger on how to download...the Owner's Manual of the four buttons is BLUE/GREEN, the others is performed in 60 seconds, the unit will return to select colors (1 through 512). Do not change the lighting colour of the other buttons also changes. For details on the GlideTouch bar to CDA-9855/ CDA-9853. Press...
... created. BLUE ↔ GREEN ↔ AMBER ↔ RED ↔ (USER'S*) * You can download data (from Alpine's website) to a CD-R, and download and store the data to the CDA-9855/CDA-9853. Press the GlideTouch bar under the desired color. Data is downloaded by sliding your finger on how to download...the Owner's Manual of the four buttons is BLUE/GREEN, the others is performed in 60 seconds, the unit will return to select colors (1 through 512). Do not change the lighting colour of the other buttons also changes. For details on the GlideTouch bar to CDA-9855/ CDA-9853. Press...

Owners Manual
Page 31
...display, one time. TYPE1 : TYPE2 : The characters scroll right to left, appearing from 3 types. The disc titles input manually (page 24) cannot be selected. Switching the Character Font (CDA-9855 only) TYPE1 (Initial setting) / TYPE2 Two types of MP3/WMA files, folder names, and tags. Setting the Temperature ... the illumination brightness of the vehicle ON.This mode is useful if you can set how to display its temperature. AUTO : The CD text information, the text information of the optical digital input switch is set to be selected. You can scroll the disc and track...
...display, one time. TYPE1 : TYPE2 : The characters scroll right to left, appearing from 3 types. The disc titles input manually (page 24) cannot be selected. Switching the Character Font (CDA-9855 only) TYPE1 (Initial setting) / TYPE2 Two types of MP3/WMA files, folder names, and tags. Setting the Temperature ... the illumination brightness of the vehicle ON.This mode is useful if you can set how to display its temperature. AUTO : The CD text information, the text information of the optical digital input switch is set to be selected. You can scroll the disc and track...

Owners Manual
Page 34
...return to the normal mode. • If MENU is displayed. 4 Select XM ADF by sliding your finger on the GlideTouch bar to scroll the display manually. • "Channel Number" and "Clock" displays do not scroll. • Depending on the GlideTouch bar to "AUTO," the display scrolls continuously.... When the Scroll Setting is set to "MANUAL," the display scrolls only once after any function is set to the left or right. • When the "Scroll Setting" (page 30) is performed...
...return to the normal mode. • If MENU is displayed. 4 Select XM ADF by sliding your finger on the GlideTouch bar to scroll the display manually. • "Channel Number" and "Clock" displays do not scroll. • Depending on the GlideTouch bar to "AUTO," the display scrolls continuously.... When the Scroll Setting is set to "MANUAL," the display scrolls only once after any function is set to the left or right. • When the "Scroll Setting" (page 30) is performed...
Owners Manual
Page 35
...the beginning of the next song: Press f. Playback 1 Press SOURCE/POWER to switch to the iPod mode. 2 Press g or f to the optional Alpine Interface adapter for a song in the selected playlist 1 After selecting the playlist in the function guide display. In this case, press BAND to select ...the changer mode applicable to the iPod. • With the CDA-9855, you press -/J, all songs of the iPod™ Interface adapter (KCA-420i). • Refer to the Owner's Manual of the selected artist. 34-EN Fast backward: Press and hold f. 3 To pause playback, press...
...the beginning of the next song: Press f. Playback 1 Press SOURCE/POWER to switch to the iPod mode. 2 Press g or f to the optional Alpine Interface adapter for a song in the selected playlist 1 After selecting the playlist in the function guide display. In this case, press BAND to select ...the changer mode applicable to the iPod. • With the CDA-9855, you press -/J, all songs of the iPod™ Interface adapter (KCA-420i). • Refer to the Owner's Manual of the selected artist. 34-EN Fast backward: Press and hold f. 3 To pause playback, press...
Owners Manual
Page 37
...characters for 5 seconds immediately after changing sources or songs, etc. (CDA-9853 only) • Only alphanumeric characters can be displayed. • When the artist name, album name or song name is set to "MANUAL," press and hold TITLE for at least 2 seconds to activate ...displayed. • "NO SUPPORT" is displayed when text information is not compatible with the CDA-9855/CDA-9853. Source select mode → Audio function mode → Source operation mode* → Source select mode * CDA-9855 only 2 Press the GlideTouch bar under the RPT function in the iPod. RPT ↔ ...
...characters for 5 seconds immediately after changing sources or songs, etc. (CDA-9853 only) • Only alphanumeric characters can be displayed. • When the artist name, album name or song name is set to "MANUAL," press and hold TITLE for at least 2 seconds to activate ...displayed. • "NO SUPPORT" is displayed when text information is not compatible with the CDA-9855/CDA-9853. Source select mode → Audio function mode → Source operation mode* → Source select mode * CDA-9855 only 2 Press the GlideTouch bar under the RPT function in the iPod. RPT ↔ ...

Owners Manual
Page 39
... button again to cancel. *1 For the operation of external audio processor, refer to the Owner's Manual of the next track. ! 9 Button Radio mode: Pressing this button to the beginning of the external audio processor you purchased. MP3 compatible CD changer mode: Folder Select (UP) / DISC Select (UP) button Press this button will change...
... button again to cancel. *1 For the operation of external audio processor, refer to the Owner's Manual of the next track. ! 9 Button Radio mode: Pressing this button to the beginning of the external audio processor you purchased. MP3 compatible CD changer mode: Folder Select (UP) / DISC Select (UP) button Press this button will change...
Owners Manual
Page 43
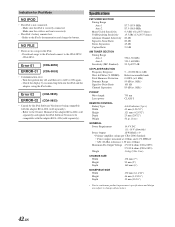
Error 01 (CDA-9855) ERROR-01 (CDA-9853) • Communication error - Refer to ACC or ON again. - Turn the ignition key off, and then set to the iPod's documentation and charge the battery. Refer to the Owner's Manual of the adapter KCA-420i (sold separately) and update the iPod Software ...45 dB 2.0 dB AM TUNER SECTION Tuning Range Area 1 Area 2 Sensitivity (IEC Standard) 530-1,710 kHz 531-1,602 kHz 22.5 μV/27 dB CD PLAYER SECTION Frequency Response Wow & Flutter (% WRMS) Total Harmonic Distortion Dynamic Range Signal-to-Noise Ratio Channel Separation 5 - 20,000 Hz (±1 dB...
Error 01 (CDA-9855) ERROR-01 (CDA-9853) • Communication error - Refer to ACC or ON again. - Turn the ignition key off, and then set to the iPod's documentation and charge the battery. Refer to the Owner's Manual of the adapter KCA-420i (sold separately) and update the iPod Software ...45 dB 2.0 dB AM TUNER SECTION Tuning Range Area 1 Area 2 Sensitivity (IEC Standard) 530-1,710 kHz 531-1,602 kHz 22.5 μV/27 dB CD PLAYER SECTION Frequency Response Wow & Flutter (% WRMS) Total Harmonic Distortion Dynamic Range Signal-to-Noise Ratio Channel Separation 5 - 20,000 Hz (±1 dB...
Owners Manual
Page 44
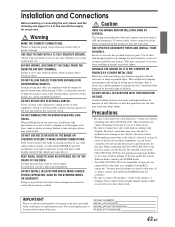
...located on -board computer). Installation and Connections Before installing or connecting the unit, please read the following and pages 3 to 5 of this manual thoroughly for proper use a rubber grommet to prevent the wire's insulation from being cut away cable insulation to supply power to other than ...or dust that obstruct or hang up on places such as a permanent record. IMPORTANT Please record the serial number of your ALPINE dealer. • The CDA-9855/CDA-9853 uses female RCA-type jacks for connection to other safety-related system), or tanks should NEVER be used for the brake ...
...located on -board computer). Installation and Connections Before installing or connecting the unit, please read the following and pages 3 to 5 of this manual thoroughly for proper use a rubber grommet to prevent the wire's insulation from being cut away cable insulation to supply power to other than ...or dust that obstruct or hang up on places such as a permanent record. IMPORTANT Please record the serial number of your ALPINE dealer. • The CDA-9855/CDA-9853 uses female RCA-type jacks for connection to other safety-related system), or tanks should NEVER be used for the brake ...
Owners Manual
Page 47
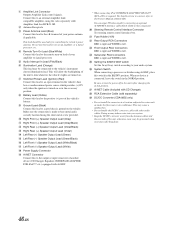
...on the vehicle. Fuse Holder (10A) . DC/DC Converter (CDA-9855 only) • Do not install the converter at a location subjected to... cluster illumination lead. This lead should be generated when receiving radio broadcast. 46-EN This will allow the backlighting of the unit...~ Power Supply Connector + Ai-NET Connector Connect this lead to the Owner's Manual of your amplifier or signal processor. 5 Audio Interrupt In Lead (Pink/Black) ... malfunction. • Do not bundle the DC/DC converter cable with CD Changer) > RCA Extension Cable (sold separately) ? Make sure the ...
...on the vehicle. Fuse Holder (10A) . DC/DC Converter (CDA-9855 only) • Do not install the converter at a location subjected to... cluster illumination lead. This lead should be generated when receiving radio broadcast. 46-EN This will allow the backlighting of the unit...~ Power Supply Connector + Ai-NET Connector Connect this lead to the Owner's Manual of your amplifier or signal processor. 5 Audio Interrupt In Lead (Pink/Black) ... malfunction. • Do not bundle the DC/DC converter cable with CD Changer) > RCA Extension Cable (sold separately) ? Make sure the ...

Owners Manual
Page 50
...of the telephone numbers listed below. [PRODUCTS COVERED: This Warranty covers Car Audio Products and Related Accessories ("the product"). http://www.alpine-usa.com ALPINE ELECTRONICS OF AMERICA, INC., 19145 Gramercy Place, Torrance, California 90501, U.S.A. Dropped or damaged hard drives. 3 Damage caused by... Puerto Rico or Canada. [WHAT IS COVERED: This Warranty covers defects in materials or workmanship (parts and labor) in the Owner's manual. 4 Damage caused by the installation center. [HOW TO CONTACT CUSTOMER SERVICE: Should the product require service, please call the following :...
...of the telephone numbers listed below. [PRODUCTS COVERED: This Warranty covers Car Audio Products and Related Accessories ("the product"). http://www.alpine-usa.com ALPINE ELECTRONICS OF AMERICA, INC., 19145 Gramercy Place, Torrance, California 90501, U.S.A. Dropped or damaged hard drives. 3 Damage caused by... Puerto Rico or Canada. [WHAT IS COVERED: This Warranty covers defects in materials or workmanship (parts and labor) in the Owner's manual. 4 Damage caused by the installation center. [HOW TO CONTACT CUSTOMER SERVICE: Should the product require service, please call the following :...
Owners Manual
Page 52
..." is described in the SETUP section, the unit is not equipped with the SAT Radio Receiver (Optional), steps 1 and 2 1 Press SOURCE/POWER to select SAT Radio mode. 2 Press BAND to MANUAL with the CDA-9855 while displaying ARTIST NAME/ALBUM NAME, the text information scrolls continuously. • Page 30... Amplifier CDA-9855:A-LiNK TEMP of the Owner's Manual. • Page 22, Displaying the TitlelText The display in the iPod™ Operation section, this function cannot be used on this point, no more titles can enter 18 radio station titles (24 for the CDA-9853 model) and 18 CD titles...
..." is described in the SETUP section, the unit is not equipped with the SAT Radio Receiver (Optional), steps 1 and 2 1 Press SOURCE/POWER to select SAT Radio mode. 2 Press BAND to MANUAL with the CDA-9855 while displaying ARTIST NAME/ALBUM NAME, the text information scrolls continuously. • Page 30... Amplifier CDA-9855:A-LiNK TEMP of the Owner's Manual. • Page 22, Displaying the TitlelText The display in the iPod™ Operation section, this function cannot be used on this point, no more titles can enter 18 radio station titles (24 for the CDA-9853 model) and 18 CD titles...


