
MCXSP10 Manual
Page 3
... operating instructions. This equipment generates/uses radio frequencies and, if not installed and used replacement parts specified by using one of interference, which can not locate the appropriate retailer, please contact Yamaha Electronics Corp., U.S.A. 6660 Orangethorpe Ave., Buena Park, CA 90620. Utilize power outlets that are required, be situated away from heat sources such as the original part. If these requirements provides a reasonable level of radio...
... operating instructions. This equipment generates/uses radio frequencies and, if not installed and used replacement parts specified by using one of interference, which can not locate the appropriate retailer, please contact Yamaha Electronics Corp., U.S.A. 6660 Orangethorpe Ave., Buena Park, CA 90620. Utilize power outlets that are required, be situated away from heat sources such as the original part. If these requirements provides a reasonable level of radio...

MCXSP10 Manual
Page 5
... input sources (Straight decoding mode 47 Using audio features 48 Enjoying pure hi-fi sound 48 Adjusting the tonal quality 48 Adjusting the speaker level 48 Enjoying multi-channel sources in 2-channel stereo 49 Selecting the night listening mode 49 FM/AM tuning 50 Automatic tuning 50 Manual tuning 50 Automatic preset tuning 51 Manual preset tuning 51 Selecting preset stations 52 Exchanging preset stations 52 XM Satellite Radio tuning 53 Connecting the XM Mini-Tuner Dock 53 Activating XM Satellite Radio 54 Basic XM Satellite Radio operations 54 Setting...
... input sources (Straight decoding mode 47 Using audio features 48 Enjoying pure hi-fi sound 48 Adjusting the tonal quality 48 Adjusting the speaker level 48 Enjoying multi-channel sources in 2-channel stereo 49 Selecting the night listening mode 49 FM/AM tuning 50 Automatic tuning 50 Manual tuning 50 Automatic preset tuning 51 Manual preset tuning 51 Selecting preset stations 52 Exchanging preset stations 52 XM Satellite Radio tuning 53 Connecting the XM Mini-Tuner Dock 53 Activating XM Satellite Radio 54 Basic XM Satellite Radio operations 54 Setting...

MCXSP10 Manual
Page 7
... the following parts. DECODE NIGHT 9 0 +10 SLEEP ENT LEVEL TITLE BAND RETURN XM MEMORY PRESET/CH SET MENU MENU SRCH MODE ENTER A-E/CAT. Remote control CODE SET TRANSMIT POWER TV POWER AV STANDBY POWER CD DVD DOCK V-AUX MD CD-R CBL DTV MULTI CH IN AUDIO SEL TUNER XM DVR VCR PHONO TV VOL TV CH AMP VOLUME SOURCE TV TV MUTE TV INPUT MUTE CLASSICAL LIVE/CLUB ENTERTAIN MOVIE 1 2 3 4 STEREO ENHANCER STRAIGHT PURE DIRECT 5 6 7 8 SUR. DISPLAY REC SCENE...
... the following parts. DECODE NIGHT 9 0 +10 SLEEP ENT LEVEL TITLE BAND RETURN XM MEMORY PRESET/CH SET MENU MENU SRCH MODE ENTER A-E/CAT. Remote control CODE SET TRANSMIT POWER TV POWER AV STANDBY POWER CD DVD DOCK V-AUX MD CD-R CBL DTV MULTI CH IN AUDIO SEL TUNER XM DVR VCR PHONO TV VOL TV CH AMP VOLUME SOURCE TV TV MUTE TV INPUT MUTE CLASSICAL LIVE/CLUB ENTERTAIN MOVIE 1 2 3 4 STEREO ENHANCER STRAIGHT PURE DIRECT 5 6 7 8 SUR. DISPLAY REC SCENE...
MCXSP10 Manual
Page 15
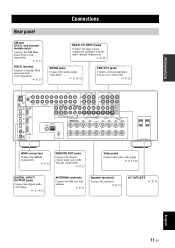
... DTV/CBL IN DVR OUT VIDEO SPEAKERS FRONT A CENTER R L IN VCR OUT MONITOR OUT SURROUND R L SURROUND BACK/ BI-AMP R SINGLE L REMOTE OUT AC OUTLETS HDMI connectors Connect the HDMI components. ☞ P. 16 REMOTE OUT jacks Connect the remote control input jack of the Yamaha components. ☞ P. 23 Video jacks Connect the video cable plugs. ☞ P. 18-20 DIGITAL INPUT/ OUTPUT jacks Connect the digital audio cable plugs. ☞ P. 19-21 ANTENNA terminals Connect the FM and AM antenna. ☞ P. 24 Speaker terminals Connect the speakers. ☞ P. 13 AC OUTLETS ☞...
... DTV/CBL IN DVR OUT VIDEO SPEAKERS FRONT A CENTER R L IN VCR OUT MONITOR OUT SURROUND R L SURROUND BACK/ BI-AMP R SINGLE L REMOTE OUT AC OUTLETS HDMI connectors Connect the HDMI components. ☞ P. 16 REMOTE OUT jacks Connect the remote control input jack of the Yamaha components. ☞ P. 23 Video jacks Connect the video cable plugs. ☞ P. 18-20 DIGITAL INPUT/ OUTPUT jacks Connect the digital audio cable plugs. ☞ P. 19-21 ANTENNA terminals Connect the FM and AM antenna. ☞ P. 24 Speaker terminals Connect the speakers. ☞ P. 13 AC OUTLETS ☞...
MCXSP10 Manual
Page 26
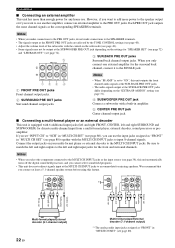
... the input source (see page 80). Notes • When "BI-AMP" is equipped with 6 additional input jacks (left and right FRONT, CENTER, left and right input jacks for the front and surround channels. Connect the output jacks on the "EXTRA SP ASSIGN" setting (see page 48). • Adjust the volume level of the subwoofer with the MULTI CH INPUT jacks to input 8-channel signals. However, if you want to use . MULTI CH INPUT CENTER L R FRONT(6CH) SB(8CH) SURROUND SUB WOOFER...
... the input source (see page 80). Notes • When "BI-AMP" is equipped with 6 additional input jacks (left and right FRONT, CENTER, left and right input jacks for the front and surround channels. Connect the output jacks on the "EXTRA SP ASSIGN" setting (see page 48). • Adjust the volume level of the subwoofer with the MULTI CH INPUT jacks to input 8-channel signals. However, if you want to use . MULTI CH INPUT CENTER L R FRONT(6CH) SB(8CH) SURROUND SUB WOOFER...
MCXSP10 Manual
Page 27
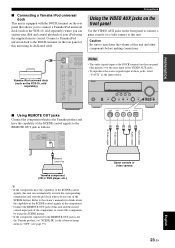
STANDBY ON/ VOLUME SPEAKERS EDIT SEARCH MODE PRESET/TUNING FM/AM CATEGORY A/B/C/D/E PRESET/TUNING/CH MEMORY DISPLAY TUNING AUTO/MAN'L NIGHT SLEEP PHONES TONE CONTROL SCENE 1 2 3 4 PROGRAM STRAIGHT PURE DIRECT AUDIO SELECT INPUT OPTIMIZER MIC VIDEO AUX SILENT CINEMA EFFECT S VIDEO VIDEO L AUDIO R OPTICAL ■ Using REMOTE OUT jacks Connect the component which is equipped with the DOCK terminal on the front panel to connect a game console or a video camera to "OFF" (see page 93). S VIDEO VIDEO L AUDIO R OPTICAL S V L R O Optical output Audio ...
STANDBY ON/ VOLUME SPEAKERS EDIT SEARCH MODE PRESET/TUNING FM/AM CATEGORY A/B/C/D/E PRESET/TUNING/CH MEMORY DISPLAY TUNING AUTO/MAN'L NIGHT SLEEP PHONES TONE CONTROL SCENE 1 2 3 4 PROGRAM STRAIGHT PURE DIRECT AUDIO SELECT INPUT OPTIMIZER MIC VIDEO AUX SILENT CINEMA EFFECT S VIDEO VIDEO L AUDIO R OPTICAL ■ Using REMOTE OUT jacks Connect the component which is equipped with the DOCK terminal on the front panel to connect a game console or a video camera to "OFF" (see page 93). S VIDEO VIDEO L AUDIO R OPTICAL S V L R O Optical output Audio ...
MCXSP10 Manual
Page 41
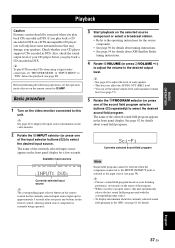
... panel display for a few seconds. Before performing the following operations, set the initial volume level and maximum volume level (see page 80). y • See page 48 to adjust the level of the program. • When you press any buttons on your speakers. y • Choose a sound field program based on the remote control, showing which source component is selected as the input source (see page 61 for details. Available input sources VCR DVR V-AUX DTV/CBL DVD...
... panel display for a few seconds. Before performing the following operations, set the initial volume level and maximum volume level (see page 80). y • See page 48 to adjust the level of the program. • When you press any buttons on your speakers. y • Choose a sound field program based on the remote control, showing which source component is selected as the input source (see page 61 for details. Available input sources VCR DVR V-AUX DTV/CBL DVD...
MCXSP10 Manual
Page 44
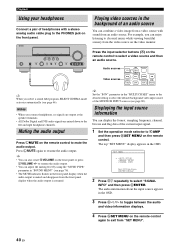
... a video source and then an audio source. STANDBY /ON VOLUME SPEAKERS EDIT SEARCH MODE PRESET/TUNING FM/AM CATEGORY A/B/C/D/E PRESET/TUNING/CH MEMORY DISPLAY TUNING AUTO/MAN'L NIGHT SLEEP PHONES TONE CONTROL SCENE 1 2 3 4 PROGRAM STRAIGHT PURE DIRECT AUDIO SELECT INPUT OPTIMIZER MIC VIDEO AUX SILENT CINEMA EFFECT S VIDEO VIDEO L AUDIO R OPTICAL Press the input selector buttons (A) on the remote control. Displaying the input source information You can enjoy listening to KAMP and then press NSET MENU on the remote control to resume the audio output.
... a video source and then an audio source. STANDBY /ON VOLUME SPEAKERS EDIT SEARCH MODE PRESET/TUNING FM/AM CATEGORY A/B/C/D/E PRESET/TUNING/CH MEMORY DISPLAY TUNING AUTO/MAN'L NIGHT SLEEP PHONES TONE CONTROL SCENE 1 2 3 4 PROGRAM STRAIGHT PURE DIRECT AUDIO SELECT INPUT OPTIMIZER MIC VIDEO AUX SILENT CINEMA EFFECT S VIDEO VIDEO L AUDIO R OPTICAL Press the input selector buttons (A) on the remote control. Displaying the input source information You can enjoy listening to KAMP and then press NSET MENU on the remote control to resume the audio output.

MCXSP10 Manual
Page 52
... DIRECT) to adjust the balance of the surround speakers may not match. • TONE CONTROL is not effective when PURE DIRECT is selected, or when MULTI CH INPUT is set the operation mode selector on the remote control to adjust. Adjusting the tonal quality Use this unit plays back the selected source with the least circuitry. Display Adjusted speaker FRONT L Front left speaker SUR. Note This operation will override the level adjustments made in the Pure Direct mode. y The front panel display turns...
... DIRECT) to adjust the balance of the surround speakers may not match. • TONE CONTROL is not effective when PURE DIRECT is selected, or when MULTI CH INPUT is set the operation mode selector on the remote control to adjust. Adjusting the tonal quality Use this unit plays back the selected source with the least circuitry. Display Adjusted speaker FRONT L Front left speaker SUR. Note This operation will override the level adjustments made in the Pure Direct mode. y The front panel display turns...

MCXSP10 Manual
Page 54
... connected FM and AM antennas for the best reception. y Hold down the button to tune into it manually. 1 Rotate the HINPUT selector on the front "FM" or "AM" appears in the front panel display, tuning is weak, tune into the desired station manually. "FM" or "AM" appears in the front panel display. 3 Press 7TUNING AUTO/MAN'L so that the AUTO indicator lights up to 40 stations (A1 to select "TUNER...
... connected FM and AM antennas for the best reception. y Hold down the button to tune into it manually. 1 Rotate the HINPUT selector on the front "FM" or "AM" appears in the front panel display, tuning is weak, tune into the desired station manually. "FM" or "AM" appears in the front panel display. 3 Press 7TUNING AUTO/MAN'L so that the AUTO indicator lights up to 40 stations (A1 to select "TUNER...

MCXSP10 Manual
Page 64
... adjustments and other components connected to this unit. • TONE CONTROL (see page 48) and VOLUME settings, the speaker level (see page 74) and the sound field programs (see page 42) do not affect recorded material. • The source connected to the MULTI CH INPUT jacks of copyrighted material may be disturbed due to make a setting so that provides only an S-video or a composite video signal, you can be output at the AUDIO...
... adjustments and other components connected to this unit. • TONE CONTROL (see page 48) and VOLUME settings, the speaker level (see page 74) and the sound field programs (see page 42) do not affect recorded material. • The source connected to the MULTI CH INPUT jacks of copyrighted material may be disturbed due to make a setting so that provides only an S-video or a composite video signal, you can be output at the AUDIO...

MCXSP10 Manual
Page 73
...menu to the DIGITAL INPUT jacks on the rear panel of this unit. B)INPUT RENAME Changes the name of the multi channel input. Features Selects the size of each speaker, the speakers for Dolby Digital or DTS signals. Parameter A)SPEAKER SET B)SPEAKER LEVEL C)SP DISTANCE D)EQUALIZER E)LFE LEVEL F)DYNAMIC RANGE G)AUDIO SET H)HDMI SET I /O ASSIGNMENT Assigns the input/output jacks of this unit operates. Selects the equalizer setting of each input source. Selects the mode of the decoders for video signal processing delays when using LCD monitors or projectors. C)VOLUME TRIM Adjusts...
...menu to the DIGITAL INPUT jacks on the rear panel of this unit. B)INPUT RENAME Changes the name of the multi channel input. Features Selects the size of each speaker, the speakers for Dolby Digital or DTS signals. Parameter A)SPEAKER SET B)SPEAKER LEVEL C)SP DISTANCE D)EQUALIZER E)LFE LEVEL F)DYNAMIC RANGE G)AUDIO SET H)HDMI SET I /O ASSIGNMENT Assigns the input/output jacks of this unit operates. Selects the equalizer setting of each input source. Selects the mode of the decoders for video signal processing delays when using LCD monitors or projectors. C)VOLUME TRIM Adjusts...

MCXSP10 Manual
Page 76
...; Select "SUR. p p p p MANUAL SETUP 1 SOUND MENU 1/2 . Use this feature to select the location of this unit, the sound is output from the front speakers. 72 En Notes • If you connect headphones to "ZONE B". • If a DSP program is selected when "FRONT B" is turned on or off and FRONT B is set automatically when you do not use the surround back speakers when surround back channel signals are input. The signals for video signal processing delays when using the CINEMA...
...; Select "SUR. p p p p MANUAL SETUP 1 SOUND MENU 1/2 . Use this feature to select the location of this unit, the sound is output from the front speakers. 72 En Notes • If you connect headphones to "ZONE B". • If a DSP program is selected when "FRONT B" is turned on or off and FRONT B is set automatically when you do not use the surround back speakers when surround back channel signals are input. The signals for video signal processing delays when using the CINEMA...

MCXSP10 Manual
Page 91
...). y The remote control has 10 modes (input areas) to control other components selected with the component has a POWER button. *2 These buttons operate your VCR or DVD recorder only when you set the appropriate remote control code for DVR (see page 88). *3 Press and hold to 10 different components. 1 CODE SET TRANSMIT POWER TV POWER AV STANDBY POWER CD DVD DOCK V-AUX MD CD-R CBL DTV MULTI CH IN AUDIO SEL TUNER XM DVR VCR PHONO TV VOL TV CH AMP VOLUME SOURCE TV TV...
...). y The remote control has 10 modes (input areas) to control other components selected with the component has a POWER button. *2 These buttons operate your VCR or DVD recorder only when you set the appropriate remote control code for DVR (see page 88). *3 Press and hold to 10 different components. 1 CODE SET TRANSMIT POWER TV POWER AV STANDBY POWER CD DVD DOCK V-AUX MD CD-R CBL DTV MULTI CH IN AUDIO SEL TUNER XM DVR VCR PHONO TV VOL TV CH AMP VOLUME SOURCE TV TV...

MCXSP10 Manual
Page 98
...or output cable connections. The optimizer microphone is set to this unit normally. Audio input jack select is connected. Speaker connections are input. The HDMI components connected to "ANALOG" while playing a source encoded in "MANUAL SETUP". Connect the power cable firmly. Set this unit to the standby mode, disconnect the power cable, plug it back in after the power is set to "RX-V861" in Dolby Digital or DTS. Turn up the volume. Play a source whose signals can be reproduced by pressing 1SPEAKERS on the front panel repeatedly. Set "SUPPORT AUDIO" to...
...or output cable connections. The optimizer microphone is set to this unit normally. Audio input jack select is connected. Speaker connections are input. The HDMI components connected to "ANALOG" while playing a source encoded in "MANUAL SETUP". Connect the power cable firmly. Set this unit to the standby mode, disconnect the power cable, plug it back in after the power is set to "RX-V861" in Dolby Digital or DTS. Turn up the volume. Play a source whose signals can be reproduced by pressing 1SPEAKERS on the front panel repeatedly. Set "SUPPORT AUDIO" to...

MCXSP10 Manual
Page 101
... transmitter is too far away or the antenna input is difficult to cool down and then turn it is poor. Check the antenna connections. Speaker cables are continuous crackling and hissing noises. The video source uses scrambled or encoded signals to eliminate multi-path interference. Problem Cause Remedy FM stereo reception is weak or the antenna connections are loose. Previously preset stations can result from such equipment. AM...
... transmitter is too far away or the antenna input is difficult to cool down and then turn it is poor. Check the antenna connections. Speaker cables are continuous crackling and hissing noises. The video source uses scrambled or encoded signals to eliminate multi-path interference. Problem Cause Remedy FM stereo reception is weak or the antenna connections are loose. Previously preset stations can result from such equipment. AM...

MCXSP10 Manual
Page 104
... microphone. Run "AUTO SETUP" again. This message may not be optimal. • If a warning message "W-2" or "W-3" appears, no corrections are not detected. The difference of the subwoofer. Adjust the output volume of volume level among speakers is set to the LEFT SURROUND BACK SPEAKERS terminal if you use surround back speakers. Notes • If the "ERROR" or "WARNING" screens appears, check the cause of similar quality. E-7:NO MIC E-8:NO SIGNAL E-9:USER...
... microphone. Run "AUTO SETUP" again. This message may not be optimal. • If a warning message "W-2" or "W-3" appears, no corrections are not detected. The difference of the subwoofer. Adjust the output volume of volume level among speakers is set to the LEFT SURROUND BACK SPEAKERS terminal if you use surround back speakers. Notes • If the "ERROR" or "WARNING" screens appears, check the cause of similar quality. E-7:NO MIC E-8:NO SIGNAL E-9:USER...

MCXSP10 Manual
Page 111
..., Input menu ..... 78 A)SPEAKER SET, Sound menu ......... 72 A.DELAY, Audio settings 76 AC OUTLETS (SWITCHED 24 Action Game, Sound field program ..... 44 Advanced setup 90 Advanced sound configurations 61 Adventure, Sound field program ......... 45 ALL CH SEARCH, XM tuning 55 All Channel Search mode, XM tuning 55 All remote control codes resetting ....... 89 AM antenna connection 24 AM tuning 50 Amplifier function OSD display time, Display settings 82 Audio cable plugs 15 Audio components connection 21 Audio delay, Audio settings 76 Audio information 41 Audio input jacks selection...
..., Input menu ..... 78 A)SPEAKER SET, Sound menu ......... 72 A.DELAY, Audio settings 76 AC OUTLETS (SWITCHED 24 Action Game, Sound field program ..... 44 Advanced setup 90 Advanced sound configurations 61 Adventure, Sound field program ......... 45 ALL CH SEARCH, XM tuning 55 All Channel Search mode, XM tuning 55 All remote control codes resetting ....... 89 AM antenna connection 24 AM tuning 50 Amplifier function OSD display time, Display settings 82 Audio cable plugs 15 Audio components connection 21 Audio delay, Audio settings 76 Audio information 41 Audio input jacks selection...

MCXSP10 Manual
Page 112
... volume, Audio settings .......77 Memory guard, Option menu 83 MODE, Extended surround decoders .....77 Mode, Extended surround decoders ........77 MON.CHK, Advanced setup 93 Monitor check, Advanced setup ...........93 Mono Movie, Sound field program ......45 MOVIE, Sound field category 45 MULTI CH INPUT component selection 38 MULTI CH INPUT jacks 22 Multi channel input settings, Input menu 80 Multi-channel source playback in 2-channel stereo 49 Multi-channel source playback with headphones 46 Multi-format player connection ...........22 Multi-information display 27 MUSIC ENHANCER...
... volume, Audio settings .......77 Memory guard, Option menu 83 MODE, Extended surround decoders .....77 Mode, Extended surround decoders ........77 MON.CHK, Advanced setup 93 Monitor check, Advanced setup ...........93 Mono Movie, Sound field program ......45 MOVIE, Sound field category 45 MULTI CH INPUT component selection 38 MULTI CH INPUT jacks 22 Multi channel input settings, Input menu 80 Multi-channel source playback in 2-channel stereo 49 Multi-channel source playback with headphones 46 Multi-format player connection ...........22 Multi-information display 27 MUSIC ENHANCER...

MCXSP10 Manual
Page 113
.../Surround back channel priority, Speaker settings 72 Preset channel setting, XM tuning ....... 56 Preset SCENE templates 35 Preset Search mode, XM tuning .......... 55 PRESET SEARCH, XM tuning 55 Preset station selection, FM/AM tuning 52 Preset stations exchange, FM/AM tuning 52 PRESET, Advanced setup 91 PRIORITY, Speaker settings 72 PRO LOGIC, Decoder type 66, 67 Projector connection 18 Pure Direct 48 Pure hi-fi sound 48 PVR connection 20 ■R Rear panel 11 REMOTE AMP, Advanced setup ........ 91 Remote control AMP ID, Advanced setup 91 Remote control code default settings...
.../Surround back channel priority, Speaker settings 72 Preset channel setting, XM tuning ....... 56 Preset SCENE templates 35 Preset Search mode, XM tuning .......... 55 PRESET SEARCH, XM tuning 55 Preset station selection, FM/AM tuning 52 Preset stations exchange, FM/AM tuning 52 PRESET, Advanced setup 91 PRIORITY, Speaker settings 72 PRO LOGIC, Decoder type 66, 67 Projector connection 18 Pure Direct 48 Pure hi-fi sound 48 PVR connection 20 ■R Rear panel 11 REMOTE AMP, Advanced setup ........ 91 Remote control AMP ID, Advanced setup 91 Remote control code default settings...


