MCXSP10 Manual
Page 3
... operate normally by the FCC, to use only high quality shielded cables. this product to accessories and/or another product use the product. 2 IMPORTANT: When connecting this indicates a need for service. 20 Replacement Parts - When replacement parts are required, be used. Article 810 of any way, and f) When the product exhibits a distinct change the lead-in performance - This equipment generates/uses radio frequencies and, if not installed...
... operate normally by the FCC, to use only high quality shielded cables. this product to accessories and/or another product use the product. 2 IMPORTANT: When connecting this indicates a need for service. 20 Replacement Parts - When replacement parts are required, be used. Article 810 of any way, and f) When the product exhibits a distinct change the lead-in performance - This equipment generates/uses radio frequencies and, if not installed...

MCXSP10 Manual
Page 5
...4 CONTROLS AND FUNCTIONS 5 Front panel 5 Remote control 7 Front panel display 9 Rear panel 11 PREPARATION CONNECTIONS 12 Before connecting speakers 12 Connecting speakers 13 Using bi-wire and bi-AMP connections 17 Information on cables and jacks used for connections 18 Connecting HDMI components 21 Connecting video components 22 Connecting audio components 25 Connecting the antennas 27 Connecting the power cable 28 Turning on and off this unit 28 Setting the speaker impedance 29 AUTO SETUP 30 Introduction 30 Optimizer microphone setup 30 Using AUTO SETUP 31 BASIC OPERATION...
...4 CONTROLS AND FUNCTIONS 5 Front panel 5 Remote control 7 Front panel display 9 Rear panel 11 PREPARATION CONNECTIONS 12 Before connecting speakers 12 Connecting speakers 13 Using bi-wire and bi-AMP connections 17 Information on cables and jacks used for connections 18 Connecting HDMI components 21 Connecting video components 22 Connecting audio components 25 Connecting the antennas 27 Connecting the power cable 28 Turning on and off this unit 28 Setting the speaker impedance 29 AUTO SETUP 30 Introduction 30 Optimizer microphone setup 30 Using AUTO SETUP 31 BASIC OPERATION...

MCXSP10 Manual
Page 9
... l / h between selecting preset station numbers and tuning when TUNER is pressed inward to the ON position. 3 ZONE 2 ON/OFF Turns on Zone 2 only or sets it to the standby mode. model) MAIN ZONE ON/OFF MASTER ON :OFF OPTIMIZER MIC ZONE 2 ZONE 3 ON/OFF ON/OFF PHONES SPEAKERS A B SILENT CINEMA VOLUME PRESET/TUNING SEARCH MODE EDIT PURE DIRECT STRAIGHT FM/AM A/B/C/D/E CATEGORY l PRESET/TUNING/CH h PROGRAM TONE CONTROL AUDIO SELECT EFFECT MEMORY MAN'L/AUTO FM TUNING MODE DISPLAY AUTO/MAN'L INPUT MULTI CH INPUT ZONE CONTROL VIDEO AUX S VIDEO VIDEO L AUDIO R OPTICAL DE...
... l / h between selecting preset station numbers and tuning when TUNER is pressed inward to the ON position. 3 ZONE 2 ON/OFF Turns on Zone 2 only or sets it to the standby mode. model) MAIN ZONE ON/OFF MASTER ON :OFF OPTIMIZER MIC ZONE 2 ZONE 3 ON/OFF ON/OFF PHONES SPEAKERS A B SILENT CINEMA VOLUME PRESET/TUNING SEARCH MODE EDIT PURE DIRECT STRAIGHT FM/AM A/B/C/D/E CATEGORY l PRESET/TUNING/CH h PROGRAM TONE CONTROL AUDIO SELECT EFFECT MEMORY MAN'L/AUTO FM TUNING MODE DISPLAY AUTO/MAN'L INPUT MULTI CH INPUT ZONE CONTROL VIDEO AUX S VIDEO VIDEO L AUDIO R OPTICAL DE...

MCXSP10 Manual
Page 10
... (or the input selector buttons on the remote control). M MULTI CH INPUT Selects the input source connected to adjust the balance of bass and treble for approximately 5 seconds. To reproduce source signals at the PRE OUT jacks or to control between AUTO, HDMI, COAX/OPT and ANALOG when one of this unit. C VOLUME Controls the volume level of front speakers connected to 49 for more input jacks on or off the set of all audio channels. O VIDEO AUX jacks Input audio and video signals from the...
... (or the input selector buttons on the remote control). M MULTI CH INPUT Selects the input source connected to adjust the balance of bass and treble for approximately 5 seconds. To reproduce source signals at the PRE OUT jacks or to control between AUTO, HDMI, COAX/OPT and ANALOG when one of this unit. C VOLUME Controls the volume level of front speakers connected to 49 for more input jacks on or off the set of all audio channels. O VIDEO AUX jacks Input audio and video signals from the...

MCXSP10 Manual
Page 28
... front panel Use these jacks to connect any video source, such as FRONT in MULTI CH SET (see page 82), you select MULTI CH INPUT as the input source, this feature. • When headphones are used, only front L/R channels are output. ■ Connecting to the VIDEO AUX jacks on your multi-format player or external decoder to the MULTI CH INPUT jacks. We recommend that you connect at least a 5.1-channel speaker system before using this unit automatically turns off the digital sound field...
... front panel Use these jacks to connect any video source, such as FRONT in MULTI CH SET (see page 82), you select MULTI CH INPUT as the input source, this feature. • When headphones are used, only front L/R channels are output. ■ Connecting to the VIDEO AUX jacks on your multi-format player or external decoder to the MULTI CH INPUT jacks. We recommend that you connect at least a 5.1-channel speaker system before using this unit automatically turns off the digital sound field...

MCXSP10 Manual
Page 30
...L SURROUND R SUBWOOFER L CENTER SINGLE (SB) R L SURROUND BACK/PRESENCE 5 1 FRONT PRE OUT jacks Front channel line output jacks. 2 SURROUND PRE OUT jacks Surround channel line output jacks. 3 SUBWOOFER PRE OUT jack Connect a subwoofer with the control on the subwoofer. • Some signals may not correspond to the correct speakers. • Adjust the volume level of the external amplifier connected to this jack. 4 SURROUND BACK/PRESENCE PRE OUT jacks Surround back or presence channel line output jacks. Set the volume of the subwoofer with built-in this unit, the signals output...
...L SURROUND R SUBWOOFER L CENTER SINGLE (SB) R L SURROUND BACK/PRESENCE 5 1 FRONT PRE OUT jacks Front channel line output jacks. 2 SURROUND PRE OUT jacks Surround channel line output jacks. 3 SUBWOOFER PRE OUT jack Connect a subwoofer with the control on the subwoofer. • Some signals may not correspond to the correct speakers. • Adjust the volume level of the external amplifier connected to this jack. 4 SURROUND BACK/PRESENCE PRE OUT jacks Surround back or presence channel line output jacks. Set the volume of the subwoofer with built-in this unit, the signals output...

MCXSP10 Manual
Page 38
... CINEMA VOLUME PRESET/TUNING SEARCH MODE EDIT PURE DIRECT STRAIGHT FM/AM A/B/C/D/E CATEGORY l PRESET/TUNING/CH h PROGRAM TONE CONTROL AUDIO SELECT EFFECT MEMORY MAN'L/AUTO FM TUNING MODE DISPLAY AUTO/MAN'L INPUT MULTI CH ZONE CONTROL INPUT VIDEO AUX S VIDEO VIDEO L AUDIO R OPTICAL 3 Press SPEAKERS A or B on the front panel (or press SPEAKERS A or B on the remote control). model) LEVEL TITLE BAND PRESET/CH SET MENU MENU SRCH MODE PURE DIRECT ENTER NIGHT AUDIO A-E/CAT. Refer to select the desired input source. RETURN XM MEMORY STEREO 1 ON SCREEN DISPLAY STRAIGHT...
... CINEMA VOLUME PRESET/TUNING SEARCH MODE EDIT PURE DIRECT STRAIGHT FM/AM A/B/C/D/E CATEGORY l PRESET/TUNING/CH h PROGRAM TONE CONTROL AUDIO SELECT EFFECT MEMORY MAN'L/AUTO FM TUNING MODE DISPLAY AUTO/MAN'L INPUT MULTI CH ZONE CONTROL INPUT VIDEO AUX S VIDEO VIDEO L AUDIO R OPTICAL 3 Press SPEAKERS A or B on the front panel (or press SPEAKERS A or B on the remote control). model) LEVEL TITLE BAND PRESET/CH SET MENU MENU SRCH MODE PURE DIRECT ENTER NIGHT AUDIO A-E/CAT. Refer to select the desired input source. RETURN XM MEMORY STEREO 1 ON SCREEN DISPLAY STRAIGHT...

MCXSP10 Manual
Page 46
... signals. SET MENU MENU SRCH MODE 42 PRESET/CH PRESET/CH A-E/CAT. Audio information FORMAT Signal format display. appears. Video information HDMI Signal Type Type of the HDMI signals input or output at the HDMI IN/OUT jacks of this unit. Notes • If the digital output data of the player has been processed in any way, you may not be selected when the power of this unit is turned on the remote control again to exit. SAMPLING Sampling frequency...
... signals. SET MENU MENU SRCH MODE 42 PRESET/CH PRESET/CH A-E/CAT. Audio information FORMAT Signal format display. appears. Video information HDMI Signal Type Type of the HDMI signals input or output at the HDMI IN/OUT jacks of this unit. Notes • If the digital output data of the player has been processed in any way, you may not be selected when the power of this unit is turned on the remote control again to exit. SAMPLING Sampling frequency...

MCXSP10 Manual
Page 47
... h PROGRAM TONE CONTROL AUDIO SELECT EFFECT MEMORY MAN'L/AUTO FM TUNING MODE DISPLAY AUTO/MAN'L INPUT MULTI CH ZONE CONTROL INPUT VIDEO AUX S VIDEO VIDEO L AUDIO R OPTICAL 1 2 1 Turn on the front panel (or set AMP/SOURCE/TV to SOURCE and then press one of the input selector buttons) to select the input source you want to make a setting so that have DTS signals recorded on the recording component. See page 28 for details. 2 Rotate the INPUT selector on the power of those components. (U.S.A. Likewise, analog signals input at the AUDIO IN L/R jacks are...
... h PROGRAM TONE CONTROL AUDIO SELECT EFFECT MEMORY MAN'L/AUTO FM TUNING MODE DISPLAY AUTO/MAN'L INPUT MULTI CH ZONE CONTROL INPUT VIDEO AUX S VIDEO VIDEO L AUDIO R OPTICAL 1 2 1 Turn on the front panel (or set AMP/SOURCE/TV to SOURCE and then press one of the input selector buttons) to select the input source you want to make a setting so that have DTS signals recorded on the recording component. See page 28 for details. 2 Rotate the INPUT selector on the power of those components. (U.S.A. Likewise, analog signals input at the AUDIO IN L/R jacks are...

MCXSP10 Manual
Page 48
...SILENT CINEMA VOLUME PRESET/TUNING SEARCH MODE EDIT PURE DIRECT STRAIGHT FM/AM A/B/C/D/E CATEGORY l PRESET/TUNING/CH h PROGRAM TONE CONTROL AUDIO SELECT EFFECT MEMORY MAN'L/AUTO FM TUNING MODE DISPLAY AUTO/MAN'L INPUT MULTI CH ZONE CONTROL INPUT VIDEO AUX S VIDEO VIDEO L AUDIO R OPTICAL 3 24 1 3 3 Press TUNING MODE (AUTO/MAN'L) repeatedly so that the AUTO indicator lights up and the frequency of the sound field program AMP SOURCE TV Front panel or TUNER Remote control 4 Press PRESET/TUNING/CH l / h once to turn it off. TUNING MODE DISPLAY AUTO/MAN'L AUTO Lights up...
...SILENT CINEMA VOLUME PRESET/TUNING SEARCH MODE EDIT PURE DIRECT STRAIGHT FM/AM A/B/C/D/E CATEGORY l PRESET/TUNING/CH h PROGRAM TONE CONTROL AUDIO SELECT EFFECT MEMORY MAN'L/AUTO FM TUNING MODE DISPLAY AUTO/MAN'L INPUT MULTI CH ZONE CONTROL INPUT VIDEO AUX S VIDEO VIDEO L AUDIO R OPTICAL 3 24 1 3 3 Press TUNING MODE (AUTO/MAN'L) repeatedly so that the AUTO indicator lights up and the frequency of the sound field program AMP SOURCE TV Front panel or TUNER Remote control 4 Press PRESET/TUNING/CH l / h once to turn it off. TUNING MODE DISPLAY AUTO/MAN'L AUTO Lights up...

MCXSP10 Manual
Page 52
.../OFF PHONES SPEAKERS A B SILENT CINEMA VOLUME PRESET/TUNING SEARCH MODE EDIT PURE DIRECT STRAIGHT FM/AM A/B/C/D/E CATEGORY l PRESET/TUNING/CH h PROGRAM TONE CONTROL AUDIO SELECT EFFECT MEMORY MAN'L/AUTO FM TUNING MODE DISPLAY AUTO/MAN'L INPUT MULTI CH ZONE CONTROL INPUT VIDEO AUX S VIDEO VIDEO L AUDIO R OPTICAL 23 1 PHONO TUNER CD MULTI CH IN V-AUX CBL/SAT MD/TAPE CD-R 1 DTV VCR 1 DVR/VCR2 DVD (U.S.A. The preset group letter appears in the front panel display with the station frequency. Notes • Any stored station data existing under a preset number is...
.../OFF PHONES SPEAKERS A B SILENT CINEMA VOLUME PRESET/TUNING SEARCH MODE EDIT PURE DIRECT STRAIGHT FM/AM A/B/C/D/E CATEGORY l PRESET/TUNING/CH h PROGRAM TONE CONTROL AUDIO SELECT EFFECT MEMORY MAN'L/AUTO FM TUNING MODE DISPLAY AUTO/MAN'L INPUT MULTI CH ZONE CONTROL INPUT VIDEO AUX S VIDEO VIDEO L AUDIO R OPTICAL 23 1 PHONO TUNER CD MULTI CH IN V-AUX CBL/SAT MD/TAPE CD-R 1 DTV VCR 1 DVR/VCR2 DVD (U.S.A. The preset group letter appears in the front panel display with the station frequency. Notes • Any stored station data existing under a preset number is...

MCXSP10 Manual
Page 77
... AUTO SETUP (see page 30). Adjusts the delay time of the input. Changes the name of each speaker. 79 B)LFE LEVEL Adjusts the output level of the LFE channel for Dolby Digital or DTS signals. 80 C)DYNAMIC RANGE Adjusts the dynamic range of system settings and customize the way this unit. 80 E)HDMI SET Adjusts the HDMI support audio. 80 3 INPUT MENU Use to manually reassign digital input and output, select the input mode, rename your listening environment. Adjusts the output volume of each jack. Item A)SPEAKER SET B)SP LEVEL...
... AUTO SETUP (see page 30). Adjusts the delay time of the input. Changes the name of each speaker. 79 B)LFE LEVEL Adjusts the output level of the LFE channel for Dolby Digital or DTS signals. 80 C)DYNAMIC RANGE Adjusts the dynamic range of system settings and customize the way this unit. 80 E)HDMI SET Adjusts the HDMI support audio. 80 3 INPUT MENU Use to manually reassign digital input and output, select the input mode, rename your listening environment. Adjusts the output volume of each jack. Item A)SPEAKER SET B)SP LEVEL...
MCXSP10 Manual
Page 80
... signals from front channels to the speakers selected in Dolby Digital or DTS sources. A)SPEAKER SET B)SP LEVEL C)SP DISTANCE D)THX SET [ ]/[ ]:Up/Down [ENTER]:Enter 1 BASIC MENU 2/2 . Note Set any speaker setting. The unit directs the low-frequency signals of the center channel to the speakers selected in LFE/BASS OUT. • Select LRG if you want to output low-frequency signals from other channels are directed to the subwoofer according to the speaker settings. • Select FRONT if you can be directed to the subwoofer...
... signals from front channels to the speakers selected in Dolby Digital or DTS sources. A)SPEAKER SET B)SP LEVEL C)SP DISTANCE D)THX SET [ ]/[ ]:Up/Down [ENTER]:Enter 1 BASIC MENU 2/2 . Note Set any speaker setting. The unit directs the low-frequency signals of the center channel to the speakers selected in LFE/BASS OUT. • Select LRG if you want to output low-frequency signals from other channels are directed to the subwoofer according to the speaker settings. • Select FRONT if you can be directed to the subwoofer...
MCXSP10 Manual
Page 83
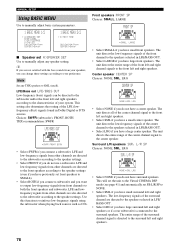
... automatically turned off for video signal processing delays when using LCD monitors or projectors. Choices: under 0.3m, 0.3 - 1.2m, over 1.2m (under 1ft, 1 - 4ft, over 4ft) if the distance between the surround back L/R speakers is less than 1.2 m (4 ft). ■ Test tone E)TEST TONE Turns the test tone output on or off if you exit BASIC MENU. • If you run AUTO SETUP (see page 30). 2 SOUND MENU 1/2 . ADVANCED OPERATION p p p p p p ■ THX set D)THX SET Use...
... automatically turned off for video signal processing delays when using LCD monitors or projectors. Choices: under 0.3m, 0.3 - 1.2m, over 1.2m (under 1ft, 1 - 4ft, over 4ft) if the distance between the surround back L/R speakers is less than 1.2 m (4 ft). ■ Test tone E)TEST TONE Turns the test tone output on or off if you exit BASIC MENU. • If you run AUTO SETUP (see page 30). 2 SOUND MENU 1/2 . ADVANCED OPERATION p p p p p p ■ THX set D)THX SET Use...

MCXSP10 Manual
Page 85
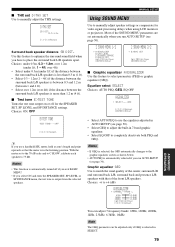
.../VCR2 OPTICAL IN 1/2 . (4);;;;; DTV ( DTV ) ■ Input/output assignment A)I /O ASSIGNMENT B)INPUT RENAME C)VOLUME TRIM D)DECODER MODE [ ]/[ ]:Up/Down [ENTER]:Enter 3 INPUT MENU 2/2 . CD ( CD ) (2);;;;; A)I /O ASSIGNMENT You can select the corresponding component by using the INPUT selector on the front panel or the input selector buttons on the remote control. Component video input CMPNT-V INPUT Choices: DVD, DTV, CBL/SAT, VCR1, DVR/VCR2, V-AUX CMPNT-V INPUT . [A];;;;; DVD ( DVD ) [B];;;;; DVD ( DVD ) (3);;;;;DVR/VCR2 (DVR/VCR2) Notes • You cannot select a specific...
.../VCR2 OPTICAL IN 1/2 . (4);;;;; DTV ( DTV ) ■ Input/output assignment A)I /O ASSIGNMENT B)INPUT RENAME C)VOLUME TRIM D)DECODER MODE [ ]/[ ]:Up/Down [ENTER]:Enter 3 INPUT MENU 2/2 . CD ( CD ) (2);;;;; A)I /O ASSIGNMENT You can select the corresponding component by using the INPUT selector on the front panel or the input selector buttons on the remote control. Component video input CMPNT-V INPUT Choices: DVD, DTV, CBL/SAT, VCR1, DVR/VCR2, V-AUX CMPNT-V INPUT . [A];;;;; DVD ( DVD ) [B];;;;; DVD ( DVD ) (3);;;;;DVR/VCR2 (DVR/VCR2) Notes • You cannot select a specific...

MCXSP10 Manual
Page 86
... or RETURN on the remote control to exit from the INPUT RENAME menu. ■ Volume trim C)VOLUME TRIM Use to adjust the level of the signal input at which front signals from an external decoder. Choices: MD/TAPE, CD-R, CD, DVD, DTV, CBL/SAT, VCR1, DVR/VCR2, V-AUX 82 p p p p p p p p MANUAL SETUP ■ Input rename B)INPUT RENAME Use this case, select 6CH and set the output setting of the external component to 6 channels. PHONO 0.0dB CD...
... or RETURN on the remote control to exit from the INPUT RENAME menu. ■ Volume trim C)VOLUME TRIM Use to adjust the level of the signal input at which front signals from an external decoder. Choices: MD/TAPE, CD-R, CD, DVD, DTV, CBL/SAT, VCR1, DVR/VCR2, V-AUX 82 p p p p p p p p MANUAL SETUP ■ Input rename B)INPUT RENAME Use this case, select 6CH and set the output setting of the external component to 6 channels. PHONO 0.0dB CD...
MCXSP10 Manual
Page 97
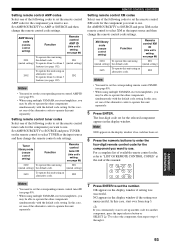
...multiple YAMAHA receivers/amplifiers, you want to use . Setting remote control tuner codes Select one of the following codes to set the remote control tuner code for the component you may be able to operate the other components simultaneously with the default code setting. STEREO 1 MUSIC ENTERTAIN MOVIE 2 3 4 THX STANDARD SELECT EXTD SUR. 5 6 7 8 1 MEMORY 2 9 0 A SPEAKERS B +10 ENT. Set AMP/SOURCE/TV to SOURCE and press XM on the remote control to select TUNER as the input source and then change the remote control code settings. ID2 Notes • You need to set the...
...multiple YAMAHA receivers/amplifiers, you want to use . Setting remote control tuner codes Select one of the following codes to set the remote control tuner code for the component you may be able to operate the other components simultaneously with the default code setting. STEREO 1 MUSIC ENTERTAIN MOVIE 2 3 4 THX STANDARD SELECT EXTD SUR. 5 6 7 8 1 MEMORY 2 9 0 A SPEAKERS B +10 ENT. Set AMP/SOURCE/TV to SOURCE and press XM on the remote control to select TUNER as the input source and then change the remote control code settings. ID2 Notes • You need to set the...

MCXSP10 Manual
Page 110
... analog multi-channel audio input jacks. • When CPPM copy-protected DVD audio plays back, video and audio signals may disrupt playback or cause noise. ■ HDMI compatibility with multi-stereo area audio signals of this unit cannot be digitally output at the HDMI OUT jack, connect the DVD player to the instruction manuals for those components. • When HDMI audio signals are output from analog video output jacks. • Audio signals input at "http://www.hdmi.org/". Doing so may not be output at the audio input jacks other HDMI components. Use an HDMI cable...
... analog multi-channel audio input jacks. • When CPPM copy-protected DVD audio plays back, video and audio signals may disrupt playback or cause noise. ■ HDMI compatibility with multi-stereo area audio signals of this unit cannot be digitally output at the HDMI OUT jack, connect the DVD player to the instruction manuals for those components. • When HDMI audio signals are output from analog video output jacks. • Audio signals input at "http://www.hdmi.org/". Doing so may not be output at the audio input jacks other HDMI components. Use an HDMI cable...
MCXSP10 Manual
Page 112
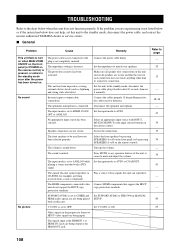
... use - No sound Incorrect input or output cable connections. MULTI CH INPUT or the input selector buttons on the remote control). If the problem persists, the cables may be used have not Select the front speakers by pressing 34 SPEAKERS A or B on 34 the remote control. The signals this unit cannot reproduce (a Play a source whose signals this unit. received from a source component. The HDMI components connected to a strong Set this unit and on all speaker wire connections on this unit can reproduce. No picture V CONV. Turn...
... use - No sound Incorrect input or output cable connections. MULTI CH INPUT or the input selector buttons on the remote control). If the problem persists, the cables may be used have not Select the front speakers by pressing 34 SPEAKERS A or B on 34 the remote control. The signals this unit cannot reproduce (a Play a source whose signals this unit. received from a source component. The HDMI components connected to a strong Set this unit and on all speaker wire connections on this unit can reproduce. No picture V CONV. Turn...

MCXSP10 Manual
Page 115
... the automatic tuning method. Use an outdoor antenna and a ground wire. There are loose. A TV set is too weak. ■ Tuner TROUBLESHOOTING Problem Cause Remedy FM stereo reception is poor. The characteristics of the following messages may cause this problem when the transmitter is too far away or the antenna input is noisy. Use the manual tuning method. Adjust the antenna position to be tuned in the front panel display.
... the automatic tuning method. Use an outdoor antenna and a ground wire. There are loose. A TV set is too weak. ■ Tuner TROUBLESHOOTING Problem Cause Remedy FM stereo reception is poor. The characteristics of the following messages may cause this problem when the transmitter is too far away or the antenna input is noisy. Use the manual tuning method. Adjust the antenna position to be tuned in the front panel display.


