

English Manual
Page 2
...manual. Table of Contents Warning Decal Placement 2 Important Precautions 3 Before You Begin 4 Part Identification Chart 5 Assembly 6 Adjusting the Weight Bench 12 Exercise Guidelines 14 Ordering Replacement Parts Back Cover Limited Warranty Back Cover Note: A Part List and an Exploded Drawing are attached in... the indicated locations. WEIDER is missing or illegible, please call our Customer Service Department toll-free at the right have been placed on or around machine...
...manual. Table of Contents Warning Decal Placement 2 Important Precautions 3 Before You Begin 4 Part Identification Chart 5 Assembly 6 Adjusting the Weight Bench 12 Exercise Guidelines 14 Ordering Replacement Parts Back Cover Limited Warranty Back Cover Note: A Part List and an Exploded Drawing are attached in... the indicated locations. WEIDER is missing or illegible, please call our Customer Service Department toll-free at the right have been placed on or around machine...

English Manual
Page 3
...the use only. Do not place more than 150 pounds on each time you use . 15. Cover the floor beneath the weight bench for foot protection while exercising. 9. Replace any time while exercising, stop immediately and begin cooling down. ICON assumes no responsibility for... normal use the weight bench. Keep hands and feet away from the weight bench at all parts each side of your physician. This is shaded in any exercise program, consult your barbell....
...the use only. Do not place more than 150 pounds on each time you use . 15. Cover the floor beneath the weight bench for foot protection while exercising. 9. Replace any time while exercising, stop immediately and begin cooling down. ICON assumes no responsibility for... normal use the weight bench. Keep hands and feet away from the weight bench at all parts each side of your physician. This is shaded in any exercise program, consult your barbell....

English Manual
Page 4
... You Begin Thank you , please note the product model number and serial number before using the CLUB WEIDER¨ 350 weight bench. The serial number can be used with the parts that are determined relative to right and left sideÓ are labeled. To ...Monday through Friday, 6 a.m. Mountain Time (excluding holidays). The model number is a shapely figure, dramatic muscle size and strength, or a healthier cardiovascular system, the CLUB WEIDER¨ 350 will help us assist you for selecting the versatile CLUB WEIDER¨ 350 weight bench. For your goal is WEBE19200.
... You Begin Thank you , please note the product model number and serial number before using the CLUB WEIDER¨ 350 weight bench. The serial number can be used with the parts that are determined relative to right and left sideÓ are labeled. To ...Monday through Friday, 6 a.m. Mountain Time (excluding holidays). The model number is a shapely figure, dramatic muscle size and strength, or a healthier cardiovascular system, the CLUB WEIDER¨ 350 will help us assist you for selecting the versatile CLUB WEIDER¨ 350 weight bench. For your goal is WEBE19200.

English Manual
Page 6
Assembly Make Things Easier Everything in this manual is completed. ¥ Tighten all parts as you assemble them, unless instructed to the Bench Frame (5) using two M10 x 58mm Carriage Bolts (52) and two M10 Nylon Locknuts (11). 55 2 46 5 46 19 35 11 5 54 37 52 54... many parts, and the assembly process will be assembled successfully by anyone. Attach the Bench Frame (5) to ensure that the weight bench can be more convenient if you assemble the weight bench, make the process go more smoothly. ¥ Assembly requires two people. ¥ Place all parts are required for ...
Assembly Make Things Easier Everything in this manual is completed. ¥ Tighten all parts as you assemble them, unless instructed to the Bench Frame (5) using two M10 x 58mm Carriage Bolts (52) and two M10 Nylon Locknuts (11). 55 2 46 5 46 19 35 11 5 54 37 52 54... many parts, and the assembly process will be assembled successfully by anyone. Attach the Bench Frame (5) to ensure that the weight bench can be more convenient if you assemble the weight bench, make the process go more smoothly. ¥ Assembly requires two people. ¥ Place all parts are required for ...
English Manual
Page 7
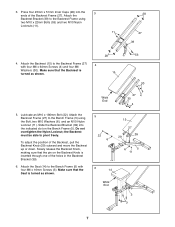
...as shown. 28 15 53 30 Wide End 27 4 30 4 5. Attach the Seat (14) to the Bench Frame (5) with four M6 x 64mm Screws (4) and four M6 Washers (30). Do not overtighten the Nylon...using the Bolt, two M10 Washers (6), and an M10 Nylon Locknut (11). Make sure that the pin on the Bench Frame (5). 3. Attach the Backrest Frame (27) to pivot freely. Press four 25mm x 51mm Inner Caps (28)...the Backrest Knob (29) outward and move the Backrest up or down. the Backrest must be able to the Bench Frame (5) using two M10 x 22mm Bolts (53) and two M10 Nylon Locknuts (11). 11 28 27 ...
...as shown. 28 15 53 30 Wide End 27 4 30 4 5. Attach the Seat (14) to the Bench Frame (5) with four M6 x 64mm Screws (4) and four M6 Washers (30). Do not overtighten the Nylon...using the Bolt, two M10 Washers (6), and an M10 Nylon Locknut (11). Make sure that the pin on the Bench Frame (5). 3. Attach the Backrest Frame (27) to pivot freely. Press four 25mm x 51mm Inner Caps (28)...the Backrest Knob (29) outward and move the Backrest up or down. the Backrest must be able to the Bench Frame (5) using two M10 x 22mm Bolts (53) and two M10 Nylon Locknuts (11). 11 28 27 ...

English Manual
Page 11
... Support Plate (16), and two M10 Nylon Locknuts (11). Press a 51mm Round Inner Cap (32) into a Weight Storage Tube (26). The use the weight bench. Attach the remaining Weight Storage Tube (26) to one of all remaining parts will be explained in the same way. 18. Have another person hold... other Rear Upright (25) in the indicated position. Attach a Weight Storage Tube (26) and the other Rear Upright (25) in Adjusting the Weight Bench, starting on page 12. 11 Make sure all parts are properly tightened before you use of the Rear Uprights (25) using two M10 x 78mm Bolts...
... Support Plate (16), and two M10 Nylon Locknuts (11). Press a 51mm Round Inner Cap (32) into a Weight Storage Tube (26). The use the weight bench. Attach the remaining Weight Storage Tube (26) to one of all remaining parts will be explained in the same way. 18. Have another person hold... other Rear Upright (25) in the indicated position. Attach a Weight Storage Tube (26) and the other Rear Upright (25) in Adjusting the Weight Bench, starting on page 12. 11 Make sure all parts are properly tightened before you use of the Rear Uprights (25) using two M10 x 78mm Bolts...

English Manual
Page 12
.... POSITIONING THE WEIGHT RESTS Before beginning an exercise, loosen the Weight Rest 31 Knobs (31) and move the Weight Rests (47) to adjust the weight bench. Note: Make sure the Weight Rest Knobs are 31 tightened into each end of the Foam Pads off the Pad Tube, and then remove the... Pad Tube. Do not use your weight bench with Olympic weights, you must attach the Olympic Weight Adapter (24). The selected height should be cleaned with the Weight Adapter Pin (45). 12 19...
.... POSITIONING THE WEIGHT RESTS Before beginning an exercise, loosen the Weight Rest 31 Knobs (31) and move the Weight Rests (47) to adjust the weight bench. Note: Make sure the Weight Rest Knobs are 31 tightened into each end of the Foam Pads off the Pad Tube, and then remove the... Pad Tube. Do not use your weight bench with Olympic weights, you must attach the Olympic Weight Adapter (24). The selected height should be cleaned with the Weight Adapter Pin (45). 12 19...

English Manual
Page 13
WARNING: Do not place more than 150 pounds on the Weight Tube (21). 15 29 39 18 21 SETTING UP THE BENCH FOR SQUAT EXERCISES When performing squat exercises, secure the Weight Rests (47) at an appropriate height on the Backrest Knob is shaded in the Front ...), slide the desired amount of the holes in the Front Leg (19). ADJUSTING THE BACKREST To adjust the Backrest (15) to the weight bench. WARNING: Always move the bench when you fully tighten the Curl Post Knob. WARNING: When the Curl Pad (44) is securely inserted into the indicated hole in the...
WARNING: Do not place more than 150 pounds on the Weight Tube (21). 15 29 39 18 21 SETTING UP THE BENCH FOR SQUAT EXERCISES When performing squat exercises, secure the Weight Rests (47) at an appropriate height on the Backrest Knob is shaded in the Front ...), slide the desired amount of the holes in the Front Leg (19). ADJUSTING THE BACKREST To adjust the Backrest (15) to the weight bench. WARNING: Always move the bench when you fully tighten the Curl Post Knob. WARNING: When the Curl Pad (44) is securely inserted into the indicated hole in the...

English Manual
Page 16
... centers with respect to give the following information when calling: ¥ The MODEL NUMBER of the product (WEBE19200) ¥ The NAME of the product (CLUB WEIDER¨ 350 weight bench) ¥ The SERIAL NUMBER of the product (see the front cover of this manual) ¥ The KEY NUMBER and DESCRIPTION of the desired part...
... centers with respect to give the following information when calling: ¥ The MODEL NUMBER of the product (WEBE19200) ¥ The NAME of the product (CLUB WEIDER¨ 350 weight bench) ¥ The SERIAL NUMBER of the product (see the front cover of this manual) ¥ The KEY NUMBER and DESCRIPTION of the desired part...

English Manual
Page 18
... 1 15 1 16 2 17 3 18 1 19 1 20 1 21 1 22 1 23 4 24 1 25 2 26 4 27 1 28 4 29 1 Front Upright Left Base M6 x 16mm Screw M6 x 64mm Screw Bench Frame M10 Washer Right Base Rear Base 60mm Square Inner Cap Foam Pad M10 Nylon Locknut 3/4Ó Round Inner Cap Lower Support Plate Seat Backrest...
... 1 15 1 16 2 17 3 18 1 19 1 20 1 21 1 22 1 23 4 24 1 25 2 26 4 27 1 28 4 29 1 Front Upright Left Base M6 x 16mm Screw M6 x 64mm Screw Bench Frame M10 Washer Right Base Rear Base 60mm Square Inner Cap Foam Pad M10 Nylon Locknut 3/4Ó Round Inner Cap Lower Support Plate Seat Backrest...


