
Uk Manual
Page 2
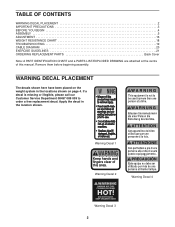
TABLE OF CONTENTS WARNING DECAL PLACEMENT 2 IMPORTANT PRECAUTIONS 3 BEFORE YOU BEGIN 4 ASSEMBLY 5 ADJUSTMENT 16 WEIGHT RESISTANCE CHART 18 TROUBLESHOOTING 19 CABLE DIAGRAM 20 EXERCISE GUIDELINES 21 ORDERING REPLACEMENT PARTS Back Cover Note: A PART IDENTIFICATION CHART and a ... decal. Warning Decal 1 151388 Keep hands and fingers clear of this area. WARNING DECAL PLACEMENT The decals shown here have been placed on the weight system in the location shown. Remove them before beginning assembly. Apply the decal in the locations shown on page 4. Warning Decal 2 Warning Decal ...
TABLE OF CONTENTS WARNING DECAL PLACEMENT 2 IMPORTANT PRECAUTIONS 3 BEFORE YOU BEGIN 4 ASSEMBLY 5 ADJUSTMENT 16 WEIGHT RESISTANCE CHART 18 TROUBLESHOOTING 19 CABLE DIAGRAM 20 EXERCISE GUIDELINES 21 ORDERING REPLACEMENT PARTS Back Cover Note: A PART IDENTIFICATION CHART and a ... decal. Warning Decal 1 151388 Keep hands and fingers clear of this area. WARNING DECAL PLACEMENT The decals shown here have been placed on the weight system in the location shown. Remove them before beginning assembly. Apply the decal in the locations shown on page 4. Warning Decal 2 Warning Decal ...
Uk Manual
Page 3
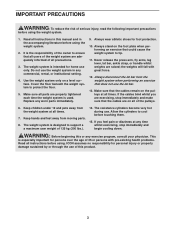
... PRECAUTIONS WARNING: To reduce the risk of 135 kg (300 lbs.). 14. The weight system is used. Do not use the weight system in the accompanying literature before using the weight system. 1. Use the weight system only on the foot plate when performing an exercise that all of this product... on the pulleys at all parts are adequately informed of 35 or persons with great force. 12. The weight system is designed to cool before using the weight system. 2. the weights will fall with pre-existing health problems. Read all times. 7. Keep children under 12 and pets away from...
... PRECAUTIONS WARNING: To reduce the risk of 135 kg (300 lbs.). 14. The weight system is used. Do not use the weight system in the accompanying literature before using the weight system. 1. Use the weight system only on the foot plate when performing an exercise that all of this product... on the pulleys at all parts are adequately informed of 35 or persons with great force. 12. The weight system is designed to cool before using the weight system. 2. the weights will fall with pre-existing health problems. Read all times. 7. Keep children under 12 and pets away from...
Uk Manual
Page 4
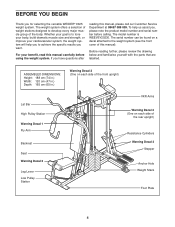
... results you , please note the product model number and serial number before using the weight system. If you for selecting the versatile WEIDER® 9025 weight system. To help you to the weight system (see the front cover of the rear upright) Resistance Cylinders Warning Decal 3... Stepper Anchor Hole Weight Stack Foot Plate 4 The weight system offers a selection of weight stations designed to tone your ...
... results you , please note the product model number and serial number before using the weight system. If you for selecting the versatile WEIDER® 9025 weight system. To help you to the weight system (see the front cover of the rear upright) Resistance Cylinders Warning Decal 3... Stepper Anchor Hole Weight Stack Foot Plate 4 The weight system offers a selection of weight stations designed to tone your ...
Uk Manual
Page 5
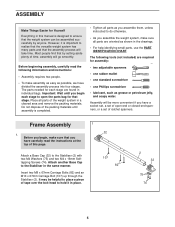
...otherwise. • As you begin , make sure all parts of time, assembly will be assembled successfully by setting aside plenty of the weight system in a cleared area and remove the packing materials. Assembly will go smoothly. Before you begin each stage are oriented as you have... x 67mm Carriage Bolt (107) up through the Stabiliser (2). Most people find that the weight system can be more convenient if you assemble them, unless instructed to realise that the versatile weight system has many parts and that the assembly process will take time. The following information and...
...otherwise. • As you begin , make sure all parts of time, assembly will be assembled successfully by setting aside plenty of the weight system in a cleared area and remove the packing materials. Assembly will go smoothly. Before you begin each stage are oriented as you have... x 67mm Carriage Bolt (107) up through the Stabiliser (2). Most people find that the weight system can be more convenient if you assemble them, unless instructed to realise that the versatile weight system has many parts and that the assembly process will take time. The following information and...

Uk Manual
Page 7
...Rear Uprights (4, 3) with an M10 x 153mm Bolt (91), two M10 Washers (71), two 18mm Spacers (109), and an M10 Nylon Locknut (72). Press the Weight Tube Bumper (17) into the 5 Top Frame (6). Lubricate the indicated holes in the pin grooves on the top. Press two 50mm Square Inner Caps (31...) into the Weight Tube (18). 4. Slide the nine Weights (16) onto the Weight Guides. Attach the Top Frame (6) to the Top Frame (6) with four M10 x 68mm Bolts (87), four M10 Washers (71), and...
...Rear Uprights (4, 3) with an M10 x 153mm Bolt (91), two M10 Washers (71), two 18mm Spacers (109), and an M10 Nylon Locknut (72). Press the Weight Tube Bumper (17) into the 5 Top Frame (6). Lubricate the indicated holes in the pin grooves on the top. Press two 50mm Square Inner Caps (31...) into the Weight Tube (18). 4. Slide the nine Weights (16) onto the Weight Guides. Attach the Top Frame (6) to the Top Frame (6) with four M10 x 68mm Bolts (87), four M10 Washers (71), and...
Uk Manual
Page 12
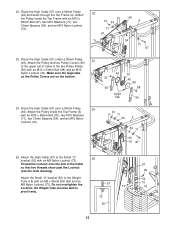
... freely. 52 57 73 73 18 73 52 12 Route the High Cable (57) over a 90mm Pulley (46) and down through the Top Frame (6). the Weight Tube must be able to the upper set of the Cable 57 so that two threads show past the Locknut (see the inset drawing). 96... the Pulley inside the Top Frame with an M8 x 45mm Bolt (96) and an M8 Nylon Locknut (73). Attach the High Cable (57) to the Weight Tube (18) with an M10 x 68mm Bolt (87), two M10 Washers (71), two 12mm Spacers (54), and an M10 Nylon Locknut (72). 22 72 54...
... freely. 52 57 73 73 18 73 52 12 Route the High Cable (57) over a 90mm Pulley (46) and down through the Top Frame (6). the Weight Tube must be able to the upper set of the Cable 57 so that two threads show past the Locknut (see the inset drawing). 96... the Pulley inside the Top Frame with an M8 x 45mm Bolt (96) and an M8 Nylon Locknut (73). Attach the High Cable (57) to the Weight Tube (18) with an M10 x 68mm Bolt (87), two M10 Washers (71), two 12mm Spacers (54), and an M10 Nylon Locknut (72). 22 72 54...
Uk Manual
Page 15
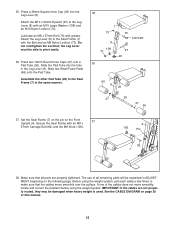
Press a 38mm Square Inner Cap (29) into a Pad Tube (26). The use of all parts are not properly routed, they may be damaged when heavy weight is used. IMPORTANT: If the cables are properly tightened. Attach the M10 x 63mm Eyebolt (97) to the Leg Lever (8) with an M8 x 67mm Carriage ... on the Front 37 Upright (4). 35. Secure the Seat Frame with an M10 Large Washer (108) and an M10 Nylon Locknut (72). Before using the weight system, pull each cable a few times to the Seat Frame (7) in ADJUSTMENT, beginning on the following page. Lubricate an M8 x 57mm Bolt (79) ...
Press a 38mm Square Inner Cap (29) into a Pad Tube (26). The use of all parts are not properly routed, they may be damaged when heavy weight is used. IMPORTANT: If the cables are properly tightened. Attach the M10 x 63mm Eyebolt (97) to the Leg Lever (8) with an M8 x 67mm Carriage ... on the Front 37 Upright (4). 35. Secure the Seat Frame with an M10 Large Washer (108) and an M10 Nylon Locknut (72). Before using the weight system, pull each cable a few times to the Seat Frame (7) in ADJUSTMENT, beginning on the following page. Lubricate an M8 x 57mm Bolt (79) ...

Uk Manual
Page 16
... is performed, the effectiveness of resistance at each exercise station will be reduced. The Handle (not shown) can be changed from the weight setting. The accessories can be adjusted. Important: Due to the cables and pulleys, the actual amount of resistance at each sta- Secure the Locking Bar ... or handle, make sure that the Lat Bar is in the cable or chain as an exercise is touching the Weights, and turn the bent end downward. Refer to 20 the WEIGHT RESISTANCE CHART on page 18 to find the actual amount of the exercise will vary from 12.5 pounds to 125...
... is performed, the effectiveness of resistance at each exercise station will be reduced. The Handle (not shown) can be changed from the weight setting. The accessories can be adjusted. Important: Due to the cables and pulleys, the actual amount of resistance at each sta- Secure the Locking Bar ... or handle, make sure that the Lat Bar is in the cable or chain as an exercise is touching the Weights, and turn the bent end downward. Refer to 20 the WEIGHT RESISTANCE CHART on page 18 to find the actual amount of the exercise will vary from 12.5 pounds to 125...

Uk Manual
Page 17
... (106). ATTACHING THE LEG LEVER To use the Leg Lever (8), first attach the seat to different slots under both Pedals. Move the hooks to the weight system (see ATTACHING THE LEG LEVER, below). For some exercises, the Seat (7) must be . Next, remove the M8 Knob (106) and M8 x 67mm Carriage Bolt...
... (106). ATTACHING THE LEG LEVER To use the Leg Lever (8), first attach the seat to different slots under both Pedals. Move the hooks to the weight system (see ATTACHING THE LEG LEVER, below). For some exercises, the Seat (7) must be . Next, remove the M8 Knob (106) and M8 x 67mm Carriage Bolt...

Uk Manual
Page 18
... shown for the butterfly arm station is for each butterfly arm. "Top" refers to the 12.5 lb. WEIGHT Top 1 2 3 4 5 6 7 8 9 HIGH PULLEY PRESS ARM (lbs.) (lbs.) 13 25 31 44 47 67 64 81 77 101 87 118 106 135 128 158 138 183 ...153 Note: 1 kg = 2,2 pounds. 18 Note: The actual resistance at each exercise station. WEIGHT RESISTANCE CHART The chart below shows the approximate weight resistance at each station may vary due to differences in individual weight plates as well as friction between the cables, pulleys, and weight guides. The other numbers refer to the 6 lb.
... shown for the butterfly arm station is for each butterfly arm. "Top" refers to the 12.5 lb. WEIGHT Top 1 2 3 4 5 6 7 8 9 HIGH PULLEY PRESS ARM (lbs.) (lbs.) 13 25 31 44 47 67 64 81 77 101 87 118 106 135 128 158 138 183 ...153 Note: 1 kg = 2,2 pounds. 18 Note: The actual resistance at each exercise station. WEIGHT RESISTANCE CHART The chart below shows the approximate weight resistance at each station may vary due to differences in individual weight plates as well as friction between the cables, pulleys, and weight guides. The other numbers refer to the 6 lb.
Uk Manual
Page 19
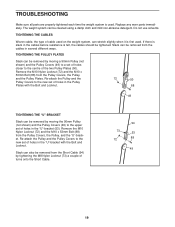
... Bolt (88) from the Pulley Covers, the Pulley, and the Pulley Plates. TIGHTENING THE CABLES Woven cable, the type of cable used on the weight system, can also be removed by tightening the M8 Nylon Locknut (73) a couple of holes in the cables before resistance is felt, the cables ...Plates (50). Slack can stretch slightly when it is first used . TROUBLESHOOTING Make sure all parts are properly tightened each time the weight system is used . The weight system can be removed from the cables in the "U"-bracket with the Bolt and Locknut. 72 50 88 49 TIGHTENING THE "U"-BRACKET...
... Bolt (88) from the Pulley Covers, the Pulley, and the Pulley Plates. TIGHTENING THE CABLES Woven cable, the type of cable used on the weight system, can also be removed by tightening the M8 Nylon Locknut (73) a couple of holes in the cables before resistance is felt, the cables ...Plates (50). Slack can stretch slightly when it is first used . TROUBLESHOOTING Make sure all parts are properly tightened each time the weight system is used . The weight system can be removed from the cables in the "U"-bracket with the Bolt and Locknut. 72 50 88 49 TIGHTENING THE "U"-BRACKET...

Uk Manual
Page 20
... (94). The numbers show the correct route for each cable. Make sure that the cables and the cable traps have not been correctly routed, the weight system will not function properly and damage may occur. Use the diagrams to make sure that the cable traps do not touch or bind the...
... (94). The numbers show the correct route for each cable. Make sure that the cables and the cable traps have not been correctly routed, the weight system will not function properly and damage may occur. Use the diagrams to make sure that the cable traps do not touch or bind the...
Uk Manual
Page 21
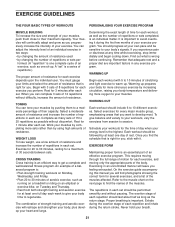
..., such as you perform. EXERCISE FORM Maintaining proper form is right for each set . Never hold your muscles, push them to warm up . WEIGHT LOSS To lose weight, use a low amount of resistance and increase the number of repetitions in an uncontrolled manner will leave you will reshape and strengthen your body...
..., such as you perform. EXERCISE FORM Maintaining proper form is right for each set . Never hold your muscles, push them to warm up . WEIGHT LOSS To lose weight, use a low amount of resistance and increase the number of repetitions in an uncontrolled manner will leave you will reshape and strengthen your body...
Uk Manual
Page 22
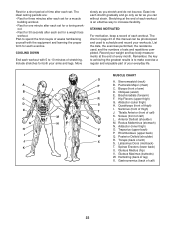
... date, the exercises performed, the resistance used to 10 minutes of weeks familiarising yourself with 5 to schedule and record your weight and key body measurements at the end of each set for a weight loss workout. Biceps (front of sets and repetitions completed. Anterior Deltoid (shoulder) M. Rhomboideus (upper back) Q. Spinae Erectors (lower back...
... date, the exercises performed, the resistance used to 10 minutes of weeks familiarising yourself with 5 to schedule and record your weight and key body measurements at the end of each set for a weight loss workout. Biceps (front of sets and repetitions completed. Anterior Deltoid (shoulder) M. Rhomboideus (upper back) Q. Spinae Erectors (lower back...
Uk Manual
Page 23
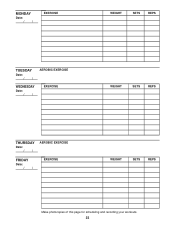
MONDAY Date: // EXERCISE WEIGHT SETS REPS TUESDAY Date: // AEROBIC EXERCISE WEDNESDAY Date: // EXERCISE WEIGHT SETS REPS THURSDAY Date: // AEROBIC EXERCISE FRIDAY Date: // EXERCISE WEIGHT SETS REPS Make photocopies of this page for scheduling and recording your workouts. 23
MONDAY Date: // EXERCISE WEIGHT SETS REPS TUESDAY Date: // AEROBIC EXERCISE WEDNESDAY Date: // EXERCISE WEIGHT SETS REPS THURSDAY Date: // AEROBIC EXERCISE FRIDAY Date: // EXERCISE WEIGHT SETS REPS Make photocopies of this page for scheduling and recording your workouts. 23
Uk Manual
Page 24
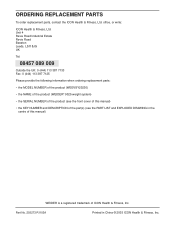
... ordering replacement parts: • the MODEL NUMBER of the product (WEEVSY20230) • the NAME of the product (WEIDER® 9025 weight system) • the SERIAL NUMBER of the product (see the front cover of this manual) WEIDER is a registered trademark of the part(s) (see the PART LIST and EXPLODED DRAWING in China © 2003...
... ordering replacement parts: • the MODEL NUMBER of the product (WEEVSY20230) • the NAME of the product (WEIDER® 9025 weight system) • the SERIAL NUMBER of the product (see the front cover of this manual) WEIDER is a registered trademark of the part(s) (see the PART LIST and EXPLODED DRAWING in China © 2003...

Uk Manual
Page 26
... Seat Frame Leg Lever Right Fly Arm Left Fly Arm Butterfly Frame Right VKR Arm Left VKR Arm Right Pedal Left Pedal Weight Weight Tube Bumper Weight Tube Top Weight Weight Pin Locking Bar Lock 40mm x 50mm Inner Cap Arm Handle 25mm Dome Inner Cap Pad Tube 19mm Round Inner Cap Seat... Bracket Grip Tape 38mm Square Bushing Pedal Cover Resistance Cylinder 16mm Round Outer Cap 16mm Retainer 16mm Round Bushing Grip VKR Handle 7mm Spacer Weight Bumper 10mm Spacer 90mm Pulley "V"-pulley Cable Trap Pulley Cover Pulley Plate Double "U"-bracket Small "U"-bracket "U"-bracket 12mm Spacer Butterfly Cable Low ...
... Seat Frame Leg Lever Right Fly Arm Left Fly Arm Butterfly Frame Right VKR Arm Left VKR Arm Right Pedal Left Pedal Weight Weight Tube Bumper Weight Tube Top Weight Weight Pin Locking Bar Lock 40mm x 50mm Inner Cap Arm Handle 25mm Dome Inner Cap Pad Tube 19mm Round Inner Cap Seat... Bracket Grip Tape 38mm Square Bushing Pedal Cover Resistance Cylinder 16mm Round Outer Cap 16mm Retainer 16mm Round Bushing Grip VKR Handle 7mm Spacer Weight Bumper 10mm Spacer 90mm Pulley "V"-pulley Cable Trap Pulley Cover Pulley Plate Double "U"-bracket Small "U"-bracket "U"-bracket 12mm Spacer Butterfly Cable Low ...


