
English Manual
Page 1
Model No. Write the serial number in this manual before using this manual for reference. USER'S MANUAL Patent Pending Visit our website at www.weiderfitness.com new products, prizes, fitness tips, and much more! As a manufacturer, we are missing or damaged parts, we will provide immediate assistance, free of charge. WEBE09310 Serial No. TO AVOID DELAYS, PLEASE CALL DIRECT TO OUR TOLLFREE CUSTOMER HOT...
Model No. Write the serial number in this manual before using this manual for reference. USER'S MANUAL Patent Pending Visit our website at www.weiderfitness.com new products, prizes, fitness tips, and much more! As a manufacturer, we are missing or damaged parts, we will provide immediate assistance, free of charge. WEBE09310 Serial No. TO AVOID DELAYS, PLEASE CALL DIRECT TO OUR TOLLFREE CUSTOMER HOT...
English Manual
Page 2
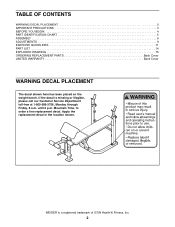
..., Monday through Friday, 6 a.m. Mountain Time, to order a free replacement decal. until 6 p.m. If the decal is a registered trademark of ICON Health & Fitness, Inc. 2 TABLE OF CONTENTS WARNING DECAL PLACEMENT 2 IMPORTANT PRECAUTIONS 3 BEFORE YOU BEGIN 4 PART IDENTIFICATION CHART 5 ASSEMBLY 6 ADJUSTMENTS 9 EXERCISE GUIDELINES 11 PART LIST 14 EXPLODED DRAWING 15 ORDERING REPLACEMENT PARTS Back Cover LIMITED WARRANTY Back Cover WARNING DECAL PLACEMENT The decal shown here has been placed on the weight bench.
..., Monday through Friday, 6 a.m. Mountain Time, to order a free replacement decal. until 6 p.m. If the decal is a registered trademark of ICON Health & Fitness, Inc. 2 TABLE OF CONTENTS WARNING DECAL PLACEMENT 2 IMPORTANT PRECAUTIONS 3 BEFORE YOU BEGIN 4 PART IDENTIFICATION CHART 5 ASSEMBLY 6 ADJUSTMENTS 9 EXERCISE GUIDELINES 11 PART LIST 14 EXPLODED DRAWING 15 ORDERING REPLACEMENT PARTS Back Cover LIMITED WARRANTY Back Cover WARNING DECAL PLACEMENT The decal shown here has been placed on the weight bench.

English Manual
Page 3
... instructions in this manual before beginning any exercise program, consult your partner should stand behind you to support a maximum of 460 pounds, including the user, a weight bar, and weights. Use the weight bench only on the weight rests. Always wear athletic shoes for home use the weight bench. WARNING: Before beginning this product. 3 Note: The weight bench does not include weights or a barbell. 3. Replace any commercial, rental, or institutional setting. 12. When adjusting...
... instructions in this manual before beginning any exercise program, consult your partner should stand behind you to support a maximum of 460 pounds, including the user, a weight bar, and weights. Use the weight bench only on the weight rests. Always wear athletic shoes for home use the weight bench. WARNING: Before beginning this product. 3 Note: The weight bench does not include weights or a barbell. 3. Replace any commercial, rental, or institutional setting. 12. When adjusting...
English Manual
Page 4
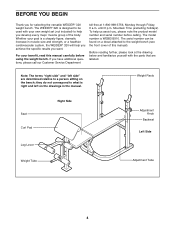
... call our Customer Service Department toll-free at the drawing below and familiarize yourself with your own weight set (not included) to the weight bench (see the front cover of the body. Note: The terms "right side" and "left on a decal attached to help you achieve the specific results you , please note the product model number and serial number before using the weight bench. For your goal...
... call our Customer Service Department toll-free at the drawing below and familiarize yourself with your own weight set (not included) to the weight bench (see the front cover of the body. Note: The terms "right side" and "left on a decal attached to help you achieve the specific results you , please note the product model number and serial number before using the weight bench. For your goal...
English Manual
Page 5
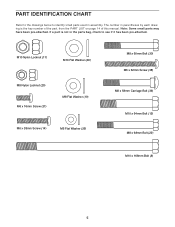
... x 68mm Bolt (22) M10 x 168mm Bolt (8) 5 Note: Some small parts may have been pre-attached. PART IDENTIFICATION CHART Refer to the drawings below to identify small parts used in parentheses by each drawing is not in the parts bag, check to see if it has been pre-attached. If a part is the key number of the part, from the PART LIST on page 14 of this manual.
... x 68mm Bolt (22) M10 x 168mm Bolt (8) 5 Note: Some small parts may have been pre-attached. PART IDENTIFICATION CHART Refer to the drawings below to identify small parts used in parentheses by each drawing is not in the parts bag, check to see if it has been pre-attached. If a part is the key number of the part, from the PART LIST on page 14 of this manual.
English Manual
Page 6
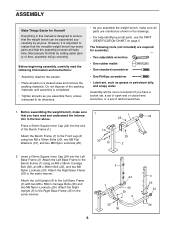
... and understand the informa- Assembly will be assembled successfully by setting aside plenty of ratchet wrenches. 1. Attach the Bench Frame (1) to the Front Leg (2) using an M8 x 58mm Carriage Bolt (36), an M8 x 68mm Bolt (22), and two M8 Nylon Locknuts (25). Attach the Right Upright (5) to the Right Base Frame (35) in the box above. 1 25 24 Press a 50mm Square Inner...
... and understand the informa- Assembly will be assembled successfully by setting aside plenty of ratchet wrenches. 1. Attach the Bench Frame (1) to the Front Leg (2) using an M8 x 58mm Carriage Bolt (36), an M8 x 68mm Bolt (22), and two M8 Nylon Locknuts (25). Attach the Right Upright (5) to the Right Base Frame (35) in the box above. 1 25 24 Press a 50mm Square Inner...
English Manual
Page 7
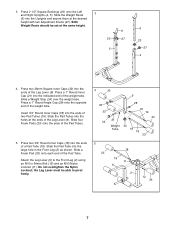
... each end of the Pad Tubes. 5. the Leg Lever must be set at the desired height with two Adjustment Knobs (27). Press two 38mm Square Inner Caps (32) into the holes at the ends of the Leg Lever (9). Slide a Weight Stop (34) over the weight tube. Slide four Foam Pads (33) onto... Slide the Weight Rests 3 (6) into the indicated end of two Pad Tubes (19). Press two 3/4" Round Inner Caps (18) into the ends of the weight tube. Press 2 1/2" Square Bushings (23) onto the Left and Right Uprights (4, 5). Both Weight Rests should be able to the Front Leg (2) using an M10 x 64mm Bolt (12) ...
... each end of the Pad Tubes. 5. the Leg Lever must be set at the desired height with two Adjustment Knobs (27). Press two 38mm Square Inner Caps (32) into the holes at the ends of the Leg Lever (9). Slide a Weight Stop (34) over the weight tube. Slide four Foam Pads (33) onto... Slide the Weight Rests 3 (6) into the indicated end of two Pad Tubes (19). Press two 3/4" Round Inner Caps (18) into the ends of the weight tube. Press 2 1/2" Square Bushings (23) onto the Left and Right Uprights (4, 5). Both Weight Rests should be able to the Front Leg (2) using an M10 x 64mm Bolt (12) ...
English Manual
Page 8
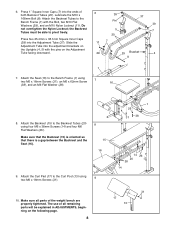
.... Lubricate the M10 x 39 168mm Bolt (8). Attach the Curl Pad (17) to the Bench Frame (1) using four M6 x 38mm Screws (14) and four M6 Flat Washers (26). 6. Slide the 11 7 Adjustment Tube into the ends of the weight bench are properly tightened. Make sure that the Backrest (15) is oriented so that there is a gap between the Backrest and the Seat...
.... Lubricate the M10 x 39 168mm Bolt (8). Attach the Curl Pad (17) to the Bench Frame (1) using four M6 x 38mm Screws (14) and four M6 Flat Washers (26). 6. Slide the 11 7 Adjustment Tube into the ends of the weight bench are properly tightened. Make sure that the Backrest (15) is oriented so that there is a gap between the Backrest and the Seat...
English Manual
Page 9
... form for important exercise information and refer to the accompanying exercise guide to the weight bench when performing squat exercises. Replace any worn parts immediately. You should be cleaned with your back to see the weight rests while exercising so that the Adjustment Tube (37) is securely seated in place by its own weight. ADJUSTMENTS The weight bench is folded. cises. 15 Do not stand with your own weight set of adjustment...
... form for important exercise information and refer to the accompanying exercise guide to the weight bench when performing squat exercises. Replace any worn parts immediately. You should be cleaned with your back to see the weight rests while exercising so that the Adjustment Tube (37) is securely seated in place by its own weight. ADJUSTMENTS The weight bench is folded. cises. 15 Do not stand with your own weight set of adjustment...
English Manual
Page 10
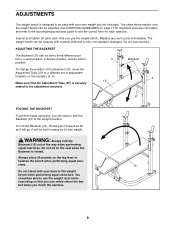
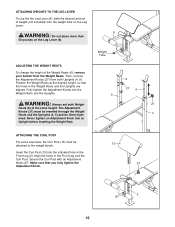
.... WARNING: Always set both Uprights (4, 5). The Adjustment Knobs (27) must be firmly tightened. Never tighten an Adjustment Knob into the Weight Rests and the Uprights. Fully tighten the Adjustment Knobs into an Upright before inserting the Weight Rest. 6 27 6 5 27 4 ATTACHING THE CURL POST For some exercises, the Curl Post (13) must be inserted through the Weight Rests and the Uprights (4, 5) and be attached to the weight bench. Then, remove the Adjustment Knobs (27) from...
.... WARNING: Always set both Uprights (4, 5). The Adjustment Knobs (27) must be firmly tightened. Never tighten an Adjustment Knob into the Weight Rests and the Uprights. Fully tighten the Adjustment Knobs into an Upright before inserting the Weight Rest. 6 27 6 5 27 4 ATTACHING THE CURL POST For some exercises, the Curl Post (13) must be inserted through the Weight Rests and the Uprights (4, 5) and be attached to the weight bench. Then, remove the Adjustment Knobs (27) from...
English Manual
Page 11
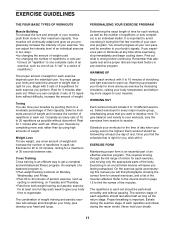
... changing the number of repetitions or sets per- Exercise for 20 to regenerate. Warming up . Schedule your workouts for the time of day when your body for 1 minute after each exercise, and moving only the appropriate parts of the body. Each workout should be followed by at any exercise program. Exercising in two ways: • by changing the amount of weight used • by using high amounts of weight...
... changing the number of repetitions or sets per- Exercise for 20 to regenerate. Warming up . Schedule your workouts for the time of day when your body for 1 minute after each exercise, and moving only the appropriate parts of the body. Each workout should be followed by at any exercise program. Exercising in two ways: • by changing the amount of weight used • by using high amounts of weight...
English Manual
Page 12
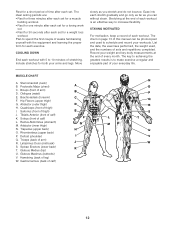
.... Ease into each exercise. List the date, the exercises performed, the weight used to increase flexibility. Record your arms and legs. Sternomastoid (neck) B. Obliques (waist) E. Abductor (outer thigh) D H. Sartorius (front of calf) N O P Q R S T U V W 12 Spinae Erectors (lower back) K T. Gastrocnemius (back of thigh) E J. COOLING DOWN End each workout. Stretching at the end of sets and repetitions completed. Pectoralis Major (chest) A C. Brachioradials (forearm) C F. Triceps...
.... Ease into each exercise. List the date, the exercises performed, the weight used to increase flexibility. Record your arms and legs. Sternomastoid (neck) B. Obliques (waist) E. Abductor (outer thigh) D H. Sartorius (front of calf) N O P Q R S T U V W 12 Spinae Erectors (lower back) K T. Gastrocnemius (back of thigh) E J. COOLING DOWN End each workout. Stretching at the end of sets and repetitions completed. Pectoralis Major (chest) A C. Brachioradials (forearm) C F. Triceps...
English Manual
Page 13
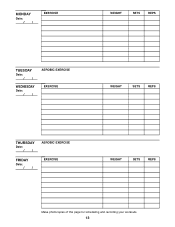
MONDAY Date: / / EXERCISE WEIGHT SETS REPS TUESDAY Date: / / WEDNESDAY Date: / / AEROBIC EXERCISE EXERCISE WEIGHT SETS REPS THURSDAY Date: / / FRIDAY Date: / / AEROBIC EXERCISE EXERCISE WEIGHT SETS REPS Make photocopies of this page for scheduling and recording your workouts. 13
MONDAY Date: / / EXERCISE WEIGHT SETS REPS TUESDAY Date: / / WEDNESDAY Date: / / AEROBIC EXERCISE EXERCISE WEIGHT SETS REPS THURSDAY Date: / / FRIDAY Date: / / AEROBIC EXERCISE EXERCISE WEIGHT SETS REPS Make photocopies of this page for scheduling and recording your workouts. 13
English Manual
Page 14
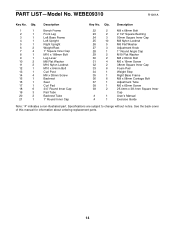
... Pad Weight Stop Right Base Frame M8 x 58mm Carriage Bolt Adjustment Tube M6 x 62mm Screw 25.4mm x 38.1mm Square Inner Cap User's Manual Exercise Guide Note: "#" indicates a non-illustrated part. WEBE09310 R1001A Key No. Specifications are subject to change without notice. Qty. 1 1 2 1 3 1 4 1 5 1 6 2 7 4 8 1 9 1 10 2 11 2 12 1 13 1 14 4 15 1 16 1 17 1 18 6 19 3 20 2 21 1 Description Bench Frame Front Leg Left Base Frame Left Upright Right Upright Weight...
... Pad Weight Stop Right Base Frame M8 x 58mm Carriage Bolt Adjustment Tube M6 x 62mm Screw 25.4mm x 38.1mm Square Inner Cap User's Manual Exercise Guide Note: "#" indicates a non-illustrated part. WEBE09310 R1001A Key No. Specifications are subject to change without notice. Qty. 1 1 2 1 3 1 4 1 5 1 6 2 7 4 8 1 9 1 10 2 11 2 12 1 13 1 14 4 15 1 16 1 17 1 18 6 19 3 20 2 21 1 Description Bench Frame Front Leg Left Base Frame Left Upright Right Upright Weight...

English Manual
Page 15
EXPLODED DRAWING-Model No. WEBE09310 R1001A 39 6 37 39 16 23 6 27 17 15 5 31 13 27 25 35 25 7 26 7 14 24 29 14 20 26 26 11 14 25 36 24 29 8 33 11 25 1 36 25 18 26 32 33 10 31 38 25 30 12 25 9 28 10 18 19 2 18 31 22 36 33 3 18 34 21 32 18 19 19 33 18 27 23 7 4 25 25 24 36 15
EXPLODED DRAWING-Model No. WEBE09310 R1001A 39 6 37 39 16 23 6 27 17 15 5 31 13 27 25 35 25 7 26 7 14 24 29 14 20 26 26 11 14 25 36 24 29 8 33 11 25 1 36 25 18 26 32 33 10 31 38 25 30 12 25 9 28 10 18 19 2 18 31 22 36 33 3 18 34 21 32 18 19 19 33 18 27 23 7 4 25 25 24 36 15
English Manual
Page 16
... and other warranty beyond that specifically set forth herein. Accordingly, the above limitation may not apply to give the following information when calling: • The MODEL NUMBER of the product (WEBE09310) • The NAME of the product (WEIDER® 320 weight bench) • The SERIAL NUMBER of the product (see the front cover of this manual) • The KEY NUMBER and DESCRIPTION of purchase. This warranty gives you...
... and other warranty beyond that specifically set forth herein. Accordingly, the above limitation may not apply to give the following information when calling: • The MODEL NUMBER of the product (WEBE09310) • The NAME of the product (WEIDER® 320 weight bench) • The SERIAL NUMBER of the product (see the front cover of this manual) • The KEY NUMBER and DESCRIPTION of purchase. This warranty gives you...


