
English Manual
Page 1
... THE WEB: www.weiderservice.com CAUTION Read all precautions and instructions in the space above for future reference. Serial Number Decal QUESTIONS? please contact Customer Care. MT Sat. 8 a.m.-4 p.m. USERʼS MANUAL WEBE1038.1 Serial No. www.weiderfitness.com Model No. Keep this manual) before using this equipment. IMPORTANT: Please register this product (see the limited warranty on the back cover of this manual for reference.
... THE WEB: www.weiderservice.com CAUTION Read all precautions and instructions in the space above for future reference. Serial Number Decal QUESTIONS? please contact Customer Care. MT Sat. 8 a.m.-4 p.m. USERʼS MANUAL WEBE1038.1 Serial No. www.weiderfitness.com Model No. Keep this manual) before using this equipment. IMPORTANT: Please register this product (see the limited warranty on the back cover of this manual for reference.

English Manual
Page 2
Apply the decal in the location shown. If a decal is a registered trademark of ICON IP, Inc. 2 TABLE OF CONTENTS WARNING DECAL PLACEMENT 2 IMPORTANT PRECAUTIONS 3 BEFORE YOU BEGIN 4 PART IDENTIFICATION CHART 5 ASSEMBLY 6 EXERCISE GUIDELINES 11 PART LIST 14 EXPLODED DRAWING 15 ORDERING REPLACEMENT PARTS Back Cover LIMITED WARRANTY Back Cover WARNING DECAL PLACEMENT This drawing shows the location(s) of this manual and request a free replacement decal. WEIDER is missing or illegible...
Apply the decal in the location shown. If a decal is a registered trademark of ICON IP, Inc. 2 TABLE OF CONTENTS WARNING DECAL PLACEMENT 2 IMPORTANT PRECAUTIONS 3 BEFORE YOU BEGIN 4 PART IDENTIFICATION CHART 5 ASSEMBLY 6 EXERCISE GUIDELINES 11 PART LIST 14 EXPLODED DRAWING 15 ORDERING REPLACEMENT PARTS Back Cover LIMITED WARRANTY Back Cover WARNING DECAL PLACEMENT This drawing shows the location(s) of this manual and request a free replacement decal. WEIDER is missing or illegible...
English Manual
Page 3
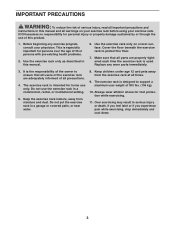
... by or through the use the exercise rack in a commercial, rental, or institutional setting. 5. Replace any exercise program, consult your exercise rack. It is the responsibility of the owner to ensure that all parts are adequately informed of all times. 9. Do not use of this manual. 6. The exercise rack is used. Before beginning any worn parts immediately. 3. Do not put the exercise rack in serious injury...
... by or through the use the exercise rack in a commercial, rental, or institutional setting. 5. Replace any exercise program, consult your exercise rack. It is the responsibility of the owner to ensure that all parts are adequately informed of all times. 9. Do not use of this manual. 6. The exercise rack is used. Before beginning any worn parts immediately. 3. Do not put the exercise rack in serious injury...
English Manual
Page 4
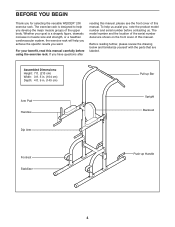
... model number and serial number before using the exercise rack. The exercise rack is a shapely figure, dramatic increase in . (145 cm) Pull-up Bar Arm Pad Handles Upright Backrest Dip Arm Footrest Stabilizer Push-up Handle 4 BEFORE YOU BEGIN Thank you develop the major muscle groups of the upper body. Before reading further, please review the drawing below and familiarize yourself with the parts...
... model number and serial number before using the exercise rack. The exercise rack is a shapely figure, dramatic increase in . (145 cm) Pull-up Bar Arm Pad Handles Upright Backrest Dip Arm Footrest Stabilizer Push-up Handle 4 BEFORE YOU BEGIN Thank you develop the major muscle groups of the upper body. Before reading further, please review the drawing below and familiarize yourself with the parts...
English Manual
Page 5
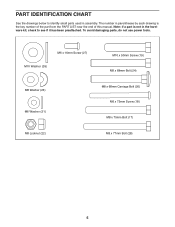
To avoid damaging parts, do not use power tools. The number in parentheses by each drawing is not in assembly. Note: If a part is the key number of the part from the PART LIST near the end of this manual. PART IDENTIFICATION CHART See the drawings below to identify small parts used in the hardware kit, check to see if it has been preattached. M6 x 16mm Screw (27) M10 Washer (26) M8 Washer (23) M6 Washer (21) M8 Locknut (22) M10 x 50mm Screw (19) M8 x 68mm Bolt (24) M8 x 68mm Carriage Bolt (20) M6 x 73mm Screw (18) M8 x 75mm Bolt (17) M8 x 77mm Bolt (28) 5
To avoid damaging parts, do not use power tools. The number in parentheses by each drawing is not in assembly. Note: If a part is the key number of the part from the PART LIST near the end of this manual. PART IDENTIFICATION CHART See the drawings below to identify small parts used in the hardware kit, check to see if it has been preattached. M6 x 16mm Screw (27) M10 Washer (26) M8 Washer (23) M6 Washer (21) M8 Locknut (22) M10 x 50mm Screw (19) M8 x 68mm Bolt (24) M8 x 68mm Carriage Bolt (20) M6 x 73mm Screw (18) M8 x 75mm Bolt (17) M8 x 77mm Bolt (28) 5

English Manual
Page 6
... set, a set of open-end or closed-end wrenches, or a set of ratchet wrenches. 1. Repeat this step with the other Stabilizer (not shown). 1 1 20 20 6 Do not dispose of its weight and size, the exercise rack should be assembled in the location where it . • Place all parts in a cleared area and remove the packing materials. Insert four M8 x 68mm Carriage Bolts (20...
... set, a set of open-end or closed-end wrenches, or a set of ratchet wrenches. 1. Repeat this step with the other Stabilizer (not shown). 1 1 20 20 6 Do not dispose of its weight and size, the exercise rack should be assembled in the location where it . • Place all parts in a cleared area and remove the packing materials. Insert four M8 x 68mm Carriage Bolts (20...

English Manual
Page 7
... Carriage Bolts (20) and two M8 Locknuts (22). Attach the Bottom 3 Crossbar to one of the Stabilizers (1) with two M8 x 77mm Bolts (28), a Support Plate (13), and two M8 Locknuts (22). 2. Hexagonal holes on top. Note: Attach the Upright Base so that the warning decal is on this side 2 22 22 1 20 3. Do not tighten the Locknuts...
... Carriage Bolts (20) and two M8 Locknuts (22). Attach the Bottom 3 Crossbar to one of the Stabilizers (1) with two M8 x 77mm Bolts (28), a Support Plate (13), and two M8 Locknuts (22). 2. Hexagonal holes on top. Note: Attach the Upright Base so that the warning decal is on this side 2 22 22 1 20 3. Do not tighten the Locknuts...

English Manual
Page 8
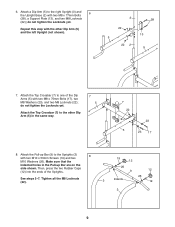
Next, attach the Support (4) to one of the Uprights (3) as shown, and 5 attach it to the lowest set of the Stabilizers (1) with two M8 x 75mm Bolts (17), two M8 Washers (23), and two M8 Locknuts (22); do not tighten the Locknuts yet. Attach a Support (4) to the Upright Base (2) with the two indicated M8 x 68mm Carriage Bolts (20) and two M8 Locknuts (22...
Next, attach the Support (4) to one of the Uprights (3) as shown, and 5 attach it to the lowest set of the Stabilizers (1) with two M8 x 75mm Bolts (17), two M8 Washers (23), and two M8 Locknuts (22); do not tighten the Locknuts yet. Attach a Support (4) to the Upright Base (2) with the two indicated M8 x 68mm Carriage Bolts (20) and two M8 Locknuts (22...
English Manual
Page 9
... the ends of the Dip Arms (5) with the other Dip Arm (5) in the Pull-up Bar (9) to the right Upright (3) and the Upright Base (2) with two M10 x 50mm Screws (19) and two 8 M10 Washers (26). See steps 2-7. 6. Attach a Dip Arm (5) to the Uprights (3) with two M8 x 77mm Bolts 6 (28), a Support Plate (13), and two M8 Locknuts (22); do not tighten the Locknuts yet.
... the ends of the Dip Arms (5) with the other Dip Arm (5) in the Pull-up Bar (9) to the right Upright (3) and the Upright Base (2) with two M10 x 50mm Screws (19) and two 8 M10 Washers (26). See steps 2-7. 6. Attach a Dip Arm (5) to the Uprights (3) with two M8 x 77mm Bolts 6 (28), a Support Plate (13), and two M8 Locknuts (22); do not tighten the Locknuts yet.
English Manual
Page 10
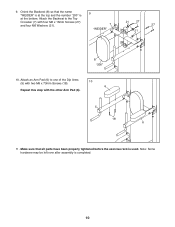
Attach the Backrest to one of the Dip Arms 10 (5) with two M6 x 73mm Screws (18). 6 Repeat this step with four M6 x 16mm Screws (27) and four M6 Washers (21). 9 7 "WEIDER" 21 27 27 21 8 "200" 10. Attach an Arm Pad (6) to the Top Crossbar (7) with the other Arm Pad (6). 5 18 6 11. Make sure that the name "WEIDER" is at the top and the number "200" is at the bottom. Note: Some hardware may be left over after assembly is used. 9. Orient the Backrest (8) so that all parts have been properly tightened before the exercise rack is completed. 10
Attach the Backrest to one of the Dip Arms 10 (5) with two M6 x 73mm Screws (18). 6 Repeat this step with four M6 x 16mm Screws (27) and four M6 Washers (21). 9 7 "WEIDER" 21 27 27 21 8 "200" 10. Attach an Arm Pad (6) to the Top Crossbar (7) with the other Arm Pad (6). 5 18 6 11. Make sure that the name "WEIDER" is at the top and the number "200" is at the bottom. Note: Some hardware may be left over after assembly is used. 9. Orient the Backrest (8) so that all parts have been properly tightened before the exercise rack is completed. 10
English Manual
Page 11
... the proper form for each workout. Record your body time to workout. Use your workouts, vary the exercises from workout to regenerate 11 The exertion stage of stretching. STAYING MOTIVATED For motivation, keep a record of sets and repetitions completed. Working Out-Include 5 to develop. Write the date, the exercises performed, the resistance used, and the numbers of each workout, and the numbers of rest. A "set" is one...
... the proper form for each workout. Record your body time to workout. Use your workouts, vary the exercises from workout to regenerate 11 The exertion stage of stretching. STAYING MOTIVATED For motivation, keep a record of sets and repetitions completed. Working Out-Include 5 to develop. Write the date, the exercises performed, the resistance used, and the numbers of each workout, and the numbers of rest. A "set" is one...
English Manual
Page 12
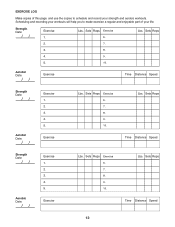
... Date: Exercise 1. Sets Reps 2. 7. 3. 8. 4. 9. 5. 10. Sets Reps Time Distance Speed 12 Lbs. Sets Reps Time Distance Speed Strength Date: Aerobic Date: Exercise 1. 2. 3. 4. 5. EXERCISE LOG Make copies of your strength and aerobic workouts. Sets Reps Exercise 6. Sets Reps Exercise 6. 7. 8. 9. 10. Lbs. Exercise Lbs. Aerobic Date: Exercise Time Distance Speed Strength Date: Aerobic Date: Exercise 1. 2. 3. 4. 5. Scheduling and recording your workouts will help you to make exercise a regular and enjoyable part of this page, and use the...
... Date: Exercise 1. Sets Reps 2. 7. 3. 8. 4. 9. 5. 10. Sets Reps Time Distance Speed 12 Lbs. Sets Reps Time Distance Speed Strength Date: Aerobic Date: Exercise 1. 2. 3. 4. 5. EXERCISE LOG Make copies of your strength and aerobic workouts. Sets Reps Exercise 6. Sets Reps Exercise 6. 7. 8. 9. 10. Lbs. Exercise Lbs. Aerobic Date: Exercise Time Distance Speed Strength Date: Aerobic Date: Exercise 1. 2. 3. 4. 5. Scheduling and recording your workouts will help you to make exercise a regular and enjoyable part of this page, and use the...
English Manual
Page 14
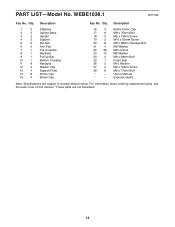
... Locknut M8 Washer M8 x 68mm Bolt Foam Grip M10 Washer M6 x 16mm Screw M8 x 77mm Bolt Userʼs Manual Exercise Guide Note: Specifications are not illustrated. 14 Qty. 1 2 2 2 3 2 4 2 5 2 6 2 7 1 8 1 9 1 10 1 11 8 12 2 13 4 14 8 15 4 Description Stabilizer Upright Base Upright Support Dip Arm Arm Pad Top Crossbar Backrest Pull-up Bar Bottom Crossbar Handgrip Rubber Cap Support Plate 25mm Cap 60mm Cap Key No. Qty. 16 4 17...
... Locknut M8 Washer M8 x 68mm Bolt Foam Grip M10 Washer M6 x 16mm Screw M8 x 77mm Bolt Userʼs Manual Exercise Guide Note: Specifications are not illustrated. 14 Qty. 1 2 2 2 3 2 4 2 5 2 6 2 7 1 8 1 9 1 10 1 11 8 12 2 13 4 14 8 15 4 Description Stabilizer Upright Base Upright Support Dip Arm Arm Pad Top Crossbar Backrest Pull-up Bar Bottom Crossbar Handgrip Rubber Cap Support Plate 25mm Cap 60mm Cap Key No. Qty. 16 4 17...

English Manual
Page 15
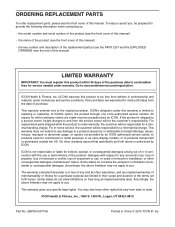
WEBE1038.1 R0710A 14 11 26 12 19 9 12 6 22 14 11 15 14 5 18 11 22 23 22 23 22 13 22 22 17 23 3 22 28 28 13 8 24 15 23 22 7 15 6 14 25 27 21 27 21 22 23 22 23 17 22 11 2 15 23 17 14 23 11 5 11 14 22 23 18 22 28 23 28 22 4 22 22 22 22 1 28 10 16 28 22 4 22 22 20 22 20 22 16 19 26 11 14 3 28 13 24 2 23 17 23 13 11 14 22 22 16 1 20 16 20 15 EXPLODED DRAWING-Model No.
WEBE1038.1 R0710A 14 11 26 12 19 9 12 6 22 14 11 15 14 5 18 11 22 23 22 23 22 13 22 22 17 23 3 22 28 28 13 8 24 15 23 22 7 15 6 14 25 27 21 27 21 22 23 22 23 17 22 11 2 15 23 17 14 23 11 5 11 14 22 23 18 22 28 23 28 22 4 22 22 22 22 1 28 10 16 28 22 4 22 22 20 22 20 22 16 19 26 11 14 3 28 13 24 2 23 17 23 13 11 14 22 22 16 1 20 16 20 15 EXPLODED DRAWING-Model No.
English Manual
Page 16
... above limitation may not apply to avoid added fees for service needed under warranty. This warranty gives you , be prepared to provide the following information when contacting us: • the model number and serial number of the product (see the front cover of this manual) • the name of the product (see the front cover of this manual) • the key number and description of the replacement part...
... above limitation may not apply to avoid added fees for service needed under warranty. This warranty gives you , be prepared to provide the following information when contacting us: • the model number and serial number of the product (see the front cover of this manual) • the name of the product (see the front cover of this manual) • the key number and description of the replacement part...


