English Owners Manual
Page 4
... On and Off........... 47 Remote Operation from Home 50 Setting a security code or . Personal Identification Number (PIN).......... 50 Dialing in to your answering system 50 Wall Mounting the Base 52 Maintenance 54 Specifications 54 Battery Information 54 Battery life 54 Low battery alert 55 Cleaning the charging contacts 55 Battery replacement and... Nickel-Cadmium Batteries Must Be Recycled or Disposed of Properly 64 Important Safety Instructions 65 The FCC Wants You To Know 65 Radio interference 67 Cordless telephone privacy 67 I.C.
... On and Off........... 47 Remote Operation from Home 50 Setting a security code or . Personal Identification Number (PIN).......... 50 Dialing in to your answering system 50 Wall Mounting the Base 52 Maintenance 54 Specifications 54 Battery Information 54 Battery life 54 Low battery alert 55 Cleaning the charging contacts 55 Battery replacement and... Nickel-Cadmium Batteries Must Be Recycled or Disposed of Properly 64 Important Safety Instructions 65 The FCC Wants You To Know 65 Radio interference 67 Cordless telephone privacy 67 I.C.
English Owners Manual
Page 52
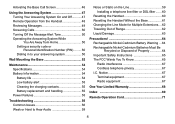
... 8 and 10. Connect the AC adapter and the telephone cords as shown on the bottom of the wall-mount bracket. Tuck the excess cord into place. Wall Mounting the Base This phone can purchase a wall-mount bracket by calling the Uniden Parts Department. (See the back cover page for contact information.) Route the telephone cord through the hole...
... 8 and 10. Connect the AC adapter and the telephone cords as shown on the bottom of the wall-mount bracket. Tuck the excess cord into place. Wall Mounting the Base This phone can purchase a wall-mount bracket by calling the Uniden Parts Department. (See the back cover page for contact information.) Route the telephone cord through the hole...
English Owners Manual
Page 53
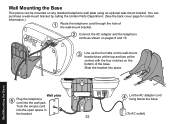
...the weight of the phone, and use the proper type of anchoring device for mounting the phone. • Align the mounting slots over the screws and slide the base down to allow room for the wall material. • Insert two #10 screws (minimum length of the wall-mount bracket as shown, ...and then slide the bracket away from the wall to lock it into place. Slide the base down into place as shown above. 53 Wall Mounting the Base Wall plate (To AC outlet) Note: Mounting the phone...
...the weight of the phone, and use the proper type of anchoring device for mounting the phone. • Align the mounting slots over the screws and slide the base down to allow room for the wall material. • Insert two #10 screws (minimum length of the wall-mount bracket as shown, ...and then slide the bracket away from the wall to lock it into place. Slide the base down into place as shown above. 53 Wall Mounting the Base Wall plate (To AC outlet) Note: Mounting the phone...
English Owners Manual
Page 69
... 50 Any key answer 30 Area code 34 Audio tone 37 AutoTalk 30 B Banner 29 Base Installing 8 Multiple bases 14 Parts of the base 19 Wall mounting 52 Battery Battery life 54 Installing 7 Low battery alert 55 Replacement and handling....... 55 C Caller ID 33 Deleting Caller ID records......... 34 Making calls from...
... 50 Any key answer 30 Area code 34 Audio tone 37 AutoTalk 30 B Banner 29 Base Installing 8 Multiple bases 14 Parts of the base 19 Wall mounting 52 Battery Battery life 54 Installing 7 Low battery alert 55 Replacement and handling....... 55 C Caller ID 33 Deleting Caller ID records......... 34 Making calls from...
English Owners Manual
Page 70
... 34 Static 59 T Text, entering 22 Tone dialing 12, 41 Transferring a call 39 Troubleshooting 56 V Voice mail 42 Waiting indicator reset 42 Volume, adjusting 36 W Wall mounting the base 52 Warranty 68 70
... 34 Static 59 T Text, entering 22 Tone dialing 12, 41 Transferring a call 39 Troubleshooting 56 V Voice mail 42 Waiting indicator reset 42 Volume, adjusting 36 W Wall mounting the base 52 Warranty 68 70


