

User Guide
Page 13
... Lesson 8: Closing programs 115 Lesson 9: Creating shortcuts 116 Creating a shortcut to the Calculator 116 Creating a shortcut to the Character Map ...... 117 Lesson 10: Changing the screen saver 119 Lesson 11: Setting the date and time 121 Lesson 12: Removing objects from the desktop .. 122 Lesson 13: Using System Restore 124 Lesson...
... Lesson 8: Closing programs 115 Lesson 9: Creating shortcuts 116 Creating a shortcut to the Calculator 116 Creating a shortcut to the Character Map ...... 117 Lesson 10: Changing the screen saver 119 Lesson 11: Setting the date and time 121 Lesson 12: Removing objects from the desktop .. 122 Lesson 13: Using System Restore 124 Lesson...
User Guide
Page 26
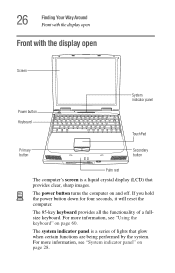
..." on page 28. 26 Finding Your Way Around Front with the display open Front with the display open Screen Power button Keyboard System indicator panel TouchPad Primary button Secondary button Palm rest The computer's screen is a series of a fullsize keyboard. The 85-key keyboard provides all the functionality of lights that provides...
..." on page 28. 26 Finding Your Way Around Front with the display open Front with the display open Screen Power button Keyboard System indicator panel TouchPad Primary button Secondary button Palm rest The computer's screen is a series of a fullsize keyboard. The 85-key keyboard provides all the functionality of lights that provides...
User Guide
Page 32
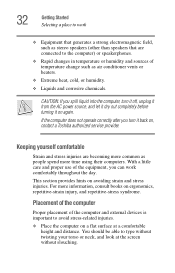
... it from the AC power source, and let it dry out completely before turning it back on a flat surface at the screen without slouching. Placement of the computer Proper placement of the equipment, you spill liquid into the computer, turn it on avoiding strain... and proper use of the computer and external devices is important to avoid stress-related injuries. ❖ Place the computer on , contact a Toshiba authorized service provider. For more information, consult books on ergonomics, repetitive-strain injury, and repetitive-stress syndrome. 32 Getting Started Selecting a place ...
... it from the AC power source, and let it dry out completely before turning it back on a flat surface at the screen without slouching. Placement of the computer Proper placement of the equipment, you spill liquid into the computer, turn it on avoiding strain... and proper use of the computer and external devices is important to avoid stress-related injuries. ❖ Place the computer on , contact a Toshiba authorized service provider. For more information, consult books on ergonomics, repetitive-strain injury, and repetitive-stress syndrome. 32 Getting Started Selecting a place ...
User Guide
Page 33
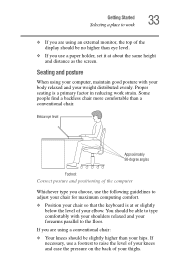
If necessary, use a footrest to work strain. Proper seating is at about the same height and distance as the screen. Some people find a backless chair more comfortable than eye level. ❖ If you are using a conventional chair: ❖ Your knees should be slightly higher than ...
If necessary, use a footrest to work strain. Proper seating is at about the same height and distance as the screen. Some people find a backless chair more comfortable than eye level. ❖ If you are using a conventional chair: ❖ Your knees should be slightly higher than ...

User Guide
Page 34
... are available at many office supply stores. ❖ Sit with your back straight so that sunlight or bright indoor lighting does not reflect off the screen. Arms and wrists ❖ Avoid bending, arching, or twisting your knees, hips, and elbows form approximately 90-degree angles when you while typing, stop using...
... are available at many office supply stores. ❖ Sit with your back straight so that sunlight or bright indoor lighting does not reflect off the screen. Arms and wrists ❖ Avoid bending, arching, or twisting your knees, hips, and elbows form approximately 90-degree angles when you while typing, stop using...
User Guide
Page 35
Intersperse such activities with other tasks. ❖ Focusing your eyes on your computer screen for long periods. Excessive pressure or impact can damage computer components or otherwise cause your computer to sharp impacts. A break of tasks into your working ...
Intersperse such activities with other tasks. ❖ Focusing your eyes on your computer screen for long periods. Excessive pressure or impact can damage computer components or otherwise cause your computer to sharp impacts. A break of tasks into your working ...
User Guide
Page 37
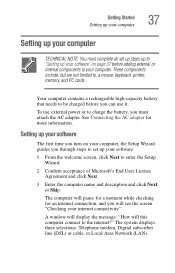
.... Your computer contains a rechargeable high-capacity battery that needs to be charged before adding external or internal components to your software. 1 From the welcome screen, click Next to enter the Setup Wizard. 2 Confirm acceptance of Microsoft's End User License Agreement and click Next. 3 Enter the computer name and...: Telephone modem, Digital subscriber line (DSL) or cable, or Local Area Network (LAN). A window will display the message: "How will see the screen "Checking your internet connectivity." The computer will pause for a moment while checking for more information.
.... Your computer contains a rechargeable high-capacity battery that needs to be charged before adding external or internal components to your software. 1 From the welcome screen, click Next to enter the Setup Wizard. 2 Confirm acceptance of Microsoft's End User License Agreement and click Next. 3 Enter the computer name and...: Telephone modem, Digital subscriber line (DSL) or cable, or Local Area Network (LAN). A window will display the message: "How will see the screen "Checking your internet connectivity." The computer will pause for a moment while checking for more information.
User Guide
Page 44
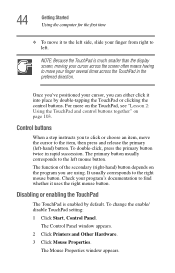
...The primary button usually corresponds to the left -hand) button. Disabling or enabling the TouchPad The TouchPad is much smaller than the display screen, moving your cursor across the TouchPad in rapid succession. 44 Getting Started Using the computer for the first time ❖ To move... your finger several times across the screen often means having to move it to the left side, slide your program's documentation to left. Once you've positioned your cursor, you...
...The primary button usually corresponds to the left -hand) button. Disabling or enabling the TouchPad The TouchPad is much smaller than the display screen, moving your cursor across the TouchPad in rapid succession. 44 Getting Started Using the computer for the first time ❖ To move... your finger several times across the screen often means having to move it to the left side, slide your program's documentation to left. Once you've positioned your cursor, you...
User Guide
Page 68
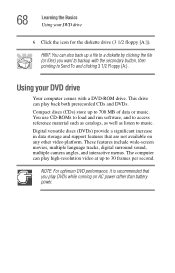
... versatile discs (DVDs) provide a significant increase in data storage and support features that you want to backup with a DVD-ROM drive. These features include wide-screen movies, multiple language tracks, digital surround sound, multiple camera angles, and interactive menus. The computer can also back up to Send To and clicking 3 1/2 Floppy...
... versatile discs (DVDs) provide a significant increase in data storage and support features that you want to backup with a DVD-ROM drive. These features include wide-screen movies, multiple language tracks, digital surround sound, multiple camera angles, and interactive menus. The computer can also back up to Send To and clicking 3 1/2 Floppy...
User Guide
Page 73
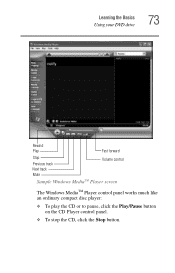
Learning the Basics Using your DVD drive 73 Rewind Play Fast forward Stop Previous track Next track Mute Volume control Sample Windows MediaTM Player screen The Windows MediaTM Player control panel works much like an ordinary compact disc player: ❖ To play the CD or to pause, click the Play/Pause button on the CD Player control panel. ❖ To stop the CD, click the Stop button.
Learning the Basics Using your DVD drive 73 Rewind Play Fast forward Stop Previous track Next track Mute Volume control Sample Windows MediaTM Player screen The Windows MediaTM Player control panel works much like an ordinary compact disc player: ❖ To play the CD or to pause, click the Play/Pause button on the CD Player control panel. ❖ To stop the CD, click the Stop button.
User Guide
Page 83
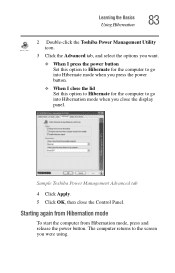
... Management Advanced tab 4 Click Apply. 5 Click OK, then close the display panel. Learning the Basics Using Hibernation 83 2 Double-click the Toshiba Power Management Utility icon. 3 Click the Advanced tab, and select the options you want. ❖ When I press the power button Set this option to Hibernate ... go into Hibernate mode when you press the power button. ❖ When I close the lid Set this option to Hibernate for the computer to the screen you close the Control Panel.
... Management Advanced tab 4 Click Apply. 5 Click OK, then close the display panel. Learning the Basics Using Hibernation 83 2 Double-click the Toshiba Power Management Utility icon. 3 Click the Advanced tab, and select the options you want. ❖ When I press the power button Set this option to Hibernate ... go into Hibernate mode when you press the power button. ❖ When I close the lid Set this option to Hibernate for the computer to the screen you close the Control Panel.
User Guide
Page 86
... future upgrades. If you put the computer in Standby mode by opening the display panel. Toshiba's online resources Toshiba maintains a number of online sites to which you up to the screen you can connect. These sites provide information about Toshiba products, give help with technical questions, and keep you can start the computer from...
... future upgrades. If you put the computer in Standby mode by opening the display panel. Toshiba's online resources Toshiba maintains a number of online sites to which you up to the screen you can connect. These sites provide information about Toshiba products, give help with technical questions, and keep you can start the computer from...

User Guide
Page 99
..., the differences are not significant and do not indicate any change in this guide may appear slightly different from this chapter will gain from the screens displayed by guiding you explore your system. Whether you have used a Windows®operating system or not, the skill and confidence you will more detailed...
..., the differences are not significant and do not indicate any change in this guide may appear slightly different from this chapter will gain from the screens displayed by guiding you explore your system. Whether you have used a Windows®operating system or not, the skill and confidence you will more detailed...
User Guide
Page 103
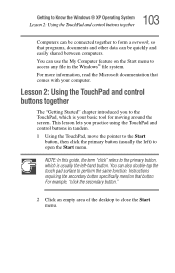
... control buttons in the Windows® file system. For more information, read the Microsoft documentation that comes with your basic tool for moving around the screen. This lesson lets you to the TouchPad, which is your computer. 103 Getting to Know the Windows® XP Operating System Lesson 2: Using the TouchPad...
... control buttons in the Windows® file system. For more information, read the Microsoft documentation that comes with your basic tool for moving around the screen. This lesson lets you to the TouchPad, which is your computer. 103 Getting to Know the Windows® XP Operating System Lesson 2: Using the TouchPad...
User Guide
Page 105
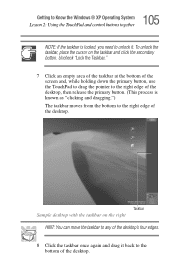
Uncheck "Lock the Taskbar." 7 Click an empty area of the taskbar at the bottom of the screen and, while holding down the primary button, use the TouchPad to drag the pointer to the right edge of the desktop, then release the primary ...
Uncheck "Lock the Taskbar." 7 Click an empty area of the taskbar at the bottom of the screen and, while holding down the primary button, use the TouchPad to drag the pointer to the right edge of the desktop, then release the primary ...
User Guide
Page 111
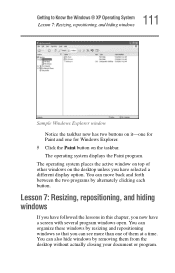
... organize these windows by alternately clicking each button. Lesson 7: Resizing, repositioning, and hiding windows If you have followed the lessons in this chapter, you have a screen with several program windows open. You can move back and forth between the two programs by resizing and repositioning windows so that you can see...
... organize these windows by alternately clicking each button. Lesson 7: Resizing, repositioning, and hiding windows If you have followed the lessons in this chapter, you have a screen with several program windows open. You can move back and forth between the two programs by resizing and repositioning windows so that you can see...

User Guide
Page 113
... less than half the width of the desktop. 4 Click the title bar of the Paint window and drag it . 5 Click Windows Explorer button on the screen. Notice that the Maximize button has changed back into the Maximize button. For the next few steps assume that you are only using that program... and do not want to be able to see both Paint and Windows Explorer at the same time. 2 Move the pointer to fill the screen, hiding everything except the taskbar.
... less than half the width of the desktop. 4 Click the title bar of the Paint window and drag it . 5 Click Windows Explorer button on the screen. Notice that the Maximize button has changed back into the Maximize button. For the next few steps assume that you are only using that program... and do not want to be able to see both Paint and Windows Explorer at the same time. 2 Move the pointer to fill the screen, hiding everything except the taskbar.
User Guide
Page 119
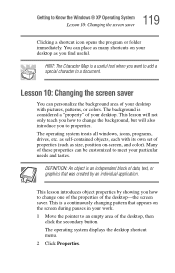
...your desktop. The operating system displays the desktop shortcut menu. 2 Click Properties. The background is an independent block of the desktop-the screen saver. 119 Getting to an empty area of the desktop, then click the secondary button. This lesson will also introduce you find useful.... You can be customized to meet your work. 1 Move the pointer to Know the Windows® XP Operating System Lesson 10: Changing the screen saver Clicking a shortcut icon opens the program or folder immediately. The operating system treats all windows, icons, programs, drives, etc. as self-...
...your desktop. The operating system displays the desktop shortcut menu. 2 Click Properties. The background is an independent block of the desktop-the screen saver. 119 Getting to an empty area of the desktop, then click the secondary button. This lesson will also introduce you find useful.... You can be customized to meet your work. 1 Move the pointer to Know the Windows® XP Operating System Lesson 10: Changing the screen saver Clicking a shortcut icon opens the program or folder immediately. The operating system treats all windows, icons, programs, drives, etc. as self-...
User Guide
Page 120
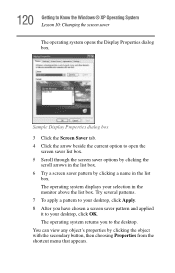
... tab. 4 Click the arrow beside the current option to Know the Windows® XP Operating System Lesson 10: Changing the screen saver The operating system opens the Display Properties dialog box. You can view any object's properties by clicking a name in the monitor above the ...list box. The operating system returns you have chosen a screen saver pattern and applied it to the desktop. Try several patterns. 7 To apply a pattern to your desktop, click Apply. 8 After you to your selection ...
... tab. 4 Click the arrow beside the current option to Know the Windows® XP Operating System Lesson 10: Changing the screen saver The operating system opens the Display Properties dialog box. You can view any object's properties by clicking a name in the monitor above the ...list box. The operating system returns you have chosen a screen saver pattern and applied it to the desktop. Try several patterns. 7 To apply a pattern to your desktop, click Apply. 8 After you to your selection ...
User Guide
Page 124
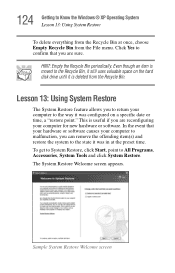
... Lesson 13: Using System Restore To delete everything from the Recycle Bin at the preset time. Sample System Restore Welcome screen In the event that you are sure. The System Restore Welcome screen appears. Lesson 13: Using System Restore The System Restore feature allows you to return your computer to malfunction, you...
... Lesson 13: Using System Restore To delete everything from the Recycle Bin at the preset time. Sample System Restore Welcome screen In the event that you are sure. The System Restore Welcome screen appears. Lesson 13: Using System Restore The System Restore feature allows you to return your computer to malfunction, you...


