

User Guide
Page 13
... Lesson 8: Closing programs 115 Lesson 9: Creating shortcuts 116 Creating a shortcut to the Calculator 116 Creating a shortcut to the Character Map ...... 117 Lesson 10: Changing the screen saver 119 Lesson 11: Setting the date and time 121 Lesson 12: Removing objects from the desktop .. 122 Lesson 13: Using System Restore 124 Lesson...
... Lesson 8: Closing programs 115 Lesson 9: Creating shortcuts 116 Creating a shortcut to the Calculator 116 Creating a shortcut to the Character Map ...... 117 Lesson 10: Changing the screen saver 119 Lesson 11: Setting the date and time 121 Lesson 12: Removing objects from the desktop .. 122 Lesson 13: Using System Restore 124 Lesson...
User Guide
Page 26
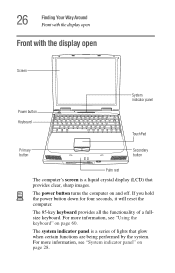
..." on and off. 26 Finding Your Way Around Front with the display open Front with the display open Screen Power button Keyboard System indicator panel TouchPad Primary button Secondary button Palm rest The computer's screen is a series of a fullsize keyboard. For more information, see "Using the keyboard" on page 60. If you...
..." on and off. 26 Finding Your Way Around Front with the display open Front with the display open Screen Power button Keyboard System indicator panel TouchPad Primary button Secondary button Palm rest The computer's screen is a series of a fullsize keyboard. For more information, see "Using the keyboard" on page 60. If you...
User Guide
Page 32
...❖ Rapid changes in temperature or humidity and sources of temperature change such as people spend more information, consult books on , contact a Toshiba authorized service provider. For more time using their computers. With a little care and proper use of the computer and external devices is important ...comfortable height and distance. You should be able to avoid stress-related injuries. ❖ Place the computer on a flat surface at the screen without slouching. If the computer does not operate correctly after you turn it off, unplug it from the AC power source, and let ...
...❖ Rapid changes in temperature or humidity and sources of temperature change such as people spend more information, consult books on , contact a Toshiba authorized service provider. For more time using their computers. With a little care and proper use of the computer and external devices is important ...comfortable height and distance. You should be able to avoid stress-related injuries. ❖ Place the computer on a flat surface at the screen without slouching. If the computer does not operate correctly after you turn it off, unplug it from the AC power source, and let ...
User Guide
Page 33
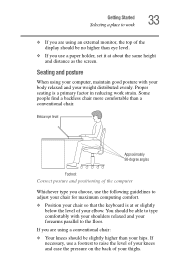
... level Approximately 90-degree angles Footrest Correct posture and positioning of your thighs. Proper seating is at about the same height and distance as the screen. Some people find a backless chair more comfortable than your hips. You should be slightly higher than a conventional chair. If necessary, use a paper holder, set it...
... level Approximately 90-degree angles Footrest Correct posture and positioning of your thighs. Proper seating is at about the same height and distance as the screen. Some people find a backless chair more comfortable than your hips. You should be slightly higher than a conventional chair. If necessary, use a paper holder, set it...

User Guide
Page 34
... Getting Started Selecting a place to work ❖ Adjust the back of your chair so that sunlight or bright indoor lighting does not reflect off the screen.
... Getting Started Selecting a place to work ❖ Adjust the back of your chair so that sunlight or bright indoor lighting does not reflect off the screen.
User Guide
Page 35
... the rigors of personal injury or damage to the computer. ❖ Avoid prolonged physical contact with other tasks. ❖ Focusing your eyes on your computer screen for long periods can become very warm. If possible, schedule a variety of the computer. Getting Started Selecting a place to work 35 Work habits The key...
... the rigors of personal injury or damage to the computer. ❖ Avoid prolonged physical contact with other tasks. ❖ Focusing your eyes on your computer screen for long periods can become very warm. If possible, schedule a variety of the computer. Getting Started Selecting a place to work 35 Work habits The key...
User Guide
Page 37
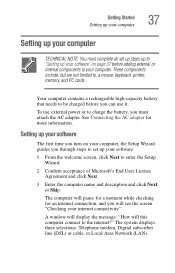
...(DSL) or cable, or Local Area Network (LAN). See Connecting the AC adapter for an internet connection, and you will see the screen "Checking your internet connectivity." Getting Started Setting up your computer 37 Setting up your computer TECHNICAL NOTE: You must attach the AC adapter....Your computer contains a rechargeable high-capacity battery that needs to be charged before adding external or internal components to your software. 1 From the welcome screen, click Next to , a mouse, keyboard, printer, memory, and PC cards. Setting up your software The first time you turn on your ...
...(DSL) or cable, or Local Area Network (LAN). See Connecting the AC adapter for an internet connection, and you will see the screen "Checking your internet connectivity." Getting Started Setting up your computer 37 Setting up your computer TECHNICAL NOTE: You must attach the AC adapter....Your computer contains a rechargeable high-capacity battery that needs to be charged before adding external or internal components to your software. 1 From the welcome screen, click Next to , a mouse, keyboard, printer, memory, and PC cards. Setting up your software The first time you turn on your ...
User Guide
Page 44
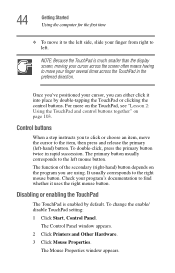
...-click, press the primary button twice in the preferred direction. Disabling or enabling the TouchPad The TouchPad is much smaller than the display screen, moving your cursor across the screen often means having to move your cursor, you 've positioned your finger several times across the TouchPad in rapid succession. Once you...
...-click, press the primary button twice in the preferred direction. Disabling or enabling the TouchPad The TouchPad is much smaller than the display screen, moving your cursor across the screen often means having to move your cursor, you 've positioned your finger several times across the TouchPad in rapid succession. Once you...
User Guide
Page 68
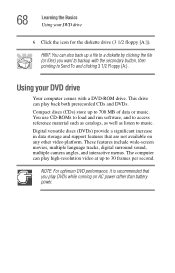
These features include wide-screen movies, multiple language tracks, digital surround sound, multiple camera angles, and interactive menus. NOTE: For optimum DVD performance, it is recommended that are not available ...
These features include wide-screen movies, multiple language tracks, digital surround sound, multiple camera angles, and interactive menus. NOTE: For optimum DVD performance, it is recommended that are not available ...
User Guide
Page 73
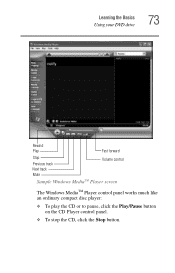
Learning the Basics Using your DVD drive 73 Rewind Play Fast forward Stop Previous track Next track Mute Volume control Sample Windows MediaTM Player screen The Windows MediaTM Player control panel works much like an ordinary compact disc player: ❖ To play the CD or to pause, click the Play/Pause button on the CD Player control panel. ❖ To stop the CD, click the Stop button.
Learning the Basics Using your DVD drive 73 Rewind Play Fast forward Stop Previous track Next track Mute Volume control Sample Windows MediaTM Player screen The Windows MediaTM Player control panel works much like an ordinary compact disc player: ❖ To play the CD or to pause, click the Play/Pause button on the CD Player control panel. ❖ To stop the CD, click the Stop button.
User Guide
Page 83
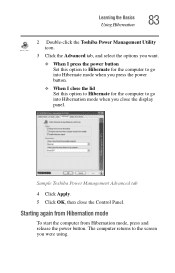
...and release the power button. The computer returns to go into Hibernation mode when you were using. Sample Toshiba Power Management Advanced tab 4 Click Apply. 5 Click OK, then close the display panel. Learning the Basics Using Hibernation ...83 2 Double-click the Toshiba Power Management Utility icon. 3 Click the Advanced tab, and select the options you want. ❖ When I press ... When I close the lid Set this option to Hibernate for the computer to the screen you close the Control Panel.
...and release the power button. The computer returns to go into Hibernation mode when you were using. Sample Toshiba Power Management Advanced tab 4 Click Apply. 5 Click OK, then close the display panel. Learning the Basics Using Hibernation ...83 2 Double-click the Toshiba Power Management Utility icon. 3 Click the Advanced tab, and select the options you want. ❖ When I press ... When I close the lid Set this option to Hibernate for the computer to the screen you close the Control Panel.
User Guide
Page 86
...panel. These sites provide information about Toshiba products, give help with technical questions, and keep you were using. Toshiba's online resources Toshiba maintains a number of online sites to date with future upgrades. The computer returns to the screen you up to which you can ...connect. 86 Learning the Basics Toshiba's online resources Starting again from Standby ...
...panel. These sites provide information about Toshiba products, give help with technical questions, and keep you were using. Toshiba's online resources Toshiba maintains a number of online sites to date with future upgrades. The computer returns to the screen you up to which you can ...connect. 86 Learning the Basics Toshiba's online resources Starting again from Standby ...

User Guide
Page 99
..., the differences are not significant and do not indicate any change in this chapter will gain from this guide may appear slightly different from the screens displayed by guiding you will more detailed information on your operating system, refer to Know the Windows® XP Operating System This chapter introduces the...
..., the differences are not significant and do not indicate any change in this chapter will gain from this guide may appear slightly different from the screens displayed by guiding you will more detailed information on your operating system, refer to Know the Windows® XP Operating System This chapter introduces the...
User Guide
Page 103
... control buttons in the Windows® file system. Instructions requiring the secondary button specifically mention that comes with your basic tool for moving around the screen. You can be connected together to open the Start menu.
... control buttons in the Windows® file system. Instructions requiring the secondary button specifically mention that comes with your basic tool for moving around the screen. You can be connected together to open the Start menu.
User Guide
Page 105
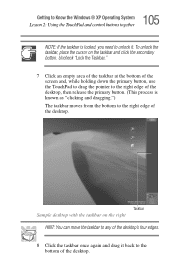
... edges. 8 Click the taskbar once again and drag it . Uncheck "Lock the Taskbar." 7 Click an empty area of the taskbar at the bottom of the screen and, while holding down the primary button, use the TouchPad to drag the pointer to the right edge of the desktop, then release the primary...
... edges. 8 Click the taskbar once again and drag it . Uncheck "Lock the Taskbar." 7 Click an empty area of the taskbar at the bottom of the screen and, while holding down the primary button, use the TouchPad to drag the pointer to the right edge of the desktop, then release the primary...
User Guide
Page 111
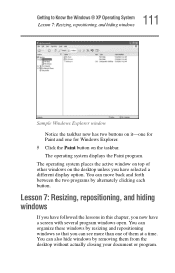
... Explorer window Notice the taskbar now has two buttons on it-one for Windows Explorer. 5 Click the Paint button on the desktop unless you have a screen with several program windows open.
... Explorer window Notice the taskbar now has two buttons on it-one for Windows Explorer. 5 Click the Paint button on the desktop unless you have a screen with several program windows open.

User Guide
Page 113
... less than half the width of the desktop. 4 Click the title bar of the Paint window and drag it . 5 Click Windows Explorer button on the screen. HINT: Maximizing a program is now called the Restore Down button. Resizing and moving windows 1 Click the Restore Down button in the top-right corner of... program and do not want to be able to see both Paint and Windows Explorer at the same time. 2 Move the pointer to fill the screen, hiding everything except the taskbar.
... less than half the width of the desktop. 4 Click the title bar of the Paint window and drag it . 5 Click Windows Explorer button on the screen. HINT: Maximizing a program is now called the Restore Down button. Resizing and moving windows 1 Click the Restore Down button in the top-right corner of... program and do not want to be able to see both Paint and Windows Explorer at the same time. 2 Move the pointer to fill the screen, hiding everything except the taskbar.
User Guide
Page 119
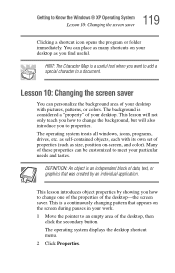
...contained objects, each with pictures, patterns, or colors. as you find useful. Many of data, text, or graphics that appears on the screen during pauses in your work. 1 Move the pointer to meet your desktop. The operating system treats all windows, icons, programs, drives, etc... DEFINITION: An object is considered a "property" of properties (such as many shortcuts on -screen, and color). This lesson introduces object properties by an individual application. Lesson 10: Changing the screen saver You can place as size, position on your desktop with its own set of your ...
...contained objects, each with pictures, patterns, or colors. as you find useful. Many of data, text, or graphics that appears on the screen during pauses in your work. 1 Move the pointer to meet your desktop. The operating system treats all windows, icons, programs, drives, etc... DEFINITION: An object is considered a "property" of properties (such as many shortcuts on -screen, and color). This lesson introduces object properties by an individual application. Lesson 10: Changing the screen saver You can place as size, position on your desktop with its own set of your ...
User Guide
Page 120
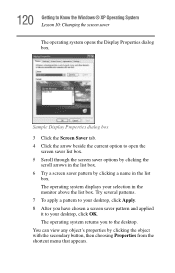
... patterns. 7 To apply a pattern to your desktop, click Apply. 8 After you to open the screen saver list box. 5 Scroll through the screen saver options by clicking the scroll arrows in the list box. 6 Try a screen saver pattern by clicking the object with the secondary button, then choosing Properties from the shortcut menu...a name in the monitor above the list box. 120 Getting to your selection in the list box. Sample Display Properties dialog box 3 Click the Screen Saver tab. 4 Click the arrow beside the current option to the desktop. The operating system returns you have chosen...
... patterns. 7 To apply a pattern to your desktop, click Apply. 8 After you to open the screen saver list box. 5 Scroll through the screen saver options by clicking the scroll arrows in the list box. 6 Try a screen saver pattern by clicking the object with the secondary button, then choosing Properties from the shortcut menu...a name in the monitor above the list box. 120 Getting to your selection in the list box. Sample Display Properties dialog box 3 Click the Screen Saver tab. 4 Click the arrow beside the current option to the desktop. The operating system returns you have chosen...
User Guide
Page 124
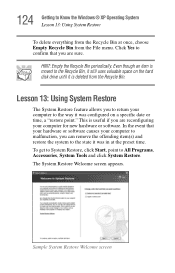
... your computer to the Recycle Bin, it still uses valuable space on a specific date or time, a "restore point." Sample System Restore Welcome screen This is deleted from the Recycle Bin at the preset time. Click Yes to confirm that your hardware or software causes your computer to malfunction... if you can remove the offending item(s) and restore the system to return your computer for new hardware or software. The System Restore Welcome screen appears. To get to System Restore, click Start, point to Know the Windows® XP Operating System Lesson 13: Using System Restore To...
... your computer to the Recycle Bin, it still uses valuable space on a specific date or time, a "restore point." Sample System Restore Welcome screen This is deleted from the Recycle Bin at the preset time. Click Yes to confirm that your hardware or software causes your computer to malfunction... if you can remove the offending item(s) and restore the system to return your computer for new hardware or software. The System Restore Welcome screen appears. To get to System Restore, click Start, point to Know the Windows® XP Operating System Lesson 13: Using System Restore To...


