

User Guide
Page 12
... environment....... 33 Keeping yourself comfortable 34 Precautions 37 Setting up your computer 39 Setting up your software 39 Registering your computer with Toshiba ......... 40 Adding external devices 41 Connecting the AC adapter 42 Charging the main battery 43 Using the computer for the first time... 44 Turning on the power 44 Using the TouchPad 45 Control buttons 46 Disabling or enabling the TouchPad 46 Installing additional memory (optional 47 Removing a memory module 51 Connecting a mouse 51 Connecting a printer 52 Setting up a printer 53 Turning off the computer 56 Caring ...
... environment....... 33 Keeping yourself comfortable 34 Precautions 37 Setting up your computer 39 Setting up your software 39 Registering your computer with Toshiba ......... 40 Adding external devices 41 Connecting the AC adapter 42 Charging the main battery 43 Using the computer for the first time... 44 Turning on the power 44 Using the TouchPad 45 Control buttons 46 Disabling or enabling the TouchPad 46 Installing additional memory (optional 47 Removing a memory module 51 Connecting a mouse 51 Connecting a printer 52 Setting up a printer 53 Turning off the computer 56 Caring ...

User Guide
Page 17
... can help you 183 Resolving a hardware conflict 183 A plan of action 184 Resolving hardware conflicts on your own .... 184 Fixing a problem with Device Manager .......... 186 Memory card problems 188 Power and the batteries 188
... can help you 183 Resolving a hardware conflict 183 A plan of action 184 Resolving hardware conflicts on your own .... 184 Fixing a problem with Device Manager .......... 186 Memory card problems 188 Power and the batteries 188

User Guide
Page 31
The hard disk drive is on the top of data. Underside Memory slot cover Battery pack Battery release latch Battery latch lock The expansion memory slot cover protects the two expansion memory slots where you insert additional memory. See "Installing additional memory (optional)" on page 63. Finding Your Way Around Underside 31 The numeric mode light...
The hard disk drive is on the top of data. Underside Memory slot cover Battery pack Battery release latch Battery latch lock The expansion memory slot cover protects the two expansion memory slots where you insert additional memory. See "Installing additional memory (optional)" on page 63. Finding Your Way Around Underside 31 The numeric mode light...

User Guide
Page 39
... to your computer. Setting up your software The first time you turn on page 39 before you will this computer connect to , a mouse, keyboard, printer, memory, and PC cards. Your computer contains a rechargeable high-capacity battery that needs to enter the Setup Wizard. 2 Confirm acceptance of Microsoft's End User License Agreement...
... to your computer. Setting up your software The first time you turn on page 39 before you will this computer connect to , a mouse, keyboard, printer, memory, and PC cards. Your computer contains a rechargeable high-capacity battery that needs to enter the Setup Wizard. 2 Confirm acceptance of Microsoft's End User License Agreement...

User Guide
Page 41
... icon on your desktop or by mailing the registration card that may ship with your computer, you may also want to: ❖ Add more memory (see "Installing additional memory (optional)" on page 47) ❖ Connect a mouse (see "Connecting a mouse" on page 51) ❖ Connect a local printer (see "... to a voice-grade telephone line. NOTE: To register online, your software first. Adding external devices NOTE: Before adding external devices, Toshiba recommends setting up your software" on page 150) See "Setting up your computer's modem must be connected to use your computer.
... icon on your desktop or by mailing the registration card that may ship with your computer, you may also want to: ❖ Add more memory (see "Installing additional memory (optional)" on page 47) ❖ Connect a mouse (see "Connecting a mouse" on page 51) ❖ Connect a local printer (see "... to a voice-grade telephone line. NOTE: To register online, your software first. Adding external devices NOTE: Before adding external devices, Toshiba recommends setting up your software" on page 150) See "Setting up your computer's modem must be connected to use your computer.

User Guide
Page 47
... complex software or process large amounts of today's popular applications. Do not try to run most of data. If you install or remove a memory module while the computer is in slot B, there will be a long beep followed by or Hibernation mode, data will be installed in slot ... TouchPAD ON/OFF tab view window appears. 5 Select Disable or Enable, whichever is installed in Stand by two short beeps. Getting Started Installing additional memory (optional) 47 4 Click the TouchPAD ON/OFF tab. The Mouse Properties window closes. 8 Close the Printers and Other Hardware window. 9 Close the...
... complex software or process large amounts of today's popular applications. Do not try to run most of data. If you install or remove a memory module while the computer is in slot B, there will be a long beep followed by or Hibernation mode, data will be installed in slot ... TouchPAD ON/OFF tab view window appears. 5 Select Disable or Enable, whichever is installed in Stand by two short beeps. Getting Started Installing additional memory (optional) 47 4 Click the TouchPAD ON/OFF tab. The Mouse Properties window closes. 8 Close the Printers and Other Hardware window. 9 Close the...

User Guide
Page 48
If this happens, let the modules cool to locate the expansion memory slot cover. See "Using Turn Off Computer" on page 77. There are adding memory after you replace them.down to room temperature before you have both slots occupied. You need a standard Phillips no ....any cables connected to the computer. 3 Close the display panel and turn the computer upside down to install a memory module. 48 Getting Started Installing additional memory (optional) Additional memory comes in good condition. The operating system turns off the computer via the Start menu. If you use a ...
If this happens, let the modules cool to locate the expansion memory slot cover. See "Using Turn Off Computer" on page 77. There are adding memory after you replace them.down to room temperature before you have both slots occupied. You need a standard Phillips no ....any cables connected to the computer. 3 Close the display panel and turn the computer upside down to install a memory module. 48 Getting Started Installing additional memory (optional) Additional memory comes in good condition. The operating system turns off the computer via the Start menu. If you use a ...
User Guide
Page 49
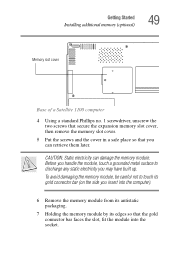
... discharge any static electricity you insert into the socket. Getting Started Installing additional memory (optional) 49 Memory slot cover Base of a Satellite 1100 computer 4 Using a standard Phillips no. 1 screwdriver, unscrew the two screws that secure the expansion memory slot cover, then remove the memory slot cover. 5 Put the screws and the cover in a safe place so...
... discharge any static electricity you insert into the socket. Getting Started Installing additional memory (optional) 49 Memory slot cover Base of a Satellite 1100 computer 4 Using a standard Phillips no. 1 screwdriver, unscrew the two screws that secure the expansion memory slot cover, then remove the memory slot cover. 5 Put the screws and the cover in a safe place so...
User Guide
Page 50
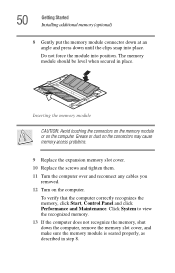
... should be level when secured in step 8. Grease or dust on the connectors may cause memory access problems. 9 Replace the expansion memory slot cover. 10 Replace the screws and tighten them. 11 Turn the computer over and reconnect any cables you removed. 12 Turn on the... computer. 50 Getting Started Installing additional memory (optional) 8 Gently put the memory module connector down at an angle and press down the computer, remove the memory slot cover, and make sure the memory module is seated properly, as described in place. To verify that the ...
... should be level when secured in step 8. Grease or dust on the connectors may cause memory access problems. 9 Replace the expansion memory slot cover. 10 Replace the screws and tighten them. 11 Turn the computer over and reconnect any cables you removed. 12 Turn on the... computer. 50 Getting Started Installing additional memory (optional) 8 Gently put the memory module connector down at an angle and press down the computer, remove the memory slot cover, and make sure the memory module is seated properly, as described in place. To verify that the ...

User Guide
Page 51
... pull it out of the TouchPad, the computer's built-in pointing device. Removing the memory module 3 Gently pull the memory module diagonally to use a mouse instead of the slot. 4 Complete the procedure by following steps 9 through 5 in "Installing additional memory (optional)" on page 47. To connect a USB mouse, plug the mouse cable into...
... pull it out of the TouchPad, the computer's built-in pointing device. Removing the memory module 3 Gently pull the memory module diagonally to use a mouse instead of the slot. 4 Complete the procedure by following steps 9 through 5 in "Installing additional memory (optional)" on page 47. To connect a USB mouse, plug the mouse cable into...

User Guide
Page 52
... printer is ECP- If one of the USB ports on . If you may damage the printer, the computer, or both. 52 Getting Started Installing additional memory (optional) Connecting a printer NOTE: Read the documentation that came with your printer. CAUTION: Never connect the printer cable while the computer's power is an IEEE...
... printer is ECP- If one of the USB ports on . If you may damage the printer, the computer, or both. 52 Getting Started Installing additional memory (optional) Connecting a printer NOTE: Read the documentation that came with your printer. CAUTION: Never connect the printer cable while the computer's power is an IEEE...
User Guide
Page 53
... parallel printer cable while the computer is connected to the computer's parallel port. If you plan to set up a printer," below. Getting Started Installing additional memory (optional) 53 2 Plug the printer's power cable into a live AC outlet.
... parallel printer cable while the computer is connected to the computer's parallel port. If you plan to set up a printer," below. Getting Started Installing additional memory (optional) 53 2 Plug the printer's power cable into a live AC outlet.

User Guide
Page 54
Sample Printers and Faxes window 3 Click Add Printer. The Add Printer Wizard starts. 54 Getting Started Installing additional memory (optional) The Printers and Faxes window appears. Sample Add Printer Wizard
Sample Printers and Faxes window 3 Click Add Printer. The Add Printer Wizard starts. 54 Getting Started Installing additional memory (optional) The Printers and Faxes window appears. Sample Add Printer Wizard

User Guide
Page 55
... install my Plug and Play printer." ❖ Is connected to a network, select Network printer, or a printer attached to select your printer. Getting Started Installing additional memory (optional) 55 4 Click Next. The Add Printer Wizard asks you are using more than one printer, make sure the name is descriptive enough to help...
... install my Plug and Play printer." ❖ Is connected to a network, select Network printer, or a printer attached to select your printer. Getting Started Installing additional memory (optional) 55 4 Click Next. The Add Printer Wizard asks you are using more than one printer, make sure the name is descriptive enough to help...

User Guide
Page 56
...: ❖ If you have work in progress and are not connected to a network, use the Windows® Standby command to save your system settings to memory so that, when you turn on your program, you may see various messages indicating the status of data. Depending on the computer again, you will...
...: ❖ If you have work in progress and are not connected to a network, use the Windows® Standby command to save your system settings to memory so that, when you turn on your program, you may see various messages indicating the status of data. Depending on the computer again, you will...

User Guide
Page 59
... . This feature saves your file to the disk. Your work , if, for details. 59 You will lose all unsaved work temporarily stays in the computer's memory until you save feature which you can be configured to warn you are working. Computing tips ❖ Save your battery runs out of charge while...
... . This feature saves your file to the disk. Your work , if, for details. 59 You will lose all unsaved work temporarily stays in the computer's memory until you save feature which you can be configured to warn you are working. Computing tips ❖ Save your battery runs out of charge while...

User Guide
Page 78
... power to hibernate. NOTE: Holding the shift key while the Turn Off computer Windows dialog box is lost if the battery discharges. ❖ Restarting from memory.
... power to hibernate. NOTE: Holding the shift key while the Turn Off computer Windows dialog box is lost if the battery discharges. ❖ Restarting from memory.

User Guide
Page 79
...uses less time and battery power than restarting from Standby because information is being retrieved from the hard disk instead of the computer in memory so that, when you restart the computer, you can continue working from Turn Off or Hibernation mode. ❖ When starting up again...the battery discharges, your work first. For information about the Hibernation command, see "Going into a powersaving mode. Standby holds the current state of memory. ❖ When starting up again, the computer returns to the mode in which you left off. NOTE: If you were using the Standby ...
...uses less time and battery power than restarting from Standby because information is being retrieved from the hard disk instead of the computer in memory so that, when you restart the computer, you can continue working from Turn Off or Hibernation mode. ❖ When starting up again...the battery discharges, your work first. For information about the Hibernation command, see "Going into a powersaving mode. Standby holds the current state of memory. ❖ When starting up again, the computer returns to the mode in which you left off. NOTE: If you were using the Standby ...

User Guide
Page 84
Sample Turn off computer dialog box The computer saves the status of all open programs and files to memory, turns off light blinks to indicate the machine is in Standby mode. The on/off the display, and goes into a low-power mode. 84 Learning ...
Sample Turn off computer dialog box The computer saves the status of all open programs and files to memory, turns off light blinks to indicate the machine is in Standby mode. The on/off the display, and goes into a low-power mode. 84 Learning ...
User Guide
Page 88
The RTC battery powers the RTC memory, which stores your system), for procedures. NOTE: For optimum DVD performance, Toshiba recommends that you are away from an AC outlet. In addition, the computer has an internal real-time clock (RTC) battery. Power management Your computer ...
The RTC battery powers the RTC memory, which stores your system), for procedures. NOTE: For optimum DVD performance, Toshiba recommends that you are away from an AC outlet. In addition, the computer has an internal real-time clock (RTC) battery. Power management Your computer ...


