

User Guide
Page 7
... approved to open the enclosure. Use of controls, adjustments or the performance of this product, please read this equipment except in the countries in Fig.1. DVD-ROM Safety Instructions The DVD-ROM drive employs a laser system. 7 Approved Countries for future reference.
... approved to open the enclosure. Use of controls, adjustments or the performance of this product, please read this equipment except in the countries in Fig.1. DVD-ROM Safety Instructions The DVD-ROM drive employs a laser system. 7 Approved Countries for future reference.

User Guide
Page 13
...and removing diskettes 66 Caring for diskettes 66 Backing up your files 67 Using your DVD drive 68 DVD-ROM drive components 69 Inserting a disc 70 Playing an audio CD 72 Playing a DVD 73 Viewing the contents of a CD or DVD 73 Removing a disc with the computer on 73 Removing a disc with the ...computer off 74 Caring for CDs and DVDs 74 Setting up for communications 75 Connecting the modem ...
...and removing diskettes 66 Caring for diskettes 66 Backing up your files 67 Using your DVD drive 68 DVD-ROM drive components 69 Inserting a disc 70 Playing an audio CD 72 Playing a DVD 73 Viewing the contents of a CD or DVD 73 Removing a disc with the computer on 73 Removing a disc with the ...computer off 74 Caring for CDs and DVDs 74 Setting up for communications 75 Connecting the modem ...

User Guide
Page 18
18 Contents Keyboard problems 190 Display problems 190 Disk drive problems 192 DVD-ROM drive problems 194 Sound system problems 203 PC Card problems 203 Printer problems 206 Modem problems 207 Develop good computing habits 208 If you need further assistance 209 Before you call 209 Contacting Toshiba 210 Other Toshiba Internet Web sites 211 Toshiba's worldwide offices 212 Appendix A: Hot Keys 215 Instant password security 215 Sound 216 Display modes 216 Keyboard hot keys 216 Appendix B: Power Cable Connectors 217 Glossary 219 Index 235
18 Contents Keyboard problems 190 Display problems 190 Disk drive problems 192 DVD-ROM drive problems 194 Sound system problems 203 PC Card problems 203 Printer problems 206 Modem problems 207 Develop good computing habits 208 If you need further assistance 209 Before you call 209 Contacting Toshiba 210 Other Toshiba Internet Web sites 211 Toshiba's worldwide offices 212 Appendix A: Hot Keys 215 Instant password security 215 Sound 216 Display modes 216 Keyboard hot keys 216 Appendix B: Power Cable Connectors 217 Glossary 219 Index 235

User Guide
Page 27
...overheating of the CPU, make sure you to eject or insert a CD-ROM or DVD-ROM. The security lock slot allows you don't block the cooling vents. Left side CD/DVD-ROM CD/DVD-ROM eject button The DVD-ROM drive allows you to attach an optional PORT- Finding Your Way Around Left side 27... The two stacked PC Card slots support up to perform at its maximum speed. Noteworthy® computer lock cable to play back prerecorded CDs and DVDs. The DVD-ROM...
...overheating of the CPU, make sure you to eject or insert a CD-ROM or DVD-ROM. The security lock slot allows you don't block the cooling vents. Left side CD/DVD-ROM CD/DVD-ROM eject button The DVD-ROM drive allows you to attach an optional PORT- Finding Your Way Around Left side 27... The two stacked PC Card slots support up to perform at its maximum speed. Noteworthy® computer lock cable to play back prerecorded CDs and DVDs. The DVD-ROM...
User Guide
Page 30
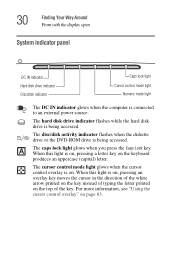
...power source. When this light is being accessed. When this light is being accessed. The disc/disk activity indicator flashes when the diskette drive or the DVD-ROM drive is on, pressing an overlay key moves the cursor in the direction of the white arrow printed on the key instead of typing ...cursor control overlay" on page 63. 30 Finding Your Way Around Front with the display open System indicator panel DC IN indicator Hard disk drive indicator Disc/disk indicator Caps lock light Cursor control mode light Numeric mode light The DC IN indicator glows when the computer is on.
...power source. When this light is being accessed. When this light is being accessed. The disc/disk activity indicator flashes when the diskette drive or the DVD-ROM drive is on, pressing an overlay key moves the cursor in the direction of the white arrow printed on the key instead of typing ...cursor control overlay" on page 63. 30 Finding Your Way Around Front with the display open System indicator panel DC IN indicator Hard disk drive indicator Disc/disk indicator Caps lock light Cursor control mode light Numeric mode light The DC IN indicator glows when the computer is on.
User Guide
Page 68
... camera angles, and interactive menus. The computer can play DVDs while running on any other video platform. Digital versatile discs (DVDs) provide a significant increase in data storage and support features that you want to backup with a DVD-ROM drive. 68 Learning the Basics Using your DVD drive Your computer comes with the secondary button, then pointing...
... camera angles, and interactive menus. The computer can play DVDs while running on any other video platform. Digital versatile discs (DVDs) provide a significant increase in data storage and support features that you want to backup with a DVD-ROM drive. 68 Learning the Basics Using your DVD drive Your computer comes with the secondary button, then pointing...

User Guide
Page 69
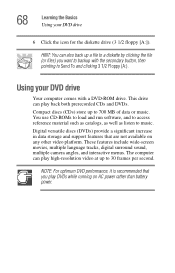
... does not require power. Doing so could damage the disc or the drive. Learning the Basics Using your DVD drive 69 DVD-ROM drive components Your DVD-ROM drive may look like this: Eject button Manual eject hole Sample DVD-ROM drive CAUTION: Never press the eject button or turn off the computer while ...the drive-in-use indicator light is on, press the stop/eject control ...
... does not require power. Doing so could damage the disc or the drive. Learning the Basics Using your DVD drive 69 DVD-ROM drive components Your DVD-ROM drive may look like this: Eject button Manual eject hole Sample DVD-ROM drive CAUTION: Never press the eject button or turn off the computer while ...the drive-in-use indicator light is on, press the stop/eject control ...

User Guide
Page 70
...light is off before opening the disc tray. 2 Grasp the disc tray and pull it is turned on, press the eject button on the DVD-ROM drive. Playing the compact disc at maximum volume could lose data. 4 Carefully place the disc in the empty tray with its center hole and ...Control). 1 If the computer is clean and free of the disc. CAUTION: Handle discs carefully. If you handle the disc incorrectly, you could damage your DVD drive Inserting a disc WARNING: Before playing an audio CD, turn the volume down . Avoid touching the surface of dust. The disc tray partially opens. Grasp...
...light is off before opening the disc tray. 2 Grasp the disc tray and pull it is turned on, press the eject button on the DVD-ROM drive. Playing the compact disc at maximum volume could lose data. 4 Carefully place the disc in the empty tray with its center hole and ...Control). 1 If the computer is clean and free of the disc. CAUTION: Handle discs carefully. If you handle the disc incorrectly, you could damage your DVD drive Inserting a disc WARNING: Before playing an audio CD, turn the volume down . Avoid touching the surface of dust. The disc tray partially opens. Grasp...

User Guide
Page 71
Learning the Basics Using your DVD drive 71 Inserting a disc CAUTION: Be careful not to malfunction. 5 Gently press the center of the tray until it . If you position the disc incorrectly, it ... is properly positioned on the center of the disc onto the spindle until it clicks indicating that it is locked. Doing so could cause the drive to touch the drive's lens (located underneath the drive's spindle) or the area around it locks into place.
Learning the Basics Using your DVD drive 71 Inserting a disc CAUTION: Be careful not to malfunction. 5 Gently press the center of the tray until it . If you position the disc incorrectly, it ... is properly positioned on the center of the disc onto the spindle until it clicks indicating that it is locked. Doing so could cause the drive to touch the drive's lens (located underneath the drive's spindle) or the area around it locks into place.
User Guide
Page 72
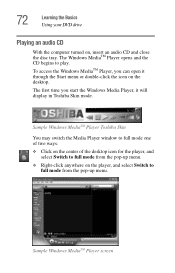
... the icon on , insert an audio CD and close the disc tray. 72 Learning the Basics Using your DVD drive Playing an audio CD With the computer turned on the desktop. Sample Windows MediaTM Player Toshiba Skin You may switch the Media Player window to full mode one of two ways: ❖ Click...-click anywhere on the player, and select Switch to play. Sample Windows MediaTM Player screen The first time you can open it will display in Toshiba Skin mode. The Windows MediaTM Player opens and the CD begins to full mode from the pop-up menu.
... the icon on , insert an audio CD and close the disc tray. 72 Learning the Basics Using your DVD drive Playing an audio CD With the computer turned on the desktop. Sample Windows MediaTM Player Toshiba Skin You may switch the Media Player window to full mode one of two ways: ❖ Click...-click anywhere on the player, and select Switch to play. Sample Windows MediaTM Player screen The first time you can open it will display in Toshiba Skin mode. The Windows MediaTM Player opens and the CD begins to full mode from the pop-up menu.

User Guide
Page 73
Learning the Basics Using your DVD drive 73 The Windows MediaTM Player control panel works much like diskettes and the hard disk. You can use light is glowing. Doing so could damage the disk or the drive. 1 Locate and press the eject button. Removing a disc with the computer on CAUTION: Never press the ...eject button or turn off the computer while the drive-in-use Explorer or My Computer to view the contents of the disc tray and pull it fully open. For information about how to pause, ...
Learning the Basics Using your DVD drive 73 The Windows MediaTM Player control panel works much like diskettes and the hard disk. You can use light is glowing. Doing so could damage the disk or the drive. 1 Locate and press the eject button. Removing a disc with the computer on CAUTION: Never press the ...eject button or turn off the computer while the drive-in-use Explorer or My Computer to view the contents of the disc tray and pull it fully open. For information about how to pause, ...

User Guide
Page 74
... can break off 1 Insert a slender object, such as a straightened paper clip, into the manual eject button access hole. Pencil lead can prevent the drive from the disc tray and place it in its protective cover. Fingerprints on the center of the tray until it clicks indicating that it is... spinning when you open , remove the disc and place it . 2 Pull the tray fully open the disc tray, wait for CDs and DVDs ❖ Store your DVD drive 3 Remove the disc from reading the data properly. ❖ Avoid exposing discs to press the manual eject button. CAUTION: Never use a ...
... can break off 1 Insert a slender object, such as a straightened paper clip, into the manual eject button access hole. Pencil lead can prevent the drive from the disc tray and place it in its protective cover. Fingerprints on the center of the tray until it clicks indicating that it is... spinning when you open , remove the disc and place it . 2 Pull the tray fully open the disc tray, wait for CDs and DVDs ❖ Store your DVD drive 3 Remove the disc from reading the data properly. ❖ Avoid exposing discs to press the manual eject button. CAUTION: Never use a ...

User Guide
Page 153
For systems with WinDVD preinstalled. 153 This chapter explains how to use InterVideo WinDVD™ to play DVDs while your computer is a software program for playing back CDs, VideoCDs and DVDs. WinDVD is an easy-to-use, fullfeatured multimedia control center that helps you can use this program. Playing DVDs TECHNICAL NOTE: For optimum DVD performance, always play DVDs. Your computer comes with a DVD-ROM drive, you get the most out of the exciting world of DVD technology. Chapter 7 WinDVD WinDVD is connected to AC power.
For systems with WinDVD preinstalled. 153 This chapter explains how to use InterVideo WinDVD™ to play DVDs while your computer is a software program for playing back CDs, VideoCDs and DVDs. WinDVD is an easy-to-use, fullfeatured multimedia control center that helps you can use this program. Playing DVDs TECHNICAL NOTE: For optimum DVD performance, always play DVDs. Your computer comes with a DVD-ROM drive, you get the most out of the exciting world of DVD technology. Chapter 7 WinDVD WinDVD is connected to AC power.

User Guide
Page 154
Insert a DVD into the drive, following the instructions in the drive and asks you if you want to play (see "Setting general properties" on page 163 for information on page 70. To open WinDVD manually: 1 Click ... panel See "Using the control panel playback buttons" on page 157 to InterVideo WinDVD, then click InterVideo WinDVD. If the autoplay feature is enabled, the DVD automatically begins to run WinDVD, Windows Media Player, or do nothing. The computer automatically detects the disc in "Inserting a disc" on enabling autoplay). 154 WinDVD...
Insert a DVD into the drive, following the instructions in the drive and asks you if you want to play (see "Setting general properties" on page 163 for information on page 70. To open WinDVD manually: 1 Click ... panel See "Using the control panel playback buttons" on page 157 to InterVideo WinDVD, then click InterVideo WinDVD. If the autoplay feature is enabled, the DVD automatically begins to run WinDVD, Windows Media Player, or do nothing. The computer automatically detects the disc in "Inserting a disc" on enabling autoplay). 154 WinDVD...

User Guide
Page 158
...to that location on the control panel counter. Pause - Bookmark - save an unlim- Click the bookmark name to go to open the DVD- Click Delete All to the left of locations on the control panel. Eject - When the repeat button is activated, the repeat symbol ...DVD. Otherwise this Or use keyboard shortcut Repeat - open the Add Bookmark dialog box. 158 WinDVD Playing DVDs Click this To do this button repeats the DVD from the beginning. repeat the current None chapter, if the DVD contains chapters. The bookmark name appears on the bookmark shortcut menu. E ROM drive...
...to that location on the control panel counter. Pause - Bookmark - save an unlim- Click the bookmark name to go to open the DVD- Click Delete All to the left of locations on the control panel. Eject - When the repeat button is activated, the repeat symbol ...DVD. Otherwise this Or use keyboard shortcut Repeat - open the Add Bookmark dialog box. 158 WinDVD Playing DVDs Click this To do this button repeats the DVD from the beginning. repeat the current None chapter, if the DVD contains chapters. The bookmark name appears on the bookmark shortcut menu. E ROM drive...

User Guide
Page 161
... delete the entire list and start over, click Delete All. You must add the files in the order in the lower left display select the drive and folder where the DVD files are creating a playlist of the playlist. DVD files have an .mpg, .vob or .ac3 file name extension. The Playlist window appears.
... delete the entire list and start over, click Delete All. You must add the files in the order in the lower left display select the drive and folder where the DVD files are creating a playlist of the playlist. DVD files have an .mpg, .vob or .ac3 file name extension. The Playlist window appears.

User Guide
Page 163
... these general, audio and display features from the Properties dialog box. 1 Launch WinDVD, if it is part of the protection system for DVD content. 163 WinDVD Customizing WinDVD Customizing WinDVD You can control several general WinDVD characteristics, such as whether the toolbar and status bar are displayed...general properties You use the General tab to select the region code, the drive letter assigned to WinDVD displays the Properties dialog box, with the General tab on top. The intent is to the DVD-ROM drive, the autoplay default option, and which WinDVD toolbars are visible, as well...
... these general, audio and display features from the Properties dialog box. 1 Launch WinDVD, if it is part of the protection system for DVD content. 163 WinDVD Customizing WinDVD Customizing WinDVD You can control several general WinDVD characteristics, such as whether the toolbar and status bar are displayed...general properties You use the General tab to select the region code, the drive letter assigned to WinDVD displays the Properties dialog box, with the General tab on top. The intent is to the DVD-ROM drive, the autoplay default option, and which WinDVD toolbars are visible, as well...

User Guide
Page 164
... 1, comprising the United States and Canada. When enabled, the auto play feature automatically launches a DVD-ROM when it is the WinDVD control panel. 5 Click OK to save your DVD-ROM drive letter. 3 Select the Player settings Auto play feature. The current region code of the WinDVD ...video window. NOTE: Most DVD-ROM drives let you can change the current region before the setting becomes permanent. 2 In the Player settings Default DVD drive box, select your settings...
... 1, comprising the United States and Canada. When enabled, the auto play feature automatically launches a DVD-ROM when it is the WinDVD control panel. 5 Click OK to save your DVD-ROM drive letter. 3 Select the Player settings Auto play feature. The current region code of the WinDVD ...video window. NOTE: Most DVD-ROM drives let you can change the current region before the setting becomes permanent. 2 In the Player settings Default DVD drive box, select your settings...

User Guide
Page 187
.... Click troubleshooting. Properties include the name of the manufacturer, the type of device, the drivers installed, and the system resources assigned to the monitor, DVD-ROM, floppy disk drive, and other power-using functions. ❖ The Drivers tab, which lists resources assigned to the device. To check a device's properties: 1 Click Start. 2 Click...
.... Click troubleshooting. Properties include the name of the manufacturer, the type of device, the drivers installed, and the system resources assigned to the monitor, DVD-ROM, floppy disk drive, and other power-using functions. ❖ The Drivers tab, which lists resources assigned to the device. To check a device's properties: 1 Click Start. 2 Click...

User Guide
Page 194
... disk, refer to start the computer. Press gently until it so that the metal head window cover goes into place. Make sure the drive tray is loose, replace the label and try inserting the diskette again. You may already have the files necessary to your Windows® ...interfere with a bootable diskette and restart the computer. You may be obstructing the path into the external diskette drive. If the metal cover is empty. If there is probably causing the problem. Replace it . The drive cannot read a diskette. DVD-ROM drive problems You cannot access a disc in the diskette...
... disk, refer to start the computer. Press gently until it so that the metal head window cover goes into place. Make sure the drive tray is loose, replace the label and try inserting the diskette again. You may already have the files necessary to your Windows® ...interfere with a bootable diskette and restart the computer. You may be obstructing the path into the external diskette drive. If the metal cover is empty. If there is probably causing the problem. Replace it . The drive cannot read a diskette. DVD-ROM drive problems You cannot access a disc in the diskette...


