Brochure
Page 2
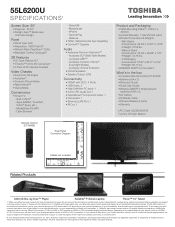
...1080p/24 fps content. 5. All rights reserved. Built-in 3D according to your Toshiba television, always use of 3D Glasses Included Video Chassis • Dual Core CQ... Resource Guide • Quick Start Guide • Wireless QWERTY Keyboard and batteries (AAA x 2) • AV Cables • IR Blaster Cable • Passive Glasses (4 pairs) • Warranty UPC Code: 022265055403 Country... ClearFrame, ClearScan, ColorStream, DynaLight, Native Mode and TriVector are the property of 2D home video in Wi-Fi® - 55L6200U S P E C I F I C AT I O N S1 Screen Size: 55" • Diagonal - 54.64...
...1080p/24 fps content. 5. All rights reserved. Built-in 3D according to your Toshiba television, always use of 3D Glasses Included Video Chassis • Dual Core CQ... Resource Guide • Quick Start Guide • Wireless QWERTY Keyboard and batteries (AAA x 2) • AV Cables • IR Blaster Cable • Passive Glasses (4 pairs) • Warranty UPC Code: 022265055403 Country... ClearFrame, ClearScan, ColorStream, DynaLight, Native Mode and TriVector are the property of 2D home video in Wi-Fi® - 55L6200U S P E C I F I C AT I O N S1 Screen Size: 55" • Diagonal - 54.64...
User Guide
Page 21
...;" on page 121. ❖ ClearScan® -Provides picture clarity for fast motion video using new Backlight Scanning technology. ❖ AutoView®-Allows you to an AV amplifier via HDMI® connection ❖ ColorStream® HD-High-resolution component video input. ❖ Digital Audio Out-Optical audio connection with 1080p input support...
...;" on page 121. ❖ ClearScan® -Provides picture clarity for fast motion video using new Backlight Scanning technology. ❖ AutoView®-Allows you to an AV amplifier via HDMI® connection ❖ ColorStream® HD-High-resolution component video input. ❖ Digital Audio Out-Optical audio connection with 1080p input support...
User Guide
Page 25
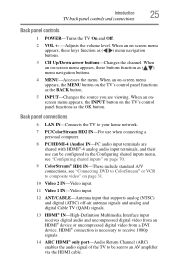
... appears, the INPUT button on page 70. 9 ColorStream® HD1 IN-These include standard A/V connections, see "Connecting DVD to ColorStream® or VCR to an AV amplifier via the HDMI cable. When an on the TV's control panel functions as the OK button. When an on-screen menu appears, the MENU...
... appears, the INPUT button on page 70. 9 ColorStream® HD1 IN-These include standard A/V connections, see "Connecting DVD to ColorStream® or VCR to an AV amplifier via the HDMI cable. When an on the TV's control panel functions as the OK button. When an on-screen menu appears, the MENU...
User Guide
Page 27
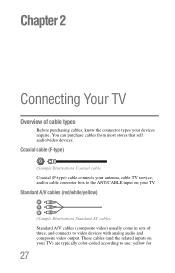
... audio and composite video output. You can purchase cables from most stores that sell audio/video devices. Standard A/V cables (red/white/yellow) (Sample Illustration) Standard AV cables Standard A/V cables (composite video) usually come in sets of cable types Before purchasing cables, know the connector types your devices require. Coaxial cable (F-type...
... audio and composite video output. You can purchase cables from most stores that sell audio/video devices. Standard A/V cables (red/white/yellow) (Sample Illustration) Standard AV cables Standard A/V cables (composite video) usually come in sets of cable types Before purchasing cables, know the connector types your devices require. Coaxial cable (F-type...

User Guide
Page 30
...VIDEO 2 STREAM HD 1 HDMI 3 TV back panel Component video cable VHF/UHF Antenna Cable TV Cable box CH 3 CH 4 IN OUT AV Component adapter cable (supplied) Coaxial cable (Sample Illustration) L6200U/L7200U Series-Connecting to an antenna, satellite receiver, and cable TV box Items needed:... ❖ Coaxial cables ❖ Standard AV cables ❖ Component video cables (red/green/blue) NOTE When you use the remote control to program or access certain features on the ...
...VIDEO 2 STREAM HD 1 HDMI 3 TV back panel Component video cable VHF/UHF Antenna Cable TV Cable box CH 3 CH 4 IN OUT AV Component adapter cable (supplied) Coaxial cable (Sample Illustration) L6200U/L7200U Series-Connecting to an antenna, satellite receiver, and cable TV box Items needed:... ❖ Coaxial cables ❖ Standard AV cables ❖ Component video cables (red/green/blue) NOTE When you use the remote control to program or access certain features on the ...
User Guide
Page 31
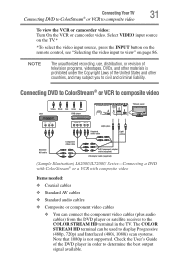
...Light green G B R W R Standard audio cable Light yellow R W Standard A/V cable R W Y Component video cable G B R A/V Component adapter cable (supplied) AV adapter cable (supplied) (Sample Illustration) L6200U/L7200U Series-Connecting a DVD with ColorStream® or a VCR with composite video Items needed: ❖ Coaxial cables ❖ ...Standard AV cables ❖ Standard audio cables ❖ Composite or component video cables ❖ You can be used to view"...
...Light green G B R W R Standard audio cable Light yellow R W Standard A/V cable R W Y Component video cable G B R A/V Component adapter cable (supplied) AV adapter cable (supplied) (Sample Illustration) L6200U/L7200U Series-Connecting a DVD with ColorStream® or a VCR with composite video Items needed: ❖ Coaxial cables ❖ ...Standard AV cables ❖ Standard audio cables ❖ Composite or component video cables ❖ You can be used to view"...
User Guide
Page 32
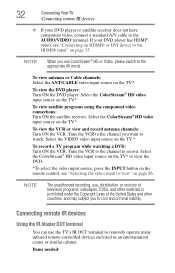
..., please switch to the AUDIO/VIDEO terminal. If your DVD player or satellite receiver does not have component video, connect a standard A/V cable to the appropriate AV mode. Items needed: Select the ColorStream® HD video input source on the TV.* To view satellite programs using the component video connections: Turn ON...
..., please switch to the AUDIO/VIDEO terminal. If your DVD player or satellite receiver does not have component video, connect a standard A/V cable to the appropriate AV mode. Items needed: Select the ColorStream® HD video input source on the TV.* To view satellite programs using the component video connections: Turn ON...
User Guide
Page 38
...® CEC Control feature may not be sent to the device you use HDMI® cables with HDMI Logo)" on page 100. However, Toshiba is not liable for compatibility information. In this case, adjust the delay time of the sound on page 101. ❖ Configure the connected ...the TV can be properly synchronized. For proper operation, it is limited to models incorporating Toshiba's HDMI® CEC Control feature. NOTE This feature is recommended that you use . When using an external AV amplifier the picture and sound may not operate properly, see "HDMI® CEC Control input...
...® CEC Control feature may not be sent to the device you use HDMI® cables with HDMI Logo)" on page 100. However, Toshiba is not liable for compatibility information. In this case, adjust the delay time of the sound on page 101. ❖ Configure the connected ...the TV can be properly synchronized. For proper operation, it is limited to models incorporating Toshiba's HDMI® CEC Control feature. NOTE This feature is recommended that you use . When using an external AV amplifier the picture and sound may not operate properly, see "HDMI® CEC Control input...
User Guide
Page 39
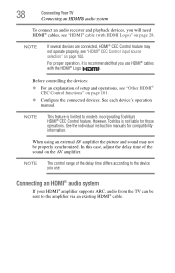
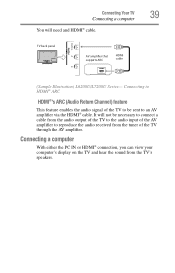
...your computer's display on the TV and hear the sound from the tuner of the AV amplifier to reproduce the audio received from the TV's speakers. Connecting Your TV Connecting a computer You will not... be sent to an AV amplifier via the HDMI® cable. Connecting to HDMI® ARC HDMI®'s ARC (Audio Return... the audio output of the TV to the audio input of the TV through the AV amplifier. TV back panel AV amplifier that supports ARC HDMI cable 39 (Sample Illustration) L6200U/L7200U Series- It will need and...
...your computer's display on the TV and hear the sound from the tuner of the AV amplifier to reproduce the audio received from the TV's speakers. Connecting Your TV Connecting a computer You will not... be sent to an AV amplifier via the HDMI® cable. Connecting to HDMI® ARC HDMI®'s ARC (Audio Return... the audio output of the TV to the audio input of the TV through the AV amplifier. TV back panel AV amplifier that supports ARC HDMI cable 39 (Sample Illustration) L6200U/L7200U Series- It will need and...
User Guide
Page 69
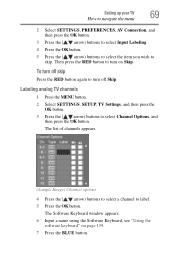
Setting up your TV 69 How to navigate the menu 2 Select SETTINGS, PREFERENCES, AV Connection, and then press the OK button. 3 Press the ( / arrow) buttons to select Input Labeling. 4 Press the OK button. 5 Press the ( / arrow) buttons to select ...
Setting up your TV 69 How to navigate the menu 2 Select SETTINGS, PREFERENCES, AV Connection, and then press the OK button. 3 Press the ( / arrow) buttons to select Input Labeling. 4 Press the OK button. 5 Press the ( / arrow) buttons to select ...
User Guide
Page 70
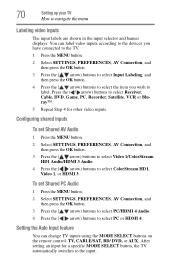
... TV How to select ColorStream HD1, Video 1, or HDMI 3. Configuring shared inputs To set Shared PC Audio 1 Press the MENU button. 2 Select SETTINGS, PREFERENCES, AV Connection, and then press the OK button. 3 Press the ( / arrow) buttons to select PC/HDMI 4 Audio. 4 Press the ( / arrow) buttons to...Auto Input feature You can label video inputs according to the devices you have connected to the TV. 1 Press the MENU button. 2 Select SETTINGS, PREFERENCES, AV Connection, and then press the OK button. 3 Press the ( / arrow) buttons to select Input Labeling, and then press the OK button. 4 Press...
... TV How to select ColorStream HD1, Video 1, or HDMI 3. Configuring shared inputs To set Shared PC Audio 1 Press the MENU button. 2 Select SETTINGS, PREFERENCES, AV Connection, and then press the OK button. 3 Press the ( / arrow) buttons to select PC/HDMI 4 Audio. 4 Press the ( / arrow) buttons to...Auto Input feature You can label video inputs according to the devices you have connected to the TV. 1 Press the MENU button. 2 Select SETTINGS, PREFERENCES, AV Connection, and then press the OK button. 3 Press the ( / arrow) buttons to select Input Labeling, and then press the OK button. 4 Press...
User Guide
Page 102
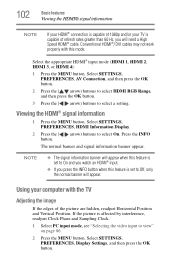
... MENU button. Press the INFO button. Using your TV is capable of the picture are hidden, readjust Horizontal Position and Vertical Position. Select SETTINGS, PREFERENCES, AV Connection, and then press the OK button. 2 Press the ( / arrow) buttons to select HDMI RGB Range, and then press the OK button. 3 Press the ( / arrow...
... MENU button. Press the INFO button. Using your TV is capable of the picture are hidden, readjust Horizontal Position and Vertical Position. Select SETTINGS, PREFERENCES, AV Connection, and then press the OK button. 2 Press the ( / arrow) buttons to select HDMI RGB Range, and then press the OK button. 3 Press the ( / arrow...
User Guide
Page 103
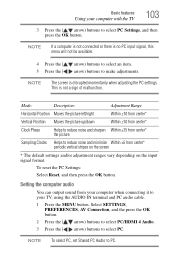
... the PC Settings: Select Reset, and then press the OK button. NOTE To select PC, set Shared PC Audio to select PC. Select SETTINGS, PREFERENCES, AV Connection, and the press the OK button. 2 Press the ( / arrow) buttons to select PC/HDMI 4 Audio. 3 Press the ( / arrow) buttons to PC. Basic features Using...
... the PC Settings: Select Reset, and then press the OK button. NOTE To select PC, set Shared PC Audio to select PC. Select SETTINGS, PREFERENCES, AV Connection, and the press the OK button. 2 Press the ( / arrow) buttons to select PC/HDMI 4 Audio. 3 Press the ( / arrow) buttons to PC. Basic features Using...
User Guide
Page 126
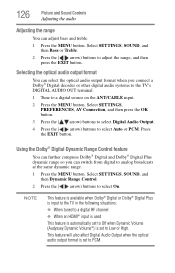
.../CABLE input. 2 Press the MENU button. Selecting the optical audio output format You can adjust bass and treble. 1 Press the MENU button. Select SETTINGS, PREFERENCES, AV Connection, and then press the OK button. 3 Press the ( / arrow) buttons to select Digital Audio Output. 4 Press the ( / arrow) buttons to PCM. This feature will...
.../CABLE input. 2 Press the MENU button. Selecting the optical audio output format You can adjust bass and treble. 1 Press the MENU button. Select SETTINGS, PREFERENCES, AV Connection, and then press the OK button. 3 Press the ( / arrow) buttons to select Digital Audio Output. 4 Press the ( / arrow) buttons to PCM. This feature will...
User Guide
Page 190
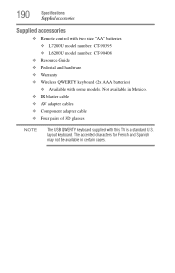
...) ❖ Available with this TV is a standard U.S. The accented characters for French and Spanish may not be available in Mexico. ❖ IR blaster cable ❖ AV adapter cables ❖ Component adapter cable ❖ Four pairs of 3D glasses NOTE The USB QWERTY keyboard supplied with some models. Not available in certain...
...) ❖ Available with this TV is a standard U.S. The accented characters for French and Spanish may not be available in Mexico. ❖ IR blaster cable ❖ AV adapter cables ❖ Component adapter cable ❖ Four pairs of 3D glasses NOTE The USB QWERTY keyboard supplied with some models. Not available in certain...


