Brochure
Page 2
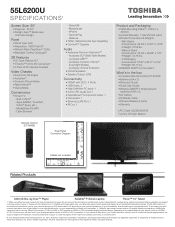
... permission from a right holder to view copyrighted works, it cannot be pushed, pulled over, or knocked down. © 2012 Toshiba America Information Systems, Inc. Audyssey EQ® (Wall/Table Modes) - All other trademarks are registered trademarks or trademarks of the... device. ePortal - It is your device, some or all HDMI® w/ CEC functions may vary depending upon content quality and display device capability/functionality/settings. and/or Toshiba Corporation. 55L6200U S P E C I F I C AT I O N S1 Screen Size: 55" • Diagonal - 54.64" • Design: Aero™ ...
... permission from a right holder to view copyrighted works, it cannot be pushed, pulled over, or knocked down. © 2012 Toshiba America Information Systems, Inc. Audyssey EQ® (Wall/Table Modes) - All other trademarks are registered trademarks or trademarks of the... device. ePortal - It is your device, some or all HDMI® w/ CEC functions may vary depending upon content quality and display device capability/functionality/settings. and/or Toshiba Corporation. 55L6200U S P E C I F I C AT I O N S1 Screen Size: 55" • Diagonal - 54.64" • Design: Aero™ ...

User Guide
Page 2
...WARNING To prevent injury, this apparatus must be securely attached to the floor/wall in particular, specifies that children can easily be heavy. TOSHIBA Cares! • The consumer electronics industry is appropriate. If you are unsure, contact a professional installer. • A minimum of ... a Wall Bracket:" on your flat panel display. • Carefully read this Toshiba LED TV. NEC, which provides guidelines for proper grounding and, in accordance with furniture and television sets. • Don't place flat panel displays on furniture that they cannot be mounted...
...WARNING To prevent injury, this apparatus must be securely attached to the floor/wall in particular, specifies that children can easily be heavy. TOSHIBA Cares! • The consumer electronics industry is appropriate. If you are unsure, contact a professional installer. • A minimum of ... a Wall Bracket:" on your flat panel display. • Carefully read this Toshiba LED TV. NEC, which provides guidelines for proper grounding and, in accordance with furniture and television sets. • Don't place flat panel displays on furniture that they cannot be mounted...
User Guide
Page 7
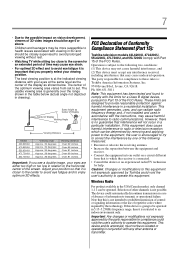
...interference, and (2) This device must not be operated. 7 • Due to the possible impact on a circuit different from set to set. Same height as Center of Display Center of information to the horizontal center of repetitive codes where required by the technology. Wireless... of the FCC Rules. FCC Declaration of the display as the center of Conformity Compliance Statement (Part 15): Toshiba television models 42L6200U, 47L6200U, 55L6200U, 47L7200U, and 55L7200U comply with the limits for help. If this equipment not expressly approved by the party responsible...
...interference, and (2) This device must not be operated. 7 • Due to the possible impact on a circuit different from set to set. Same height as Center of Display Center of information to the horizontal center of repetitive codes where required by the technology. Wireless... of the FCC Rules. FCC Declaration of the display as the center of Conformity Compliance Statement (Part 15): Toshiba television models 42L6200U, 47L6200U, 55L6200U, 47L7200U, and 55L7200U comply with the limits for help. If this equipment not expressly approved by the party responsible...
User Guide
Page 8
...be co-located or operating in conjunction with IC RSS-102 radiation exposure limits set by the party responsible for normal home use of malfunction, and is subject to [Home] mode settings, select [AutoView] picture mode. [AutoView] mode is not responsible for ENERGY ...fixed, non-moving image appears for a long period of time. Changing Picture Settings may not work with RSS-210. Selection of information to operate this TV is not possible. therefore, Toshiba is recommended for compliance could automatically discontinue transmission in this equipment. ENERGY STAR...
...be co-located or operating in conjunction with IC RSS-102 radiation exposure limits set by the party responsible for normal home use of malfunction, and is subject to [Home] mode settings, select [AutoView] picture mode. [AutoView] mode is not responsible for ENERGY ...fixed, non-moving image appears for a long period of time. Changing Picture Settings may not work with RSS-210. Selection of information to operate this TV is not possible. therefore, Toshiba is recommended for compliance could automatically discontinue transmission in this equipment. ENERGY STAR...
User Guide
Page 13
...Setup 59 Navigating the menu system 61 Main menu layout 62 Quick Menu 63 Chapter 5: Setting up your TV 64 How to navigate the menu 64 Changing initial settings 64 Individual settings 65 Storing channels in memory (optional 66 Skipping channels 68 Skipping video inputs 68 Labeling analog... TV channels 69 Labeling video inputs 70 Configuring shared inputs 70 Setting the Auto Input feature 70 Chapter 6: Basic features 72 Viewing 3D images 72 Using 3D functions 74 Switching display mode or selecting...
...Setup 59 Navigating the menu system 61 Main menu layout 62 Quick Menu 63 Chapter 5: Setting up your TV 64 How to navigate the menu 64 Changing initial settings 64 Individual settings 65 Storing channels in memory (optional 66 Skipping channels 68 Skipping video inputs 68 Labeling analog... TV channels 69 Labeling video inputs 70 Configuring shared inputs 70 Setting the Auto Input feature 70 Chapter 6: Basic features 72 Viewing 3D images 72 Using 3D functions 74 Switching display mode or selecting...
User Guide
Page 14
... code 81 Enter a new PIN code 81 Change or delete your PIN code 82 Forgotten PIN codes 82 Setting the 3D start message 82 Setting the 3D Lock 83 Setting the 3D Timer Lock 83 Setting the Enable 3D Timer 83 Displaying 3D Important Information 84 Adjusting 2D to 3D depth 84 Switching left... 85 Using Channel Return 85 Using SurfLock 85 Selecting the video input to view 86 Using closed captions 87 Analog CC mode 87 Digital CC settings 89 Setting the PIN code 90 Entering a new PIN code 91 Changing or deleting your PIN code 91 Forgotten PIN code 91 Using parental controls 91...
... code 81 Enter a new PIN code 81 Change or delete your PIN code 82 Forgotten PIN codes 82 Setting the 3D start message 82 Setting the 3D Lock 83 Setting the 3D Timer Lock 83 Setting the Enable 3D Timer 83 Displaying 3D Important Information 84 Adjusting 2D to 3D depth 84 Switching left... 85 Using Channel Return 85 Using SurfLock 85 Selecting the video input to view 86 Using closed captions 87 Analog CC mode 87 Digital CC settings 89 Setting the PIN code 90 Entering a new PIN code 91 Changing or deleting your PIN code 91 Forgotten PIN code 91 Using parental controls 91...

User Guide
Page 15
... the HDMI® signal information 102 Using your computer with the TV 102 Adjusting the image 102 Setting the computer audio 103 Setting the timer to turn on the TV 104 Setting the sleep timer 105 Setting No Signal Power Down 106 Displaying TV status information 106 Viewing support information 107 Resetting to Factory... Aspect feature 114 Using the 4:3 Stretch 114 Adjusting the picture 115 Selecting the picture mode 115 Adjusting the picture quality 115 Using the advanced picture settings features........117 Edge Enhancer 117 Dynamic Contrast 117
... the HDMI® signal information 102 Using your computer with the TV 102 Adjusting the image 102 Setting the computer audio 103 Setting the timer to turn on the TV 104 Setting the sleep timer 105 Setting No Signal Power Down 106 Displaying TV status information 106 Viewing support information 107 Resetting to Factory... Aspect feature 114 Using the 4:3 Stretch 114 Adjusting the picture 115 Selecting the picture mode 115 Adjusting the picture quality 115 Using the advanced picture settings features........117 Edge Enhancer 117 Dynamic Contrast 117
User Guide
Page 16
... Pro 120 ColorMaster 121 Base Color Adjustment 121 Color temperature 122 Resetting to the factory default 122 Setting the expert picture settings 122 Test Pattern 122 RGB Filter 123 White Balance 123 Locking the picture settings 124 Adjusting the audio 125 Muting the sound 125 Selecting stereo/SAP broadcasts 125 Adjusting the audio... 127 Audyssey ABX 128 Using the surround sound feature 128 Chapter 8: Advanced features 129 Using your home network 129 When using a Wireless network connection ...130 Setting up the Network 131
... Pro 120 ColorMaster 121 Base Color Adjustment 121 Color temperature 122 Resetting to the factory default 122 Setting the expert picture settings 122 Test Pattern 122 RGB Filter 123 White Balance 123 Locking the picture settings 124 Adjusting the audio 125 Muting the sound 125 Selecting stereo/SAP broadcasts 125 Adjusting the audio... 127 Audyssey ABX 128 Using the surround sound feature 128 Chapter 8: Advanced features 129 Using your home network 129 When using a Wireless network connection ...130 Setting up the Network 131
User Guide
Page 17
... Basic operation 158 Viewing movie files 160 Playing music files 162 Viewing photo files 164 Search 166 Network Device Setup 167 External Control Setup 167 Setting up the Media Renderer feature............168
... Basic operation 158 Viewing movie files 160 Playing music files 162 Viewing photo files 164 Search 166 Network Device Setup 167 External Control Setup 167 Setting up the Media Renderer feature............168
User Guide
Page 21
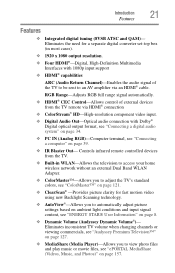
...the TV's standard colors, see "ColorMaster™" on page 121. ❖ ClearScan® -Provides picture clarity for a separate digital converter set-top box (in most cases). ❖ 1920 x 1080 output resolution. ❖ Four HDMI®-Digital, High-Definition Multimedia Interfaces with ... Out- Eliminates the need for fast motion video using new Backlight Scanning technology. ❖ AutoView®-Allows you to automatically adjust picture settings based on ambient light conditions and input signal content, see "ePORTAL MediaShare (Videos, Music, and Photos)" on page 8. ❖ ...
...the TV's standard colors, see "ColorMaster™" on page 121. ❖ ClearScan® -Provides picture clarity for a separate digital converter set-top box (in most cases). ❖ 1920 x 1080 output resolution. ❖ Four HDMI®-Digital, High-Definition Multimedia Interfaces with ... Out- Eliminates the need for fast motion video using new Backlight Scanning technology. ❖ AutoView®-Allows you to automatically adjust picture settings based on ambient light conditions and input signal content, see "ePORTAL MediaShare (Videos, Music, and Photos)" on page 8. ❖ ...
User Guide
Page 22
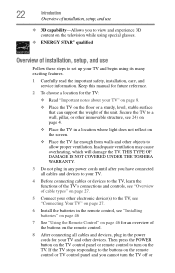
... installation, care, and service information. If the TV stops responding to turn the TV off or THIS TYPE OF DAMAGE IS NOT COVERED UNDER THE TOSHIBA WARRANTY. 3 Do not plug in the power cords for an overview of the buttons on the remote control. 8 After connecting all cables and devices... your other devices. Inadequate ventilation may cause overheating, which will damage the TV. 22 Introduction Overview of installation, setup, and use Follow these steps to set up your TV" on page 8. ❖ Place the TV on the floor or a sturdy, level, stable surface that can support the weight of...
... installation, care, and service information. If the TV stops responding to turn the TV off or THIS TYPE OF DAMAGE IS NOT COVERED UNDER THE TOSHIBA WARRANTY. 3 Do not plug in the power cords for an overview of the buttons on the remote control. 8 After connecting all cables and devices... your other devices. Inadequate ventilation may cause overheating, which will damage the TV. 22 Introduction Overview of installation, setup, and use Follow these steps to set up your TV" on page 8. ❖ Place the TV on the floor or a sturdy, level, stable surface that can support the weight of...
User Guide
Page 27
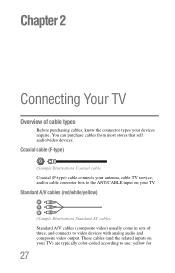
... cable Coaxial (F-type) cable connects your devices require. Standard A/V cables (red/white/yellow) (Sample Illustration) Standard AV cables Standard A/V cables (composite video) usually come in sets of cable types Before purchasing cables, know the connector types your antenna, cable TV service, and/or cable converter box to use: yellow for 27...
... cable Coaxial (F-type) cable connects your devices require. Standard A/V cables (red/white/yellow) (Sample Illustration) Standard AV cables Standard A/V cables (composite video) usually come in sets of cable types Before purchasing cables, know the connector types your antenna, cable TV service, and/or cable converter box to use: yellow for 27...
User Guide
Page 28
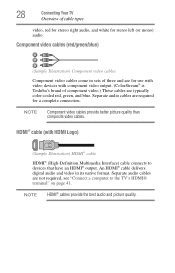
... have an HDMI® output. An HDMI® cable delivers digital audio and video in sets of three and are for stereo left (or mono) audio. HDMI® cable (with component video output. (ColorStream® is Toshiba's brand of cable types video, red for stereo right audio, and white for use with...
... have an HDMI® output. An HDMI® cable delivers digital audio and video in sets of three and are for stereo left (or mono) audio. HDMI® cable (with component video output. (ColorStream® is Toshiba's brand of cable types video, red for stereo right audio, and white for use with...

User Guide
Page 30
... the remote control to program or access certain features on the TV.* Tune the TV to channel 3 or 4 (whichever channel the cable box output is set to).
... the remote control to program or access certain features on the TV.* Tune the TV to channel 3 or 4 (whichever channel the cable box output is set to).
User Guide
Page 36
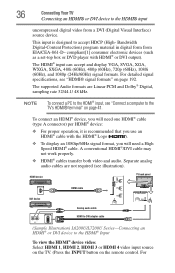
...-Connecting an HDMI® or DVI device to the HDMI® input uncompressed digital video from EIA/CEA-861-D- compliant[1] consumer electronic devices (such as a set-top box or DVD player with the HDMI® Logo ( ). ❖ To display an 1080ip/60Hz signal format, you will need a High Speed HDMI®...
...-Connecting an HDMI® or DVI device to the HDMI® input uncompressed digital video from EIA/CEA-861-D- compliant[1] consumer electronic devices (such as a set-top box or DVD player with the HDMI® Logo ( ). ❖ To display an 1080ip/60Hz signal format, you will need a High Speed HDMI®...
User Guide
Page 40
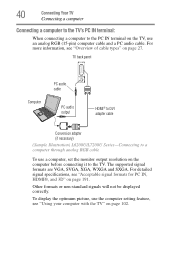
... TV Connecting a computer Connecting a computer to the TV's PC IN terminal: When connecting a computer to the PC IN terminal on the TV, use the computer setting feature, see "Using your computer with the TV" on page 102. TV back panel Computer PC/HDMI 3 PC audio (AUDIO) cable PC audio output HDMI... "Acceptable signal formats for PC IN, HDMI®, and 3D" on the computer before connecting it to a computer through analog RGB cable To use a computer, set the monitor output resolution on page 191.
... TV Connecting a computer Connecting a computer to the TV's PC IN terminal: When connecting a computer to the PC IN terminal on the TV, use the computer setting feature, see "Using your computer with the TV" on page 102. TV back panel Computer PC/HDMI 3 PC audio (AUDIO) cable PC audio output HDMI... "Acceptable signal formats for PC IN, HDMI®, and 3D" on the computer before connecting it to a computer through analog RGB cable To use a computer, set the monitor output resolution on page 191.
User Guide
Page 41
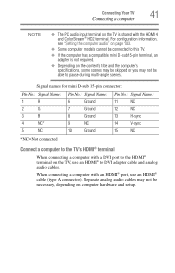
... adapter is shared with a DVI port to the HDMI® terminal on the TV, use an HDMI® cable (type A connector). For configuration information, see "Setting the computer audio" on page 103. ❖ Some computer models cannot be able to pause during multi-angle scenes. When connecting a computer with an HDMI...
... adapter is shared with a DVI port to the HDMI® terminal on the TV, use an HDMI® cable (type A connector). For configuration information, see "Setting the computer audio" on page 103. ❖ Some computer models cannot be able to pause during multi-angle scenes. When connecting a computer with an HDMI...
User Guide
Page 51
However, if you do not finish Initial Setup, the Initial Setup screen will appear every time you first turn on page 64. ❖ The EXIT button does not work until Menu Language/Country, Time Zone/Daylight Saving Time, and Store/Home Mode have been set. 51 NOTE ❖ You can stop Initial Setup by pressing the EXIT button. To finish Initial Setup, see "Changing initial settings" on your TV. Chapter 4 Initial Setup and Menu Initial setup When you turn on or reset the TV, the Initial Setup window appears.
However, if you do not finish Initial Setup, the Initial Setup screen will appear every time you first turn on page 64. ❖ The EXIT button does not work until Menu Language/Country, Time Zone/Daylight Saving Time, and Store/Home Mode have been set. 51 NOTE ❖ You can stop Initial Setup by pressing the EXIT button. To finish Initial Setup, see "Changing initial settings" on your TV. Chapter 4 Initial Setup and Menu Initial setup When you turn on or reset the TV, the Initial Setup window appears.

User Guide
Page 52
...Illustration) Selecting Menu Language/Country 2 Time Zone Select a time zone. Quick Setup Menu Language Country English U.S. Local Time Setting Time Zone Daylight Saving Time Central On Time zone (Sample Illustration) Selecting Time Zone 3 Daylight Saving Time Select On or Off. Local Time... Setting Time Zone Daylight Saving Time Central Off (Sample Illustration) Selecting Daylight Saving Time 4 Store/Home Mode Select Store or Home. ...
...Illustration) Selecting Menu Language/Country 2 Time Zone Select a time zone. Quick Setup Menu Language Country English U.S. Local Time Setting Time Zone Daylight Saving Time Central On Time zone (Sample Illustration) Selecting Time Zone 3 Daylight Saving Time Select On or Off. Local Time... Setting Time Zone Daylight Saving Time Central Off (Sample Illustration) Selecting Daylight Saving Time 4 Store/Home Mode Select Store or Home. ...

User Guide
Page 53
... ANT/CABLE. Then select Next. Initial Setup and Menu 53 Initial setup 5 ANT/CABLE To select Antenna, first select Antenna. Press OK. Auto Tuning Previous settings will be lost!
... ANT/CABLE. Then select Next. Initial Setup and Menu 53 Initial setup 5 ANT/CABLE To select Antenna, first select Antenna. Press OK. Auto Tuning Previous settings will be lost!


